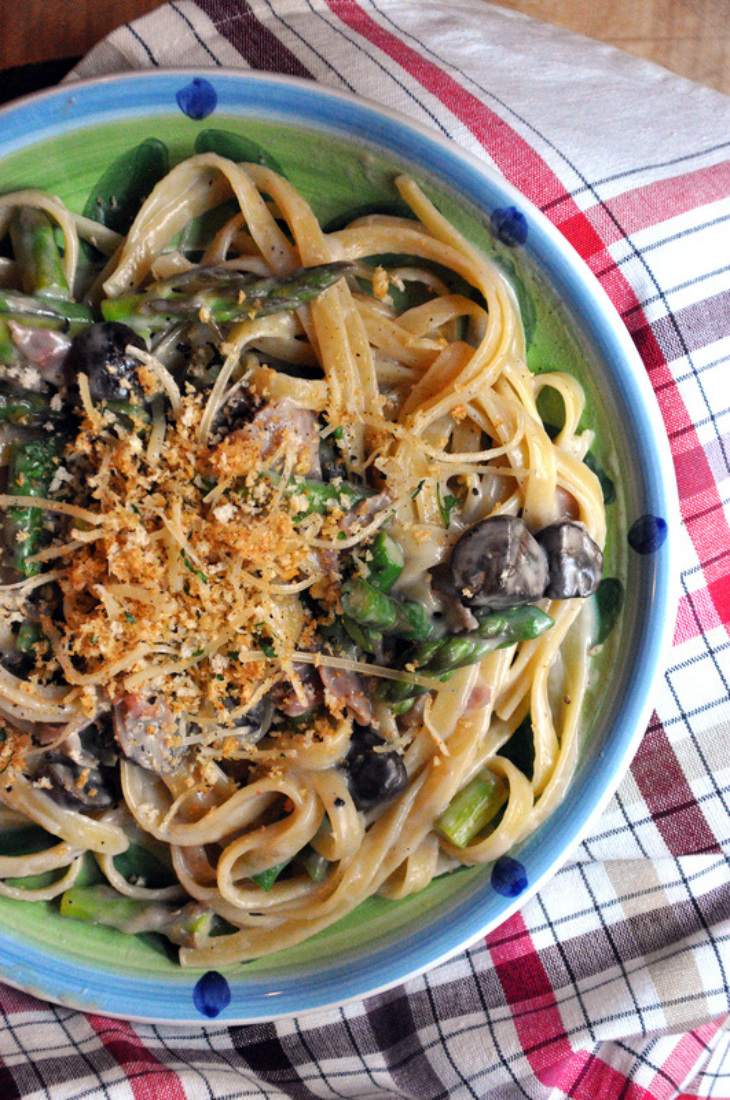
It’s sort of fun to see how much ones tastes change depending on the weather. Bright sunny days make you want to start anew and eat something healthy. Juice smoothies anyone? Rainy days are often cookie days. And cold weather…I don’t think I’ve ever heard someone say, man this cold weather is making me hanker for a garden salad with dressing on the side. No. We want stews, and steaks. We want pizzas and pastas. Oven roasted tasties, sweet and savory. So needless to say (or as I’m always thinking in my head “needles to hay”), the transition from winter to spring is a confusing time. The temperature fluctuations, pretty much all across the country, will make your head spin. Most nights what I end up eating is concocted on my bike rides home from work (when I’m not planning a meal a head of time) and recently I’ve been all over the map. One day I’m riding in a sweatshirt giddy with anticipation for spring, the next I’m hunkered down in my ski parka, ski mittens, a fleece lined hat and neck warmer. I could go on, but lets talk food. What I really wanted to talk about is this magic thing called a roux. Now it’s not very nutritious or glamorous. It’s not some new superfood. It’s nothing really, just a little butter, flour and milk full of old fashioned charm. I think it’s magical. Add some spices, infuse the milk with an herb, throw in a little cheese…and now you have a bonafide fancy cream sauce, a faux-alfredo sauce. You don’t need mountains of cheese or heavy cream, just a few basic pantry items. Now I’m not trying to label this pasta recipe as “healthy” but it does have some veggies in it, and it’s way lighter than some other cream sauces that I’ve come across. It’s still a comfort dish and I think we’re all in need of a little comfort to battle this cold winter. 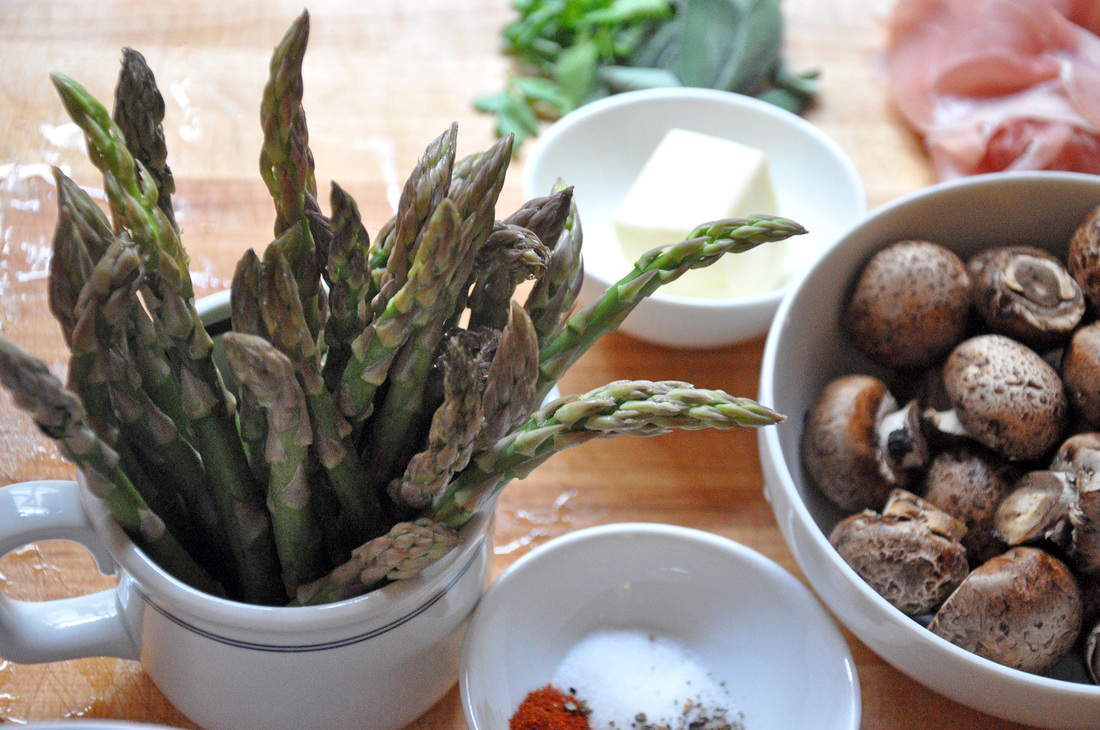

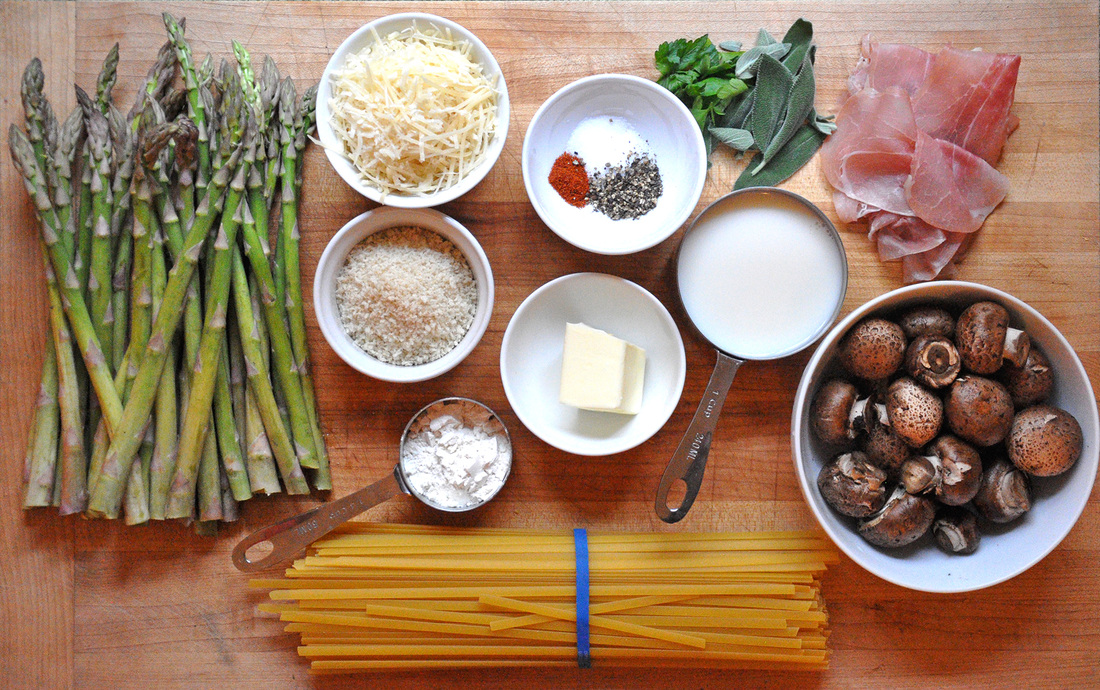
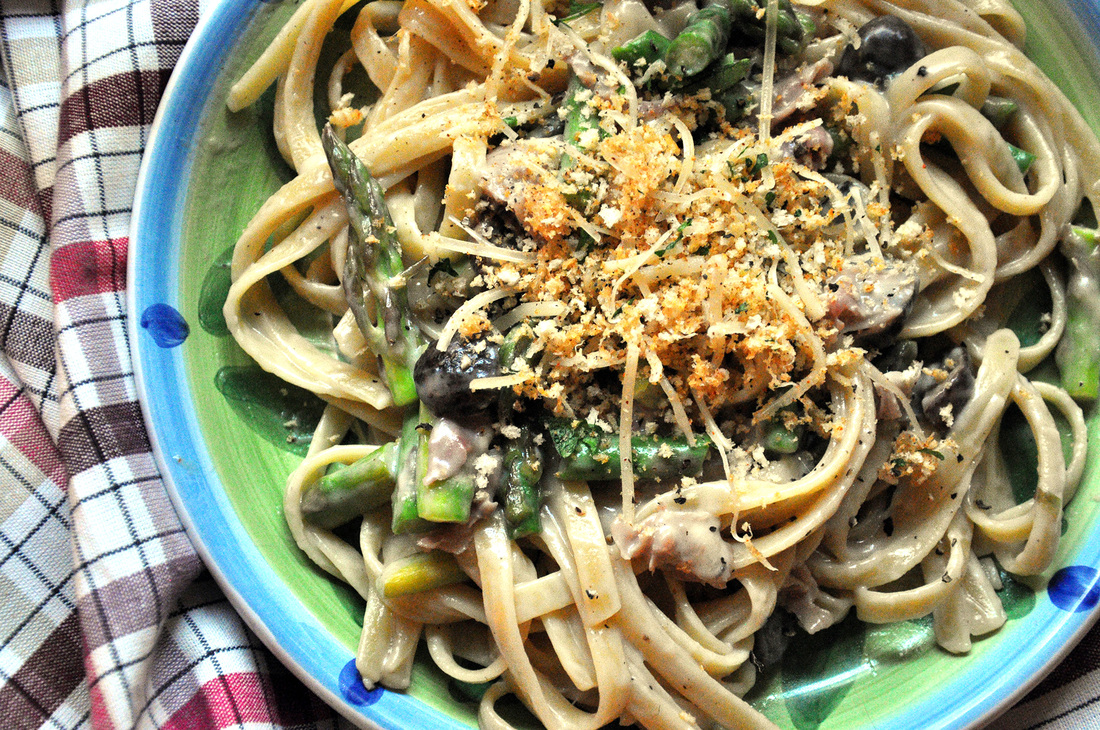
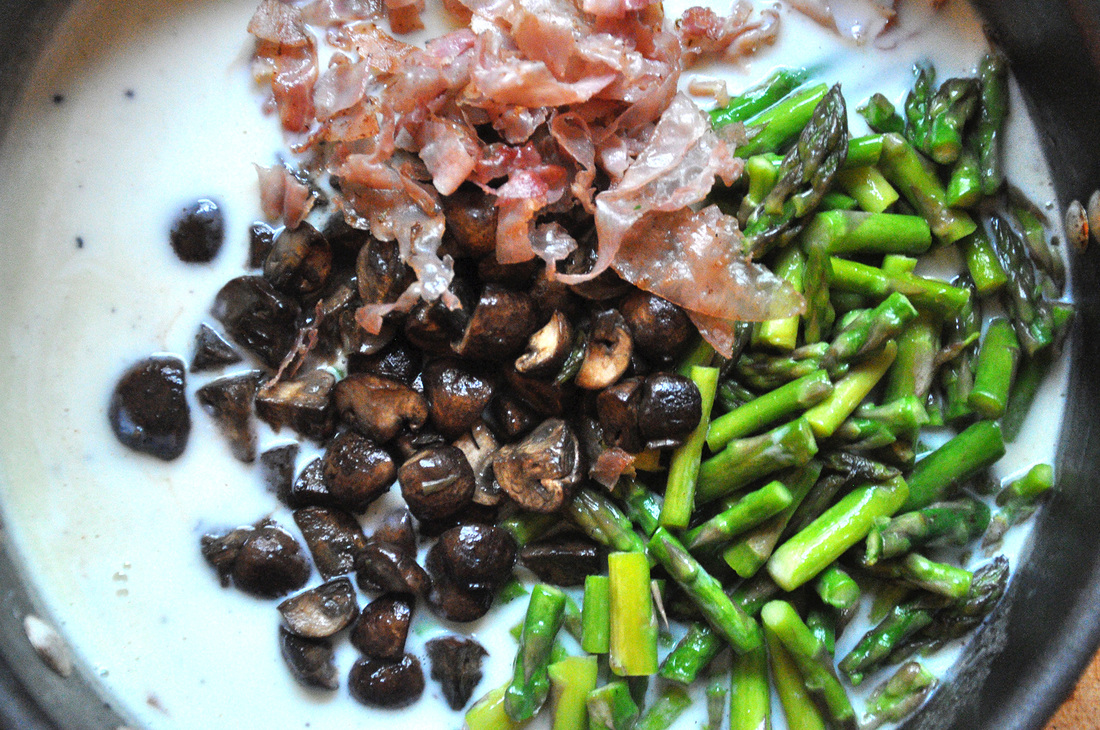
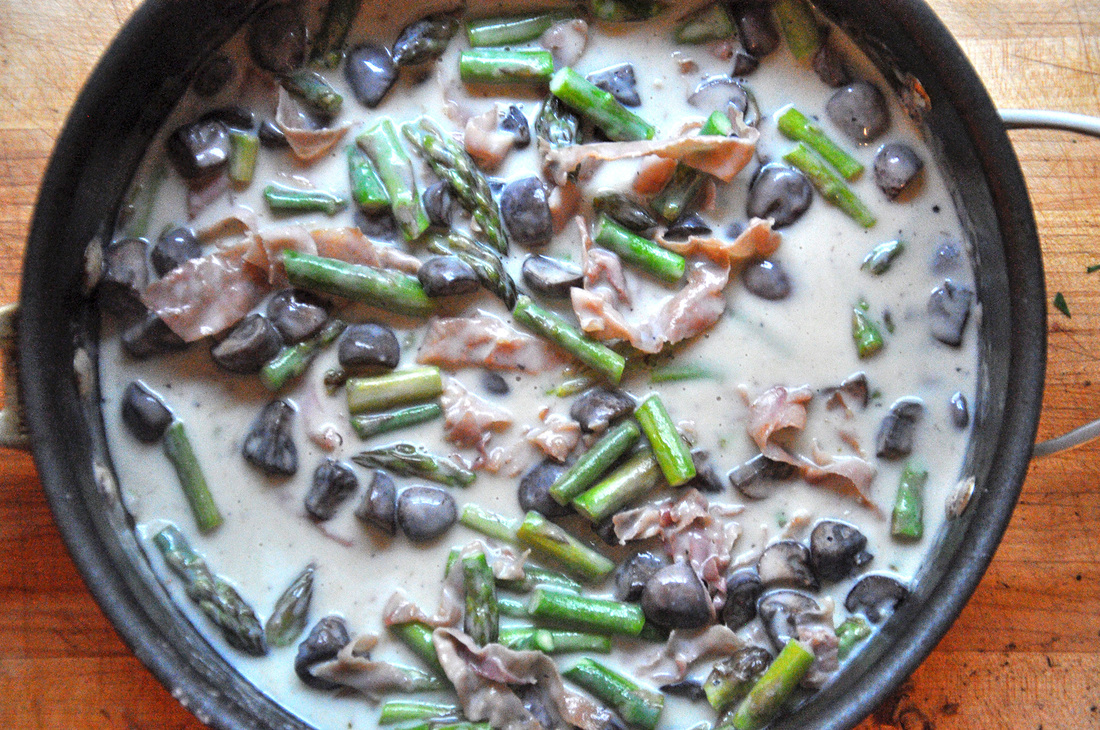
Faux Alfredo with Asparagus, Mushrooms and Prosciutto PRINT RECIPE [Prep: 10mins / Cook: 25mins / TOTAL: 35mins [4 servings servings]
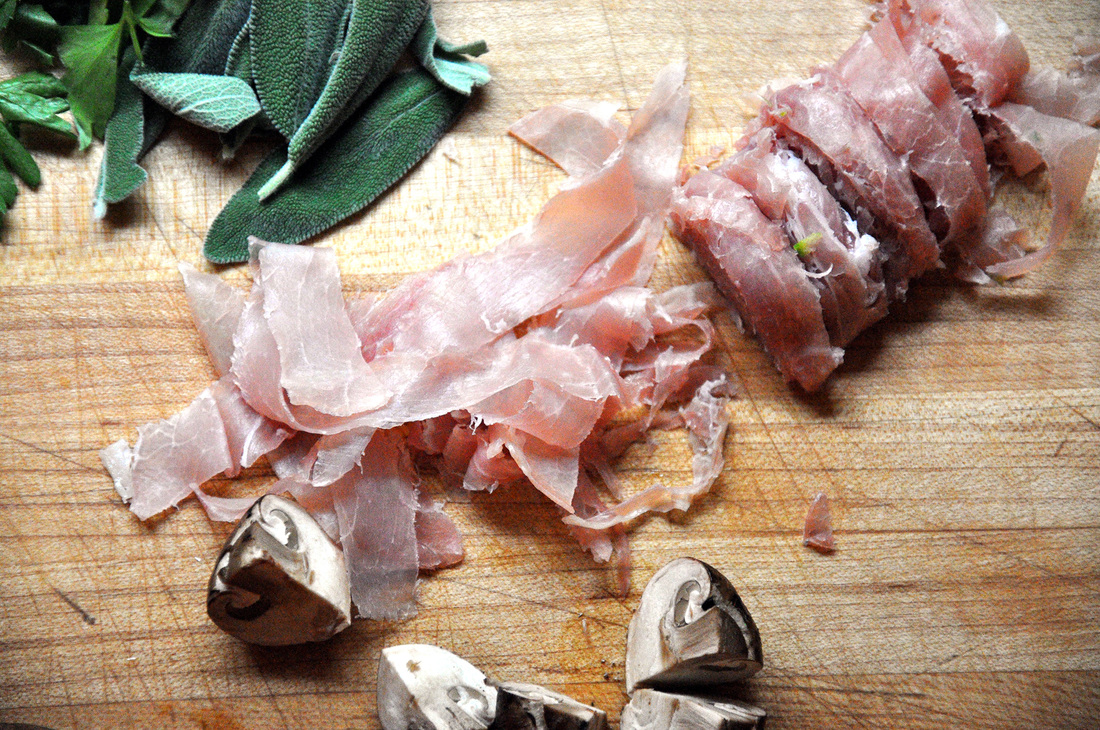
Put a large pot of salted water over high heat and cover, it should take about 10 minutes to boil. During this time you can start prepping the ingredients. Into a small skillet or saucier pour 1 ¼ cup milk, add the sage leaves and bring to a slow simmer over med heat. You’ll want to whisk the mixture so the milk doesn’t burn and stick to the bottom of the skillet. After a few minutes of simmering turn the heat to low and let sit for 5 minutes. Pour off the milk mixture into a small container, there should be about 1 cup remaining. Rinse and dry off the skillet – you can reuse it to toast the panko. While the milk is simmering you can get started on the veggies and prosciutto. Rinse the asparagus, snap off the bottoms - discard, and cut the remaining pieces into 1 ½ inch spears. Rinse the mushrooms, trim the stems and quarter. Layer the prosciutto slices on top of each other and roll tightly lengthwise. Cut into ½ inch strips. Unroll and pull strips apart. Heat a large skillet over med-high heat. Add ½ tablespoon butter, asparagus and a dash of salt. Let sauté for about 5 minutes, stirring a few times. Remove asparagus and add the mushrooms to the same skillet. Add ½ tablespoon more of butter and let mushrooms sit undisturbed for the first minute. Add a dash of salt and stir mushrooms a few times, after 5 minutes remove them from the skillet. Add prosciutto strips to the skillet, let sit for 1 minute undisturbed. Stir a few times and let cook for about 5 minutes or until crisp. The pasta water is probably boiling at this point. Add 1 box of fettuccine – or any other pasta that you have chosen, I think bowties would work really well this recipe – and bring back to a boil. If you are using fettuccine set your timer to 10 minutes. Now onto the last two elements of the dish. To toast the panko, just add a little pad of butter to the small skillet and put the heat on medium. Once it’s melted add the panko, a dash of salt, a few grinds of fresh black pepper, and 1 /4 teaspoon cayenne pepper. Let it toast for about 5 minutes, stirring occasionally so the panko doesn’t burn. Once it is finished, pour toasted panko into a small bowl and add 1 tablespoon of the grated parmesan cheese, mix well. (I had a sprig of parsley I wanted to use up so I chopped that up and added it in to the mix) The base of this “cream sauce” is the roux. To begin, melt 2 tablespoons of butter in the large skillet over med-high heat, whisk in the 2 tablespoons of flour. The mixture should be smooth, thick and start to bubble. Remove it from the heat and whisk in the sage infused milk. Put it back over the heat, but lower it to medium. Season with a little salt, some fresh black pepper, and a pinch of cayenne. Gently whisk roux until it thickens – about 2-3 minutes. Add vegetables, prosciutto and parmesan. Mix well until everything is coated. The pasta should be finished about this time. Reserve ¼ cup pasta water. Drain and add pasta to the large skillet. Mix well add a little of the reserved pasta water, cover and let sit for 2 minutes. Serve and top off with the panko mixture and enjoy!
6 Comments
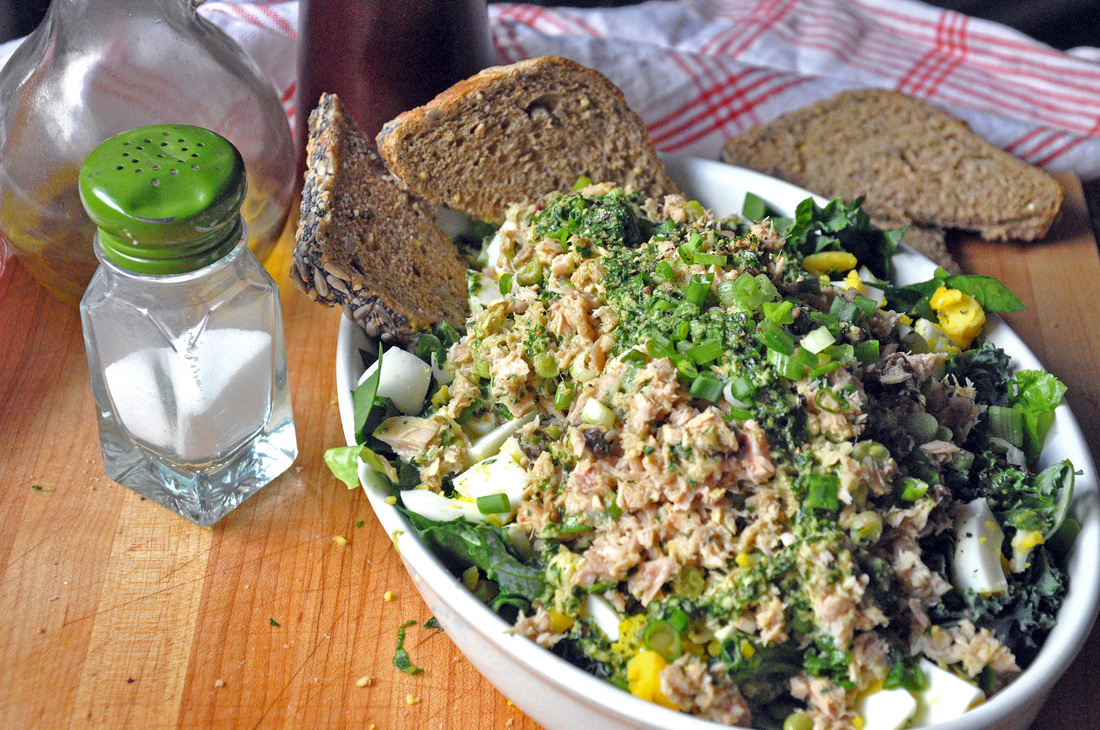 Hey so I’m back! I’m not quite sure who out there is following me yet, but to those who are, I am sorry I left you hanging…Amidst post holiday fatigue, a baby shower, cleaning out my childhood apartment (sniff) so they can be sold, travelling to see family (see two previous items mentioned), a rockin’ ladies weekend in Memphis, and a stronger desire to eat food instead of holding on a sec and documenting it…I haven’t been a good friend to you all. It’s also been super cold, no wait it was springtime last weekend…annnnnd now it’s cold again. So I haven’t been quite sure what I wanted to make for you. So finally I decided on this: tuna salad with raisins and hard-boiled eggs! I call it Eggy Tuna Salad. I have a feeling your first reaction isn’t going to be all that great, its ok I’ll wait. Sound good yet? No? Well it may never actually sound good, but it tastes good and that’s all that matters. Come to think of though, I’ve had this one in the back of my mind for a while. Ever since I first tasted this combination, tuna salad with hard-boiled egg on raisin grain bread, I’ve been a bit perplexed. It was a few years ago now and having put some space between that sandwich and my palette I can quite remember the seasoning, but I thought I’d give it a try and put my spin on it. Oh and I used to think a boiled eggs was just you know…a boiled egg. But check out this diddy from Bon Appetite if you what to know what’s what about cooking an egg. 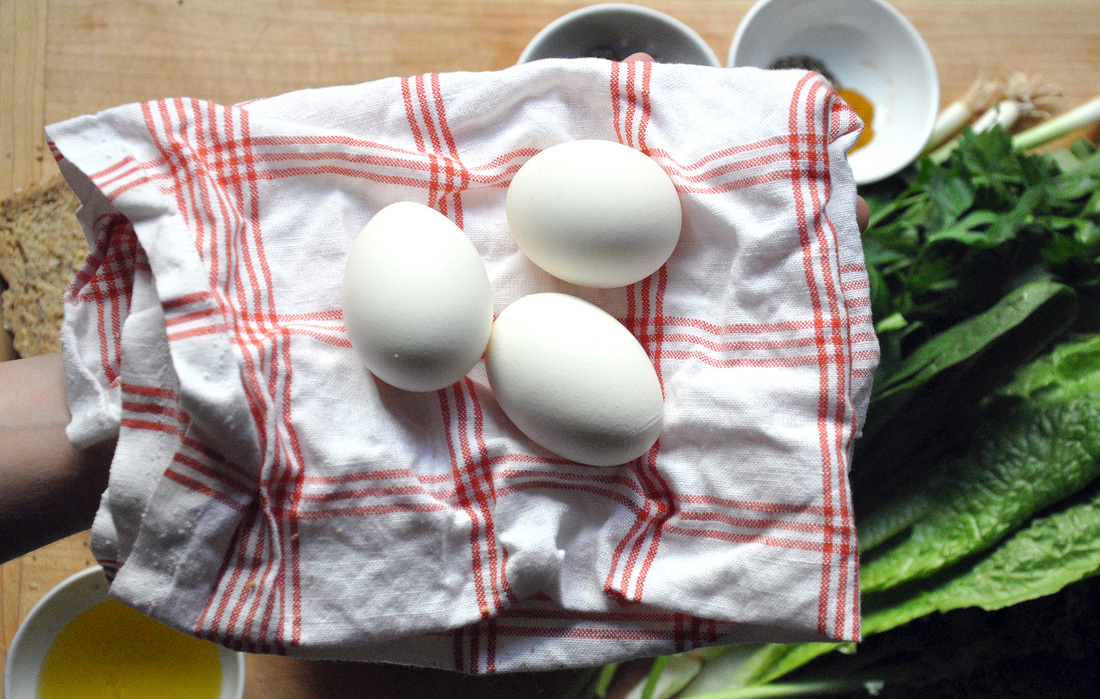 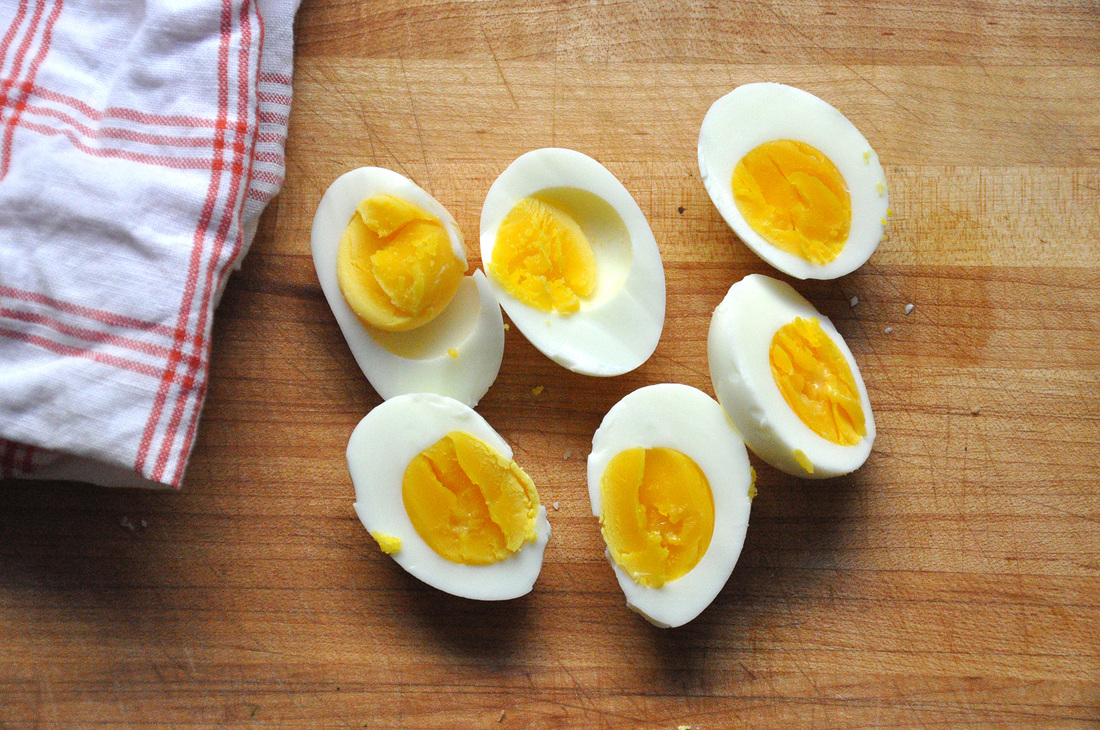 
Eggy Tuna Salad PRINT RECIPE [Prep: 20min / Cook: 5min / TOTAL: 25min [4 small servings]
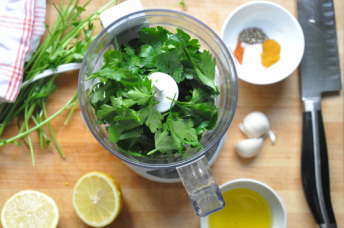
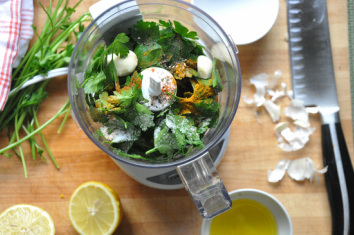
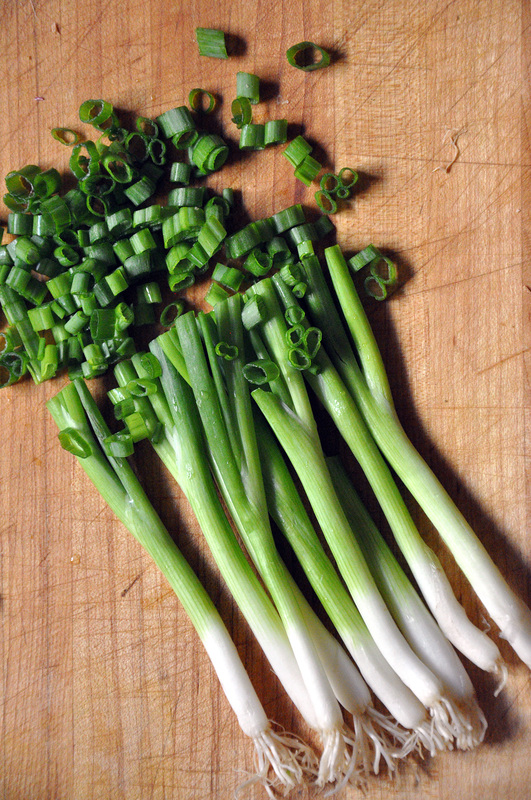
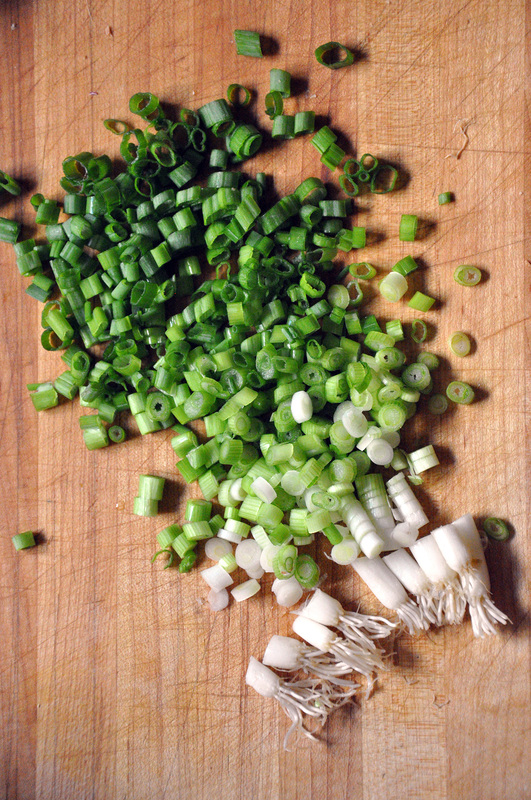
Place eggs in a pot, add enough water to cover the eggs, cover and set over high heat. You want to let the water come to a boil, when this happens, wait one minute, then remove from heat and let sit covered for 10 more minutes. After this they will be hard-boiled but not overcooked or dried out. Before peeling you can put them in a cold-water bath so they will be cool enough to handle. After the eggs have been boiled and are resting you can make the salad dressing. Using a mini food processor (you can do this by hand but you’ll need to mince or press the garlic and finely chop up the parsley first) add parsley, olive oil, lemon juice, water and spices. Pulse until parsley leaves are broken down. Now onto the salad greens. After they have all been rinsed and stemmed where needed (only the stem of the kale really needs to be taken out), roughly chop up the spinach and romaine, finely chop the kale and thinly slice up the scallions. Add all, reserving about half of the sliced scallions, to a large mixing bowl and incorporate a few tablespoons of the salad dressing. Toss until well mixed. In a small mixing bowl, incorporate the tuna, raisins, remaining scallions, 2 tablespoons of the salad dressing, a dash of salt, pepper, cayenne and curry powder. Mix well. Put your toast into the oven/toaster and get started with peeling the cooled eggs. Once peeled chop them up into big chunks. To assemble the salad, place the lightly dressed greens on the bottom of your serving platter, next the hard boiled eggs, and finished it off with the tuna salad. Drizzle the remaining dressing over the Eggy Tuna Salad. Slice up your toasted bread and enjoy! 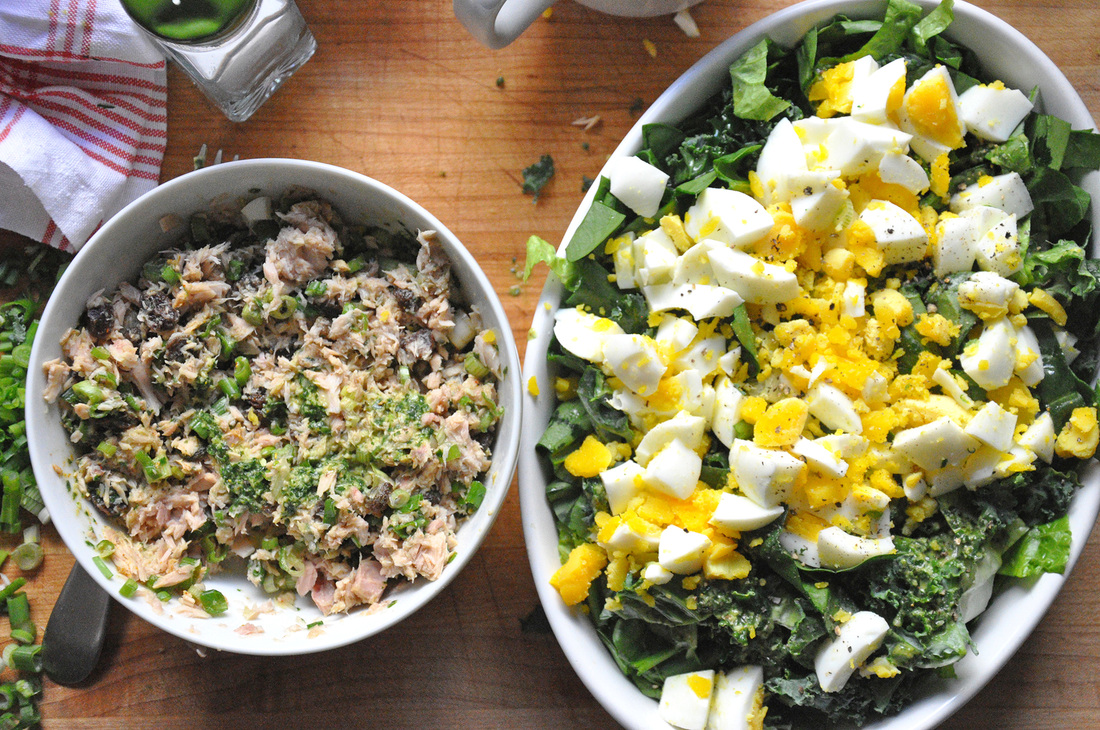 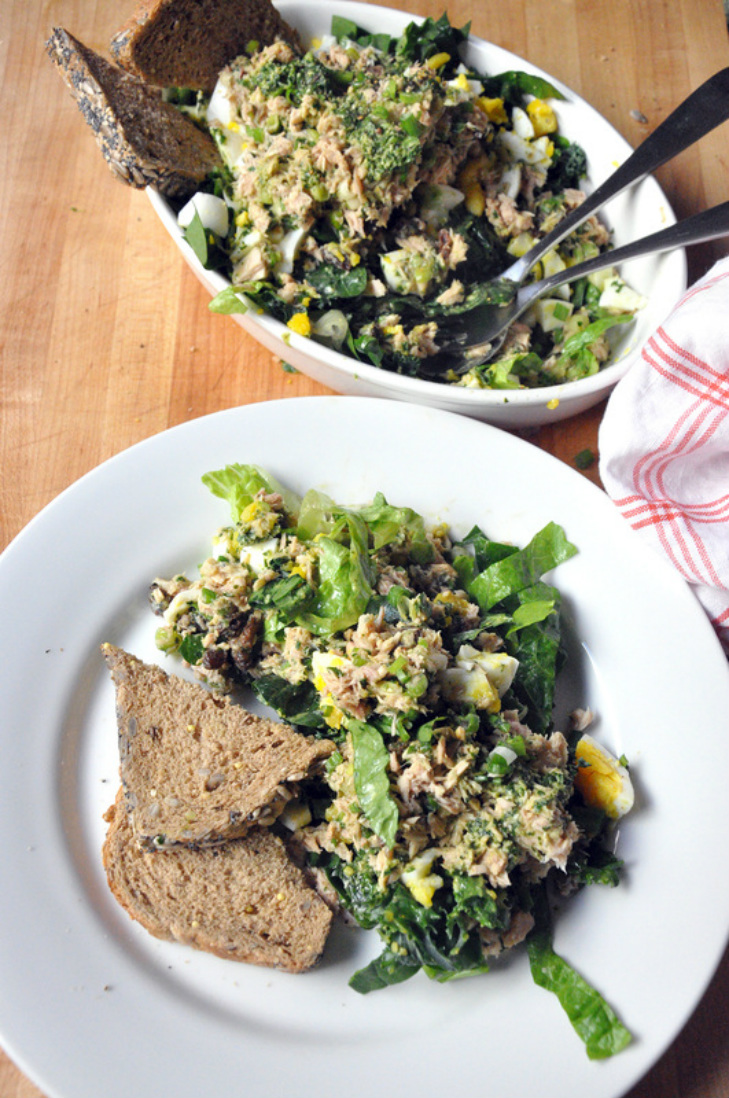 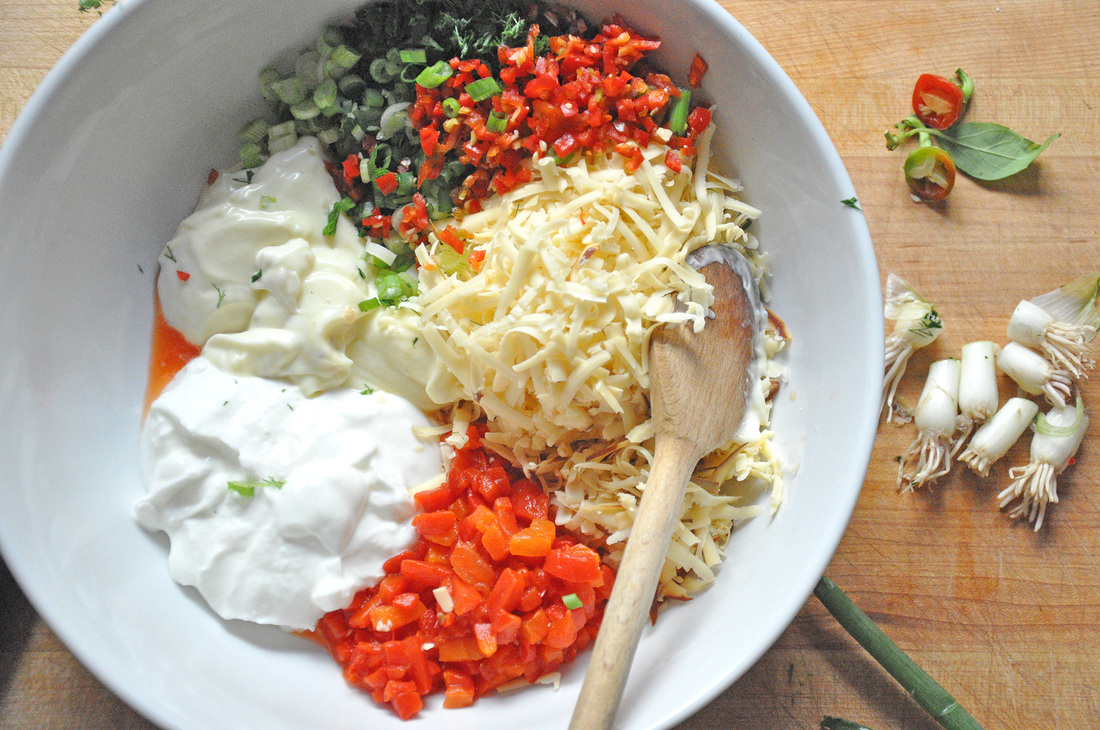 I was trying to put together a menu for this weeks post when a close friend of mine called me and said, “I’ve made a huge batch of pimento cheese last night, I’ll bring you over some after work.” I politely declined and said, “I’m not a fan.” She responded with something like, “phsht, oh come on. Have you ever even tried pimento cheese?” No, I hadn’t and was ashamed to admit that I’d said no to something I’d never tasted. “You’ll like it,” she promised. So I’ll admit I had to look up pimento cheese the first time I heard about it. Growing up in the northeast it wasn’t one of the comfort foods that I had become familiar with. Actually when I finally I figured out what it was, I thought pimento cheese sounded perfectly awful. Mayo? American cheese? Jarred peppers? Why would I want to eat that? It was a southern tradition that I was fine to miss out on. Except that it kept popping up, at restaurants, in conversations and cocktail parties… I remained skeptical even when a friend ordered it at a diner in the grilled cheese fashion, and enjoyed it. It really took one of my best friends – originally from Mississippi – making a homemade batch, for me to try it. I trusted her not to steer me wrong, but I still told her no thanks the first time she offered. She persisted. I finally gave in and said, “What!? This is what I’ve been missing?” It was good. Really really good. Since then I’ve had pimento cheese with sliced apples, crackers, warmed up on toast as she suggested. I was a convert. What I learned is that like any dip, spread or sauce, there’s a supermarket processed version, and then there’s homemade. There are so many possibilities with pimento cheese, you could add pickles or garlic, mix different kinds of cheeses, or spice up your mayo.  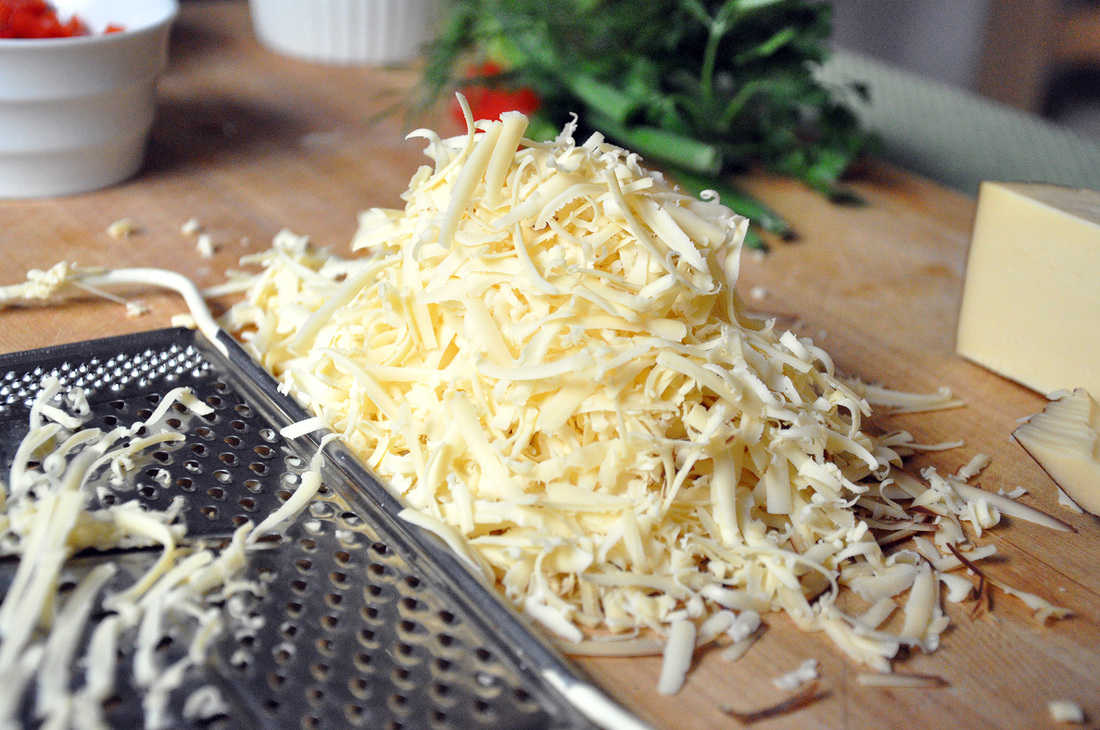  So Basically I’ve learned to shut my mouth, open my mind and try anything once. Especially when it’s homemade. I think I’ve made my southern friends very happy. 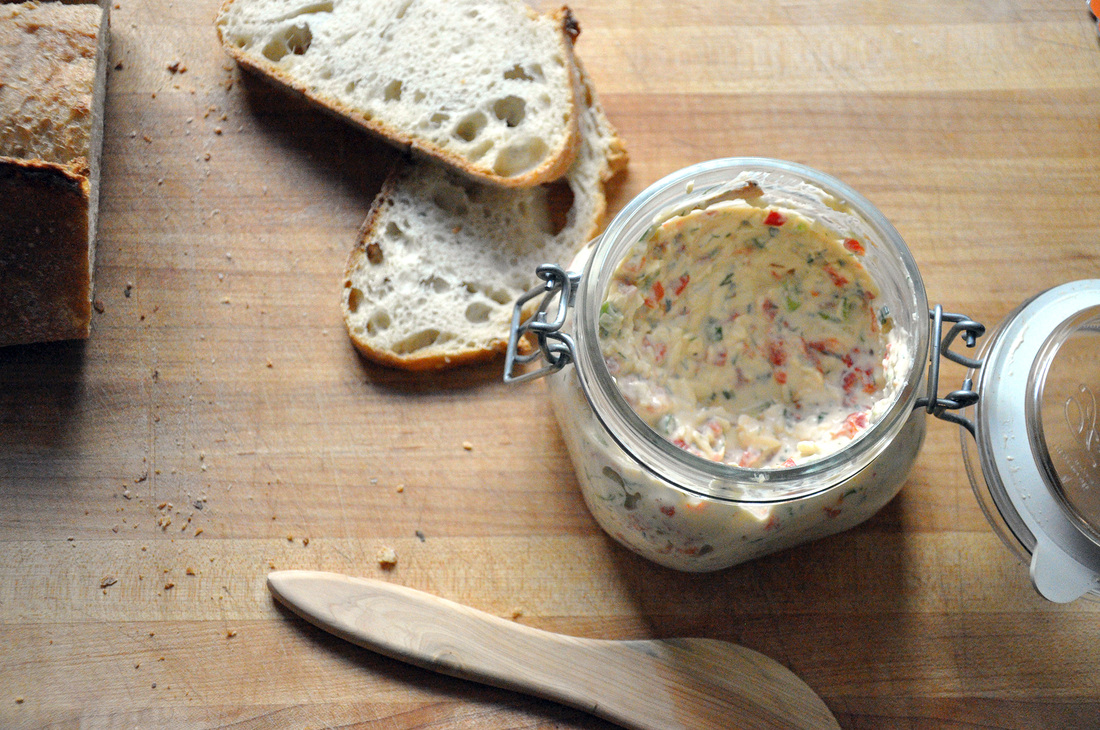 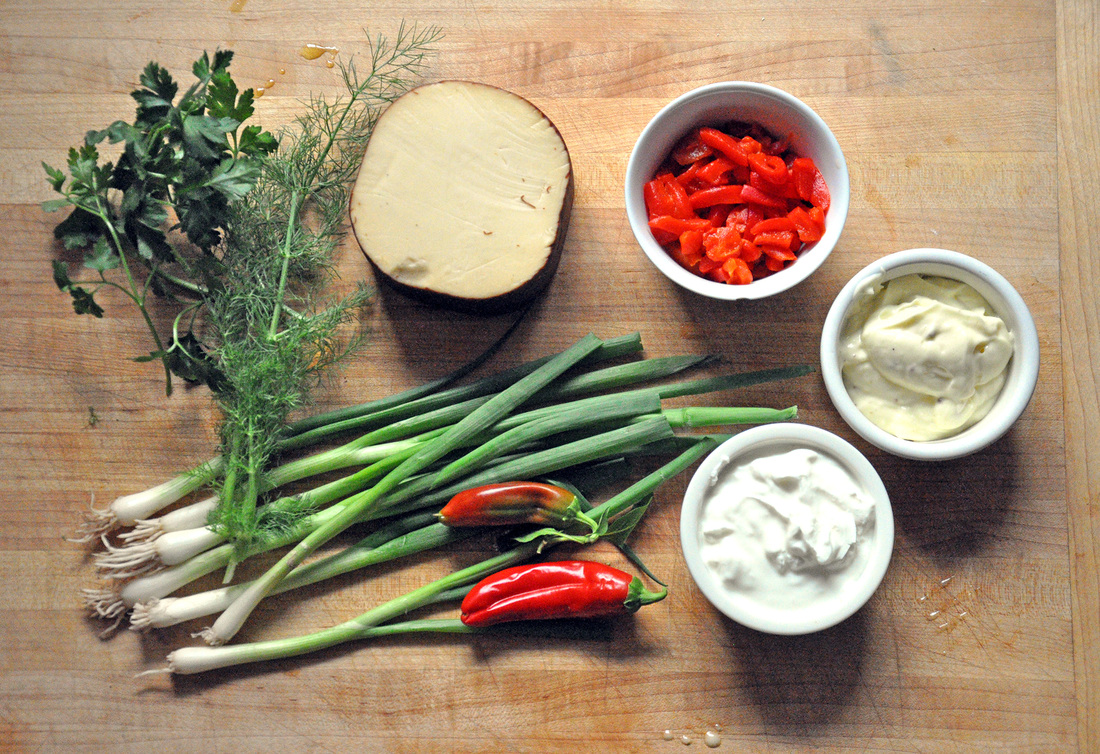 Smoked Gouda Pimento Cheese Sandwich PRINT RECIPE [Prep: 25min / Cook: 5min / TOTAL: 30min] [6 servings]
Homemade Mayo [~3/4 cup]
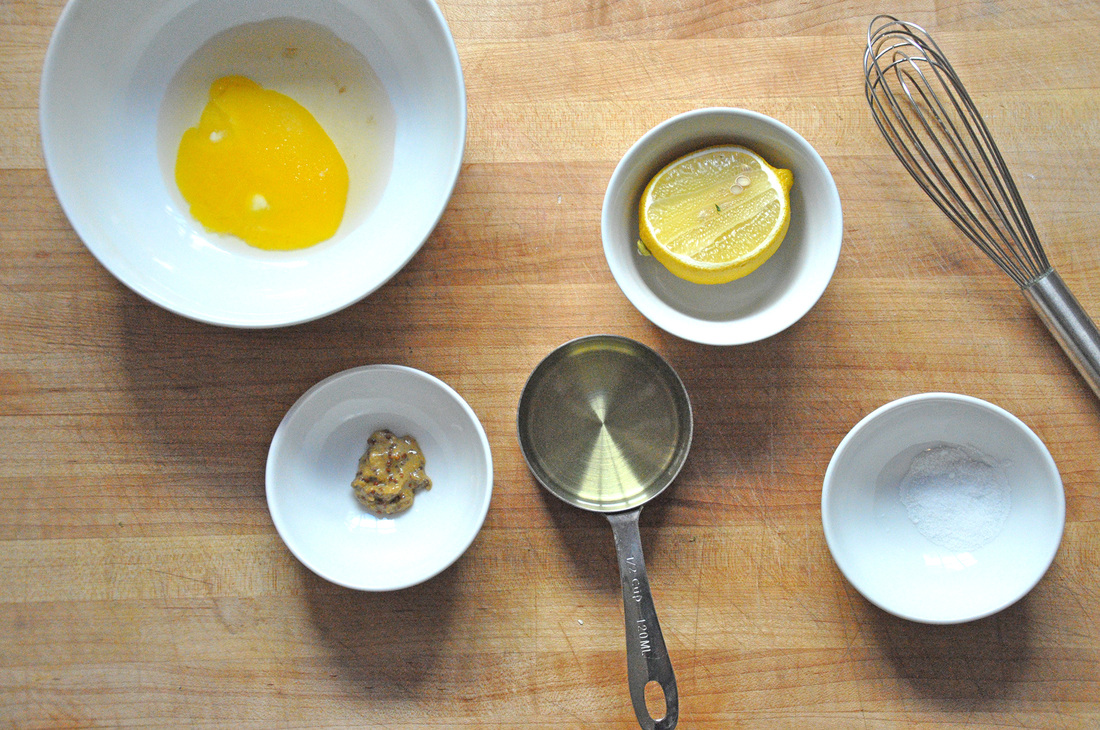
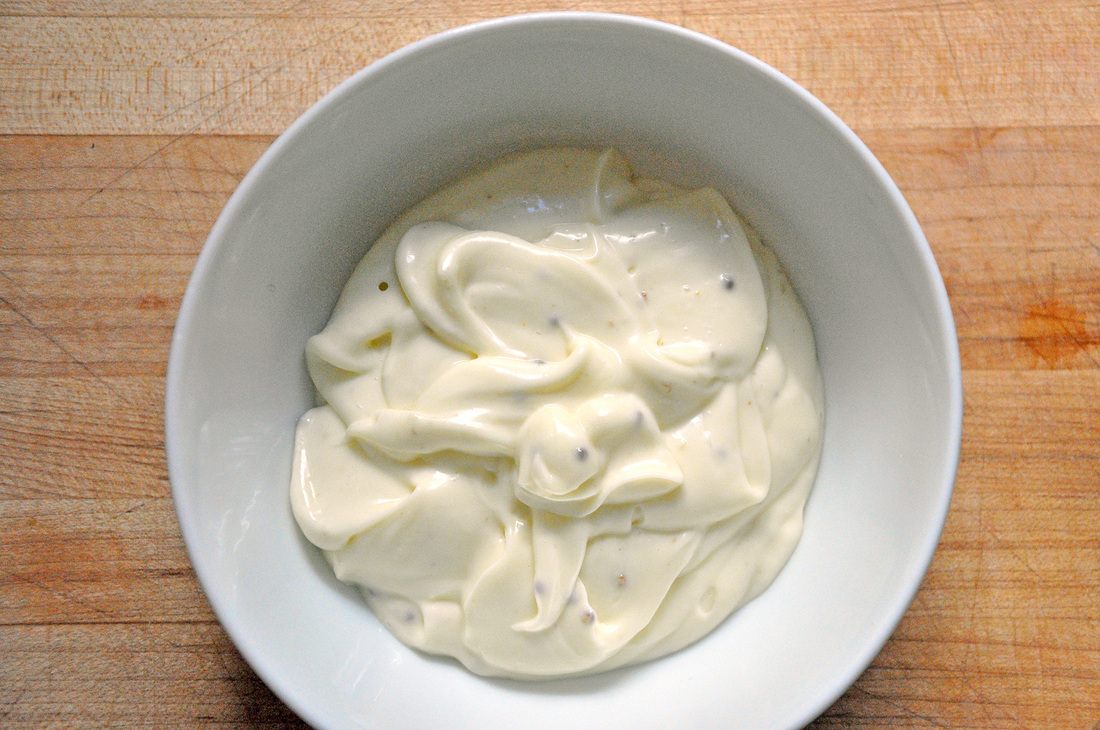
The hardest part of this recipe is making your homemade mayo – which of course is totally optional. While I’d like to say that I whipped it all up by hand, I recently got a mini food processor and really wanted to try it out. So first I added all of the ingredients for the mayo – except the oil – together in the mini food processor and pulsed it a few times. Then I slowly added the oil bit by bit until the ingredients started to come together, thicken, and become mayo. It really is that easy, and it tastes delicious. You should experiment with herbs and spices to make “fancy” mayo, a good way impress any dinner guest.
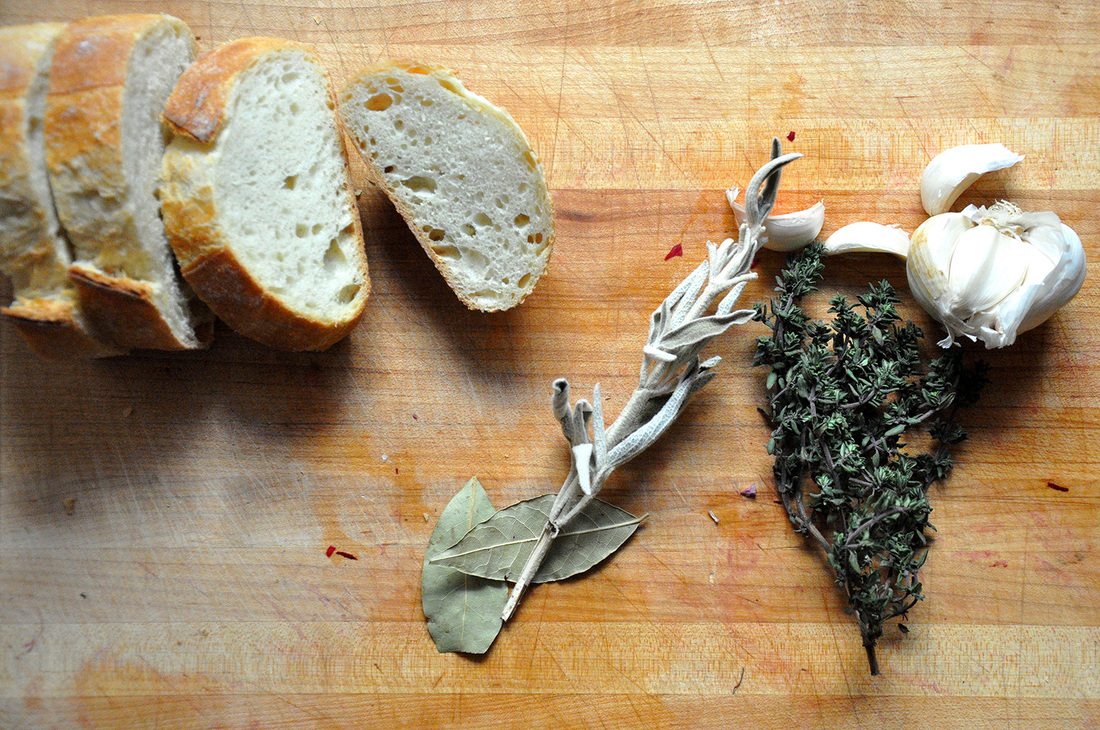
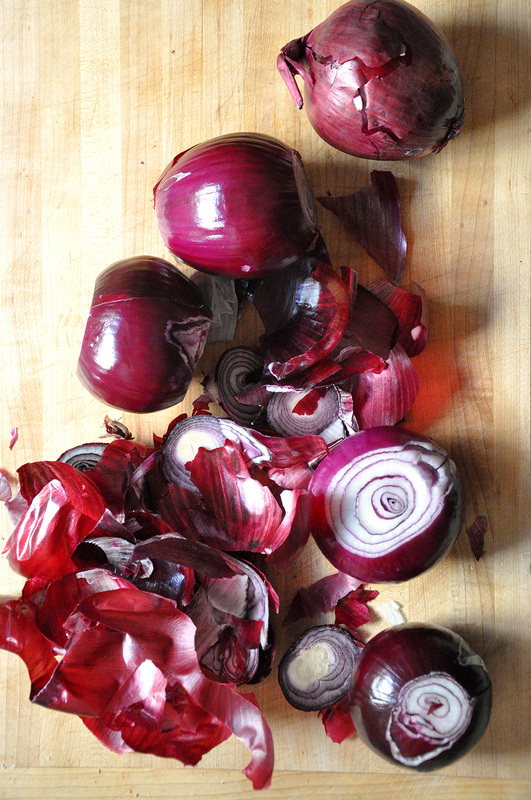
To make the pimento cheese spread start by shredding the smoked gouda, you can do this by hand or in a larger food processor that has a part for shredding cheese. In a medium sized mixing bowl, combine the cheese, yogurt, mayo, and pimento peppers. Finely chop up the rest of the herbs and veggies, incorporate and mix well. There you have it! Pimento Cheese. This type of cheese spread can be served many different ways, with crackers or veggie sticks, but I think the best way is the grilled cheese way. Basically just pile as much pimento cheese onto a slice of bread as you can handle, top it off with another slice and “grill” on a well-oiled cast iron skillet over med heat. Flip after one side is browned and toasted, about 3 minutes and cover, waiting about 1 more minute. 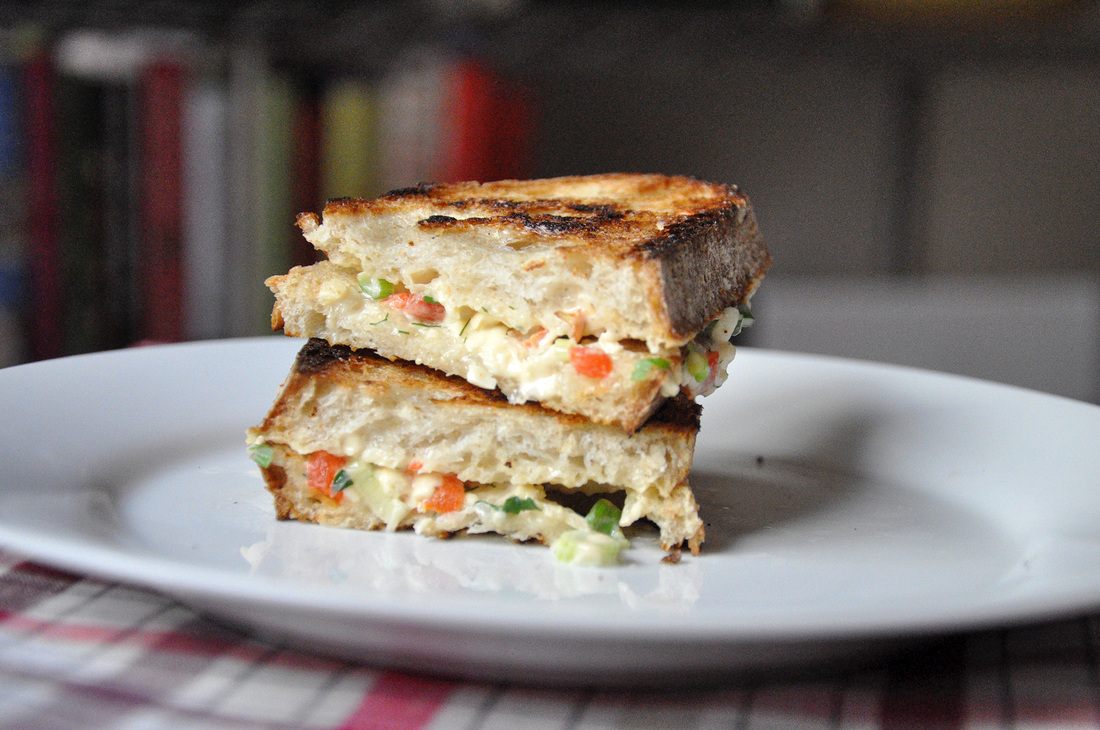 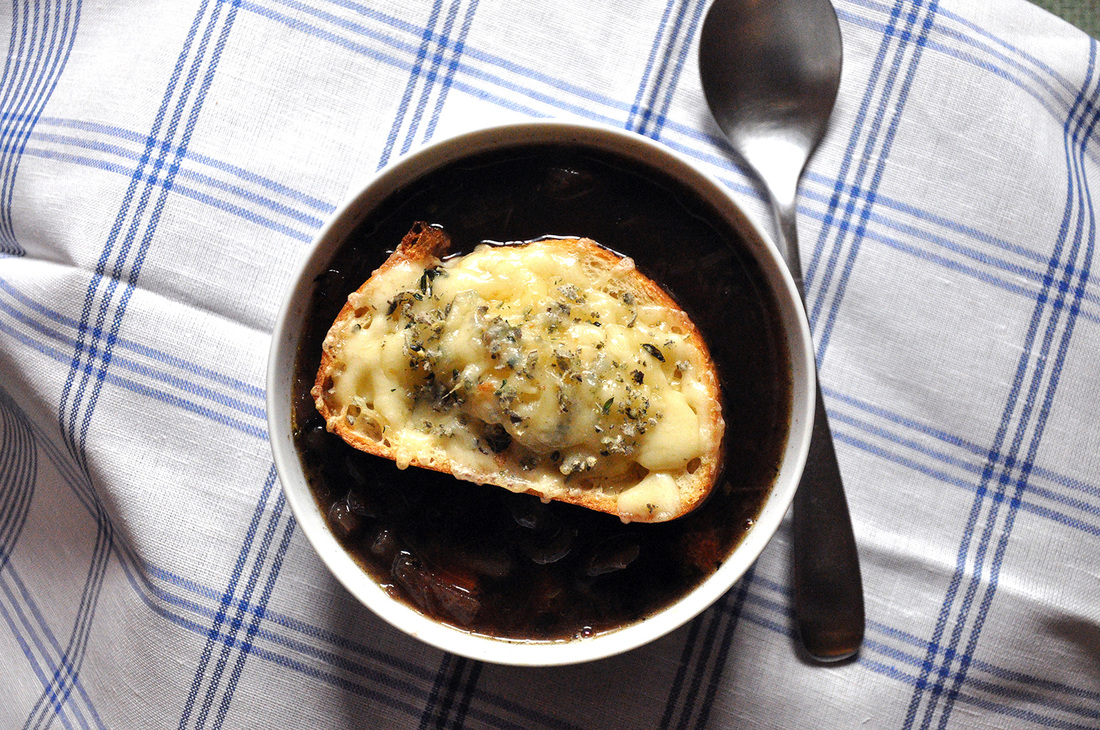 Here are a few things that we all know about winter: it gets cold, people get sick, soup gets made. We all have our favorites and family recipes. Me, I normally make a roasted butternut squash and sweet potato soup. In a restaurant though there’s really only one I order, the mouth burning French Onion soup. We all do it, we order it and wait expectantly for the gooey bubbly cheesy little crock to be placed in front of us – and when it finally arrives we are told to be careful because it is still quite hot. And what do we do? We dig in and burn our mouths. But we go on because the magical soup is so good, so comforting, and so cheesy, brothy and mushy. All table manners go out the window when the soup is all gone and we start to pick at the burned hardened cheese that had bubbled over under the broiler. But don’t worry, the other restaurant goers understand because you are eating French Onion soup and that is just what you do. 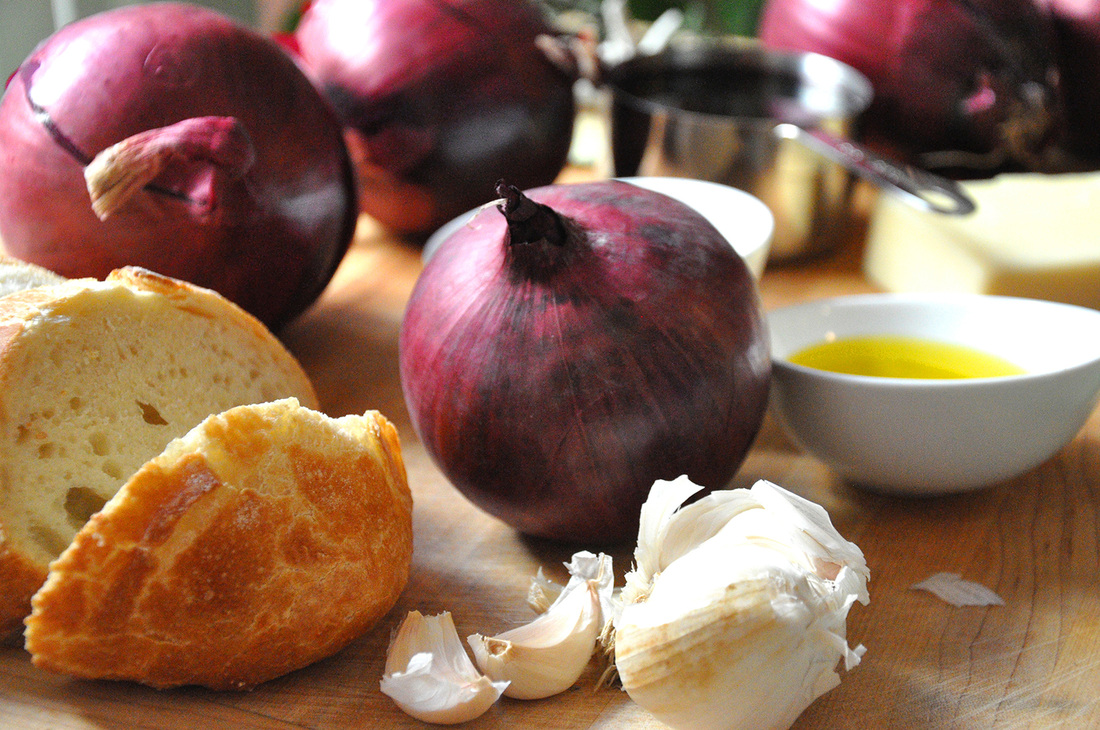 This past weekend I was gearing up to make my first batch of winter soup and I saw an article in the New York Times about Red Onion Soup. The author had made a similar version years before with Jacques Pepin – the be all and end all of French cooking (except for Julia Child of course) and he was going over how it was made. This version used water not broth; it really was a pauper’s soup – onions, garlic, herbs, stale bread, cheese, salt pepper, a little wine and a lot of water. I did a little more research and saw that everyone had their own style; some used broth – beef or chicken, wine – white or red, alcohol – sherry, brandy or cognac. So many choices! I’d never made French Onion soup before and was a little overwhelmed because so many people said theirs was the “true” recipe. I decided to stick with the original recipe that used water, I liked the simplicity of it – and honestly I wanted to see how good water and caramelized onions could actually taste. Good. Really really good. It tasted better than it had any business to. And it was so easy! So please, go to the store, stock up on onions and try this soup. Here’s the link to the NYTimes Red Onion Soup recipe published on 1/1/14. …and because we all love Julia Child
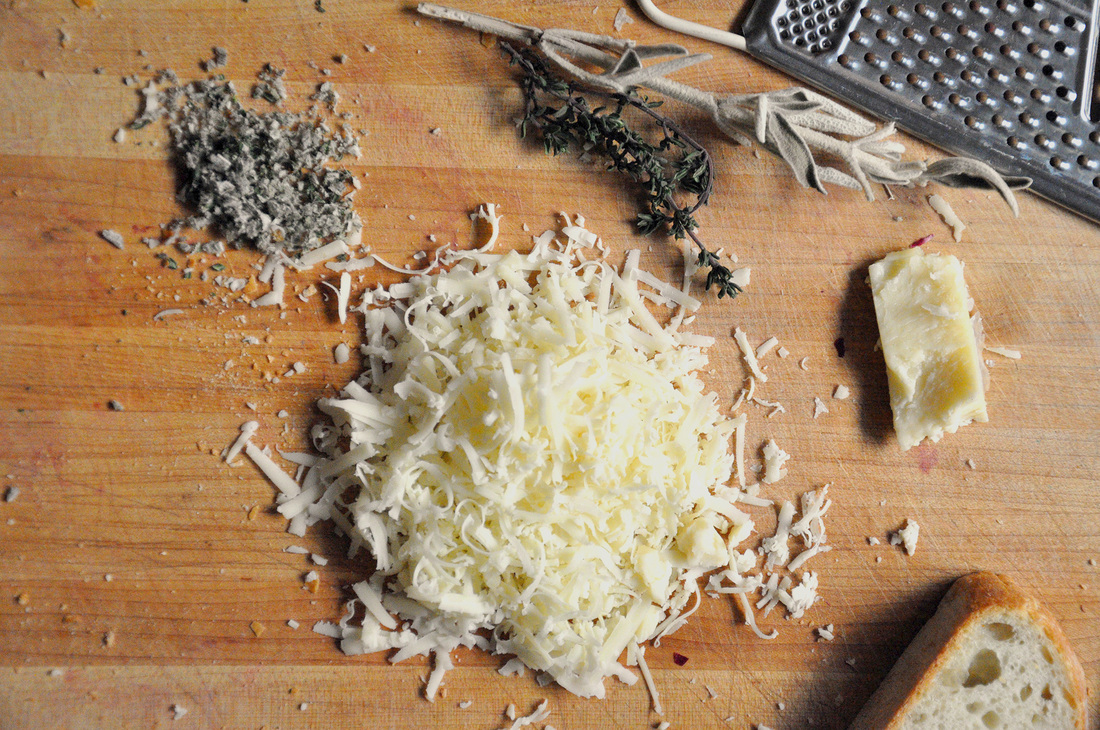
  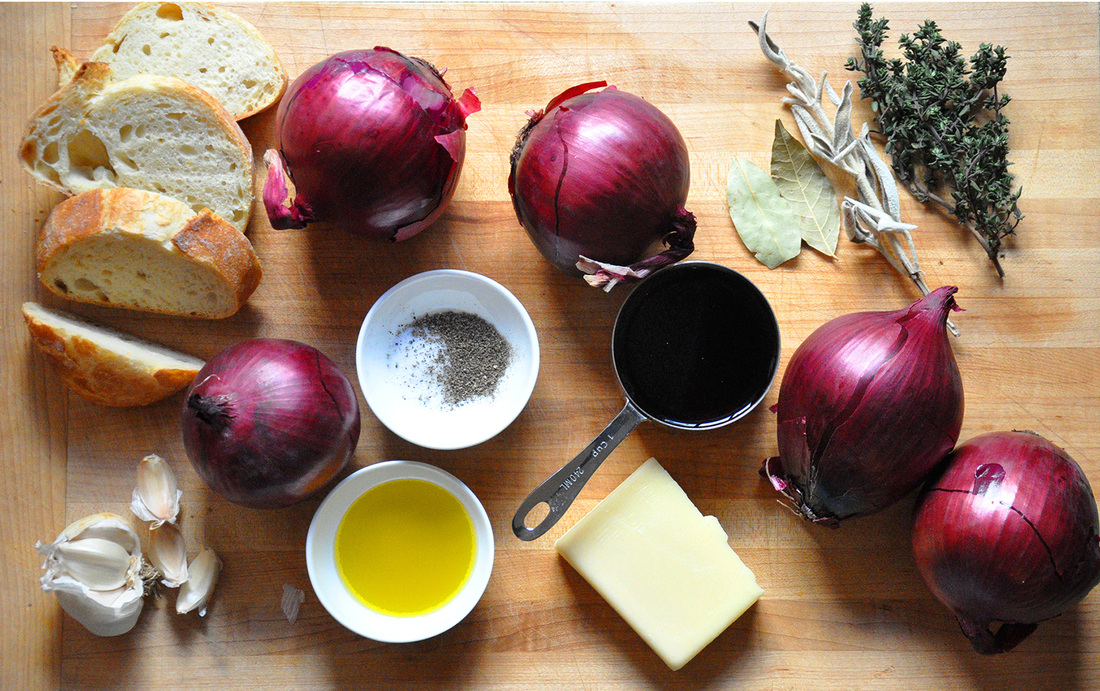 French Onion Soup PRINT RECIPE [Prep: 20min / Cook: 1hr 15min TOTAL: 1hr 35min [6 servings]
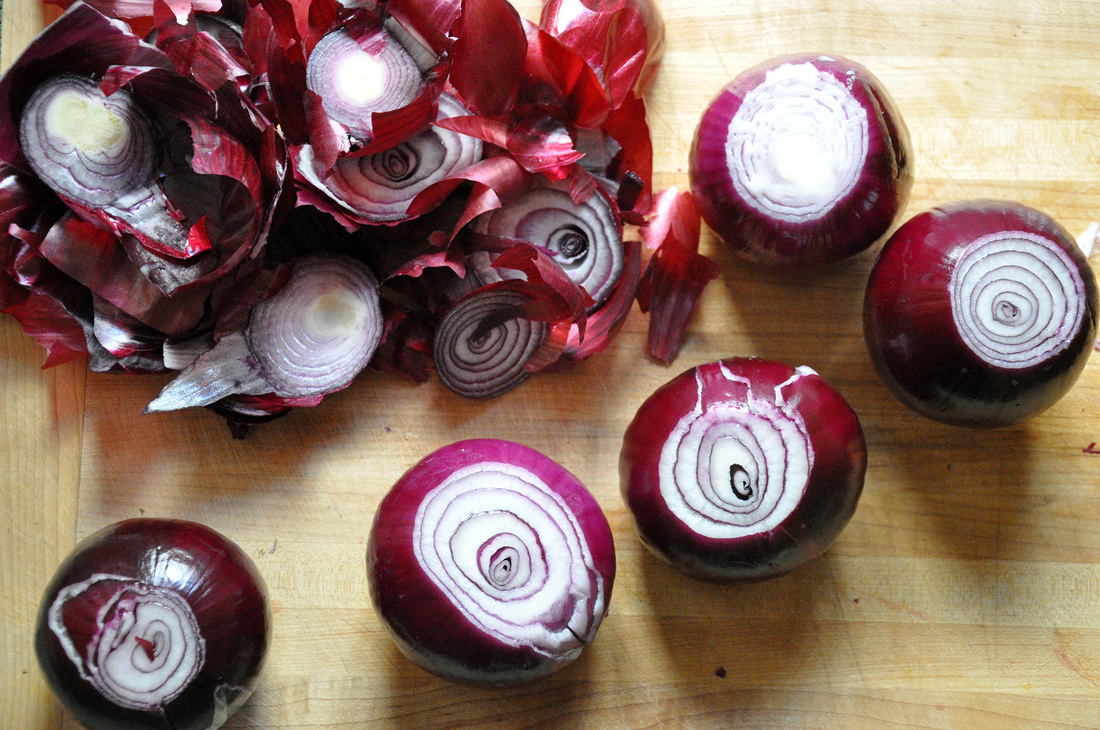
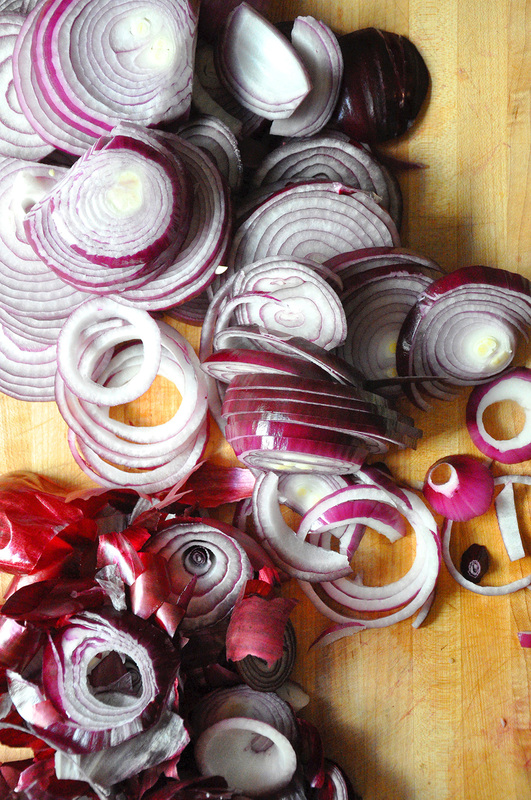
The prep for this soup is painfully simple, peel and thinly slice your red onions – but choppers beware you will most likely cry. This is a large amount of onions and it is hard to get through cutting all of them without taking a break. The only trick that works for me (sort of) is biting the wooden end of a matchstick. Now onto the garlic, the cloves just need to be roughly chopped – which is great because all you have to do is press the cloves with the flat side of the blade of the knife you’re working with – the garlic will smoosh and pop out of its skin a little, making it super easy to peel. Then just a few little chops – no tedious mincing required.
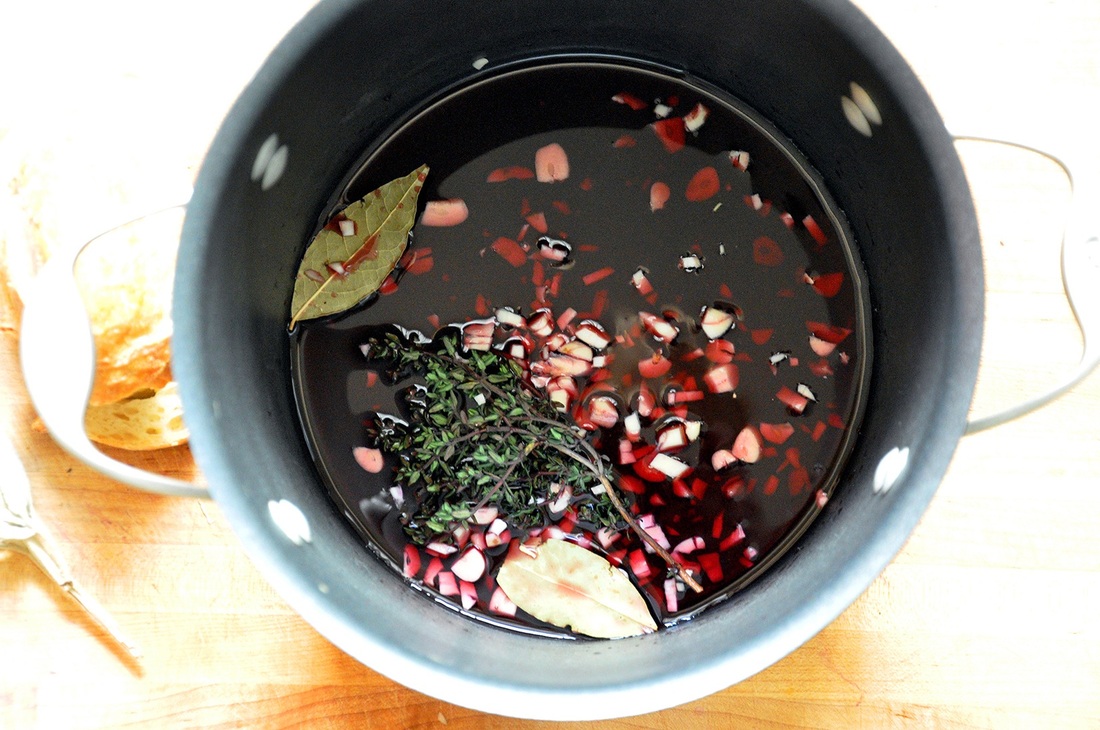
Once you’re done with the chopping, set up your stove with two skillets – as big as you have would be ideal – and a large pot, at least 3 quarts. Add 1 cup red wine, 2 bay leaves, small bunch thyme and minced garlic to the pot. Turn the heat to med-high under both of the skillets. As soon as they get hot – about 1 minute – pour 1 tablespoon of olive oil in each skillet and let heat up for about 30 seconds before adding the onions. They may need to be cooked in 2 batches, you don’t want to overfill the skillets, otherwise the onions won’t brown evenly. Add salt to each – about 1 teaspoon and a few grinds of pepper. Let sauté for about 10 minutes stirring occasionally so they don’t burn. Have 2 cups water ready – once the onions are finished, they should be a dark golden brown and may have sections of dark brown if they got a little burned (that’s ok!), turn off the heat and add them to the pot – then pour one cup water into each skillet to deglaze them. Using a wooden spoon scrape up all the little bits left on the bottom of the skillet, the water will take on the caramelized onion flavor. Add deglazing water to the pot. Repeat until all the onions have been cooked. Turn heat to mid-high under the pot and bring mixture of onions, garlic, red wine, deglazing water and herbs to a simmer, let sit for 5 minutes. Add two teaspoons of salt a few grinds of pepper and 8 cups of water. Bring to a boil – this will take a few minutes, if the tap water is hot when you add it this will speed up the process a little. Once the soup is boiling turn the heat down so it stays a slow simmer - you may need play with the heat a little. Let simmer for about 45 minutes. Now you can start prepping the bread, cheese and herbs. I suggested 6 slices of bread because this soup yields 6 bowls, however if you are making this recipe but only have a few mouths to feed you’ll only need a few slices. Also this soup (pre-cheese) will last a few days in the fridge and you can always freeze it for later! Grate the desired amount of cheese into a small mixing bowl. Chop the sage and thyme – or any herbs that you have on hand and think will go well – add them to the cheese and grate some fresh pepper on top. Mix it well. If your bread is fresh and not stale, now is the time you should toast it. After 45 minutes have past, taste the soup and season accordingly, you can always add another splash of red wine or even sherry, cognac or brandy. Let cook for 5-10 more minutes. You can make the soup ahead of time (up to a day ahead) and re-heat it. Once the soup is ready to plate put your oven on broil, make sure the rack in the oven is near the top, about 6 inches away, then pile the cheese and herb mixture onto the bread and put it in the oven. *I put the bread slices on foil first and then on a baking dish, otherwise the cheese melt over the sides and stick to the dish. You only need to leave the toast in the oven for about 45 seconds, just until the cheese is a browned and bubbly. Now you are ready to plate the soup. Pour a few ladlefuls into warmed bowls and put the freshly made cheesy toast on top. Grate some fresh pepper and enjoy! *If you have proper soup crocks with a rolled rim, follow these instructions for a more traditional presentation of the dish. Place the piece(s) of toast in the bowl before adding the soup and cover well with gruyere. Put the whole crock into the oven under the broiler, about 8 inches away from heat, for 3-4 minutes. 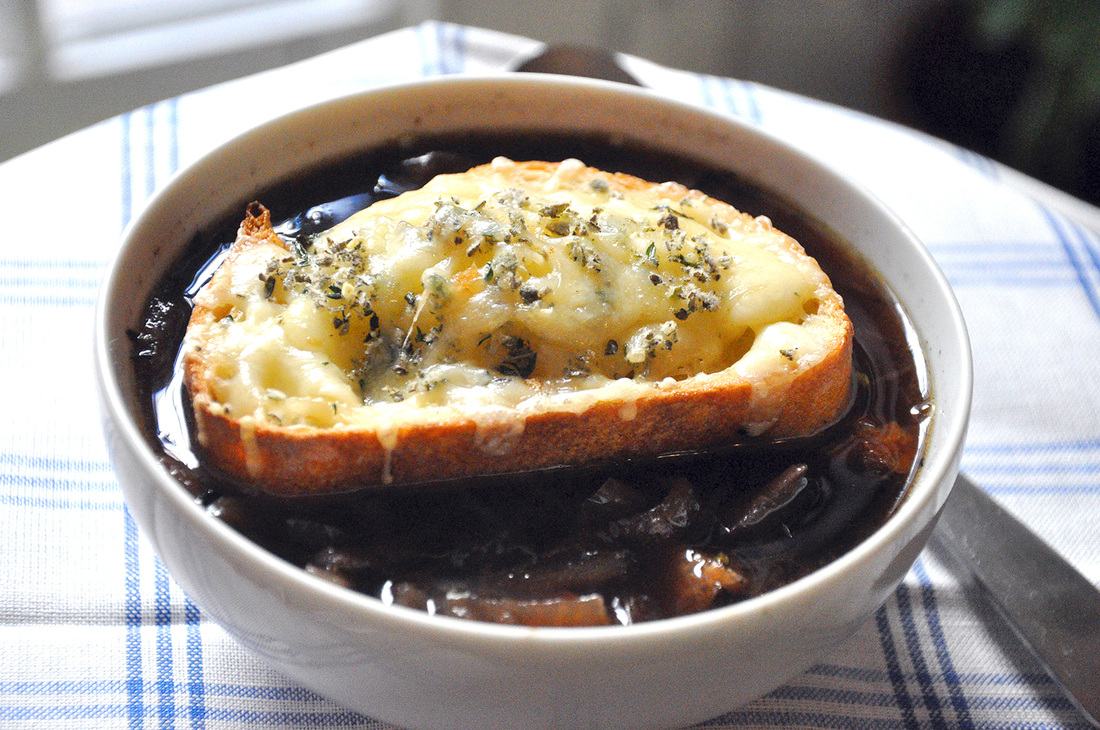 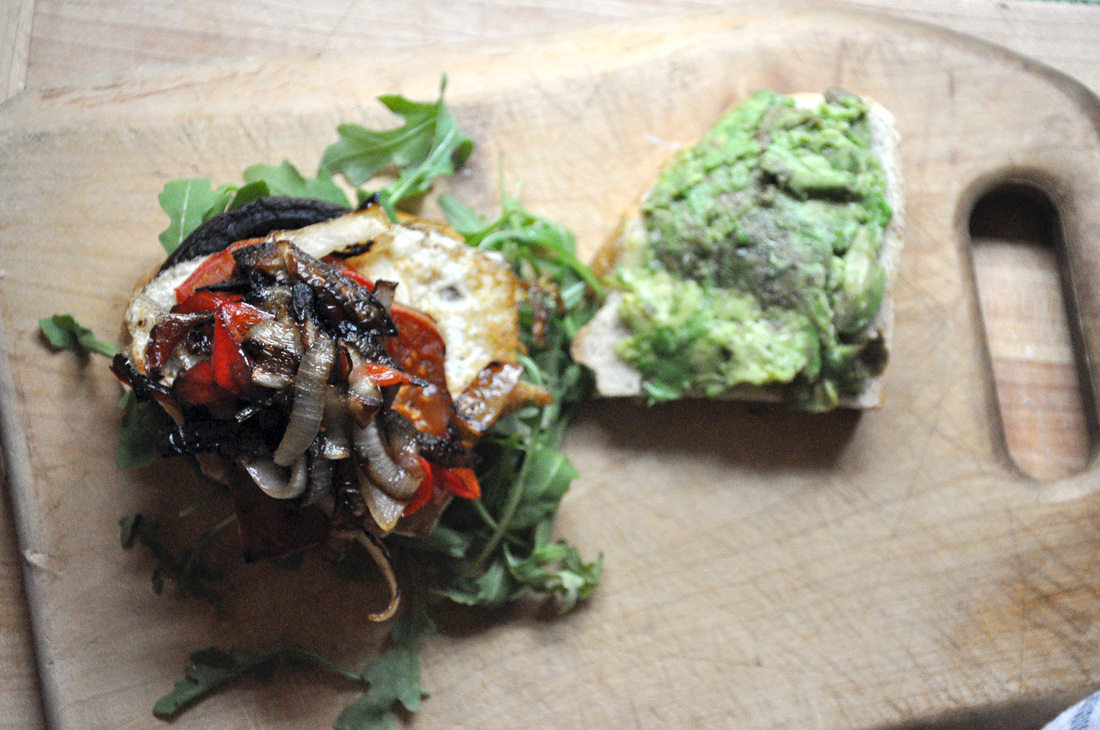 So picture this – you’re hungry and out of ideas for what to eat – be it breakfast, lunch or dinner. I’m not saying that you have to feed a whole army – it’s not that kind of dire situation – you just have to feed yourself and maybe a hungry boyfriend/wife/roommate. I secretly love this scenario. You’re desperate and think you have nothing to make, but then ingredients start popping up in the fridge as ideas start lighting up in your head. Bread – check, random assortment of half used veggies – check, small piece of smelly cheese – check, one egg left…- check! So I start picturing this epic meal – just a sandwich really - in my mind and I get hungrier by the second. How can I maximize efficiency and cut down on time…enter trusty cast iron skillet. Well hello my hefty well-seasoned problem solving friend – lets get down to business. It's at this point I realize that I can pretty much add all of my ingredients into the skillet and cook them at the same time – I am feeling pretty self-satisfied. Ok enough about my feelings and talking to my kitchen cookware. I’ve made this sandwich a few times now and it’s yummy and satisfying. You don’t need to use the same exact ingredients that I used, that’s exactly NOT the point - It’s to use up what you have in your fridge and make an awesome sammie. There are too many options to even try and cover here. So go on now, go on and try it for yourself! 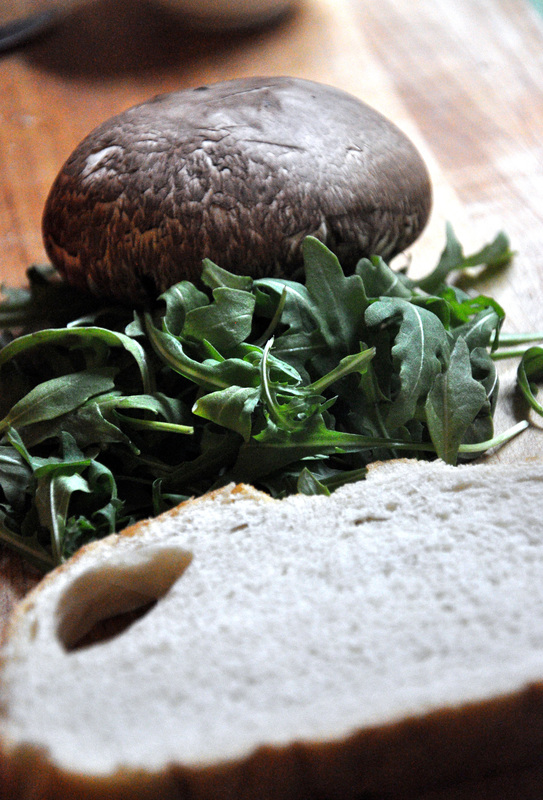 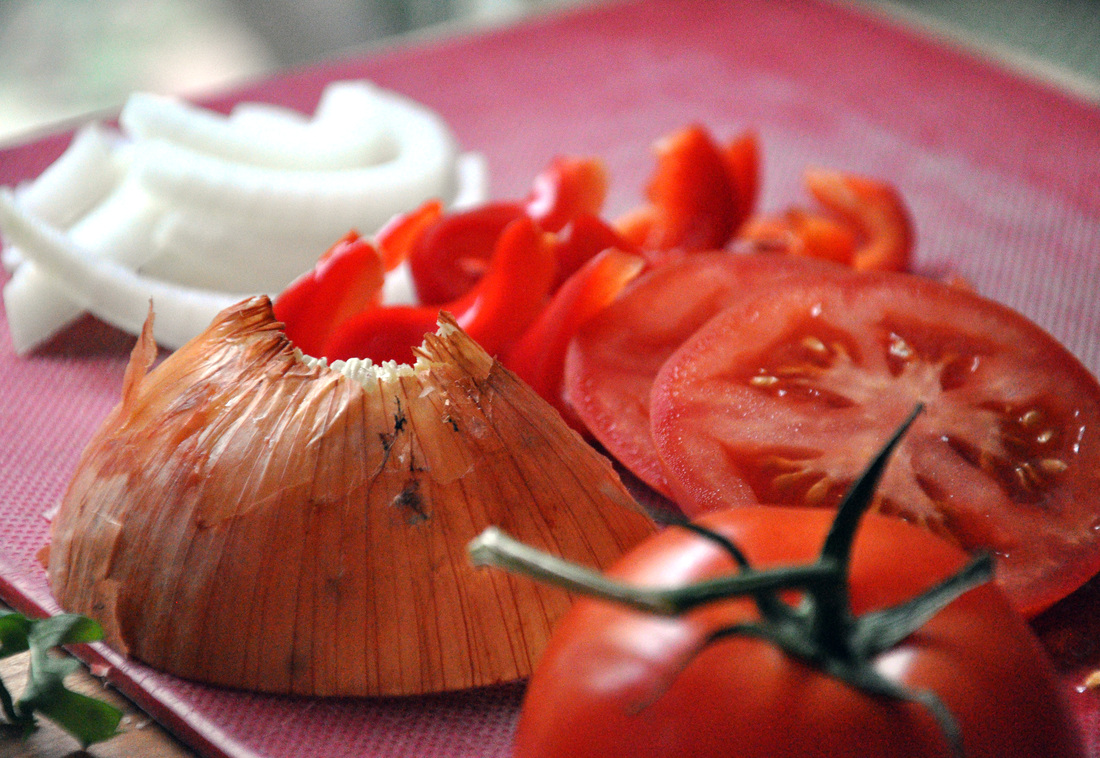  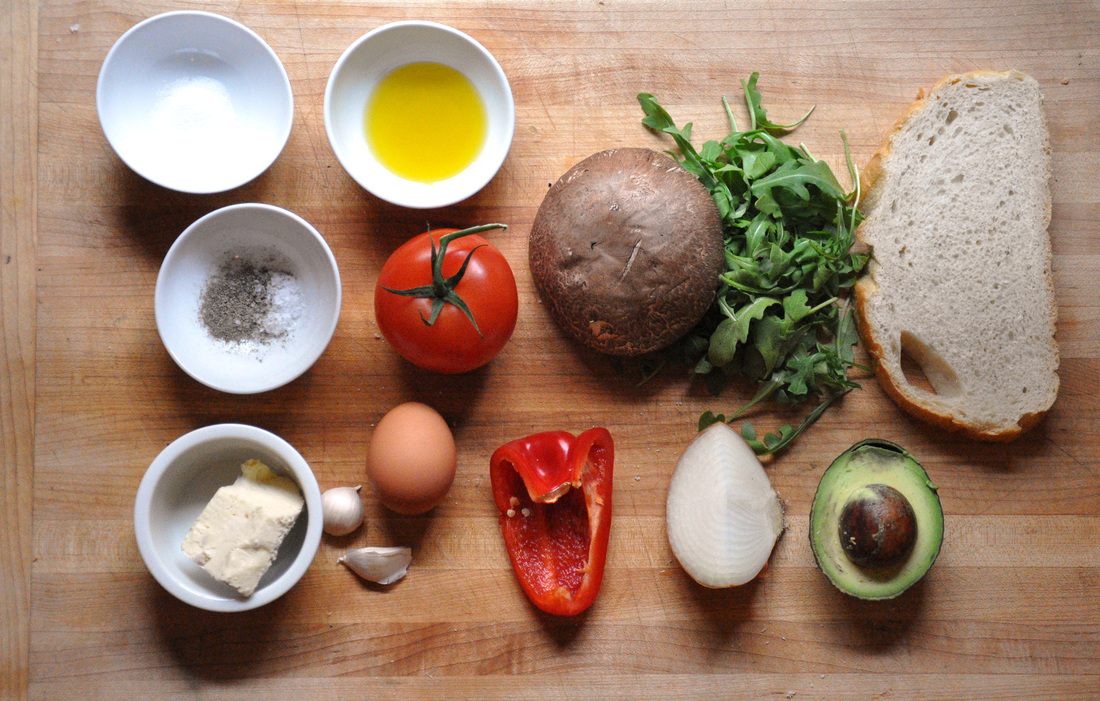 Portabella Skillet Sammie PRINT RECIPE [Prep: 10 / Cook: 20 TOTAL: 20 (the prep can take place simultaneously to cooking)] [one serving]
Heat the oven to 350° - this is only necessary if you don’t have a toaster oven. Place a large cast iron skillet over medium heat and add 1 tablespoon extra virgin olive oil. Wait a few minutes for it to heat up and then add the portabella cap face down. Let this cook on its own for a few minutes - 5 minutes should be enough. While the mushroom is cooking, put the sliced bread in the oven - set your timer to 5 minutes - slice up the onion, pepper and tomato. To the same skillet add the sliced onions, red peppers, and tomatoes. Keep them separate from each other. The idea is to caramelize the onions and blacken the peppers and tomatoes. The peppers and onions should be stirred up and can mix a little with each other, but the tomatoes will fall apart if you are too rough with them. When the onions start to turn a warm golden color and the peppers start to blacken, carefully flip the tomato slices over. [Check to see if the toast is ready!] Now you can flip the portabella slice over and add a pinch of salt to everything and a pinch of sugar just to the onions. Then you can let everything sit in the skillet for 5 more minutes, stirring up the onions and peppers every now and then. While you are waiting on the veggies in the skillet, spread on the still warm toast whichever soft cheese you’ve decided to use - I had a rich triple cream on hand. Take the halved avocado and mash it up with a fork while still in its skin. Take the peeled garlic clove and rub all over the other half of toast, then smear it with the mashed avocado and season lightly with salt and pepper. Add the piece of toast smeared with cheese to the skillet and crack your egg into any empty space you can find – you may need to do a little rearranging for everything to fit – and cover. Since the skillet should be nice and hot the egg shouldn’t spread out too much once it hits the pan, if it does, just coax it back a little before covering. The egg should be done after a 2 minutes or so, flip it – waiting about 30 seconds, and then scoop it up with a spatula and place on top of the portabella. Now the fun part - carefully stacking the sammie. I chose the creamy triple brie smeared side to be on the bottom, dressed it with the arugala and then the portabella with egg. Next, I added the fried tomatoes, peppers and onions, and topped it off with the garlicky avocado toast. So yes it’ll become sort of a mouthful for a sandwich, but you can press down a little on it, cut it in half and watch the yolk spread and mix with all the yummy ingredients. [If runny yolk isn't your thing just let the egg cook another minute (instead of 30 seconds) after you’ve flipped it.] If you have some potato chips to throw on the side, even better! Oh and it’s a pretty hearty sandwich – so if you feel like sharing – a half is probably enough to fill a hungry belly. Enjoy! 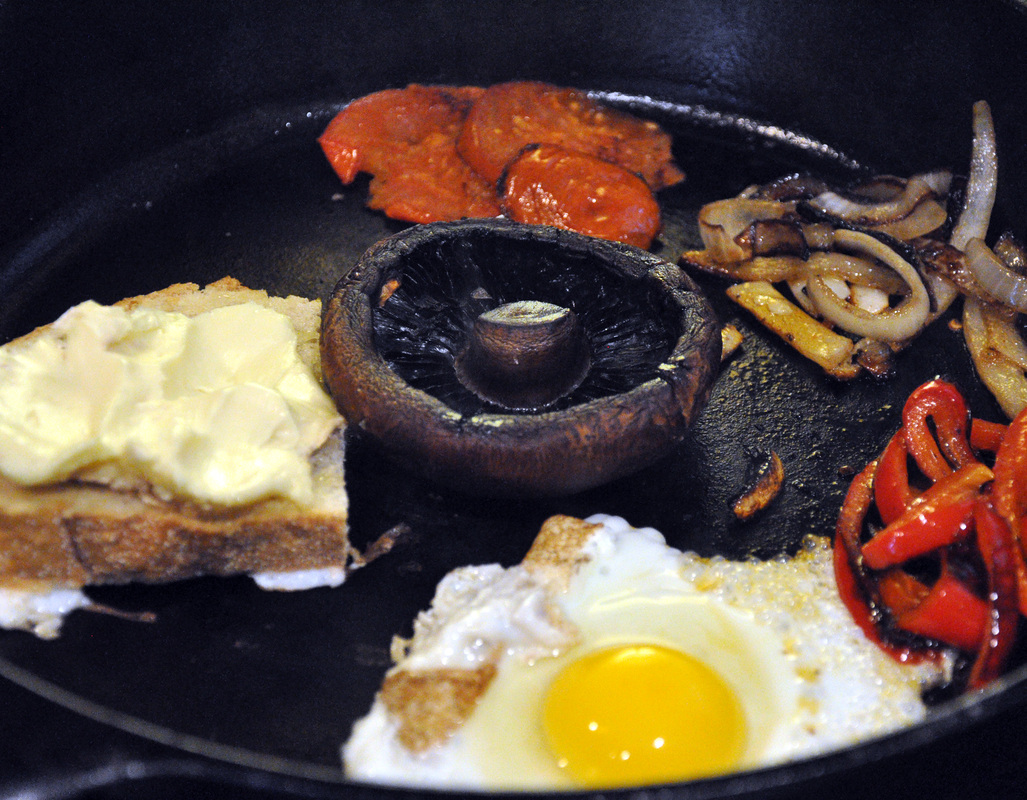 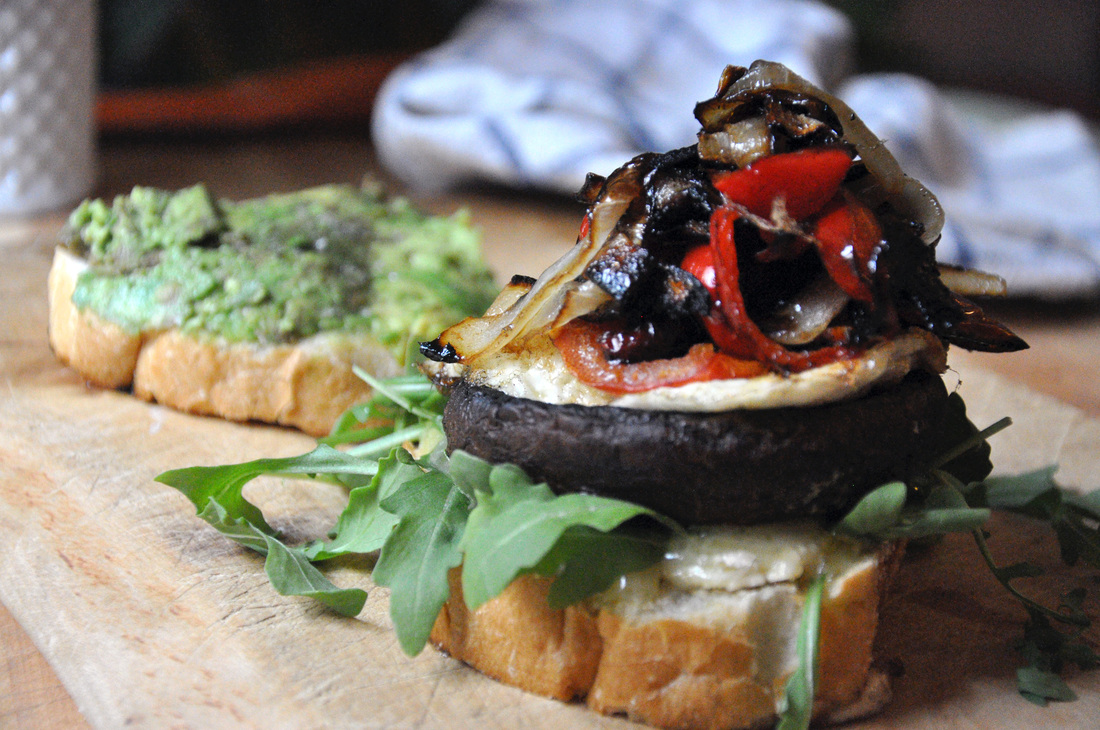 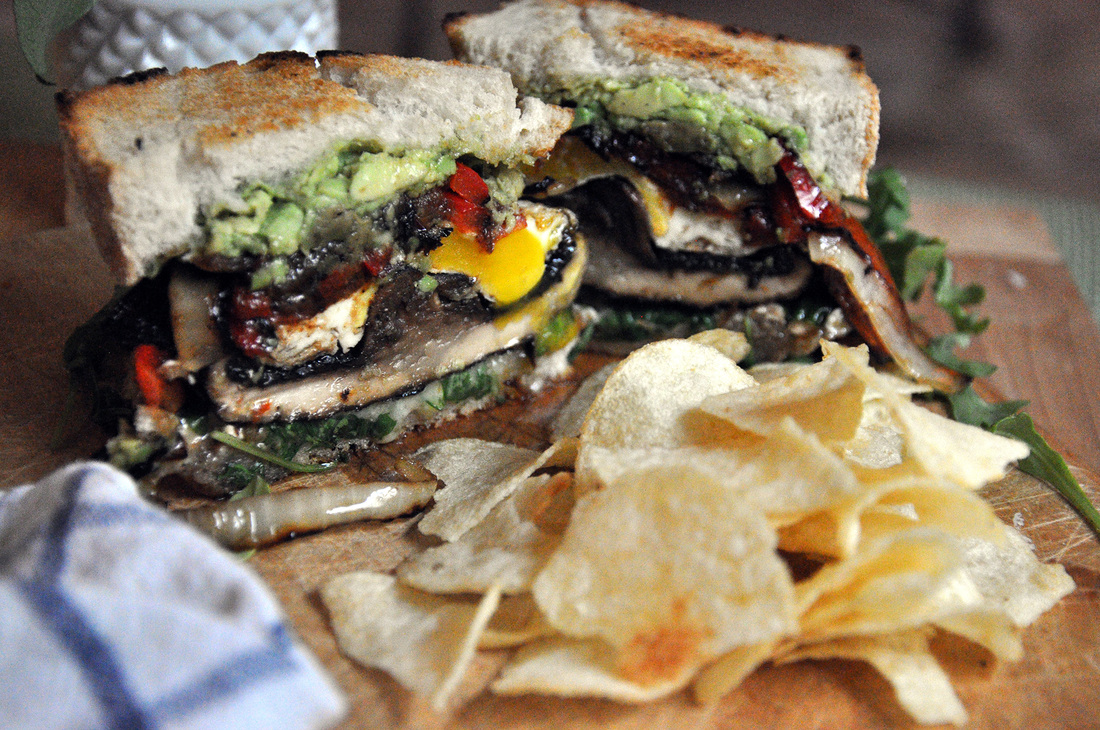 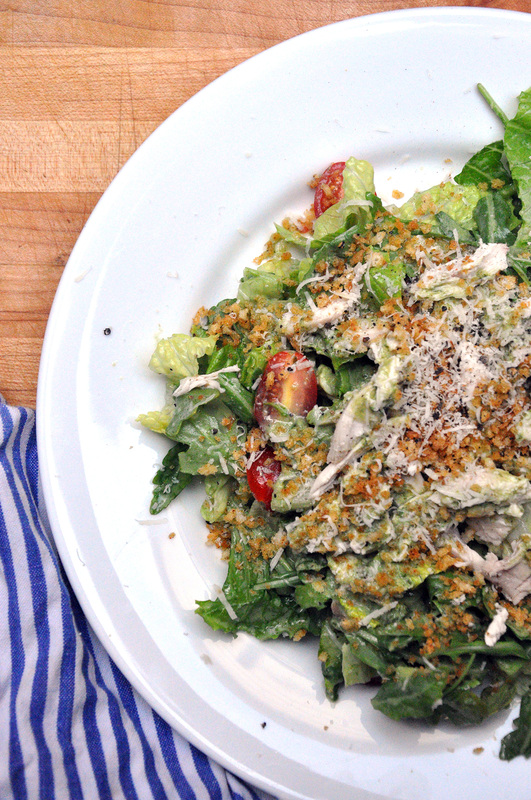 I apologize – I haven’t been posting recently, but I have been cooking and eating – a lot. You see that’s been the problem either I don’t stop to take photos for my blog, or I’m trying something out for the first time – either a random concoction of my own or someone else’s recipe that I just cant stop thinking about. I even tried my hand at home made pasta. Excuse # 3 is that my sister was visiting – just in time to catch the last weekend of the Texas State Fair and all the fried food you could dream up. Again, I was all set to take photos, but I quickly got distracted by said fried food, and my good intentions fell by the way side. Therefore I’ve decided to dedicate this post to left overs based on some killer recipes I’ve tried out. The first is a smoothie, the Green Machine Smoothie to be exact taken from Whole Living’s website, it yields about 3 cups worth of healthy goodness. It combines parsley, romaine, kale, pineapple and ginger perfectly – I know I’ve gone on about parsley before but who knew it could taste so good in a smoothie? The recipe also calls for mango, but I’ve subbed in apple juice and apricot juice, it’s just as good. Have coconut water hanging around, you could add a little of that too! So I’m getting off track and could very easily end up wandering into my kitchen and see what else I can throw into my blender. My point is that I have some romaine lettuce and purple kale in my fridge and whenever I have romaine I always want to make a creamy caesar salad. 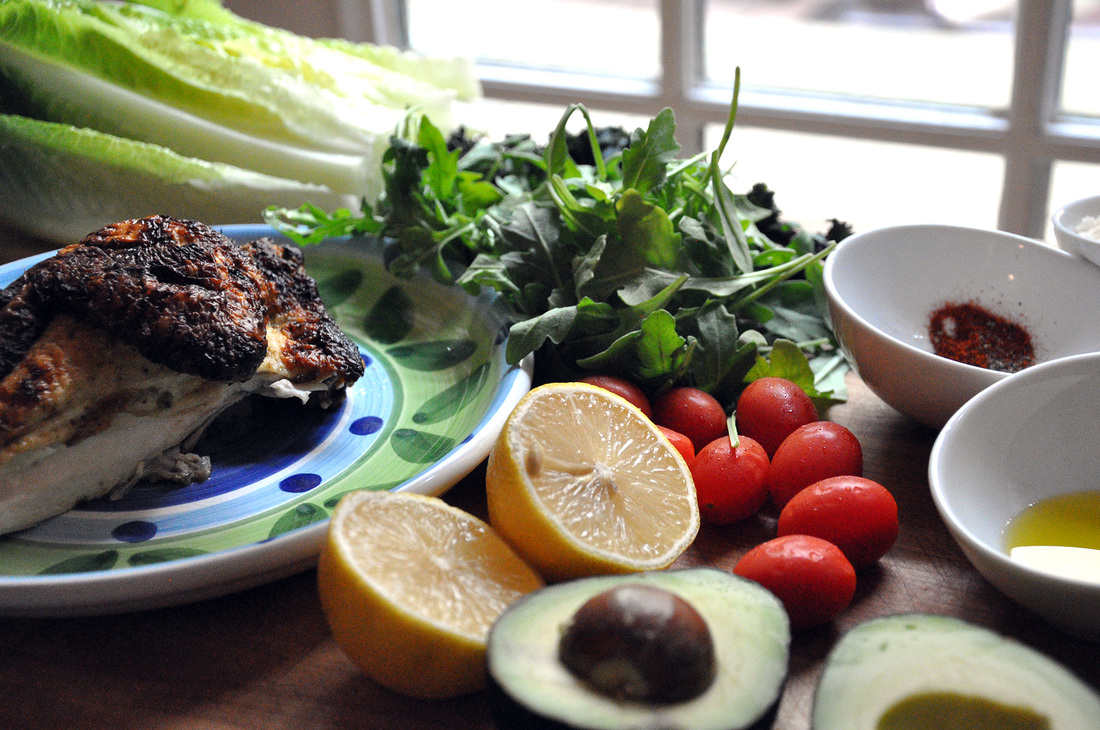 This brings me to the next recipe that I was literally talking about for days - Melissa Clarks’, Green Goddess Roasted Chicken from the New York Times. I don’t cook chicken often much less a whole chicken, but the photos from this NYTimes story where pretty ridiculous. All you had to do to was blend a few ingredients, Buttermilk, basil, chives, green onion, garlic, and a little salt and pepper, do a spatchcock number on that chicken [butterfly it] and let it marinate over night. Then roast in the oven for about 40 minutes at 500 degrees. You reserve a little of the marinade sauce at the beginning to drizzle on the finished bird and its pretty close to roasted chicken perfection. The only suggestion I would make is that if your bird is small enough after it’s been flattened, brown the underside in a cast iron skillet and then transfer it into the oven. Basically what I am left with is, some leafy greens, left over roasted chicken, and a badass basil chive buttermilk sauce. So yes, in my mind this equals a rockstar version of the good old traditional chicken caesar salad. 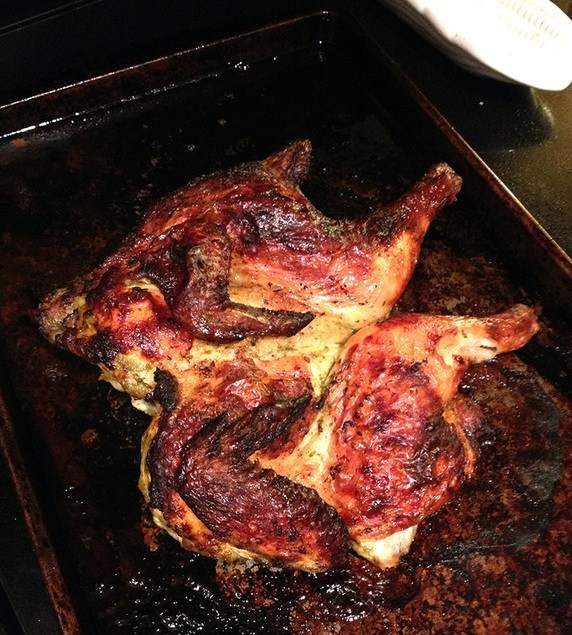
 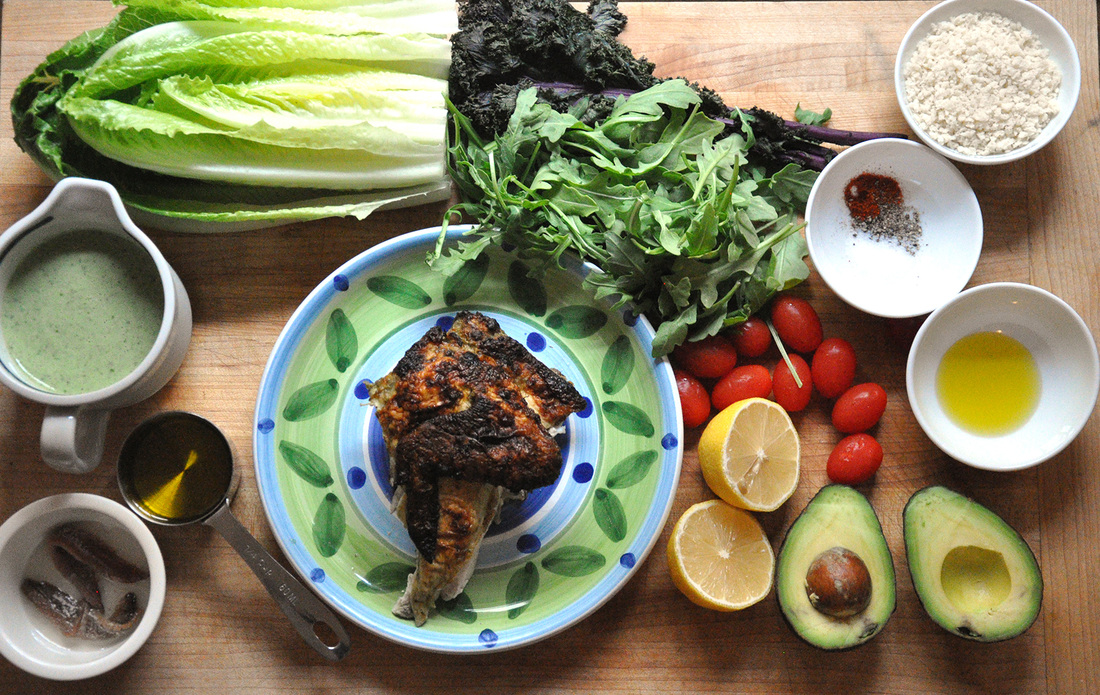 Rockstar Chicken Caesar Salad PRINT RECIPE [Prep: 20 / TOTAL: 20] [Serving size depends on home much chicken is left over]
Dressing:
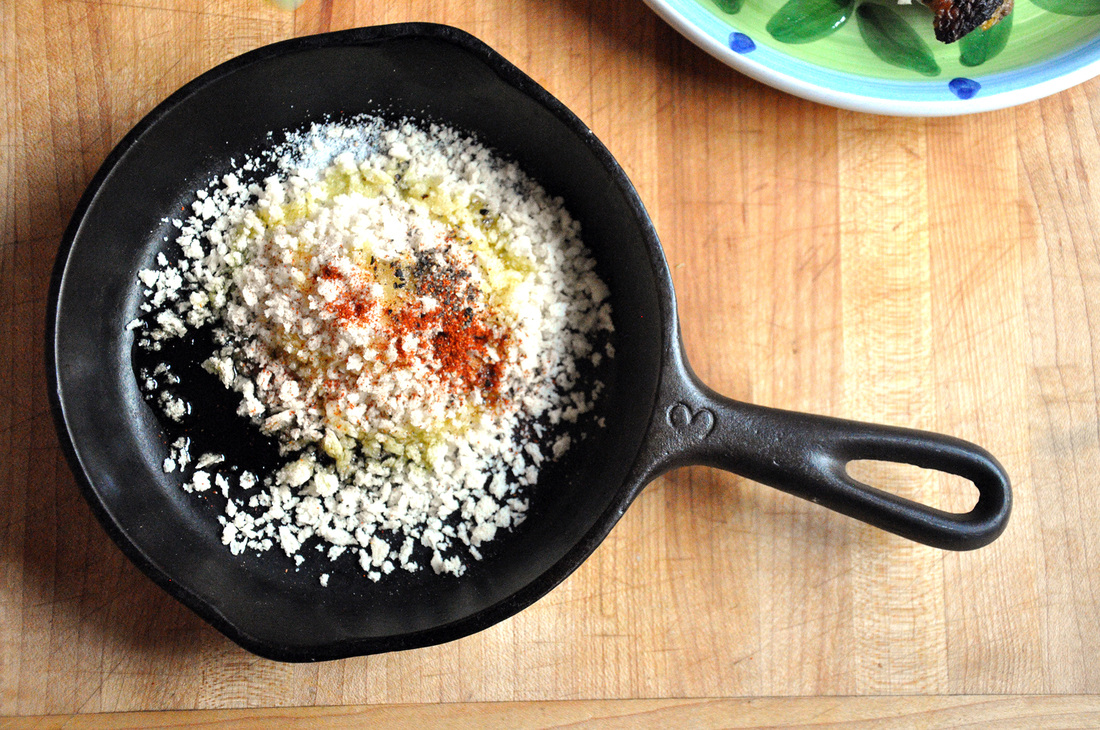
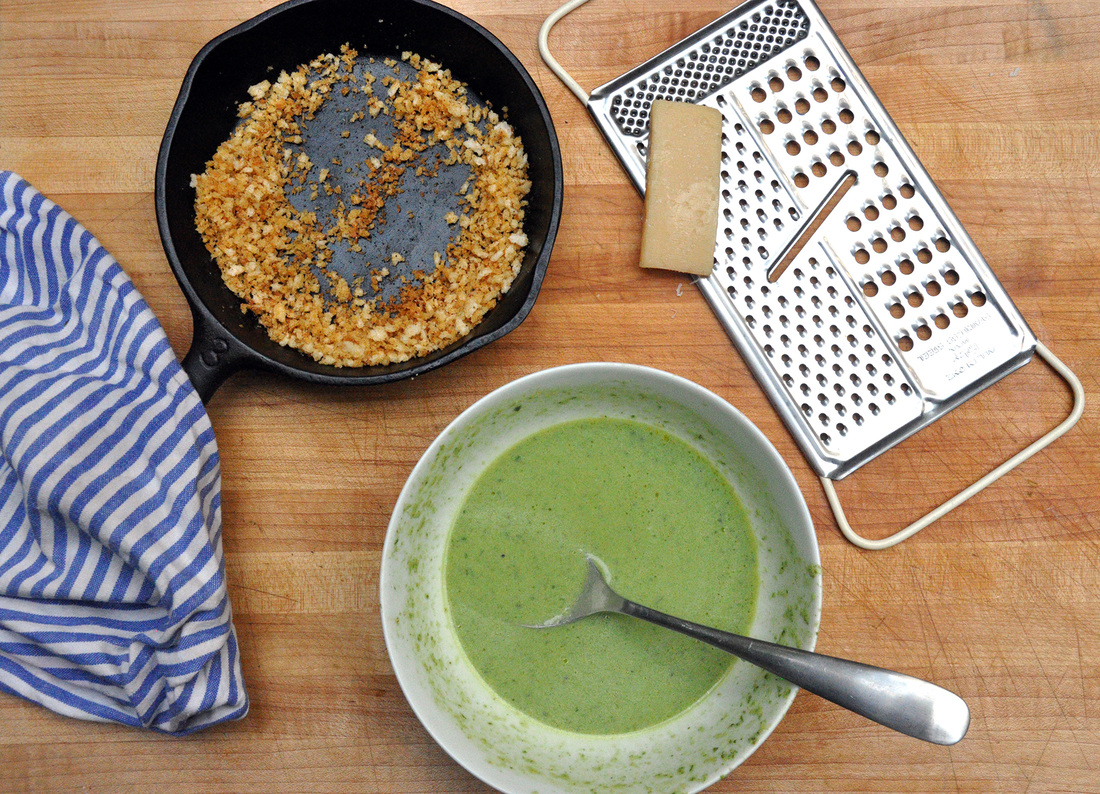 For the basil and chive buttermilk dressing, whisk all of the ingredients together in small bowl except for the olive oil. The oil you should slowly incorporate a little at a time while whisking, so it can emulsify and the dressing can become thicker. This dressing won’t become as creamy as a traditional caesar salad because of the volume of buttermilk already in the sauce – it will still taste darn good. To assemble the salad just wash and chop up the romaine, kale [stem it first] arugula and put into a large mixing bowl. Wash and halve the cherry tomatoes, pit and cube/slice the avocado and mix both in with the greens. Here you can pre-mix the salad with a few tablespoons of the dressing – just enough to coat everything. In small skillet or saucier pan toast a 4 tablespoons of panko crumbs on medium-high heat. Add a dash of olive oil, a pinch of salt, a little cracked pepper and a pinch of cayenne pepper. Toast for 4 minutes, stirring a few times so it doesn't burn. Pull the roasted chicken off the bones and slice it up. [You should save all the bones, skin and other inedible pieces from the whole roasted chicken, it will make killer stock. You can always save them in a Ziploc bag in the freezer until you are ready to make a homemade stock.] Plate the mixed salad and top with the sliced chicken. Drizzle more of the dressing on top and finish off with the toasted panko, the shaved parmesan and a few grinds of cracked pepper. 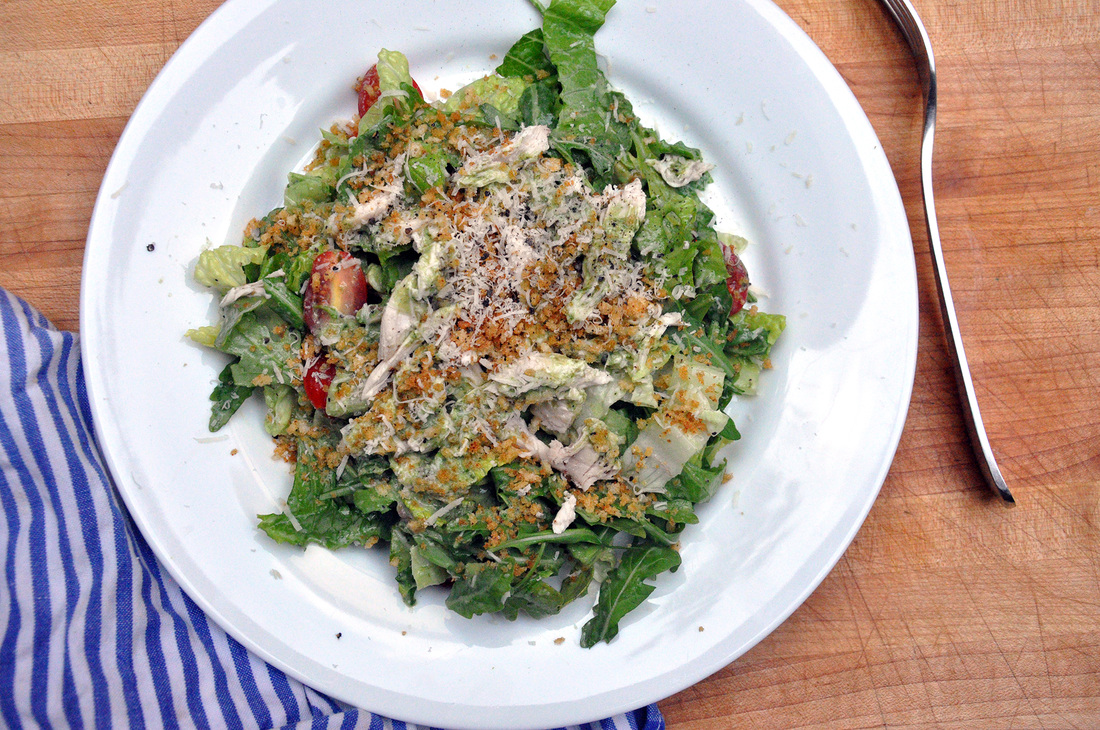 [If you see something missing in this photo it's because I had to ditch the purple kale, it smelled pretty bad – it had gone funky. It’s always a bummer when food goes to waste...] NOTE: If you have some leftover chicken but no buttermilk sauce (so sad) no worries, here’s a basic caesar dressing that’s easy to whip up:
Classic Caesar Dressing [Should make enough for 2-4 salads, depending on serving size]
Blend all the ingredients together in small food processor, except the olive oil, or mash anchovies and pressed garlic together in a mortar and pestle and incorporate all the ingredients – again, except the olive oil. Transfer to a small bowl or measuring cup and slowly drizzle the olive oil while whisking the mixture. The slow drizzle will help the dressing come together and become creamy. If it becomes too thick for your liking you can always add a little water or vinegar to thin it out to be more like a vinaigrette. 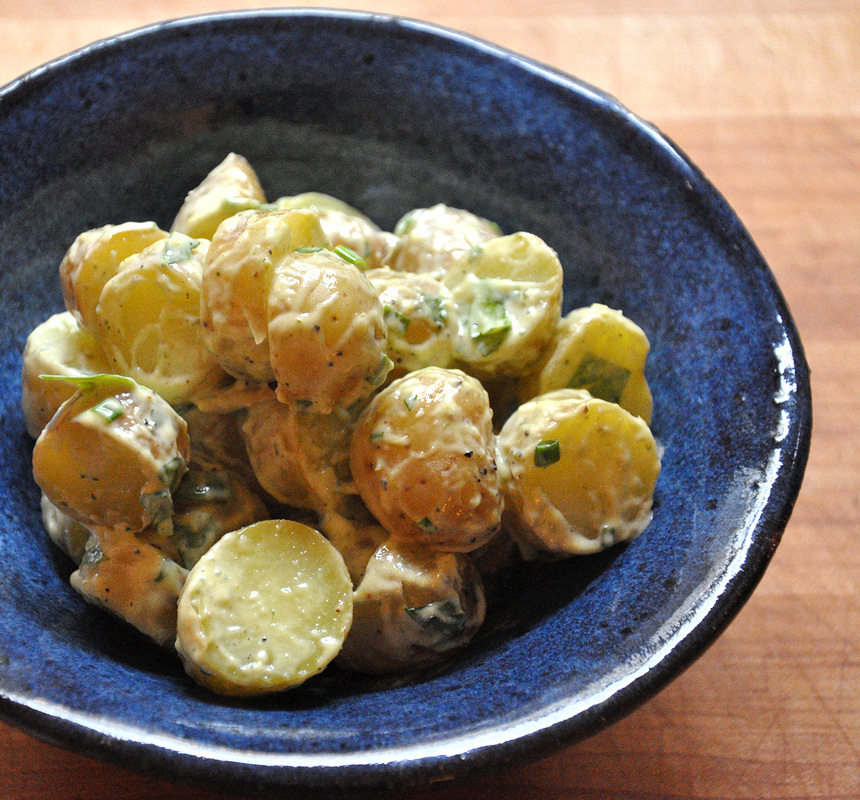 The varieties of potato salads are endless. Some are light and fresh, others tangy and vinegary with chunks of cornichon, some are heavy on the mustard seeds, other the mayo. Everyone has a favorite. I never turn down potato salad; I have to try them all. This general understanding is what brought me to my latest creation. This past summer I was lucky enough to be invited to an out of this world, celebratory, indulgent, week long vacation in Normandy with cherished old friends. We stayed at a chateau…yes I am still pinching myself. There was an abundance of good food…it was one of those experiences where everything simple just tasted better. The bread, the brie, the saucisson, the wine…and apparently the potato salad. One of the nights we stayed in and cooked. Grilled meats, roasted veggies – charcuterie, olives and cheese were plentiful, as were fresh crusty baguettes. And then there was this simple potato salad with the tiniest potatoes I’d ever seen. It was lemony and chivy, a little creamy and gone way to quickly. I never got the recipe – perhaps there wasn’t even one, perhaps it was the creation of whim. Though potato salads are a thing of the summer, I recently I saw these same potatoes in the grocery store and knew what I had to do with them. 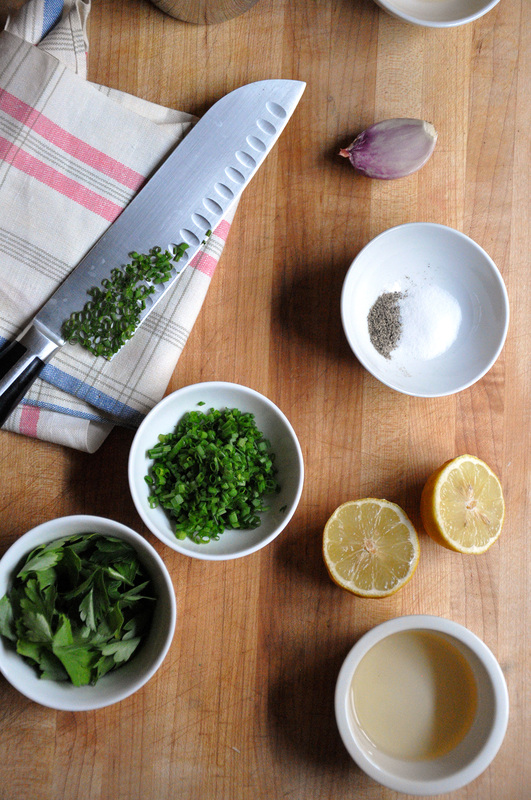 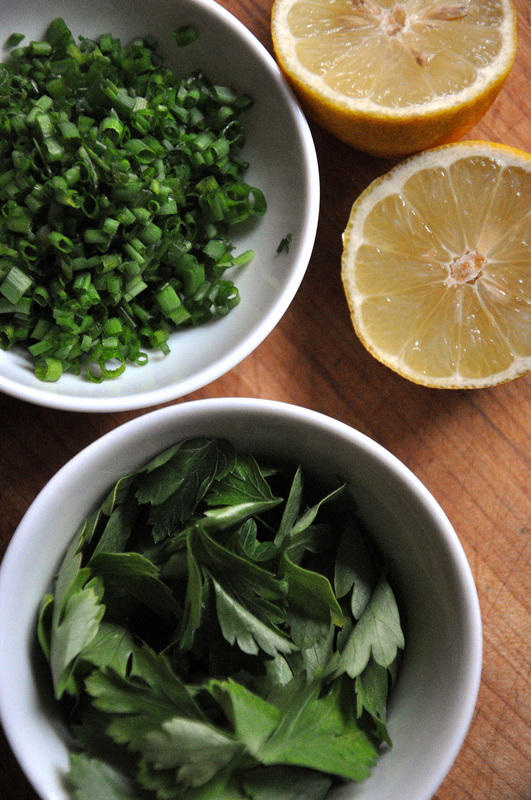 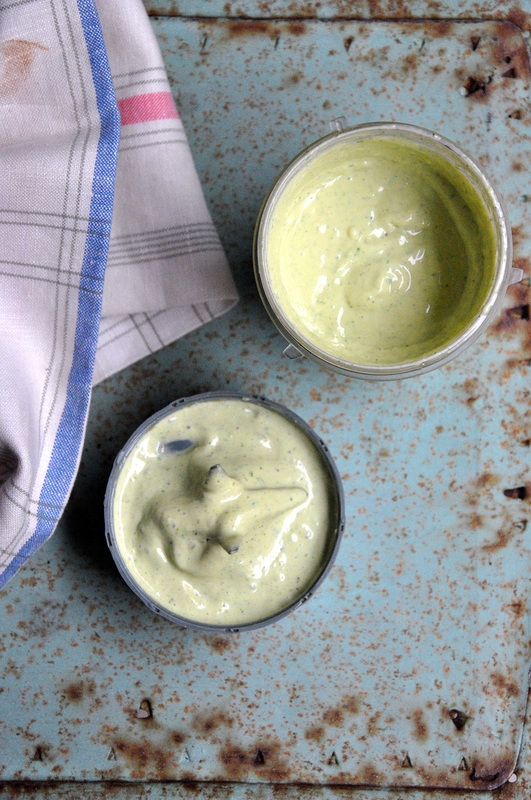 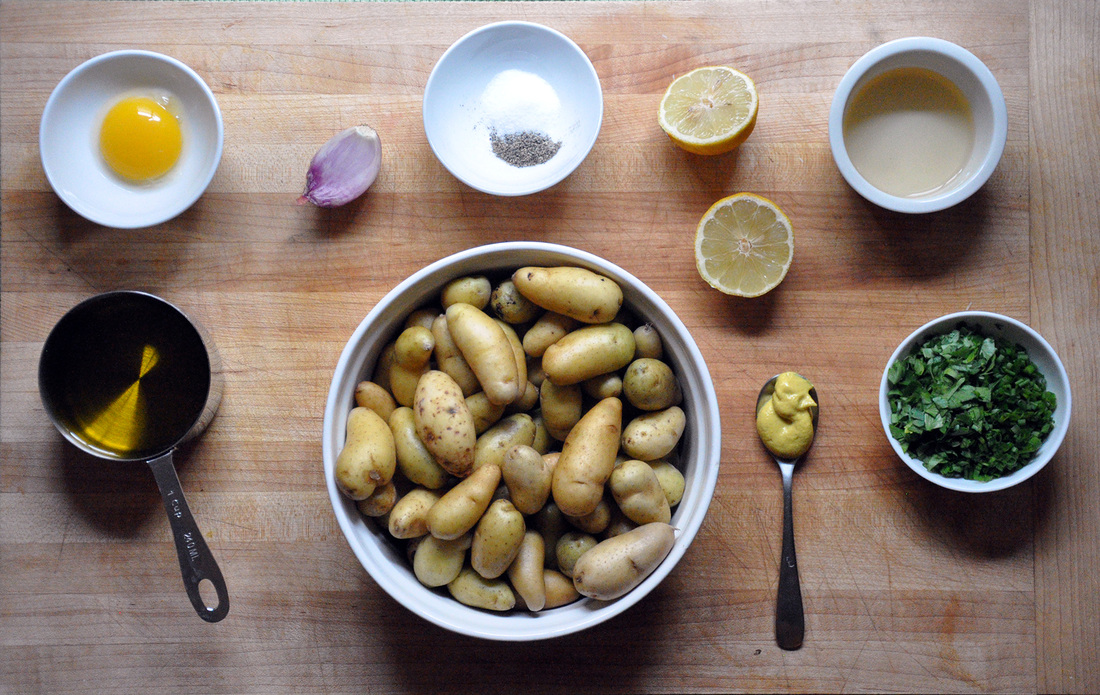 Three Herb Aioli Teeny Tiny Potato Salad PRINT RECIPE [Prep: 10 / Cook: 15 / TOTAL: 25 minutes] [makes about 1 cup aioli and 6 side servings of potato salad]
Start out by washing the teeny tiny potatoes thoroughly under cold water. We will wait to cut them until after they have been cooked. Place potatoes in a large saucepan and fill with cold water until just covered. Salt water generously [at least 1 teaspoon], put on high heat and cover. It should come to a boil after 4 minutes. As soon as this happens lower heat to medium and leave uncovered simmering for 10 minutes. You can check for doneness by piercing the potatoes with the point of a paring knife, it should slide in easily. If you think they are ready, it’s always a good idea to do a taste test first. While the potatoes are coming to a boil, incorporate the peeled and quartered shallot, half of the chives, half of the parsley,1 cup olive oil, 1 egg yolk, 1 teaspoon of salt in a small food processor. Blend for 30 seconds. Now add to the food processor, 2 tablespoons of tarragon vinegar, lemon juice [from one of the lemons], cracked pepper and mustard and blend for 30 seconds. This combination will make an aioli. The longer you blend the thicker it will become. You can always thin it out with some water. This step can also be done by hand. You would whisk together all of the ingredients except for the oil. Once the mixture is well combined, add the olive oil, dribbling it in slowly while whisking the egg yolk and vinegar mixture. The aioli should start to form as the yolk soaks up the oil. When the potatoes are finished remove them from the heat and pour into a colander placed in the sink. Let the potatoes rest in the sink until they are cool enough to handle. If you’re tight on time, you can run cold water over them for 1 minute so they are cool enough to handle faster. Cut the potatoes into ½ inch rounds. Pour juice from the second lemon, 1 tablespoon of tarragon vinegar, and 1 teaspoon salt over the potatoes, mix and let sit for a few minutes. Add the aioli and the chopped parsley and chives, toss well. Taste and season with sea salt or fresh cracked pepper – and enjoy! 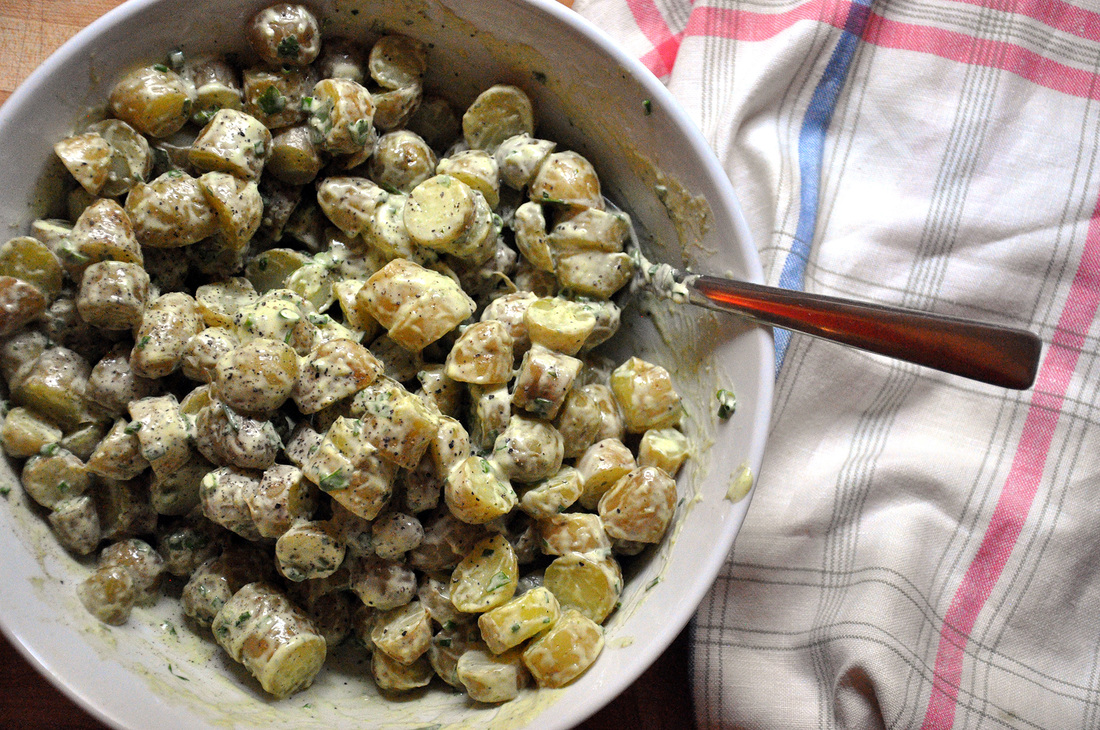  Recently my boyfriend has been on a crepe craze. He’s been whipping them up for years, so I’m a lucky girl. I haven’t tried my hand at them in a while, but the other day I really really wanted some mushroom crepes… My early memories of these thin, delicate pancakes revolve around them being stuffed with mushrooms and cream or baby shrimp and dill. My Swedish grandmother and great aunt would make them when I visited in the summer and fall. It’s not a very strong memory – other parts of my trips to Sweden remain closer to the surface…the cinnamon buns [kanelbullar], gummy candy [goodies], lingonsaft [lingonberry syrup and water] and of course the Äppelkaka – I was young and sweets were always on my mind…Anyways these creamy mushroom crepes have been lingering in my thoughts recently and I had to have them. Unfortunately I don’t have either my grandmother’s or great aunt’s recipe, so with a little help from a Swedish cookbook I sort of come up with my own version. Traditionally the pannkakor med svampfyllning [Swedish pancakes with wild mushroom filling] has just that, wild, fresh picked mushrooms. I had good old white button mushrooms – champignons - on hand. Also the recipe calls for cream; I decided to use some ricotta as well. Add a little lemon, paprika, chives, and onions…and what I ended up with was remarkably close to what I remembered. It was a happy moment. The most amazing thing about crepes is their versatility. You could throw the chives in the crepe batter, instead of the filling, the paprika too. Or save some of the crepes for dessert and make a sweet filling… 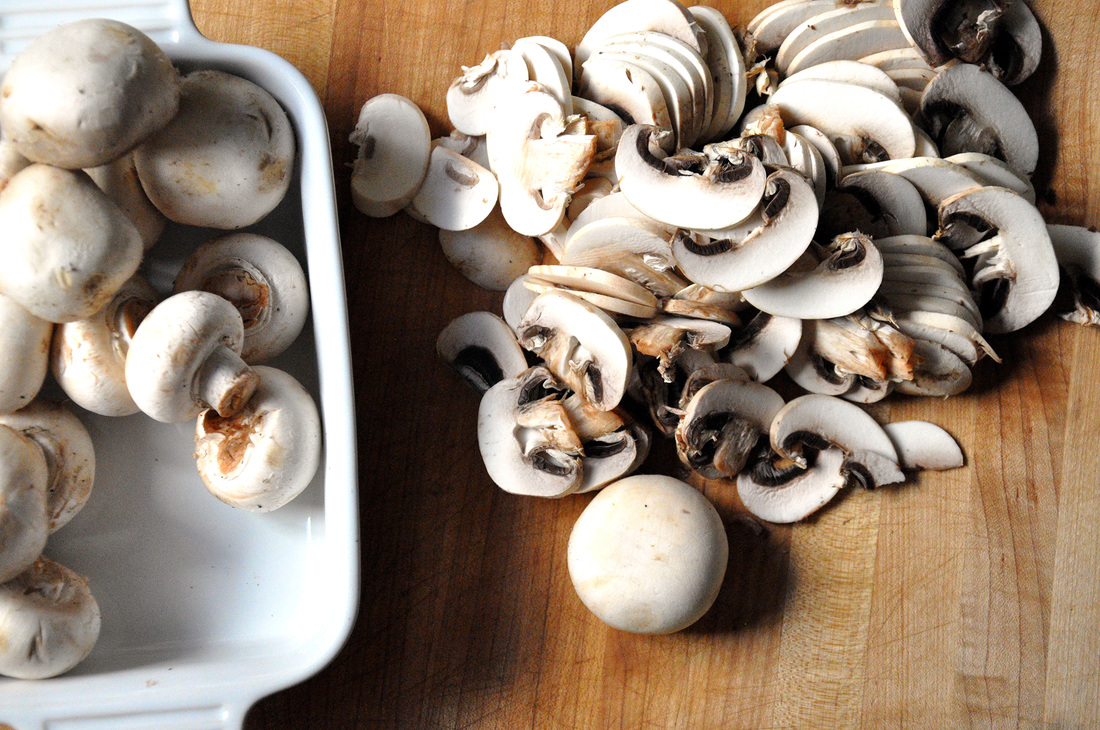 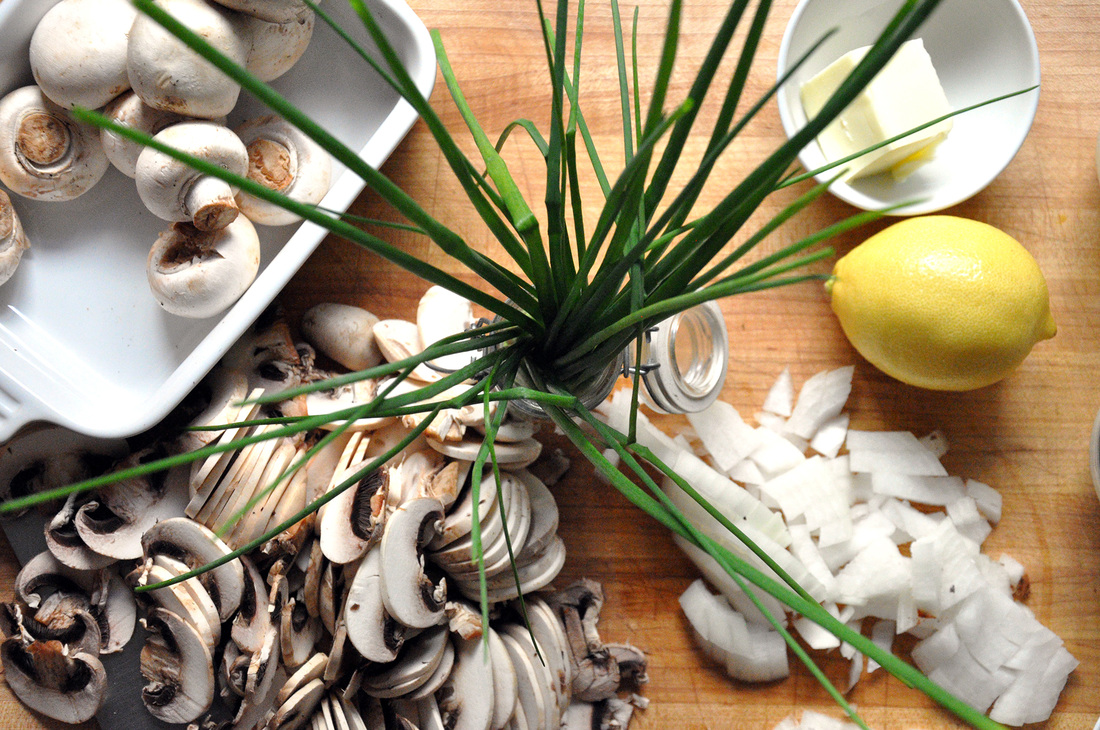 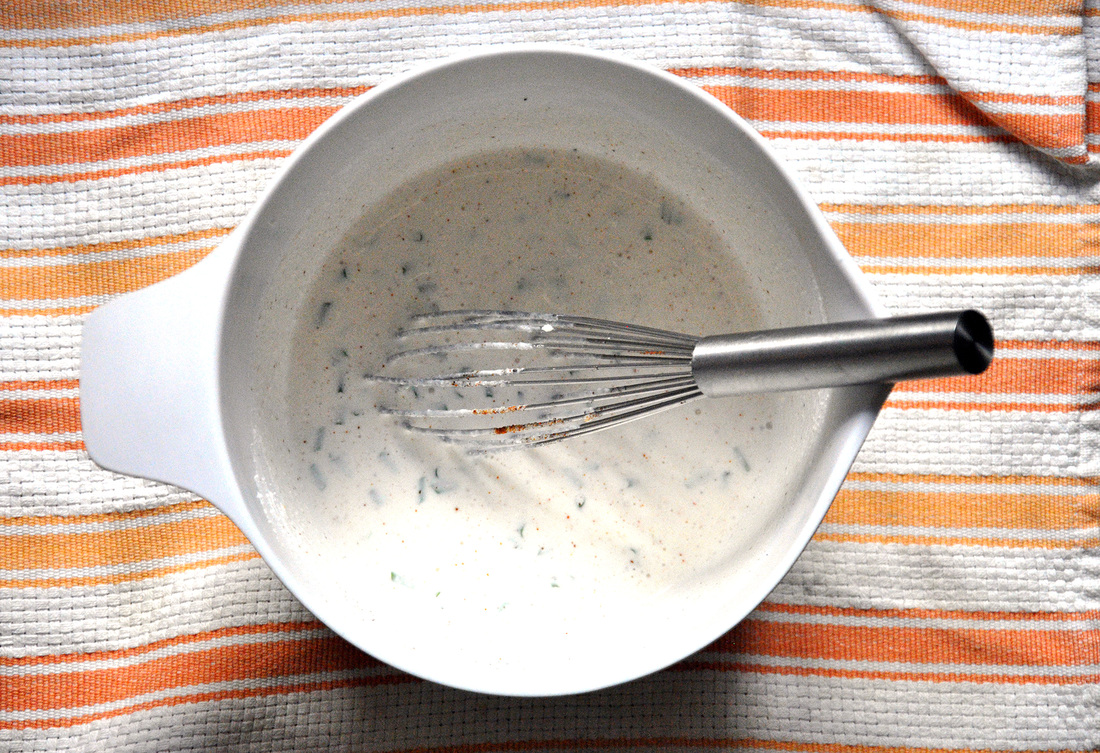 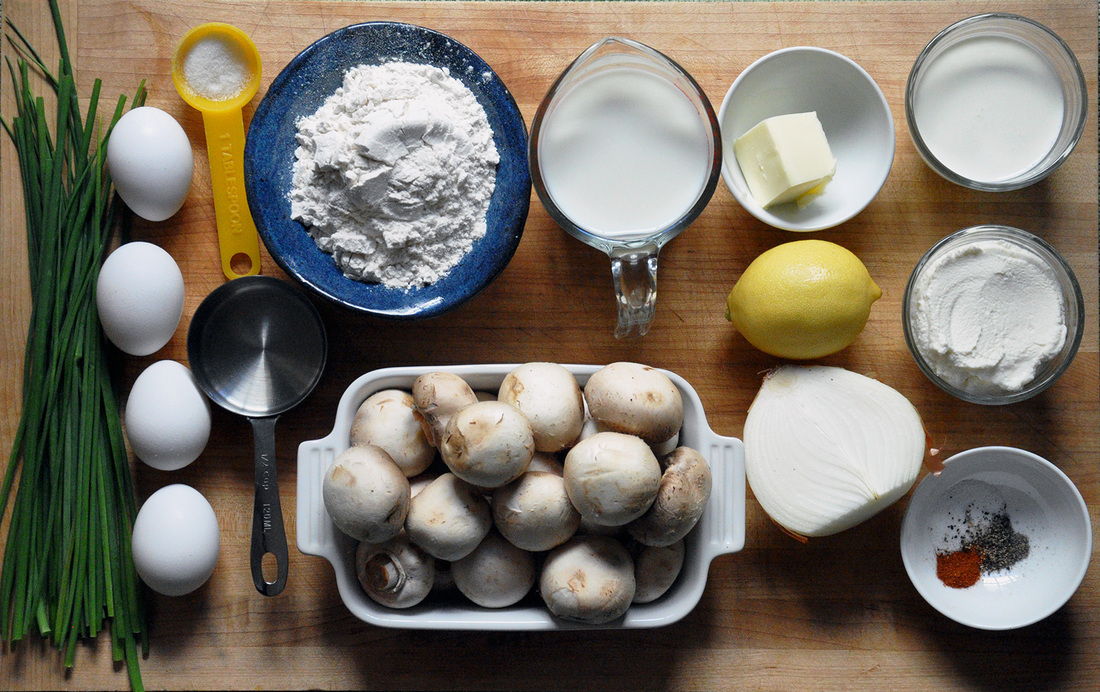 Swedish style crepes with Mushroom Ricotta filling PRINT RECIPE [Prep: 20 minutes / Cook: 25 minutes / TOTAL: 45] [make about 10 crepes] Crepes:
Mushroom Ricotta filling:
To make this crepe batter you’ll need a food processor or blender…then add all of the ingredients and blend! You have your fancy crepe batter ready to go – isn’t it awesome how easy this is. You can keep the batter in the blender and just pour it in to the pan when you are ready to make the crepes. First though, let’s compose part of the mushroom ricotta filling. Combine the ricotta cheese, cream, paprika, chives, lemon juice, salt and pepper – a few grinds of the pepper and a pinch of salt should do. Now whisk this all together and taste. It should have a balanced flavor, not too lemony or salty. The actual making of the crepes can be a little intimidating. Put a sauté over medium heat and add a tablespoon of butter. Make sure to coat the bottom of the pan as well as the sides. Wait until the pan is hot [you can splash a few drops of water to test, it will sizzle when it’s ready] and have a spatula ready. Pour in about a ¼ cup of the batter, or just until the batter almost covers the bottom of the pan. Tilt and rotate the pan so that it is evenly coated with the batter. You will notice that small bubbles rise to the top of the crepe – this is good, it means it is almost ready to flip - depending on how hot the pan is, this could take 1 minute. Take the spatula and gently easy it under the edges of the crepe until you can slide it the whole way around and then ease it towards the center of the crepe. There are a few ways to flip it, you can lift the edge with a spatula and then grab it with your fingertips, or you can try flipping it with the spatula alone. It make take a few tries, but you’ll get the hang of it, and anyways, they don’t need to look perfect – they just need to taste that way. The crepes will need less time on the second side, they should be ready to come out after about 30 seconds. You will need to add a little more butter to the pan as your crepe making process moves along - maybe every third crepe or so. As they finish up you should have a plate nearby that you can transfer them to and cover with a paper towel. You don’t want to cover the crepes with foil, as it will make them soggy.  All that’s left to do is finish the mushroom ricotta sauce. Thinly slice up the mushrooms and dice the onions. You can use the same sauté pan; just add a tablespoon of butter and a tablespoon of olive oil. Once this is hot [again you can tell by splashing a few drops of water into the pan – if there’s a sizzle you are good to go] add the minced onion and sauté for 3 minutes. Then add the mushrooms and sauté for 5 minutes longer. At this point you can a pinch of salt and a few grinds of black pepper. After the 5 minutes is over add the ricotta and cream mix to the sauté pan. Cook this mixture for 2 minutes longer, stirring a few times. To compose the crepe, just spoon a few tablespoons of the mushroom sauce into the crepe, roll it up and garnish with some chives.  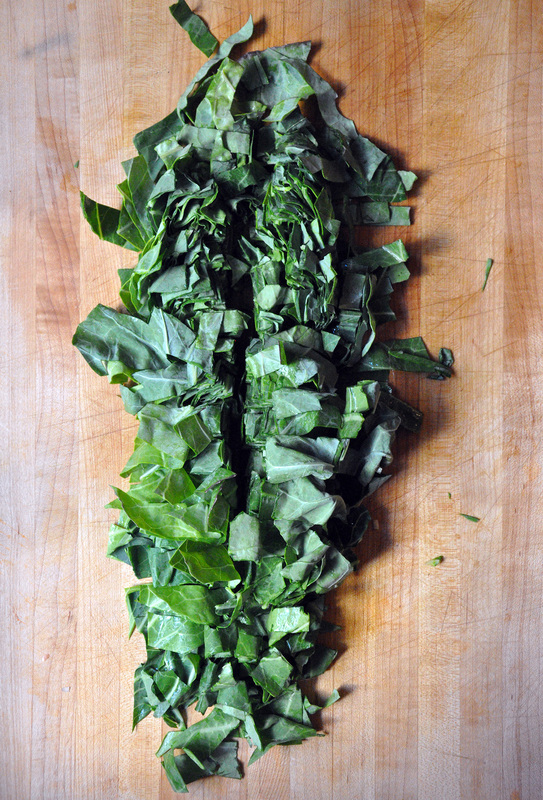 Back when I lived in NYC about 2 ½ years ago…oh dear how time flies…I used to have Sunday night suppers with a close group of friends. One couple in particular would host, their place being the most appropriate, well at least bigger than the 475 square feet that I inhabited with my boyfriend. They also had a backyard, a sheer joy that most new Yorkers do not get to experience often. Anyways, we’d plan these yummy communal meals like pizza, roast pork loin, or Korean dumplings. We’d spend a few hours prepping, cooking and drinking wine…and eventually eating too – really, what else is there? Recently a lot of the cooking for these posts have taken place on Sunday and it’s finally, f i n a l l y, starting to cool down here in Texas. I was thinking of what to make when I remembered my last Sunday night supper – two weeks ago on a trip home visiting my family. I spent a weekend with this couple in Brooklyn and we made a risotto with collard greens. The wife – my culinary cohort of sorts – and I looked at the collard greens she had gotten in a CSA share, both a bit dumbfounded. Was I, the resident “southerner” or at least the closest one to it, supposed to know what to do with it? Um…let’s make a risotto, I said. And my friend, being the wonderful cook she is, already had nearly everything on hand to do so. So we wung it. Winged it. Whatever. We came up with a rocking risotto recipe with collard greens and red peppers. I decided to try it again, except this time I would beef it up with some bacon. While on my way to the grocery store I called my friend to let her know I was cooking a Sunday night supper of my own. She told me that she was as well; hers was to be spaghetti and meatballs. Oh yes, delicious, I said, thinking of the last time we had made it together, stuffing each meatball with a piece of mozzarella. Food embraces, it reminds, it can make friends over 1,500 miles apart feel close – in each other's kitchen with a glass of wine and wrists deep in ground chuck. 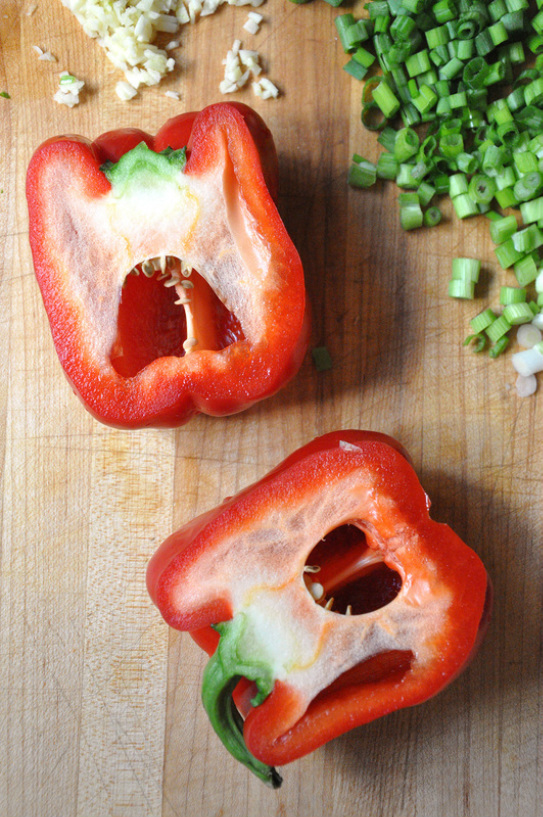 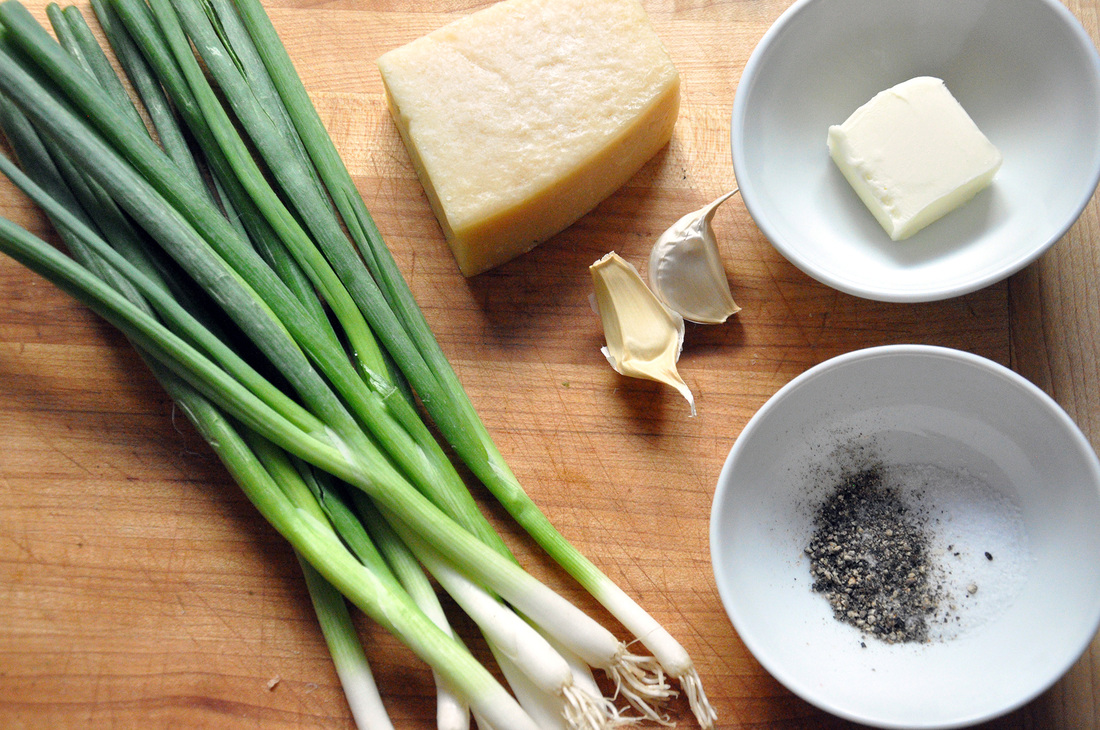
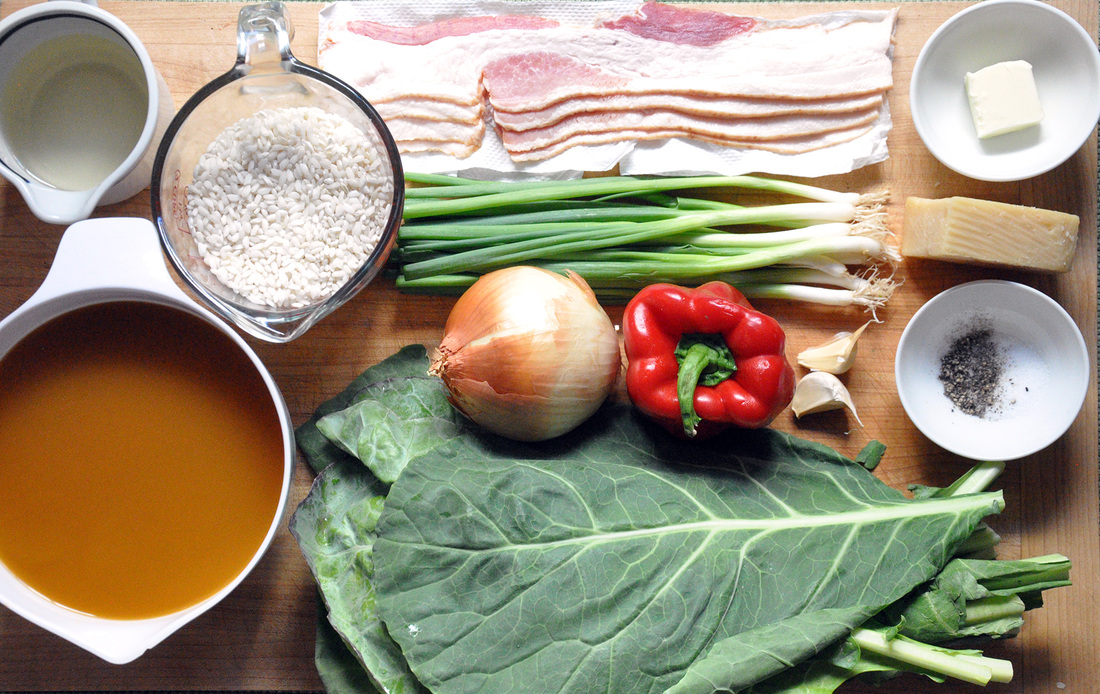 Risotto with Collard Greens, Red Pepper and Bacon PRINT RECIPE [Prep: 30 minutes / Cook: 30 minutes / TOTAL: 60 minutes] [Serves 4 as main course]
So here we go. If you’ve never made risotto do not fear, it’s really quite simple – it just takes a little looking after. It’s a common mistake to think that it takes a long time to make, actually once the prep is all done, it only takes 25-30 minutes! Before you get started with any chopping, pour 5 cups of low sodium broth into a medium sized saucepan. [If you have homemade broth – even better!] I use low sodium because I like to add the salt myself, then I actually now how much is in there. It’s always a good idea to taste the broth and to get a sense of the flavor and saltiness you are working with. Set this to medium-high heat and leave covered. You’ll want this to come to a boil by the time you’re done prepping. This hot broth will be added to the risotto in batches. You’ll also want to grab a larger saucepan, or even a pasta pot, fill it half way with water, put the heat on high and cover it. This is for blanching the collard greens. Take out a large prep bowl and fill it half way with ice – this will become the ice bath for the greens. Now you are all set to start with the chopping! There’s nothing fancy going on here – just try and have the onions and red peppers chopped to approximately the same size. A trick for chopping the onions [which can be used for the garlic as well] is to cut the onion lengthwise and then cut those pieces in half widthwise. Peel the outer layer of skin off; lay the onion down on its flat side so that the root end is on the cutting board, not sticking in the air. Then make long radial cuts all the way to the root leaving about a ¼ inch of the root intact. Then cut perpendicular to those slices all the way up the onion. Now you have perfect uniform chopped pieces. The scallions are easy too. After they’ve been washed, just trim about 2 inches of the greens off of the top and start chopping your way down to about ¼ inch from the white roots. Discard to the tops and roots. The collard greens are super easy to stem; you can use the same method that I’ve suggested for kale, slice the leaf along the stem nearly to the top on each side and pull it out. The collard green leaves are quite stiff and can even just be pulled off of the stem. I like to make a chiffonade of the greens by rolling all the leaves together lengthwise and chopping them cross wise into ribbons. I took this one step further by then making one long slice down the middle length of the roll. I don’t want the slivers of collard greens to be long and unruly in the risotto. By now both of the liquids on the stove top should be boiling. You can turn off the broth and leave it covered; it will stay hot for a while. Toss the collards greens into the boiling water in the pasta pot and add a dash of salt. The greens need to be blanched for 4 minutes. Now is a good time to fill the bowl of ice with cold water. While you are waiting on the greens, take a pair of kitchen scissors or shears and cut the slices of bacon into ½ inch pieces and put the saucepan you’ll be using for the risotto on medium heat. [The ideal saucepan has a wide base about, 10 inches across, and 3-4 inch high sides – so it’s wider than it is high.] Once the greens are done you can either empty the pot over a colander in the sink or transfer the collard greens directly from the pot to the ice bath with a slotted spoon. Let the greens sit while you add the bacon to the saucepan, they should sizzle once they hit the surface of the pan. At this heat it should take about 2 minutes for them to crisp up. Mix them up a few times so both sides are crisp. During this time you should remove the collard greens and spread them out to dry a little on a paper towel. Once the bacon is finished [nice and crispy] transfer them with the slotted spoon to a small plate covered by a paper towel. The bacon fat will be quite hot by now so you should turn the heat down to low. 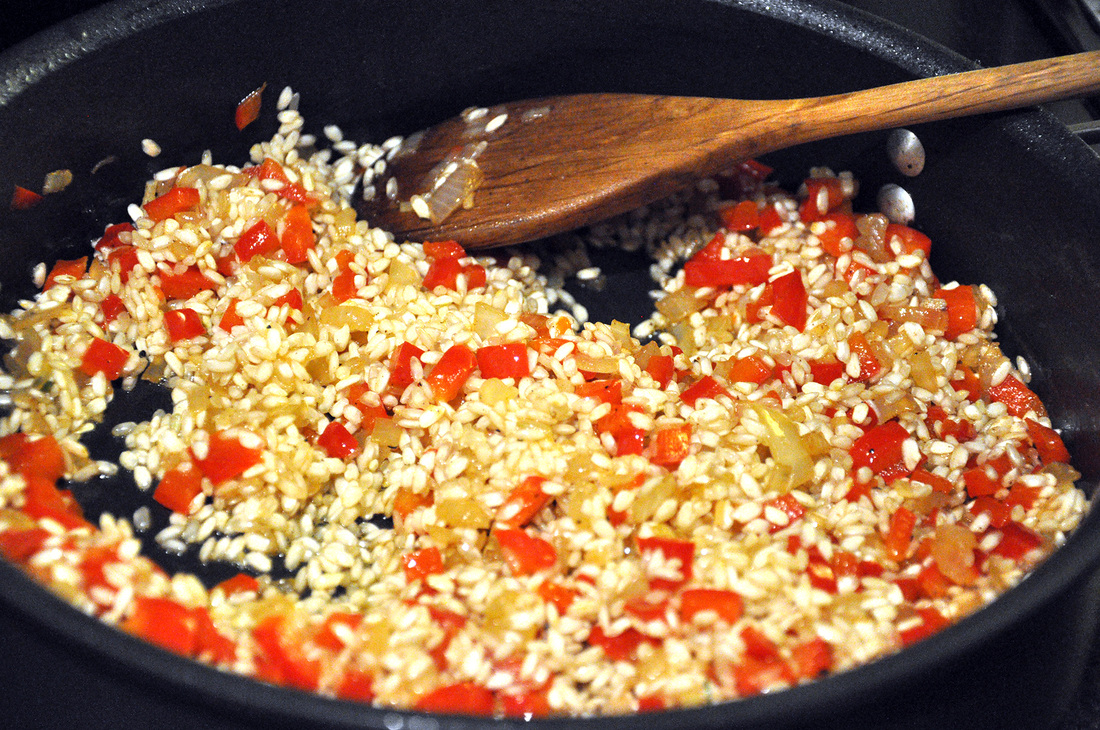 You are now ready to start the risotto! I would take this time to make sure that you have everything ready at hand. Are the wine and rice measured out? Do you have a ladle ready to use to transfer the broth? Is the cheese grated? After checking that all these steps have been taken the bacon fat should be cooled a little and ready to use. To it you should add 1 tablespoon of the butter, the chopped onion and a pinch of salt. Let this sauté, stirring a few times, for about 3 minutes. [I would re-adjust the heat to a medium-low temp.] Once the onions are slightly translucent add the garlic and let sauté for 1 minute, stirring a few times. Add the red pepper and let sauté 3 more minutes, again stirring a few times. [This base for the risotto should be quite fragrant and the kitchen should smell delicious.] Now it’s time to add the rice – mix it in well so that everything has a nice coat of the butter and bacon fat. Sauté the risotto for about 1 minute, stirring the whole time so the rice doesn’t stick to the bottom of the pan. Now add the wine and turn the heat to medium, give the ingredients a good stir and let sit for 1 minute. Ladle in 2 scoops of the broth, add the collard greens and another pinch of salt, and mix well. From this point the risotto shouldn’t take more than 20 minutes. You’ll want to add 2 more scoops of broth about every 3 minutes. Stir regularly. You’ll see when you aren’t stirring that the liquid rises to the top and bubbles. This is okay but you don’t want to let it sit for too long. You never want it to dry out or stick to the bottom. You’ll know it’s ready for more broth when you stir and pull the risotto mixture from the bottom of the pan and there’s no liquid. Over time you’ll recognize the signs. As the risotto cooks the Arborio rice start to plump up a little and the liquid will become creamy. After about 15 minutes you should taste the rice for salt and flavor. Careful – it will be very hot. It will still be al dente, which is to be expected, but how about salt? Even though the broth was low-sodium we did start out this risotto with bacon fat, so it may not need a lot of extra salt – also remember we will be adding some parmesan cheese, which adds it’s own unique salty flavor. It’s easier to add salt than take it out. It’s nice to serve a dish like this on a warmed plate; you can heat the oven to 250 and put the plates in there for about 8 minutes. Keep tasting the risotto for doneness. There should still be a slight bite to the rice, but it shouldn’t be chewy. It will be absorbing the liquid less quickly. At about 20 minutes it may be ready for the last step. You should be nearly done with the broth by this time, maybe 1-2 ladleful’s left – transfer this to the risotto, as well as 2/3rds of the bacon, the ½ cup of parmesan cheese, 1 tablespoon of butter, and a few grinds of black pepper. Mix well; turn off the heat, cover, and let sit for 2 minutes. While you are waiting, finely chop up the rest of the bacon into small bits. Your risotto is finished! It should be creamy and even a little runny. Serve it on the warmed plate [not a bowl] so that it can spread out. Top it off with the chopped scallions, bacon bits, and some fresh ground pepper. Don’t forget the white wine…and enjoy. 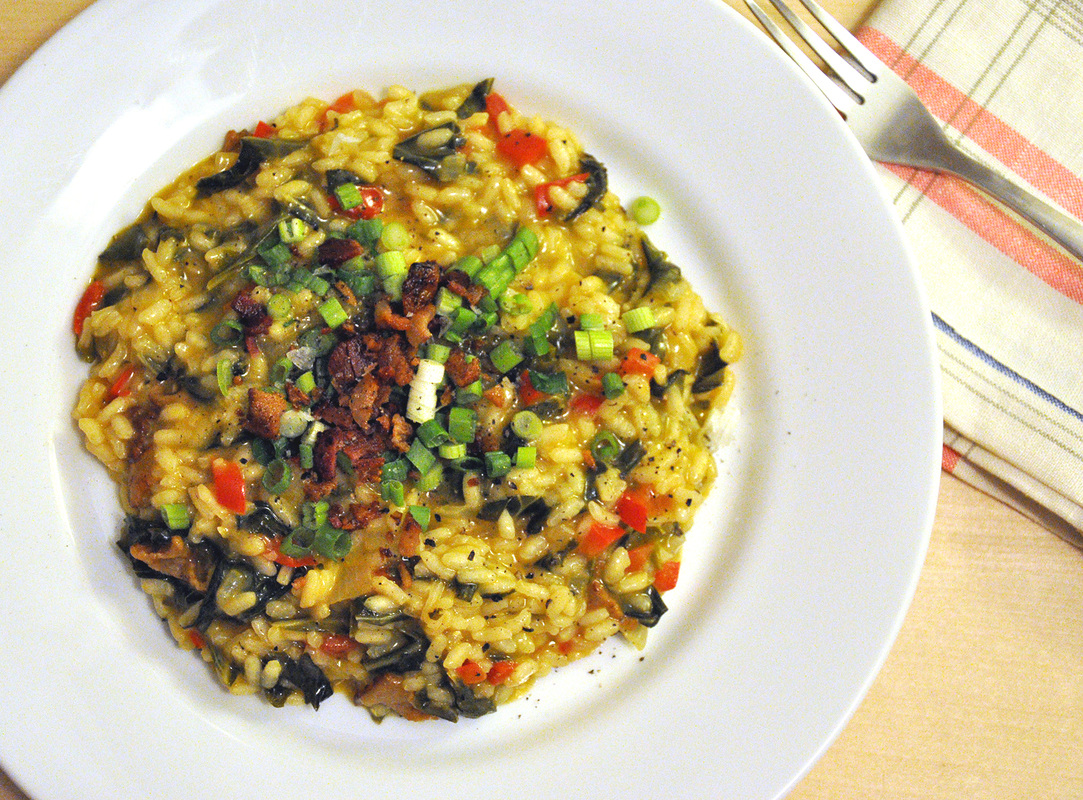 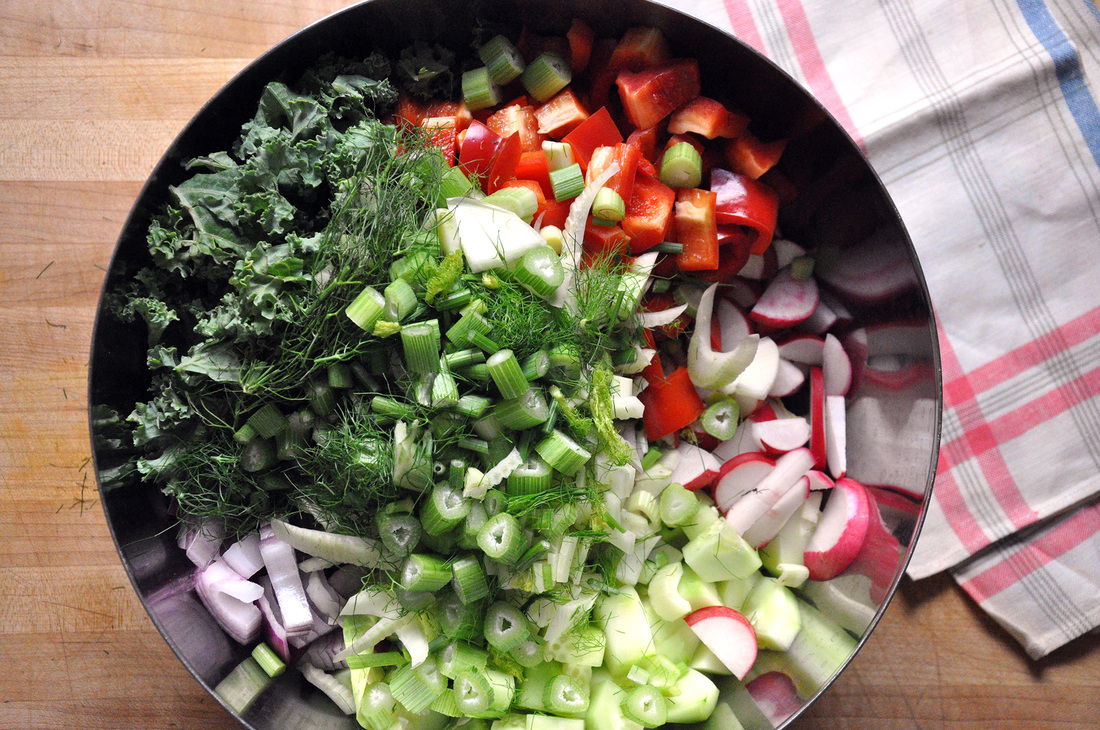 This ain’t no side salad. If you’ve never had fennel before, then welcome. What about radishes? My love affair with fennel began a few years back. My mother had roasted a whole chicken with carrots, onions, and this thing called fennel. When roasted in the oven it melts in your mouth and makes you feel good. It took me a while to try fennel raw. Why? Because it smelled just like licorice, which, despite my Swedish heritage, I cannot stand. Fennel raw is a whole other food than when its cooked. When raw it’s sweet and tough, it’s flavor a far off distant twice-removed cousin of licorice. Don’t get me wrong, it’s a strong flavor and I sometimes use it up a little at a time, like a topping…on pizza, or a burger… Ok now onto anchovies. I promise that even though you say you don’t like ‘em, you’ve eaten something with anchovies and just had no idea. I bet you even said….hmm there’s some ingredient I just can’t place but this is delicious. Well if you’ve eaten at my house you have. Simply put, they are super awesome sea-saltiness in a can. So start using them! Salads like this help you to remember how vegetables taste fresh. Radishes are peppery and bright, red bell peppers are sweet and happy. Bok choy has that mild cabbage flavor, but it’s packed with water like cucumbers – which has that super calming scent. Red onions are sharp, endives are bitter and kale is, well it just tastes so darn healthy. So all together it’s a pretty awesome medley. A salad can be a meal. Here’s the proof. 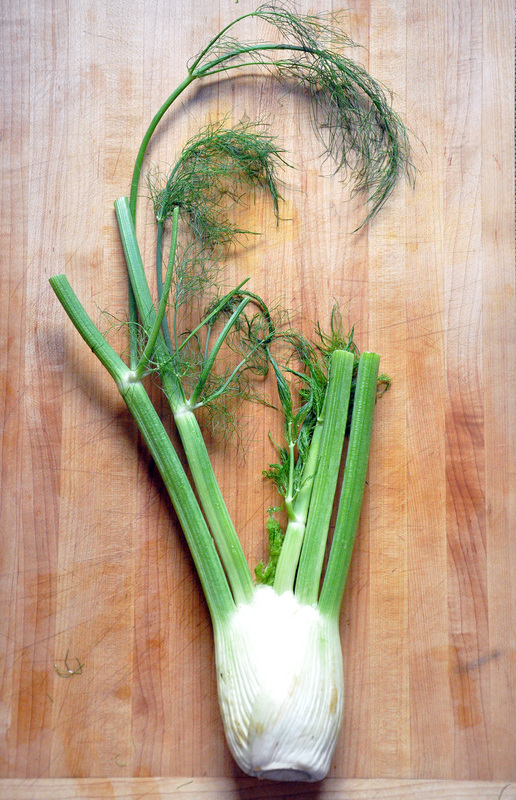  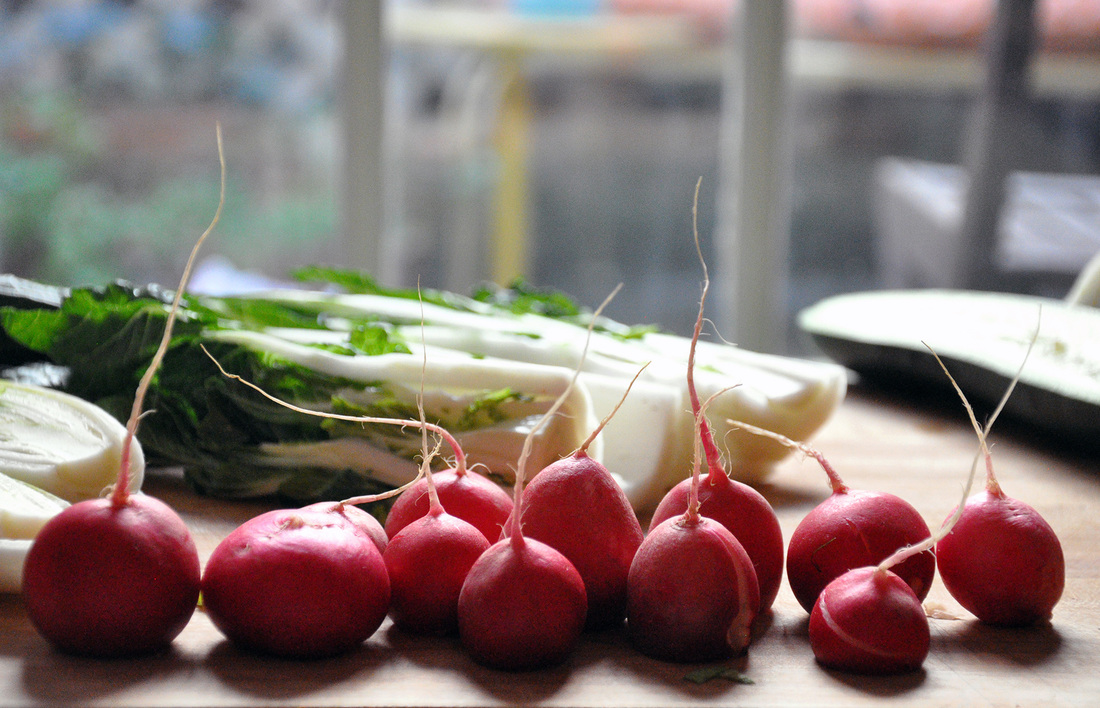 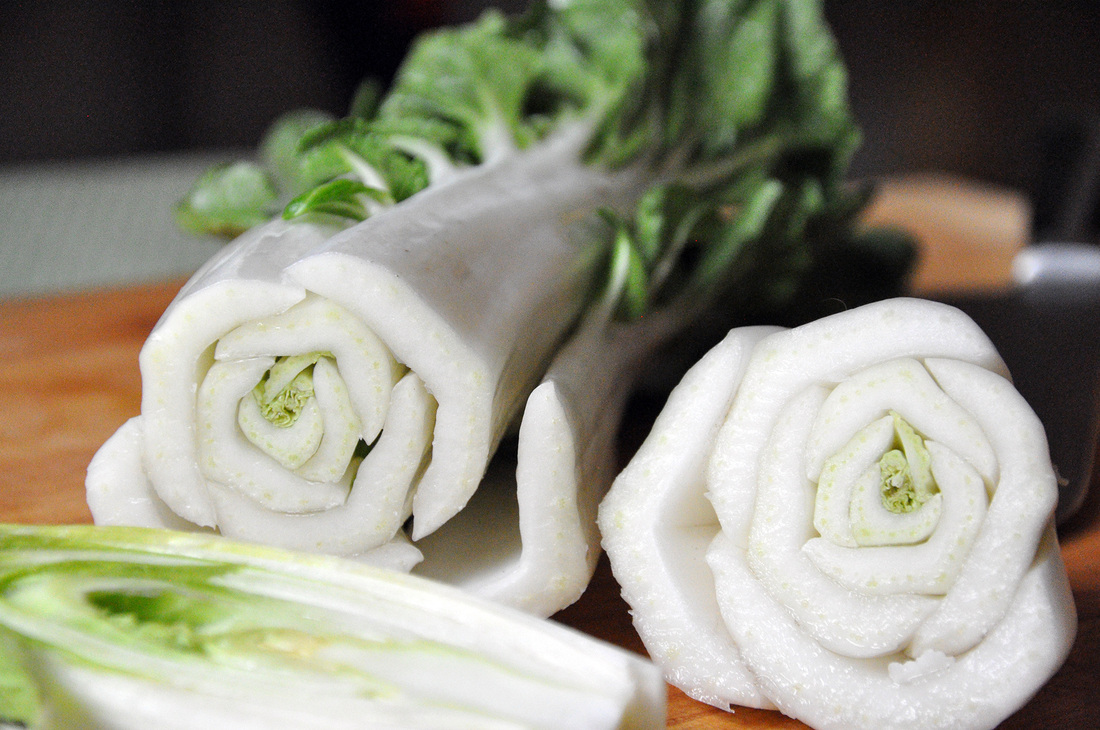 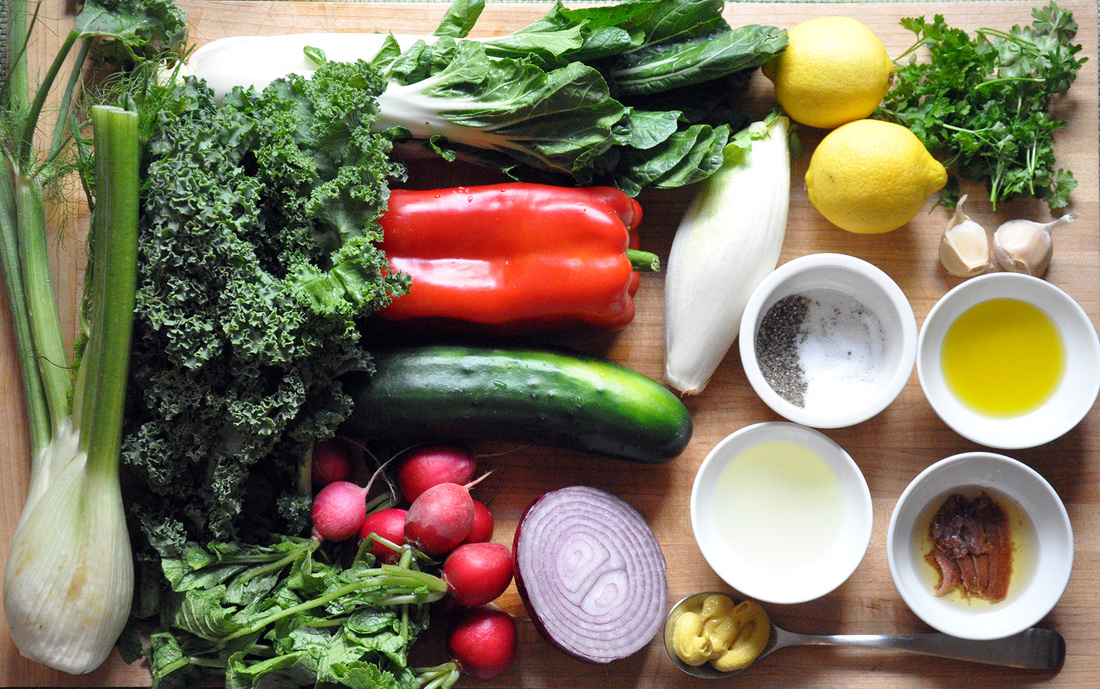 Fennel salad with Garlic Anchovy dressing PRINT RECIPE [Prep: 30 minutes / TOTAL: 30 minutes] [Serves 6] Salad:
Dressing: [yields almost 1 cup]
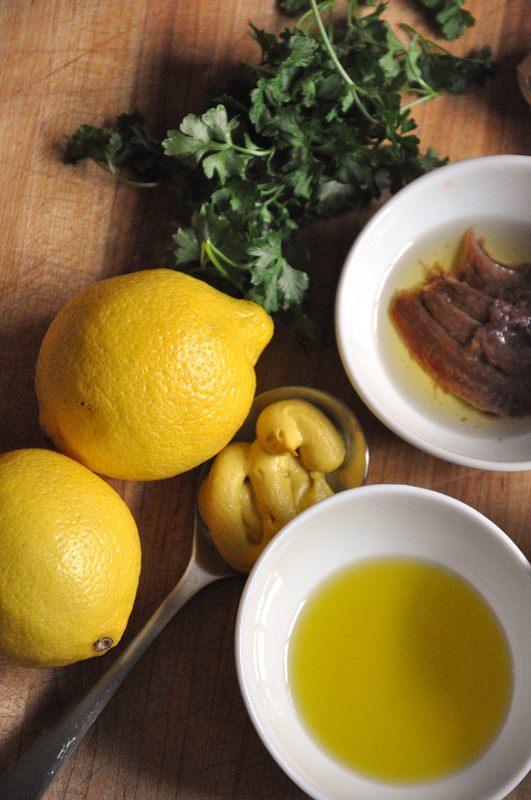 This is a hearty hearty salad. It holds up so well that I even think it’s better the next day. It goes well with a hunk of crusty bread [or with some left over mac and cheese] but is also pretty satisfying on its own. There’s really not much to the prep for this salad. If you’ve never worked with fennel before, no worries, it’s very easy. Start by rinsing the whole root, making sure to get rid of any dirt or grit that likes to get stuck in the grooves. Then pull off any of the delicate leafy part that looks dark, mushy, or rotten. Take your knife and peel off any brown spots at the bulb and chop off any dried ends of the stalk. Now cut that sucker in half lengthwise and de-core it [the tough part in the center]. Do this by making two deep slices on either side of the core, like an upside down “V” and then pull the core out with your fingers. This part is tough and not fun to eat raw. De-core the endive the same way. The kale should be washed and de-stemmed – just slice the leaf along the stem nearly to the top on each side, discard and then chop up the rest. The outer leaves of the bok choy can look a little worse for the wear, you can throw those out, slice about 2 inches off the bottom and you are good to start chopping. If you are using baby bok choy, discard sparingly since there isn’t much to these little guys and only cut about a ½ inch off the bottom. The radishes need to have their leaves and roots removed and then they are ready to chop. The prep for the rest of the veggies is pretty straight forward. There will be so many textures to this salad so I like to chop everything roughly the same size. If you cut everything really small it becomes more of a slaw. Now onto the dressing. I toss all of the ingredients into a small food processor, any kind will work. I like to press the garlic cloves into this mixture so that there are no chunks in the dressing. Now all it needs is about 15 second of blending. This dressing is very lemony and zesty; if it’s a little strong for you, add a little more olive oil. 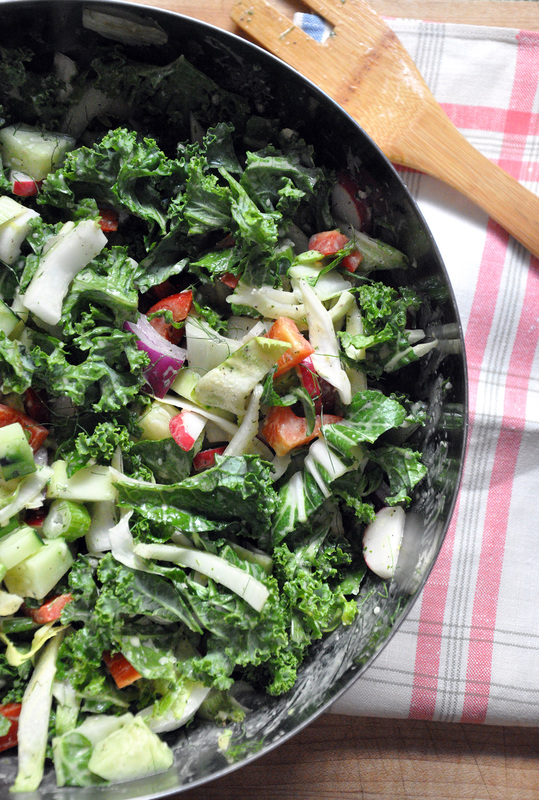 |
All
Stuff I follow...
Not Without Salt
My New Roots Sprouted Kitchen Thug Kitchen Lady and Pups A CUP OF JO The Daily Meal Melissa Clark ...always 3191 Miles Apart The Sartorialist Garance Dore The Nourished Kitchen Archives
October 2014
|


 RSS Feed