 Back when I lived in NYC about 2 ½ years ago…oh dear how time flies…I used to have Sunday night suppers with a close group of friends. One couple in particular would host, their place being the most appropriate, well at least bigger than the 475 square feet that I inhabited with my boyfriend. They also had a backyard, a sheer joy that most new Yorkers do not get to experience often. Anyways, we’d plan these yummy communal meals like pizza, roast pork loin, or Korean dumplings. We’d spend a few hours prepping, cooking and drinking wine…and eventually eating too – really, what else is there? Recently a lot of the cooking for these posts have taken place on Sunday and it’s finally, f i n a l l y, starting to cool down here in Texas. I was thinking of what to make when I remembered my last Sunday night supper – two weeks ago on a trip home visiting my family. I spent a weekend with this couple in Brooklyn and we made a risotto with collard greens. The wife – my culinary cohort of sorts – and I looked at the collard greens she had gotten in a CSA share, both a bit dumbfounded. Was I, the resident “southerner” or at least the closest one to it, supposed to know what to do with it? Um…let’s make a risotto, I said. And my friend, being the wonderful cook she is, already had nearly everything on hand to do so. So we wung it. Winged it. Whatever. We came up with a rocking risotto recipe with collard greens and red peppers. I decided to try it again, except this time I would beef it up with some bacon. While on my way to the grocery store I called my friend to let her know I was cooking a Sunday night supper of my own. She told me that she was as well; hers was to be spaghetti and meatballs. Oh yes, delicious, I said, thinking of the last time we had made it together, stuffing each meatball with a piece of mozzarella. Food embraces, it reminds, it can make friends over 1,500 miles apart feel close – in each other's kitchen with a glass of wine and wrists deep in ground chuck. 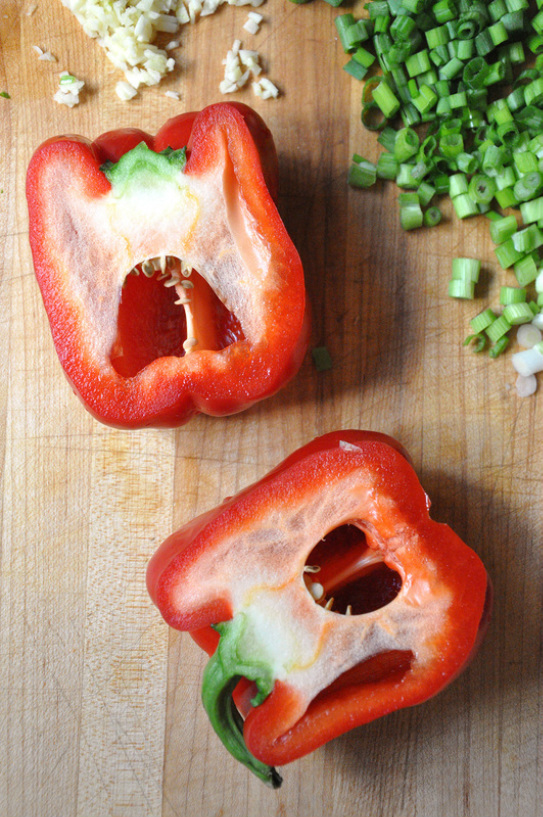 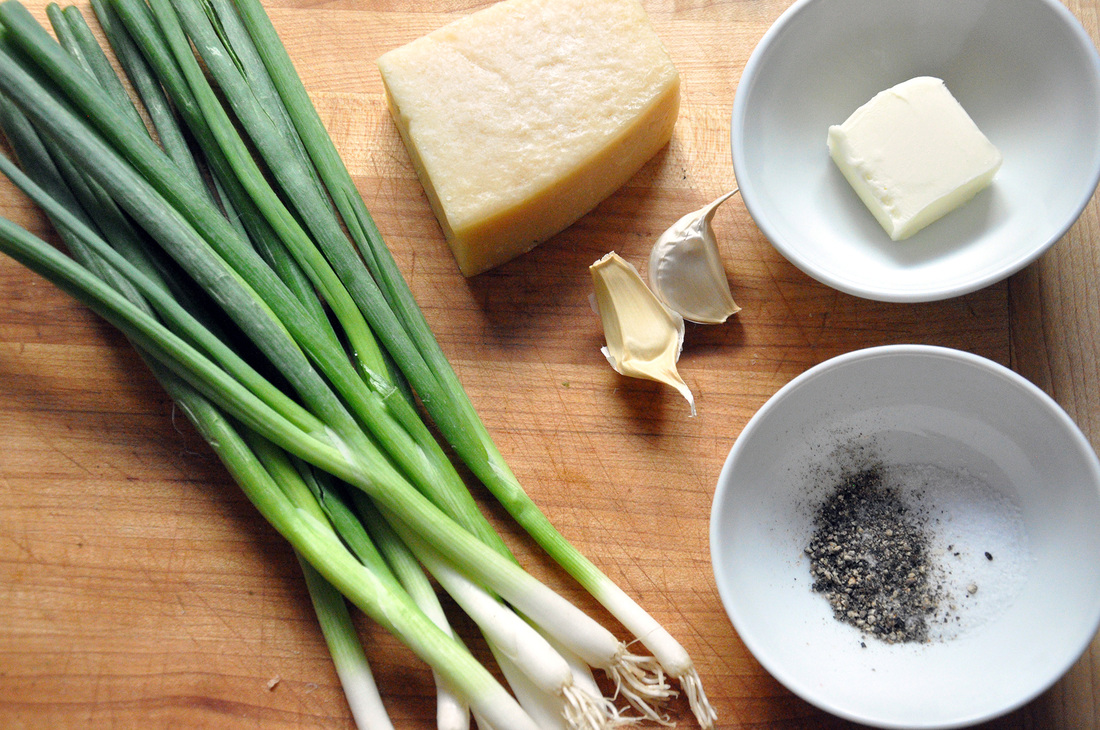
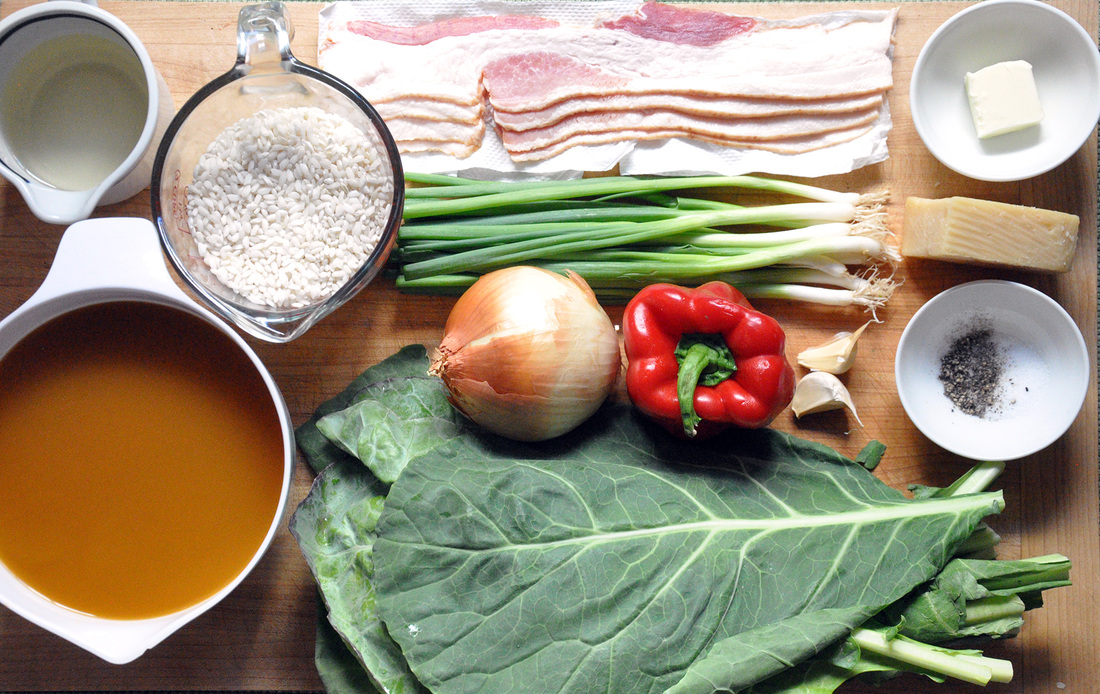 Risotto with Collard Greens, Red Pepper and Bacon PRINT RECIPE [Prep: 30 minutes / Cook: 30 minutes / TOTAL: 60 minutes] [Serves 4 as main course]
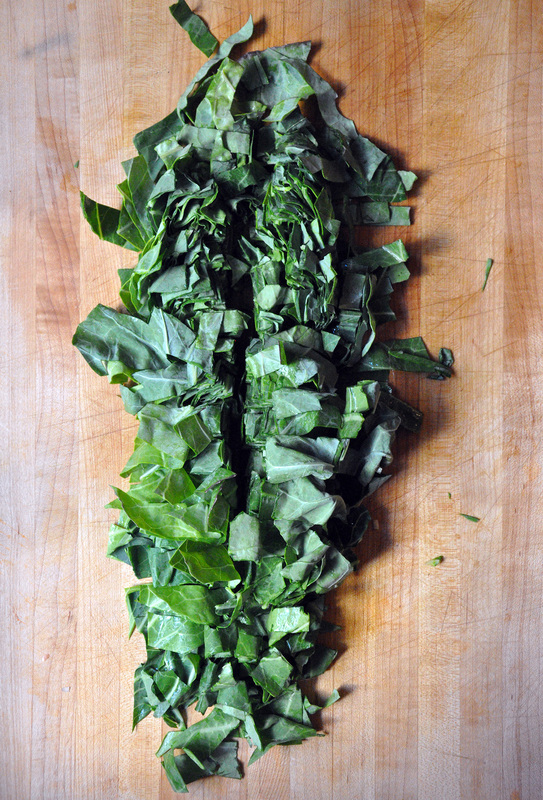
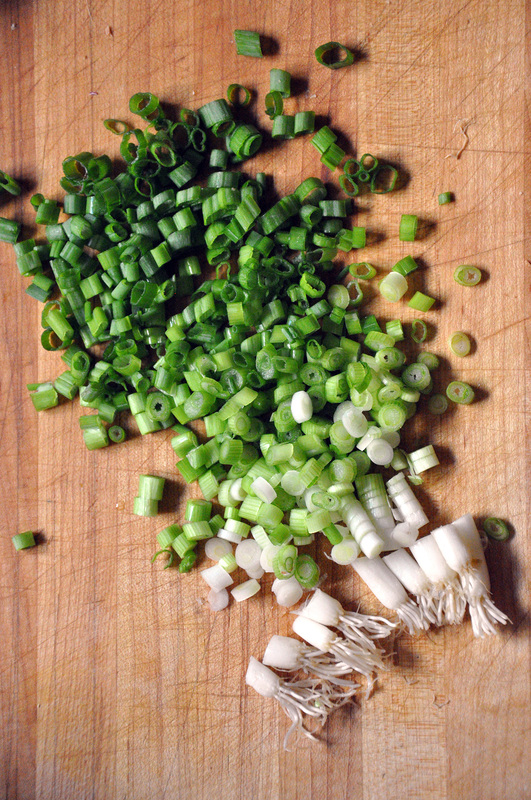
So here we go. If you’ve never made risotto do not fear, it’s really quite simple – it just takes a little looking after. It’s a common mistake to think that it takes a long time to make, actually once the prep is all done, it only takes 25-30 minutes! Before you get started with any chopping, pour 5 cups of low sodium broth into a medium sized saucepan. [If you have homemade broth – even better!] I use low sodium because I like to add the salt myself, then I actually now how much is in there. It’s always a good idea to taste the broth and to get a sense of the flavor and saltiness you are working with. Set this to medium-high heat and leave covered. You’ll want this to come to a boil by the time you’re done prepping. This hot broth will be added to the risotto in batches. You’ll also want to grab a larger saucepan, or even a pasta pot, fill it half way with water, put the heat on high and cover it. This is for blanching the collard greens. Take out a large prep bowl and fill it half way with ice – this will become the ice bath for the greens. Now you are all set to start with the chopping! There’s nothing fancy going on here – just try and have the onions and red peppers chopped to approximately the same size. A trick for chopping the onions [which can be used for the garlic as well] is to cut the onion lengthwise and then cut those pieces in half widthwise. Peel the outer layer of skin off; lay the onion down on its flat side so that the root end is on the cutting board, not sticking in the air. Then make long radial cuts all the way to the root leaving about a ¼ inch of the root intact. Then cut perpendicular to those slices all the way up the onion. Now you have perfect uniform chopped pieces. The scallions are easy too. After they’ve been washed, just trim about 2 inches of the greens off of the top and start chopping your way down to about ¼ inch from the white roots. Discard to the tops and roots. The collard greens are super easy to stem; you can use the same method that I’ve suggested for kale, slice the leaf along the stem nearly to the top on each side and pull it out. The collard green leaves are quite stiff and can even just be pulled off of the stem. I like to make a chiffonade of the greens by rolling all the leaves together lengthwise and chopping them cross wise into ribbons. I took this one step further by then making one long slice down the middle length of the roll. I don’t want the slivers of collard greens to be long and unruly in the risotto. By now both of the liquids on the stove top should be boiling. You can turn off the broth and leave it covered; it will stay hot for a while. Toss the collards greens into the boiling water in the pasta pot and add a dash of salt. The greens need to be blanched for 4 minutes. Now is a good time to fill the bowl of ice with cold water. While you are waiting on the greens, take a pair of kitchen scissors or shears and cut the slices of bacon into ½ inch pieces and put the saucepan you’ll be using for the risotto on medium heat. [The ideal saucepan has a wide base about, 10 inches across, and 3-4 inch high sides – so it’s wider than it is high.] Once the greens are done you can either empty the pot over a colander in the sink or transfer the collard greens directly from the pot to the ice bath with a slotted spoon. Let the greens sit while you add the bacon to the saucepan, they should sizzle once they hit the surface of the pan. At this heat it should take about 2 minutes for them to crisp up. Mix them up a few times so both sides are crisp. During this time you should remove the collard greens and spread them out to dry a little on a paper towel. Once the bacon is finished [nice and crispy] transfer them with the slotted spoon to a small plate covered by a paper towel. The bacon fat will be quite hot by now so you should turn the heat down to low. 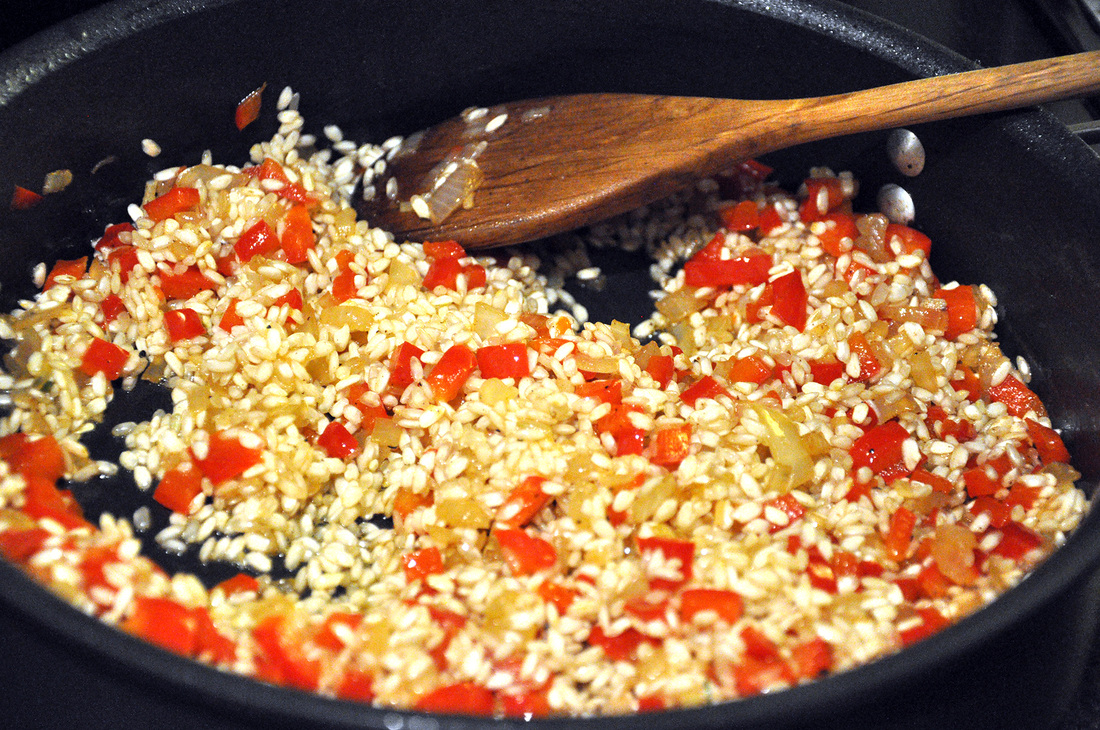 You are now ready to start the risotto! I would take this time to make sure that you have everything ready at hand. Are the wine and rice measured out? Do you have a ladle ready to use to transfer the broth? Is the cheese grated? After checking that all these steps have been taken the bacon fat should be cooled a little and ready to use. To it you should add 1 tablespoon of the butter, the chopped onion and a pinch of salt. Let this sauté, stirring a few times, for about 3 minutes. [I would re-adjust the heat to a medium-low temp.] Once the onions are slightly translucent add the garlic and let sauté for 1 minute, stirring a few times. Add the red pepper and let sauté 3 more minutes, again stirring a few times. [This base for the risotto should be quite fragrant and the kitchen should smell delicious.] Now it’s time to add the rice – mix it in well so that everything has a nice coat of the butter and bacon fat. Sauté the risotto for about 1 minute, stirring the whole time so the rice doesn’t stick to the bottom of the pan. Now add the wine and turn the heat to medium, give the ingredients a good stir and let sit for 1 minute. Ladle in 2 scoops of the broth, add the collard greens and another pinch of salt, and mix well. From this point the risotto shouldn’t take more than 20 minutes. You’ll want to add 2 more scoops of broth about every 3 minutes. Stir regularly. You’ll see when you aren’t stirring that the liquid rises to the top and bubbles. This is okay but you don’t want to let it sit for too long. You never want it to dry out or stick to the bottom. You’ll know it’s ready for more broth when you stir and pull the risotto mixture from the bottom of the pan and there’s no liquid. Over time you’ll recognize the signs. As the risotto cooks the Arborio rice start to plump up a little and the liquid will become creamy. After about 15 minutes you should taste the rice for salt and flavor. Careful – it will be very hot. It will still be al dente, which is to be expected, but how about salt? Even though the broth was low-sodium we did start out this risotto with bacon fat, so it may not need a lot of extra salt – also remember we will be adding some parmesan cheese, which adds it’s own unique salty flavor. It’s easier to add salt than take it out. It’s nice to serve a dish like this on a warmed plate; you can heat the oven to 250 and put the plates in there for about 8 minutes. Keep tasting the risotto for doneness. There should still be a slight bite to the rice, but it shouldn’t be chewy. It will be absorbing the liquid less quickly. At about 20 minutes it may be ready for the last step. You should be nearly done with the broth by this time, maybe 1-2 ladleful’s left – transfer this to the risotto, as well as 2/3rds of the bacon, the ½ cup of parmesan cheese, 1 tablespoon of butter, and a few grinds of black pepper. Mix well; turn off the heat, cover, and let sit for 2 minutes. While you are waiting, finely chop up the rest of the bacon into small bits. Your risotto is finished! It should be creamy and even a little runny. Serve it on the warmed plate [not a bowl] so that it can spread out. Top it off with the chopped scallions, bacon bits, and some fresh ground pepper. Don’t forget the white wine…and enjoy. 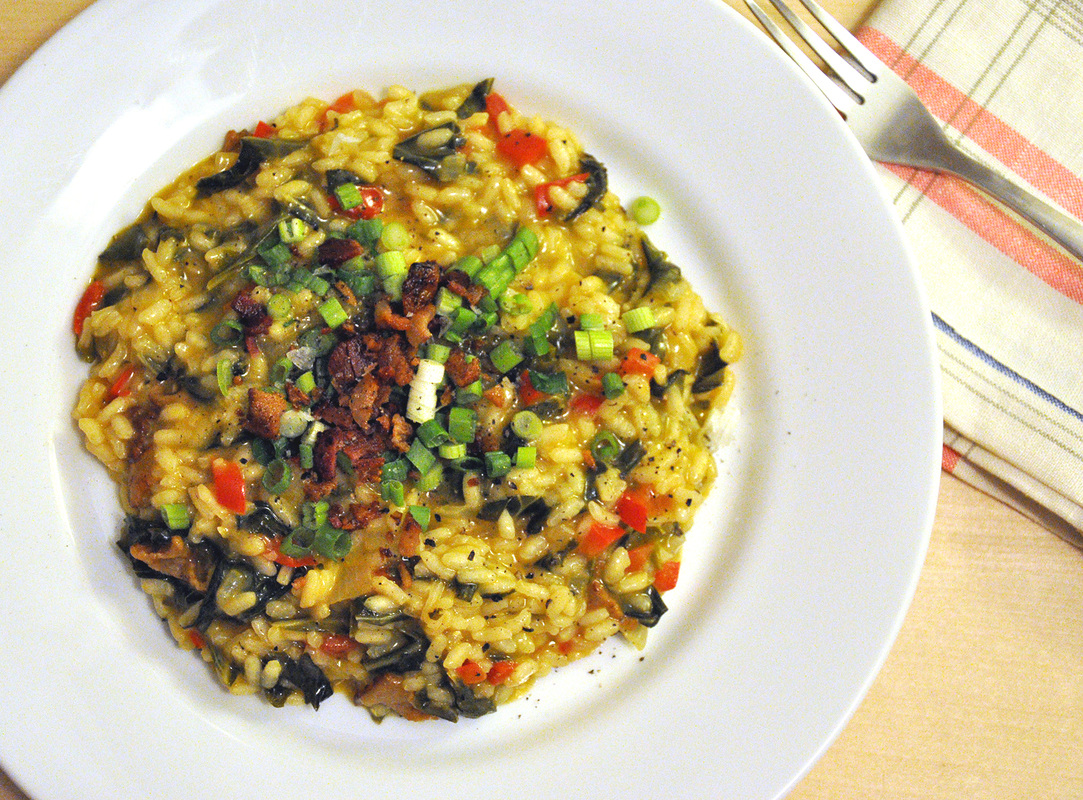
10 Comments
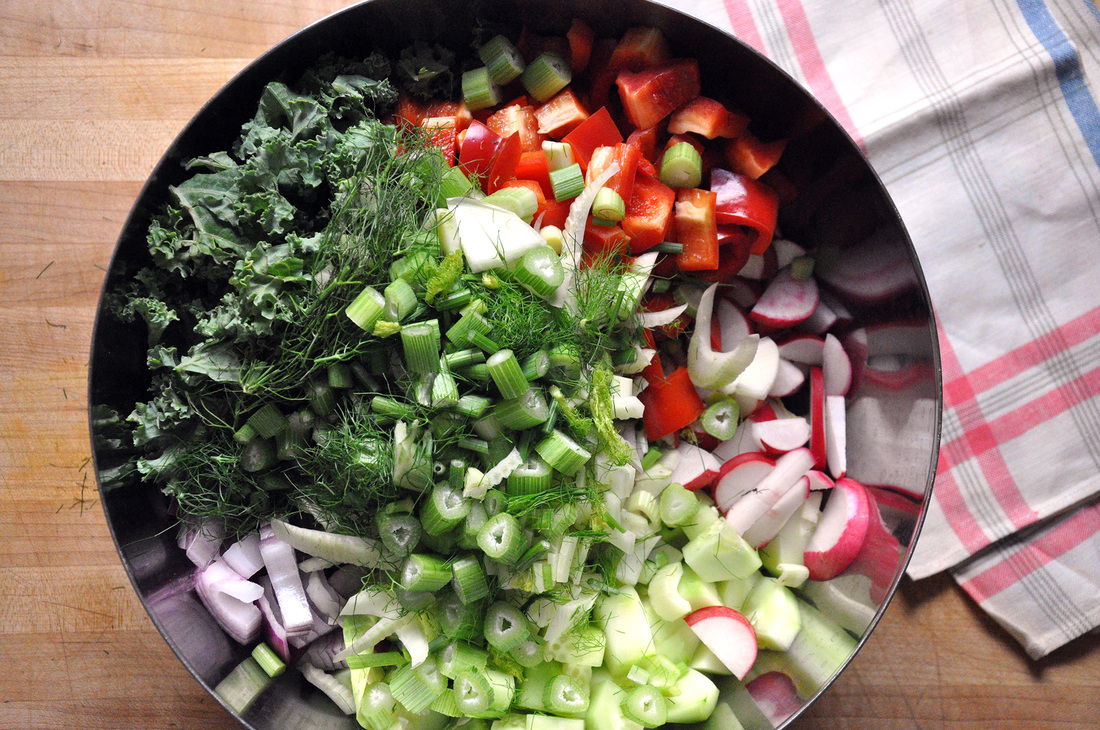 This ain’t no side salad. If you’ve never had fennel before, then welcome. What about radishes? My love affair with fennel began a few years back. My mother had roasted a whole chicken with carrots, onions, and this thing called fennel. When roasted in the oven it melts in your mouth and makes you feel good. It took me a while to try fennel raw. Why? Because it smelled just like licorice, which, despite my Swedish heritage, I cannot stand. Fennel raw is a whole other food than when its cooked. When raw it’s sweet and tough, it’s flavor a far off distant twice-removed cousin of licorice. Don’t get me wrong, it’s a strong flavor and I sometimes use it up a little at a time, like a topping…on pizza, or a burger… Ok now onto anchovies. I promise that even though you say you don’t like ‘em, you’ve eaten something with anchovies and just had no idea. I bet you even said….hmm there’s some ingredient I just can’t place but this is delicious. Well if you’ve eaten at my house you have. Simply put, they are super awesome sea-saltiness in a can. So start using them! Salads like this help you to remember how vegetables taste fresh. Radishes are peppery and bright, red bell peppers are sweet and happy. Bok choy has that mild cabbage flavor, but it’s packed with water like cucumbers – which has that super calming scent. Red onions are sharp, endives are bitter and kale is, well it just tastes so darn healthy. So all together it’s a pretty awesome medley. A salad can be a meal. Here’s the proof. 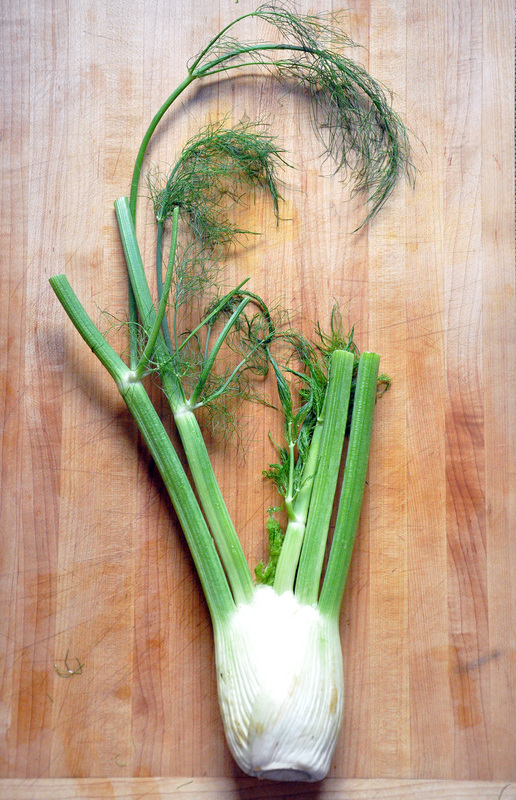  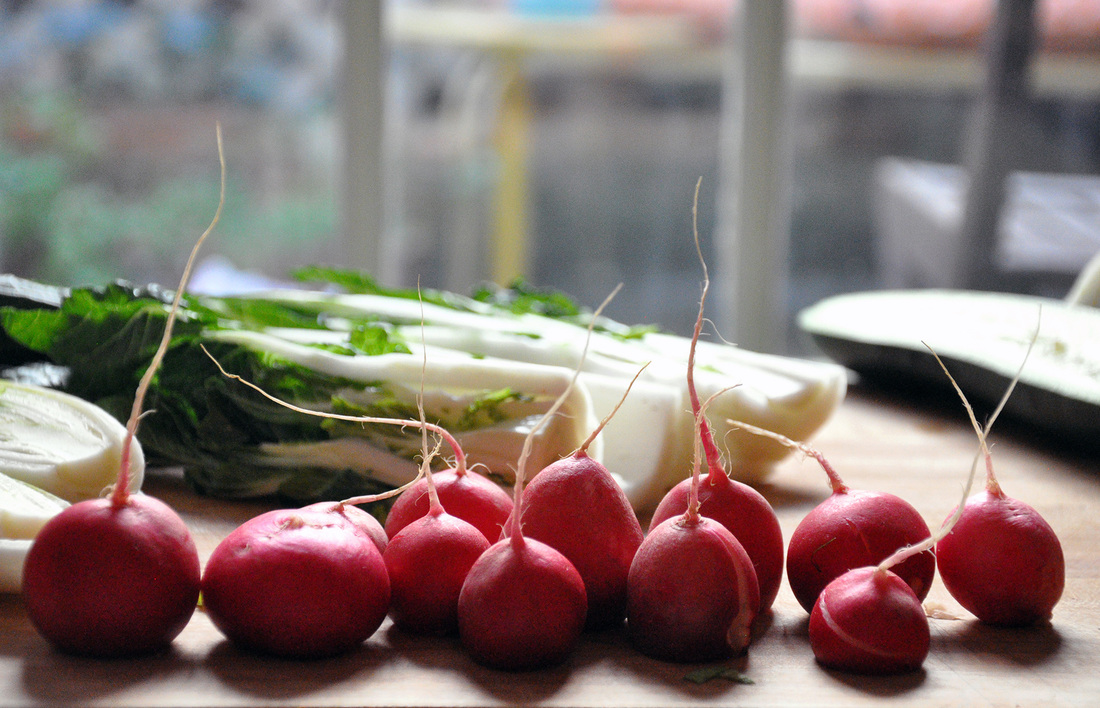 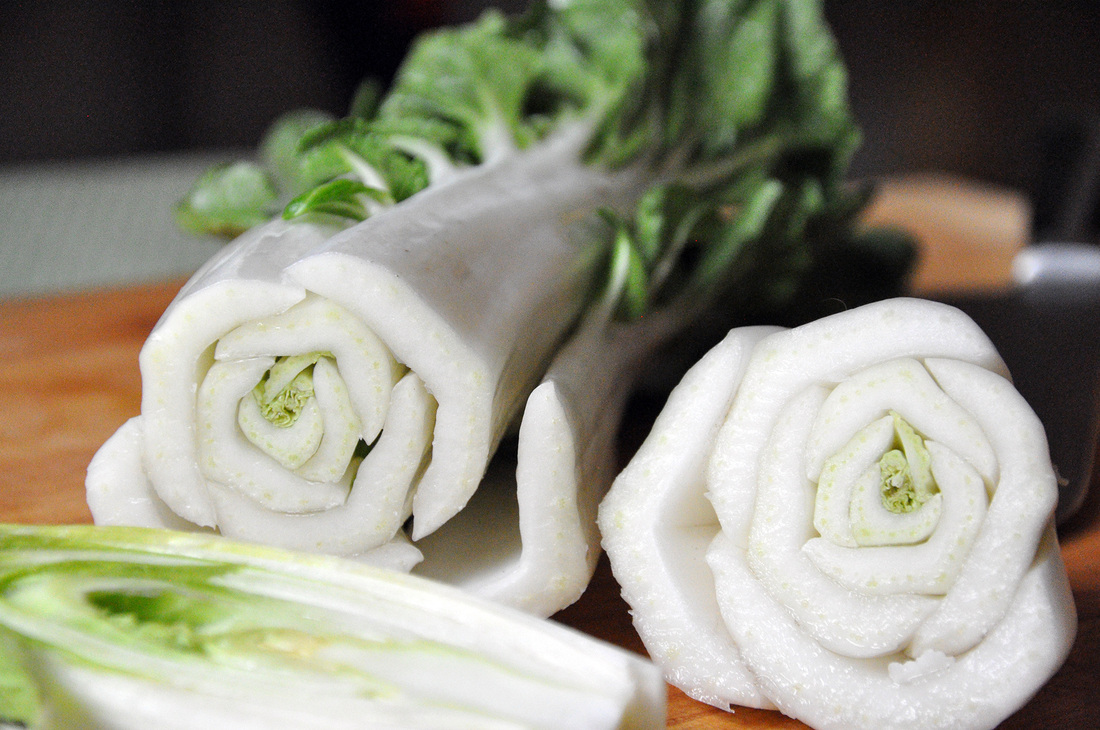 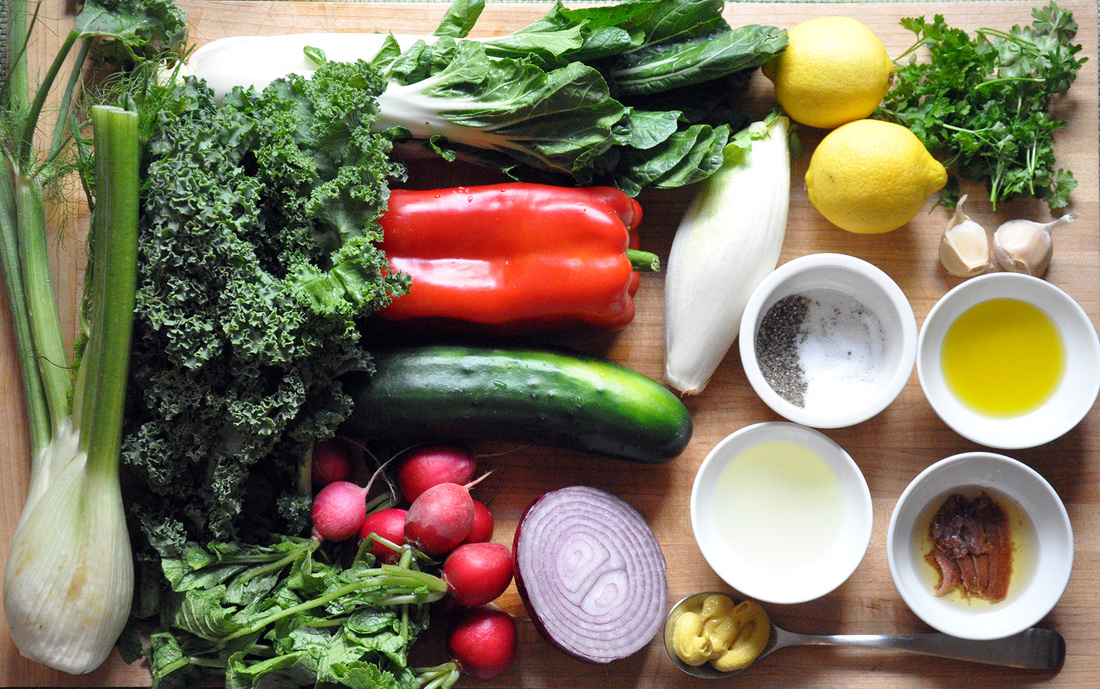 Fennel salad with Garlic Anchovy dressing PRINT RECIPE [Prep: 30 minutes / TOTAL: 30 minutes] [Serves 6] Salad:
Dressing: [yields almost 1 cup]
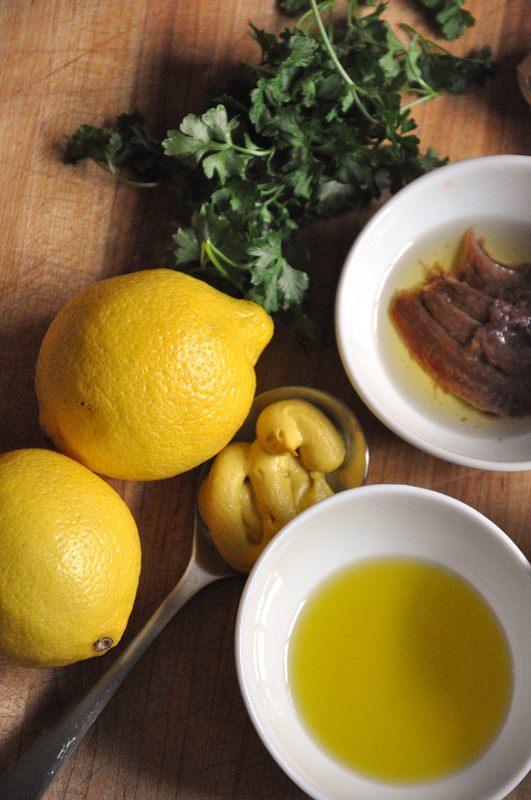 This is a hearty hearty salad. It holds up so well that I even think it’s better the next day. It goes well with a hunk of crusty bread [or with some left over mac and cheese] but is also pretty satisfying on its own. There’s really not much to the prep for this salad. If you’ve never worked with fennel before, no worries, it’s very easy. Start by rinsing the whole root, making sure to get rid of any dirt or grit that likes to get stuck in the grooves. Then pull off any of the delicate leafy part that looks dark, mushy, or rotten. Take your knife and peel off any brown spots at the bulb and chop off any dried ends of the stalk. Now cut that sucker in half lengthwise and de-core it [the tough part in the center]. Do this by making two deep slices on either side of the core, like an upside down “V” and then pull the core out with your fingers. This part is tough and not fun to eat raw. De-core the endive the same way. The kale should be washed and de-stemmed – just slice the leaf along the stem nearly to the top on each side, discard and then chop up the rest. The outer leaves of the bok choy can look a little worse for the wear, you can throw those out, slice about 2 inches off the bottom and you are good to start chopping. If you are using baby bok choy, discard sparingly since there isn’t much to these little guys and only cut about a ½ inch off the bottom. The radishes need to have their leaves and roots removed and then they are ready to chop. The prep for the rest of the veggies is pretty straight forward. There will be so many textures to this salad so I like to chop everything roughly the same size. If you cut everything really small it becomes more of a slaw. Now onto the dressing. I toss all of the ingredients into a small food processor, any kind will work. I like to press the garlic cloves into this mixture so that there are no chunks in the dressing. Now all it needs is about 15 second of blending. This dressing is very lemony and zesty; if it’s a little strong for you, add a little more olive oil. 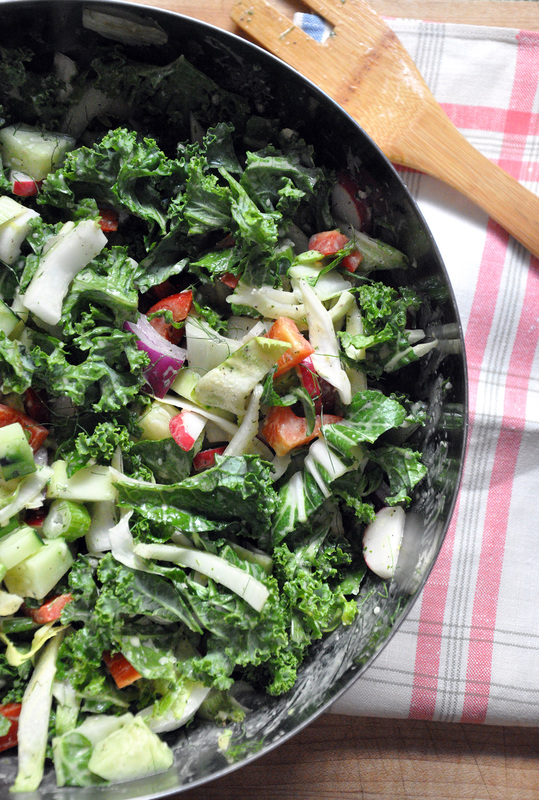 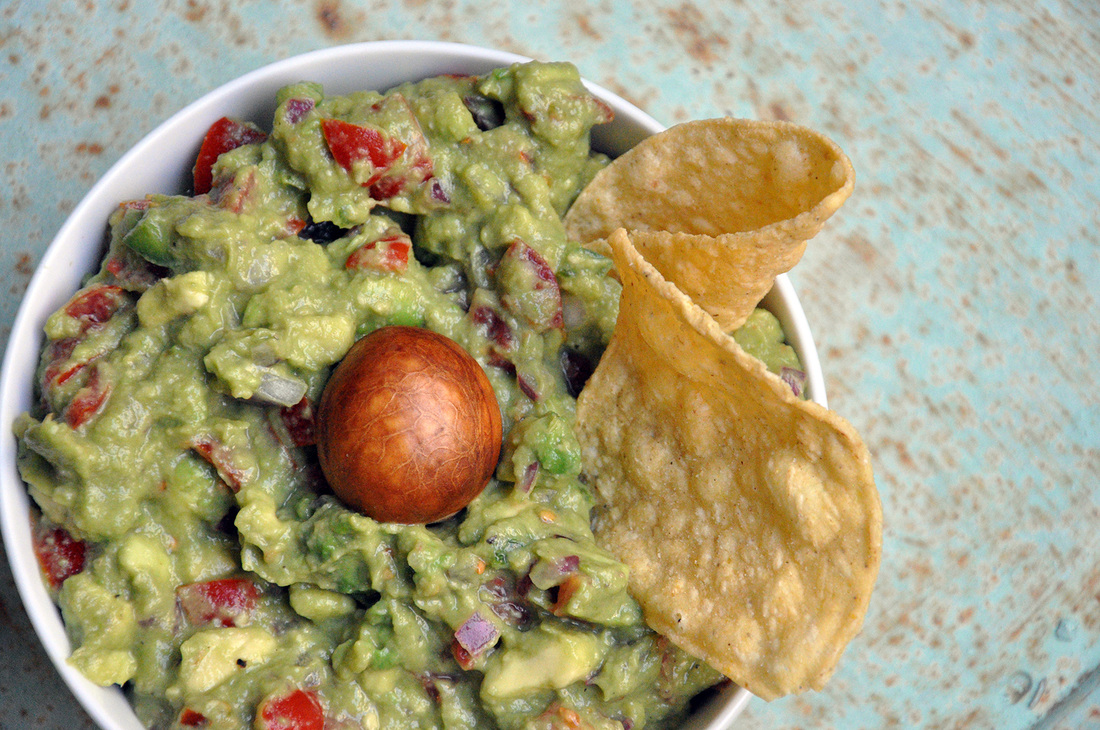 What is the most appropriate dish to bring to any sort of gathering? Guacamole. What is great way to take out your adult aggression? Mashing up some guacamole. What reminds me of childhood summer birthdays? Strawberry shortcake, pool parties, rose bushes, oh and yes a huge bowl of guacamole. You see where I’m headed. It’s simple, it’s pure, it’s delicious. Add some salty tortilla chips and it’s heaven. There’s really not much else to say except, here avocado… ready to be mashed into some guacamole? 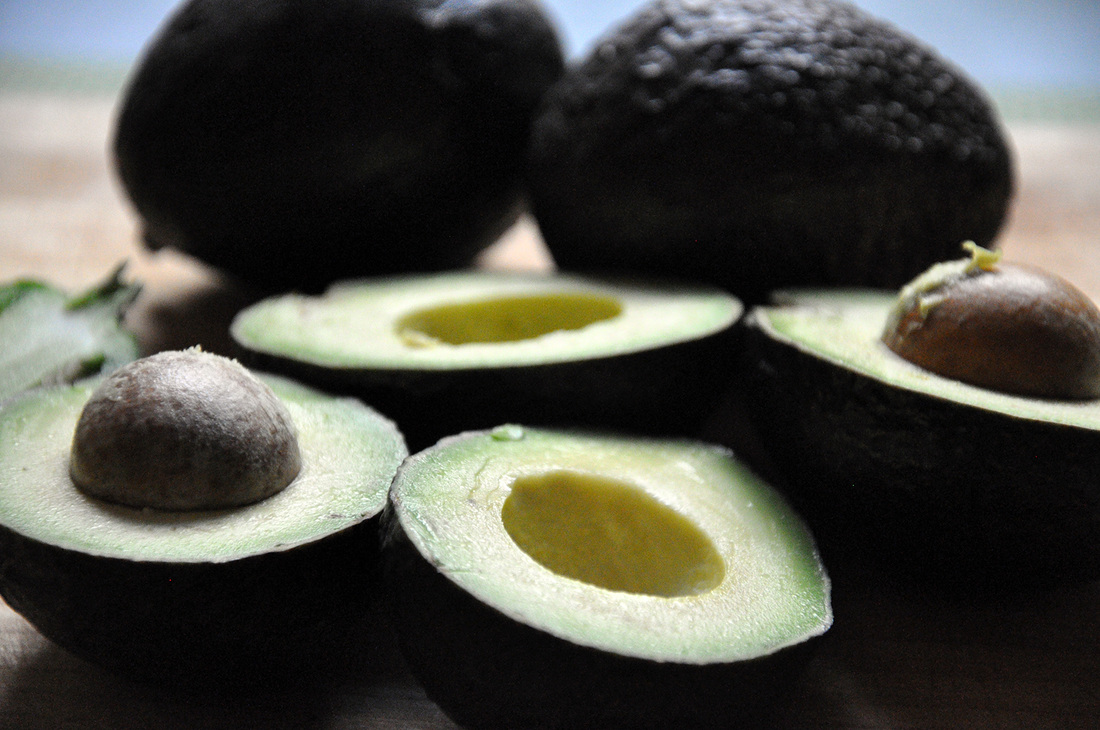 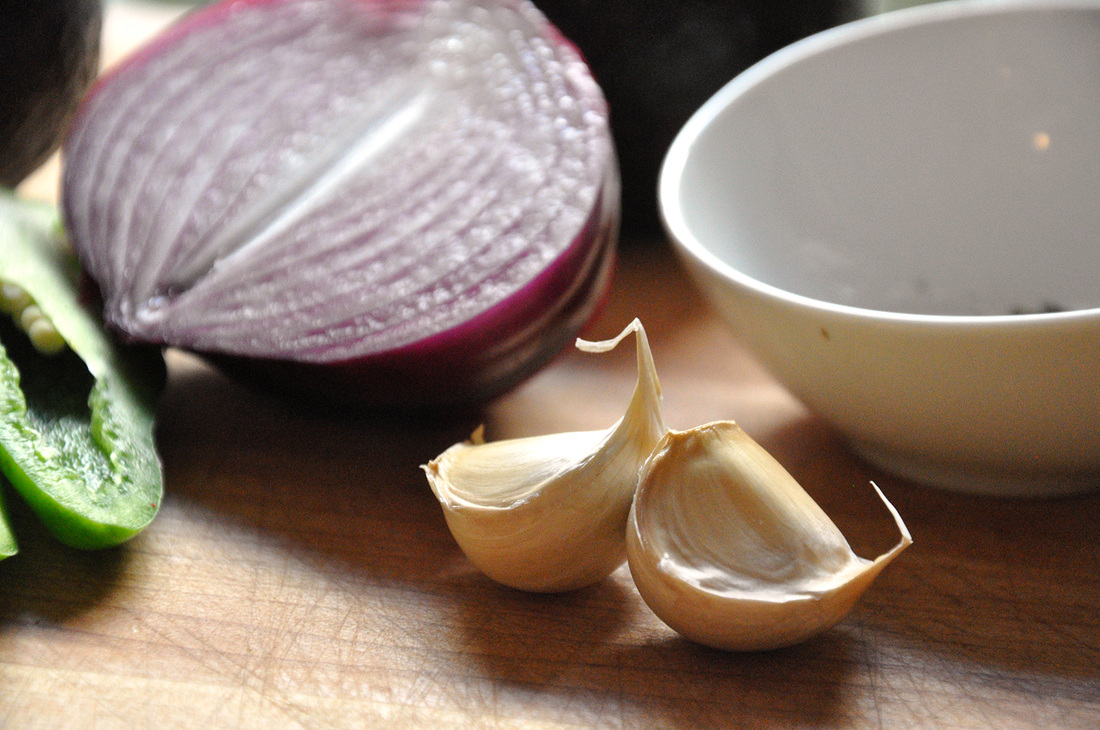 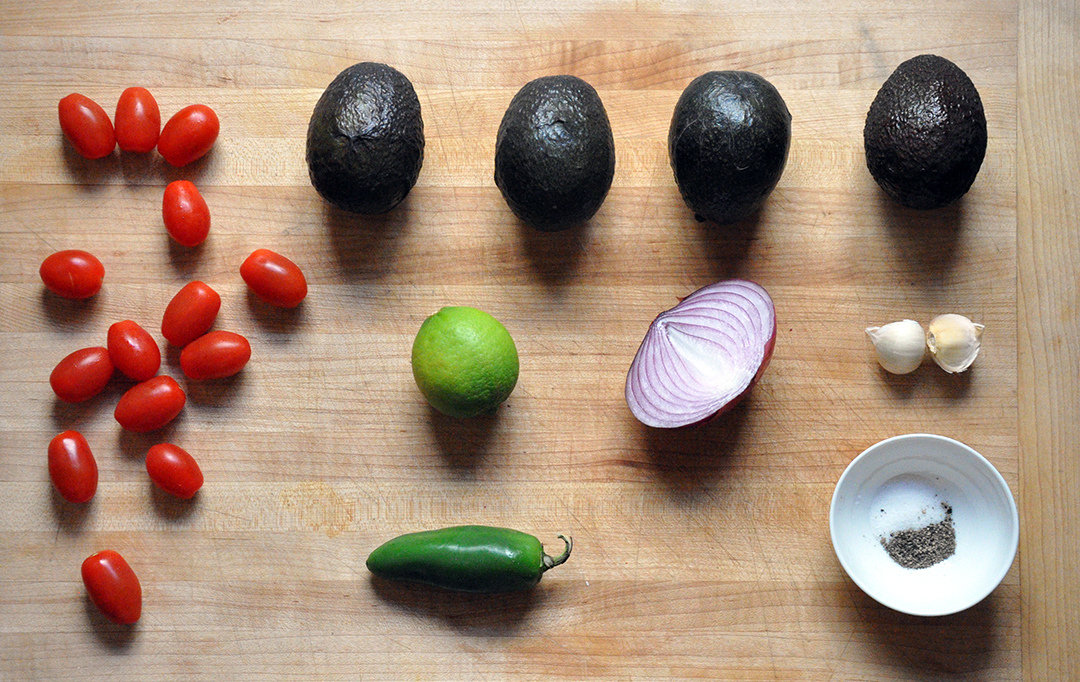 Guacamole PRINT RECIPE [Prep: 15 minutes / TOTAL: 15 minutes] [makes about 1 ½ - 2 cups depending on the size of the avocados]
For this recipe I am not using cilantro – if you think guac isn’t complete without any, throw it in! Personally I don’t think making guacamole is a hard science, everyone has his or her own version. The ingredients above and their measurements can be adapted. I think of it as a place to start. Depending on the ripeness of avocados or the sweetness of the cherry tomatoes you may need to add a dash more salt or more lime juice, but I wait to do this until the end so the guacamole doesn’t get over seasoned and the yummy flavor of the avocados still shine through. To start cut the avocados in half lengthwise and twist the two halves apart. Take the side with the pit still attached and spoon it out. If you are feeling adventurous you could use a sharp knife and with a quick tap to the pit use the blade to spear it [with the length of the blade not the tip] and pop it out. Score the avocado flesh with the knife – be careful not to slice through the skin and cut your hand – then scoop it out with a spoon into a medium sized mixing bowl. Repeat with the remaining avocados and save a pit that we’ll use later. 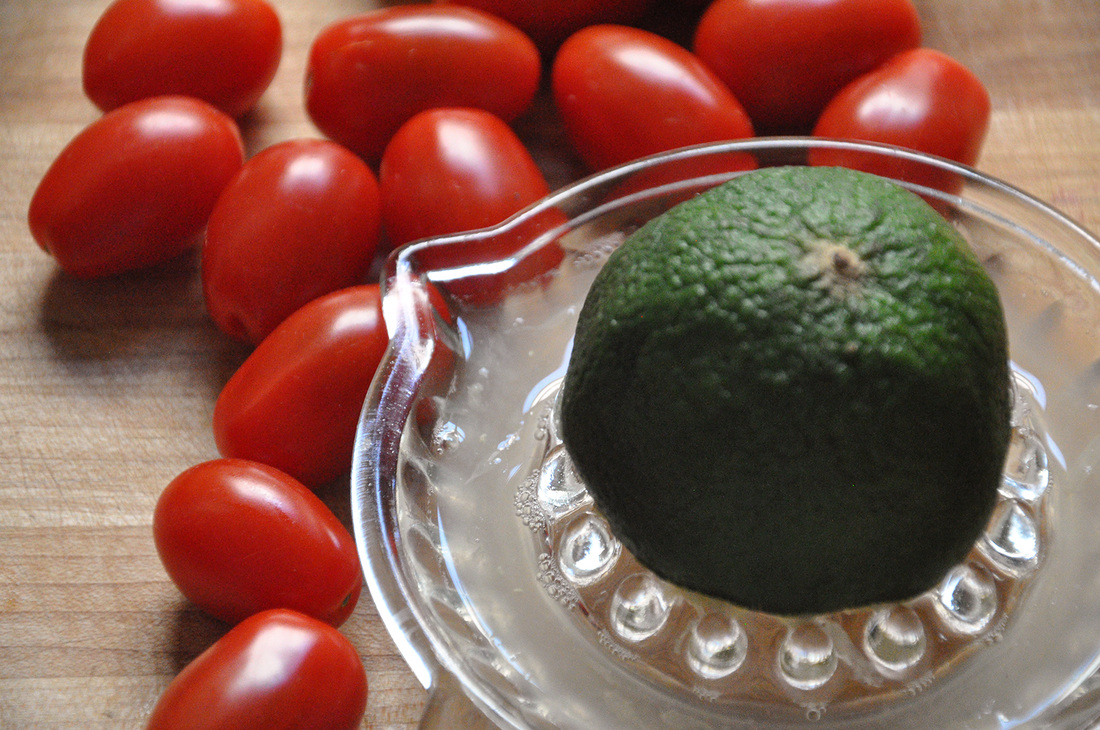 Quarter the cherry tomatoes and chop the onion, they should be roughly the same size, and add them to the mixing bowl. Peel and press the two cloves of garlic over the mixing bowl, add the salt, pepper and fresh lime juice. Now onto the jalapenos. I actually prefer to use the pickled jalapenos for their flavor and you won’t end up crying when you accidentally rub your eye after handling the fresh cut jalapeño’s seeds. But again either will work, I happened to have a fresh one on hand so that’s what I used. If you are using the pickled version take out about 1 tablespoon, finely chop it and add to the bowl. If you are using a the fresh version cut it lengthwise and remove about half of the seeds – though if you like things really spicy leave them all in – and finely chop the pepper and add to the rest of the ingredients. All that’s left to do is mash it all together – the riper the avocado the easier this will be. It’s really up to you how smooth you want the guacamole to be. And now we taste. You can adjust the flavors with a pinch of salt or even a dash of your favorite hot sauce if it needs more of a kick. When you are ready to serve it, transfer it to a smaller bowl and place the saved avocado pit in the middle on top of the guacamole. This will help prevent the dip from turning brown – or at least I’m told. And now we eat! 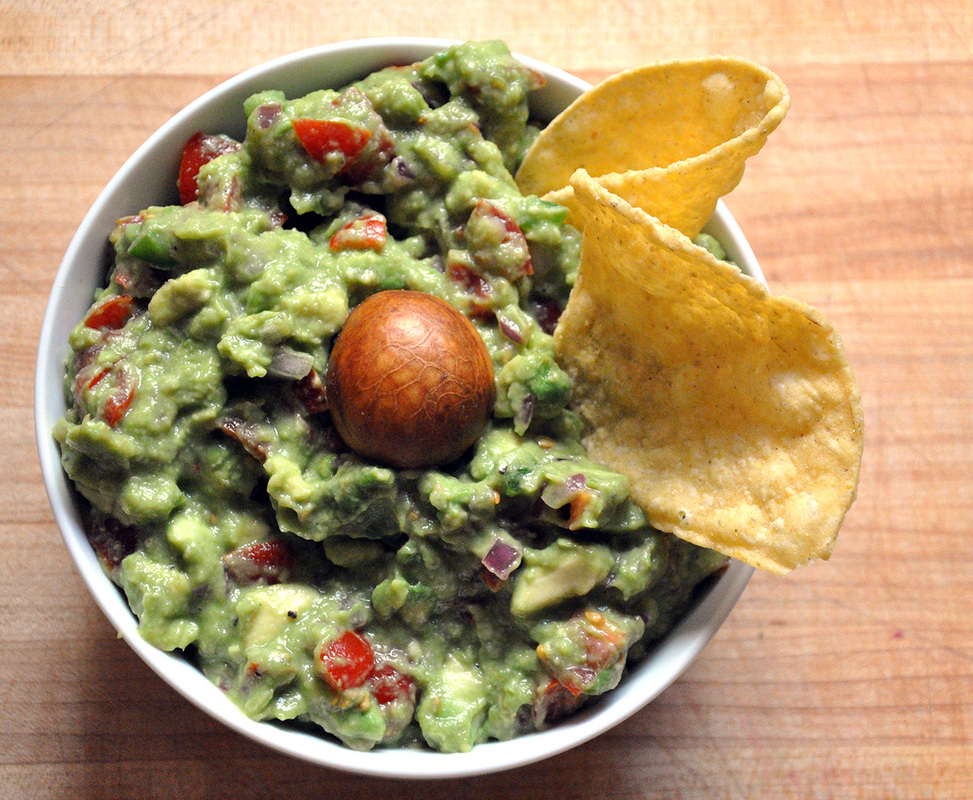 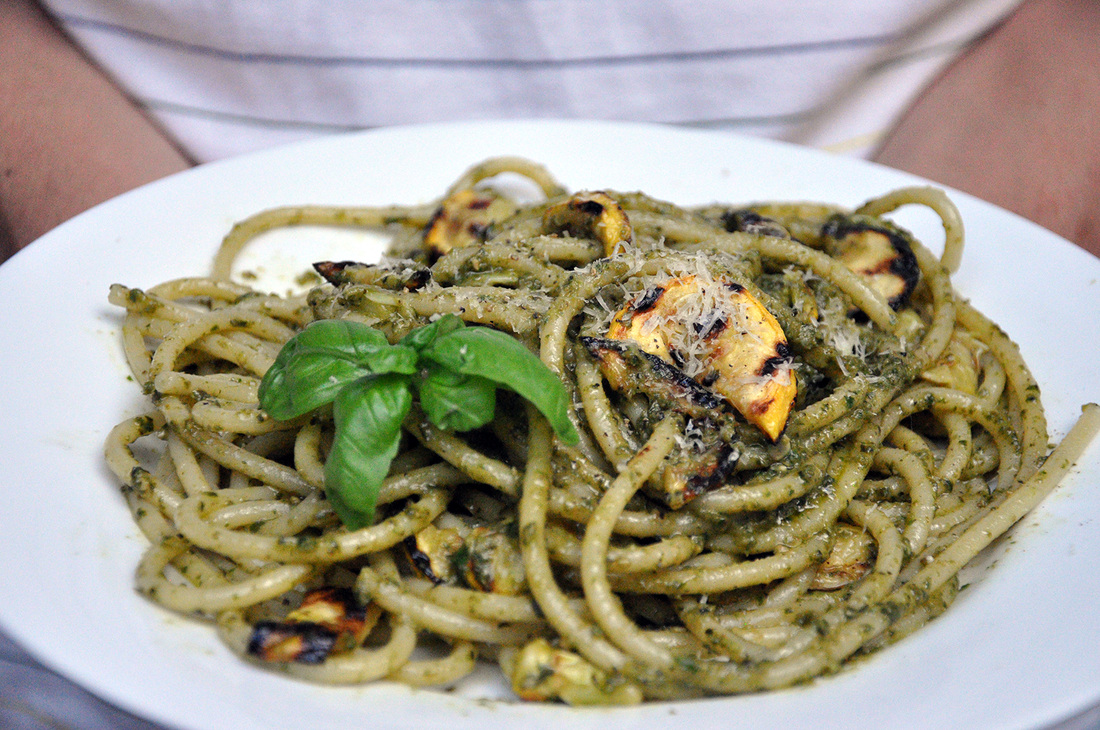 Summer begins and ends with basil pesto. Let me backtrack. I’ve headed north to the coast for a late summer visit home and it’s clear that summer is slowly wrapping itself up – I’m sorry I had to say it. I only just learned this myself when on the hunt for popsicle molds. I went into the local hardware store and was told “Summer is over, you won’t find those anywhere” and when I replied that no it wasn’t over, I was politely [if that’s possible] laughed at. The nights are cooler but the ocean is warm. The sun isn’t as strong or up as late but the late blooms are abundant. Seasons aren’t a switch you can flip, they transition into each other and I say summer isn’t over – yet. Not until I make one last bunch of fresh basil pesto. That’s right ocimum basilicum pesto. The herb that finds it's name in roots of the Greek word βασιλεύς [basileus], meaning king. So yes, it is the King of Herbs pesto. Basil pesto is actually something I’ve never ordered in a restaurant or bought from a store. There’s really no need. It’s just a few little ingredients blended together. And once you’ve mastered the holy grail of pesto sauces, Marcella Hazan's, feel free to experiment. Switch basil for parsley or pine nuts for walnuts. The art of pesto, which is really just crushing or mashing, never gets boring. 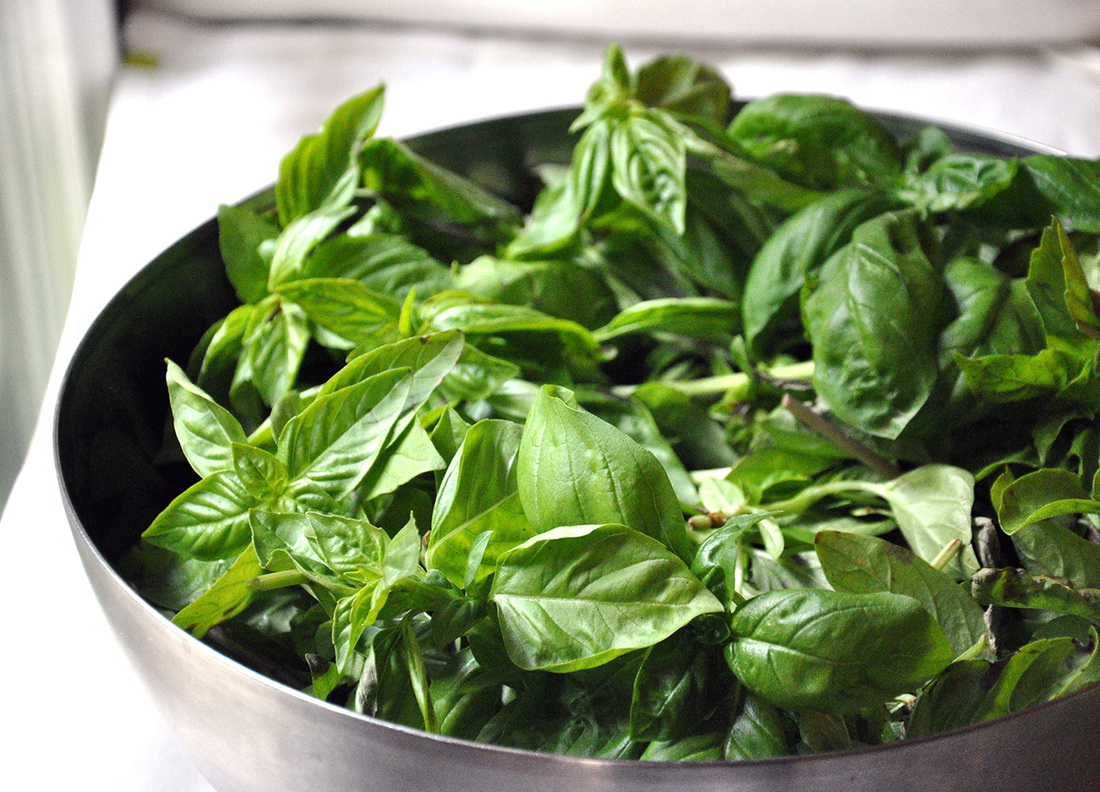 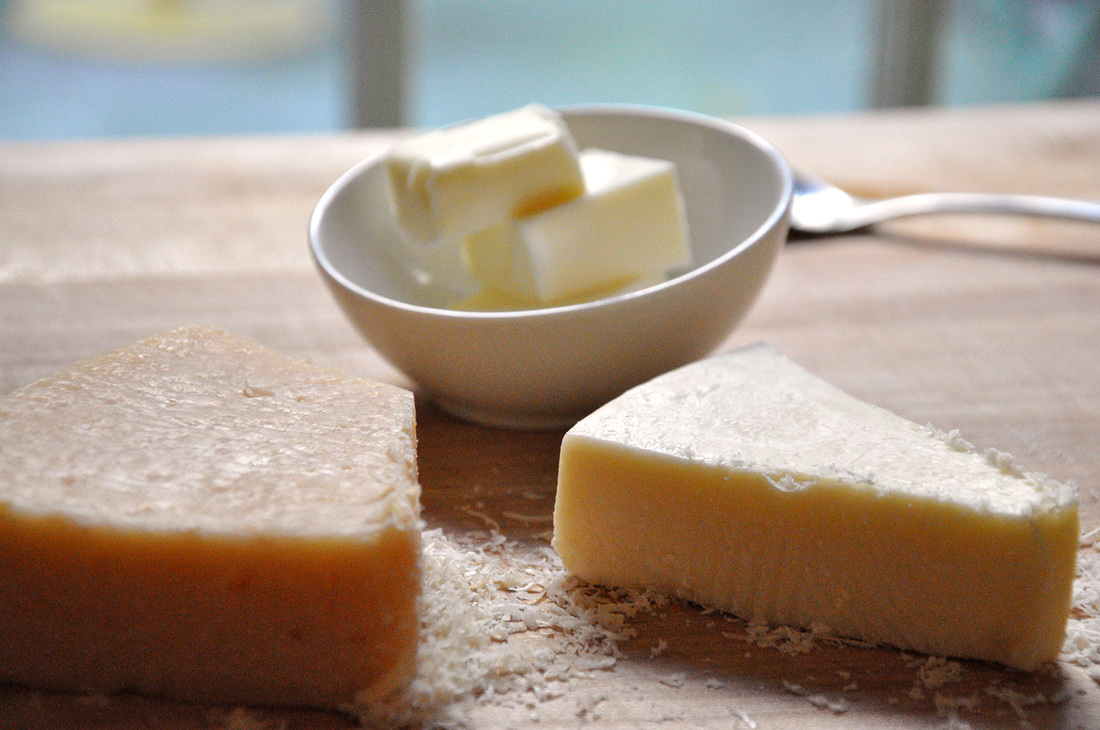 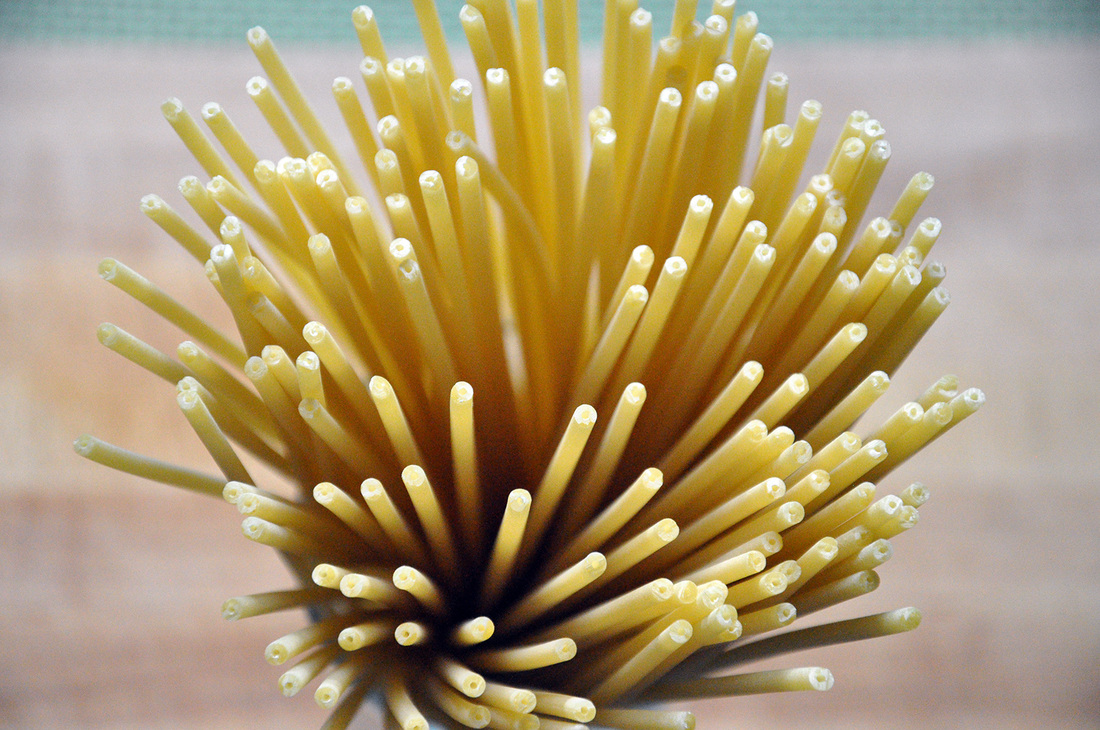 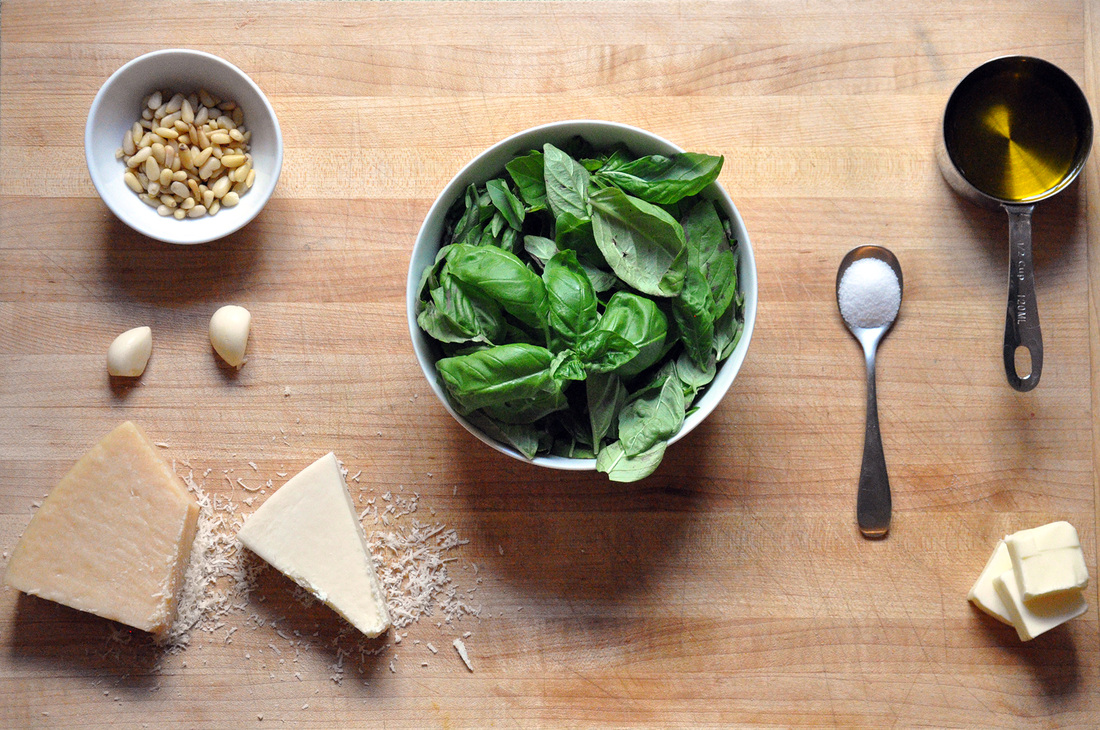 Basil Pesto [c/o Marcella Hazan] PRINT RECIPE [Prep: 20 minutes / Cooking: 10 / TOTAL: 30 minutes] [Serves 4 dinner sized portions]
Grilled Summer Squash [Prep: 3 minutes / Cooking: 6 / TOTAL: 9 minutes]
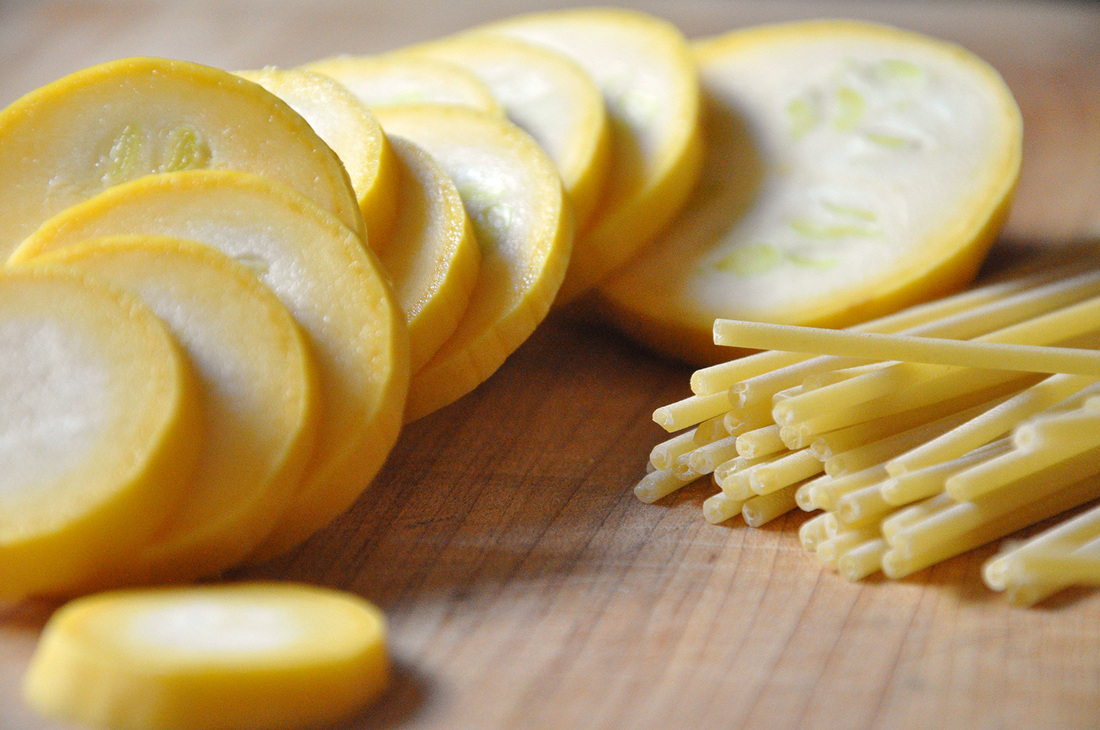 To start take out the butter so that it can soften and come to room temperature, it will get mixed into the pesto with the grated cheese at the end. If you are using long pasta, fill up a large pot with about 5 quarts of water - or until water is about 3 inches from the top. Why so much water? Salt generously - at least 1 tablespoon - cover and set heat to high. This amount of water will take about 10 minutes to boil. Now onto the star of this meal, Basil. So how do we prep this noble green? Simple, just pick it off its stem and wash it. Some basil is dirtier or sandier than others depending on how it's been packaged or grown. An easy way to wash it is to put the leaves in a cold water bath for a few minutes and let any grit settle on the bottom. Pay careful attention to the next few steps, you won’t want to miss them…pack the basil into a blender [or food processor] add the olive oil, garlic cloves, pine nuts and salt. Blend until incorporated – it should be a nice smooth texture but not a liquid – and…you’re done. [If you are using a blender you may need to stop and use a spoon to push the ingredients down off the sides once or twice.] If you are really adventurous you can use a mortar and pestle. The water should be boiling by now and ready for the pasta. I chose to use bucatini because it’s fun, hearty and has a nice bite to it - it turns this dish into a meal. It looks like thick spaghetti but has a hole going down the center. In general I like to use long pasta when making pesto, but that’s really just a personal preference. Bucatini should boil for about 9 minutes, until al dente. Transfer the pesto to a medium sized bowl and add the softened cubed butter. With a fork mush the butter in until mostly mixed. Grate the cheese, Parmesan and Pecorino Romano, and incorporate into the pesto sauce in batches. The Pecorino is saltier than Parmesan and is a nice addition to the sauce. The pesto will come out ok without it. Before straining out the pasta, save some of the water. Toss the bucatini in a large bowl with 1 tablespoon olive oil and mix in half of the pesto sauce with a little of the reserved water. This creates a nice base and all of the pasta should be coated in the sauce. The rest should be served on the table and your guests can add more as they please. I also leave out the block of Parmesan so everyone can top off their dishes with a fresh grate! The last step to this meal was grilling up some summer squash and topping off the pasta with it. This took less then 5 minutes and could easily be done in the oven. However, this is not a necessity, I just had a yummy lone squash hanging out in the fridge. See this recipe on how to grill it! 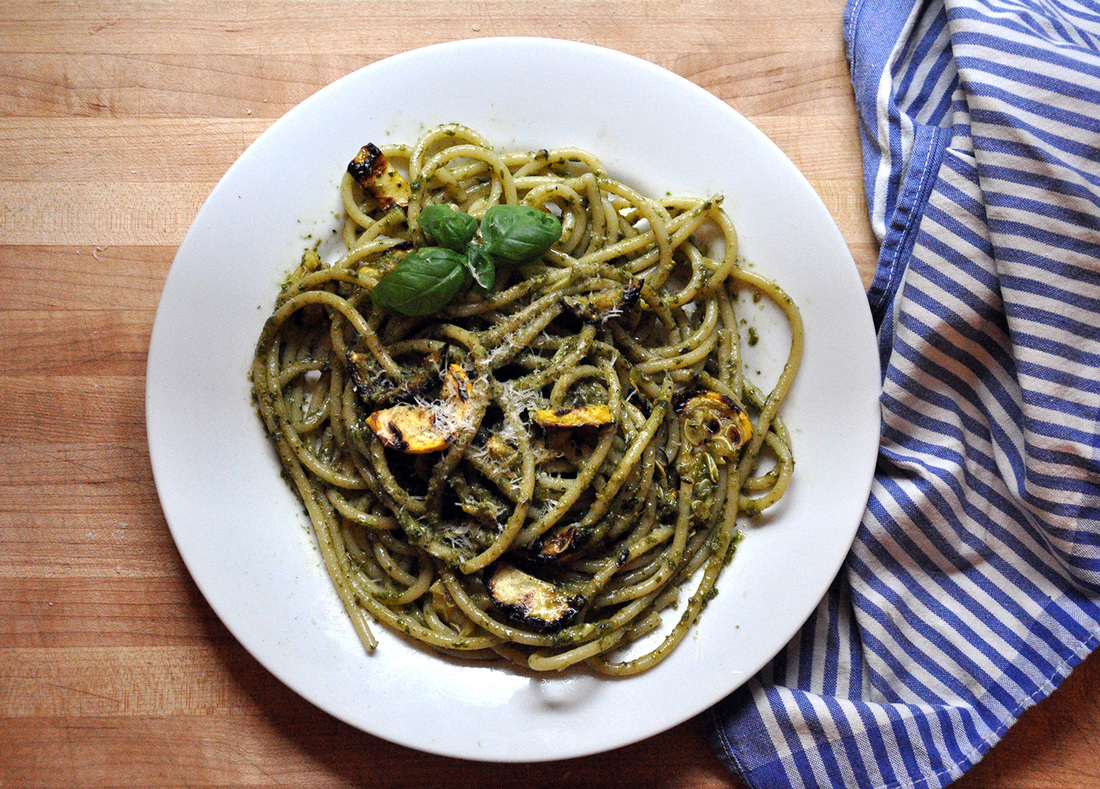 Tips: If you are having more than 4 guests and don’t have enough ingredients to double the recipe, this pasta goes well as a side dish with grilled sausage or shrimp.
Also if you have any leftover pesto it rocks on sandwiches or as a base on homemade pizza. I like to make a big batch of basil pesto at the end of summer and freeze it. It will keep for months and is a nice treat to have in the winter – it tides me over until the summer. I don’t add the butter or cheese before I freeze the sauce; it tastes fresher to add that after defrosting the pesto. You can freeze it in an ice cube tray and then transfer to a zip lock bag or freeze it in a glass jar – it’s up to you – you won’t regret it!  It was a few years ago when I realized that I never seemed to have the right ingredients on hand for recipes like this. They can be hard to find and over priced in your average grocery store. I make it a habit now to go once a year to a Chinese supermarket and stock up on all the sauces, noodles, oils and pastes I can carry. So when I came across a tasty looking sesame-peanut recipe I was ready to play and make it my own. It was few months ago that I tried this dish for the first time and since then I’ve made it three times. It’s the sort of meal you can serve any time of the year and it’s definitely on my current [mental] list of go-to dinners. So what do I want to say about this noodle salad? It goes quickly. Who knew that peanuts went so well with so many contrasting ingredients? Ginger, lime, rice wine, soy sauce, tahini – they all come together to make a nutty-tangy sort of sweet and salty perfection. This is simple kitchen chemistry at its best. Since the sauce is a little decadent –the yummy peanut butter and tahini sauce are to blame - I like to play around with hearty power vegetables like kale and broccoli and bright refreshing ones like cucumber and red onion. The color combo ain’t to bad either, the greens and purples make a pretty palette. This is a feel good, comfort food dish and since it makes really good leftovers, you might find that you’re feeling good the next day or two. Its quite filling so I serve it in a small bowl, oh and I eat it with chopsticks – so it feels a little like take out, but healthier. 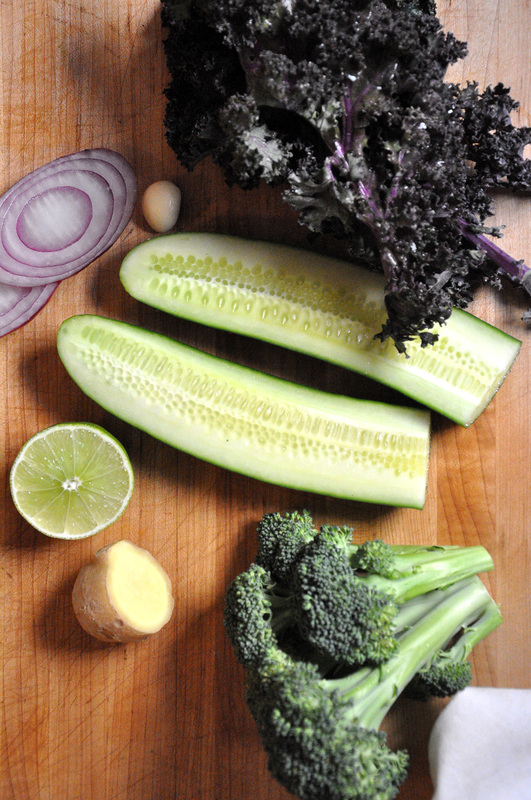 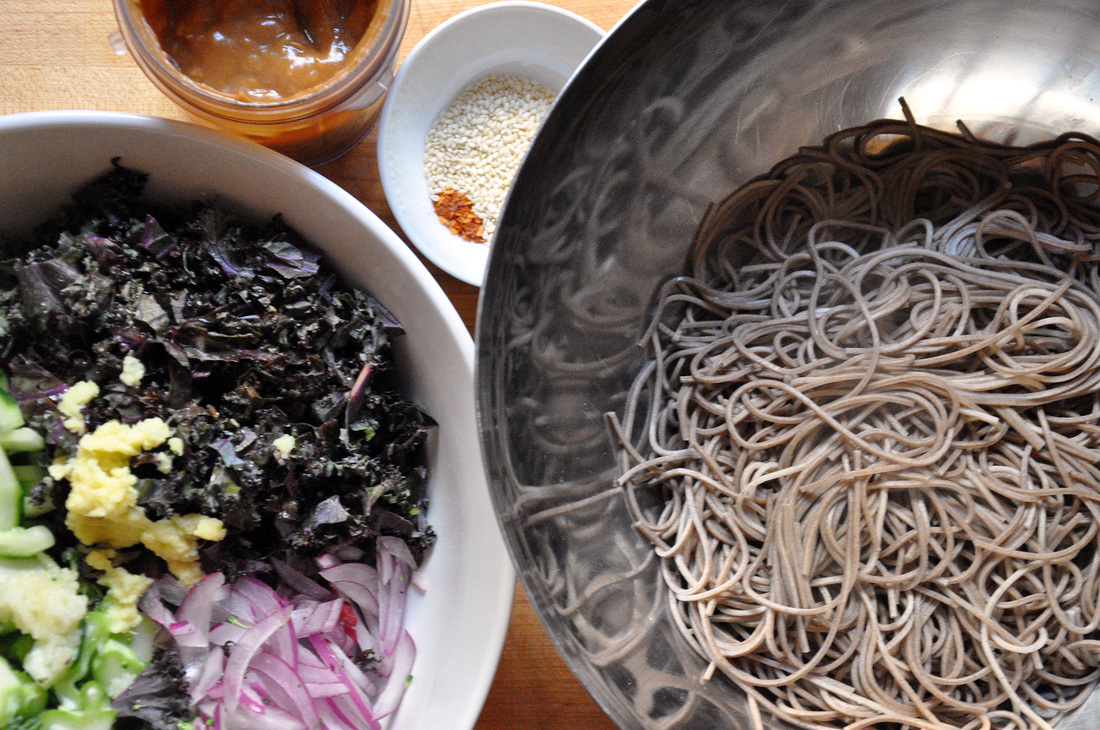 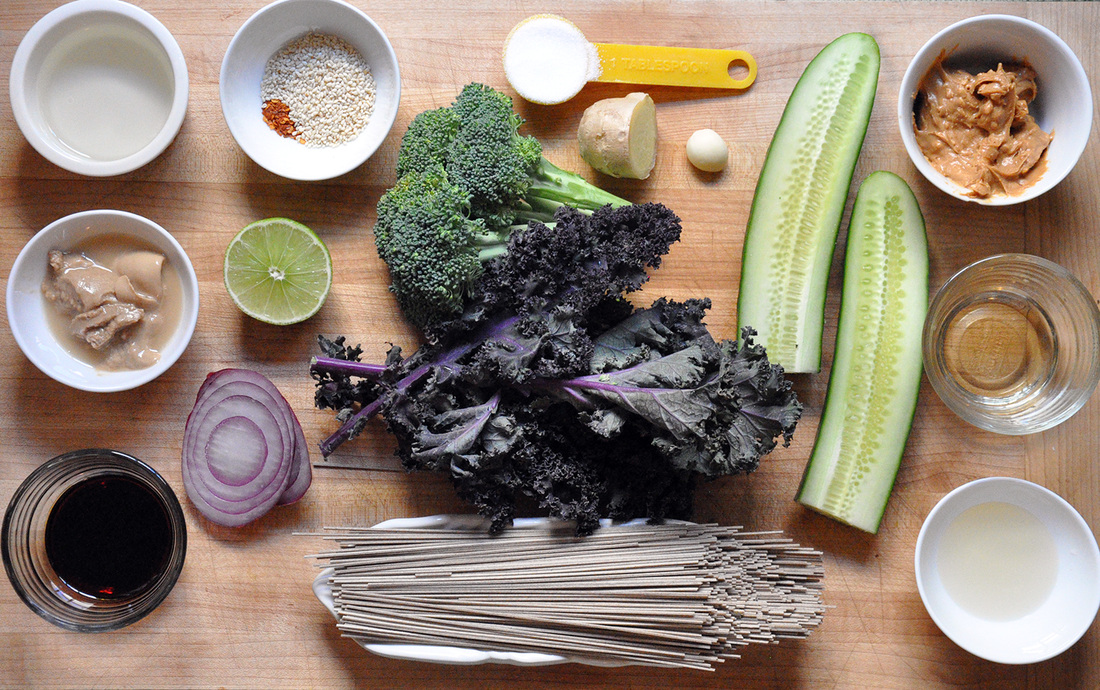 Chilled Sesame-Ginger Peanut Noodle Salad PRINT RECIPE [Prep: 25 minutes / Cooking: 5 minutes / TOTAL: 30 minutes] [Serves 4 small dinner sized portions] Noodle Salad:
Sauce:
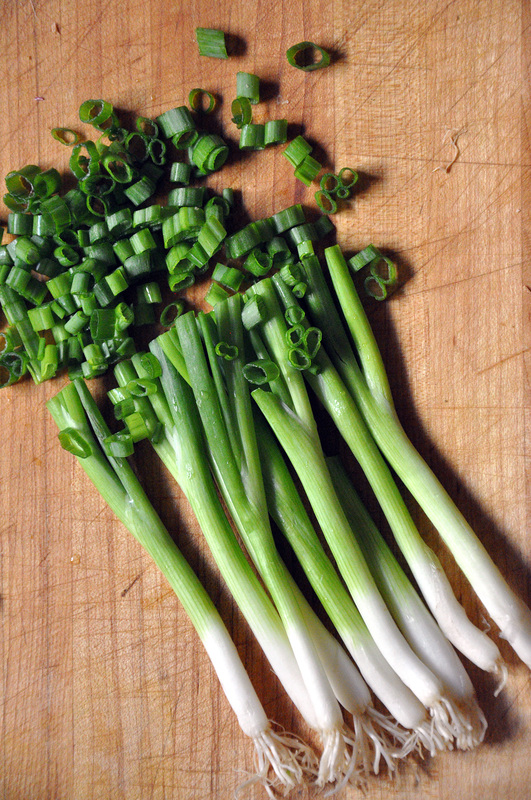
[This recipe was inspired by Andrew Zimmerman’s version as seen in Food and Wine.] 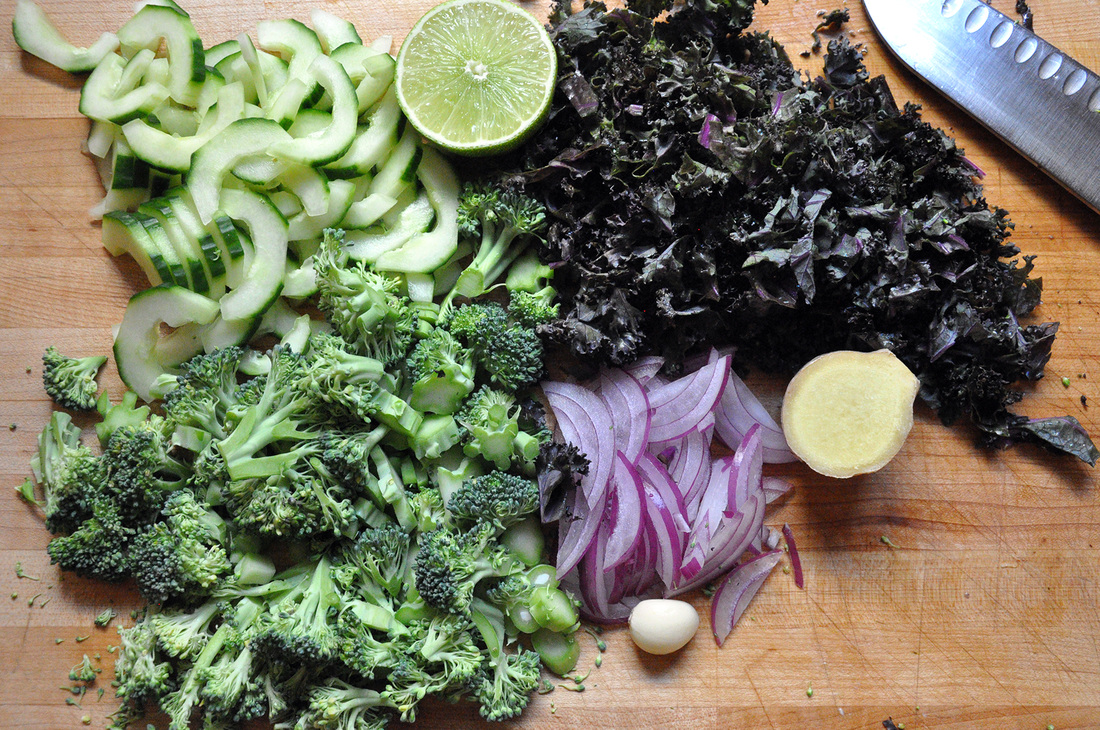 This noodle salad recipe is super easy and there’s literally no cooking involved. Start out with the veggies. The broccoli should be washed and cut into bite sized pieces, the cucumber peeled, de-seeded and cut into little half moon slices. Likewise with the red onion, it should be peeled and slivered – here you could use scallions instead if you like. The kale should be washed and de-stemmed – just slice the leaf along the stem nearly to the top on each side. The stem can be tough and bitter, especially if uncooked. I should point out here that the kale doesn’t have to be purple – it just creates a nice color contrast with the rest of the greens, any other leafy green can be substituted. Put all of the veggies in a large bowl – large enough to accommodate the noodles that will be mixed in at the end. These last three steps should be done over the large bowl: squeeze the ½ lime, press the peeled garlic clove and grate the peeled ginger with a zester/micro grater. Mix all the ingredients together. The acidity in the lime will help to break down the tougher veggies a little – think of it as a marinade. There are many types of noodles that will work for this dish. I had half a packet of soba noodles in my pantry, but you could even use linguine – though I would break the pasta in half before boiling. I was happy to only have half a packet because I wanted this to be more of a noodle salad than noodle heavy dish. Fill your pot with 8 cups of water, cover and turn the heat on high. It should take about 5 minutes to come to a boil. [You should have enough time to prepare the sauce while waiting for the water to heat up – see the directions below]. Once it’s boiling, add the soba noodles and leave uncovered. Wait for the water to come back to a boil and then add 1 cup cold water and wait for the water to boil one last time. [These directions are specifically for those using soba noodles]. Before straining the noodles in a colander over the sink, reserve about a 1/3 cup of the noodle water. Now onto the sauce. I use a small bullet blender for the next step but a mini food processor will also work. As for the peanut butter I tried to find one with no sugar and low salt, but all I could find was a low sugar and salt variety – because of this I used 1 tablespoon of sugar and no extra salt. Add the peanut oil, peanut butter, tahini paste, sugar, mirin, rice vinegar and soy sauce to the blender and mix until all the ingredients are well incorporated. The consistency should be thick - it will be thinned out with the reserved noodle water later. All that’s really left to do is mix everything together. First toss the noodles with the veggies, add the sesame seeds and red pepper flakes and then alternate incorporating the Sesame-Ginger Peanut sauce and the reserved water a little at a time. Mix well each time. Everything should be coated well with the sauce. If you have time to wait to eat, put the noodle salad in the fridge for about 15 minutes so it gets chilled. If not, eat it warm tonight and then cold tomorrow! 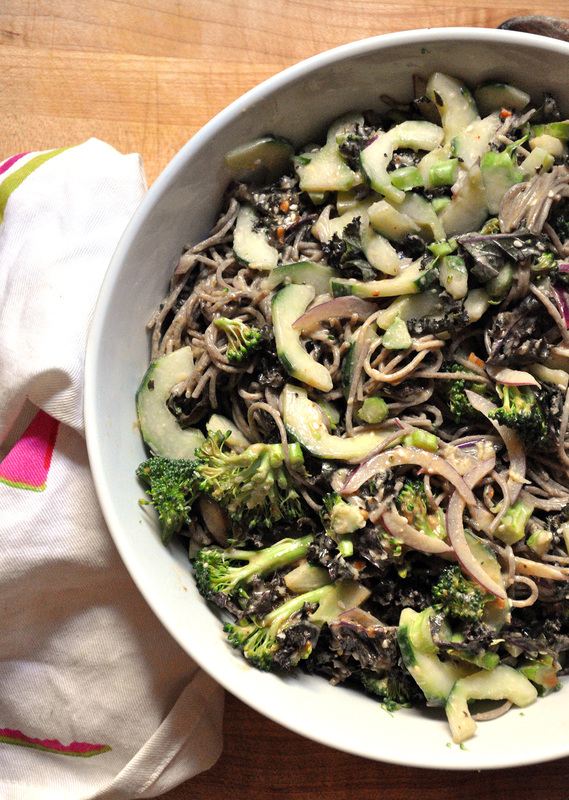 |
All
Stuff I follow...
Not Without Salt
My New Roots Sprouted Kitchen Thug Kitchen Lady and Pups A CUP OF JO The Daily Meal Melissa Clark ...always 3191 Miles Apart The Sartorialist Garance Dore The Nourished Kitchen Archives
October 2014
|

 RSS Feed