 Another day another dinner…honestly that’s sometimes how I feel. Luckily, on those days I have a wonderful guy to pick up the slack and who can whip something yummy up from the dredges of our fridge and small pantry. Other times, I have planned dinner out to a “T” for the whole week and get annoyed when he uses something up, that (in my mind) I had dibs on. It gets complicated…In the summer though, I get inspired by all the colorful produce and try to do as minimal cooking as possible – essentially leaving the veggies raw, enhancing them with some salt and pepper and fresh herbs. The veggies stay vibrant and presentation can be pretty spectacular without a ton of effort. It’s easier to do than you think, it keeps the kitchen cool (keeping the cook happy) and is super fast…you can make soups, salsas, salads, and pestos galore! I’d been hearing about green goddess dressings a lot recently - I can personally vouch for this one by Melissa Clark - and then a few weeks ago I saw a recipe for a red goddess salad dressing - which I have yet to try, but think looks pretty awesome – which got me to thinking about how my pestos are always green – delicious, but unfailingly green. So why not try a red one, I thought and why not make your first time doing it for your blog…so foolish of me. However, dressings and pestos are sort my thang, my niche, my comfort zone, so I forged ahead and thought the results were quite tasty. This recipe yields about a cup of pesto, more than you probably need for the dish, and if you don’t end up finishing it in a few days, you should freeze it. Then some day when you are spent and have no interest in cooking and are complaining that the fridge is empty anyways, your other (slightly more resourceful) half can pull it from the depths of the freezer and make something annoyingly impressive with it. 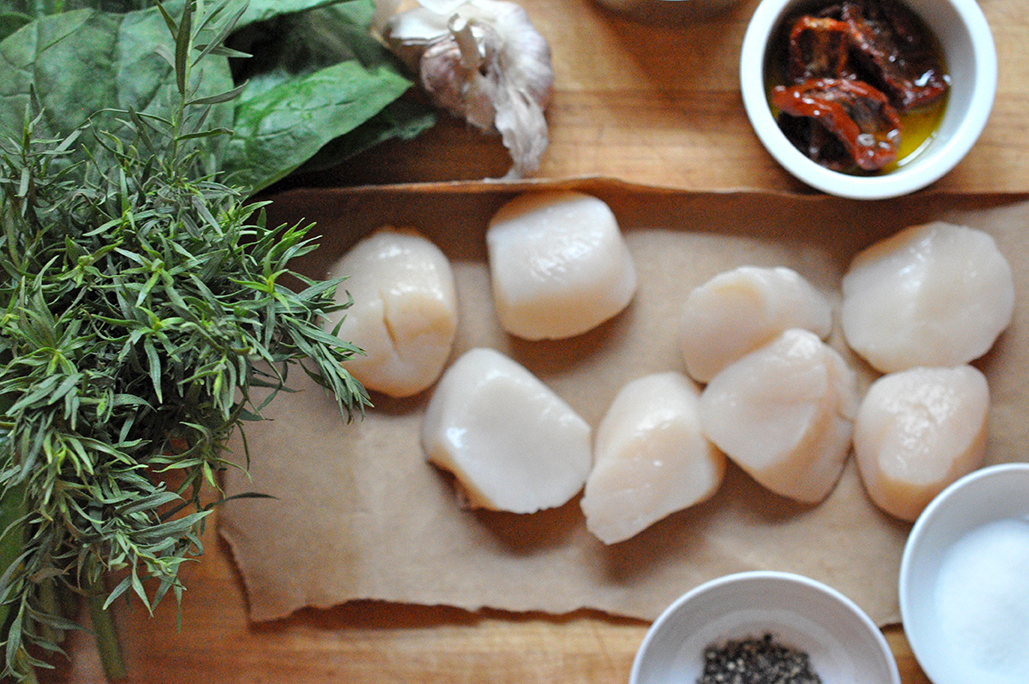 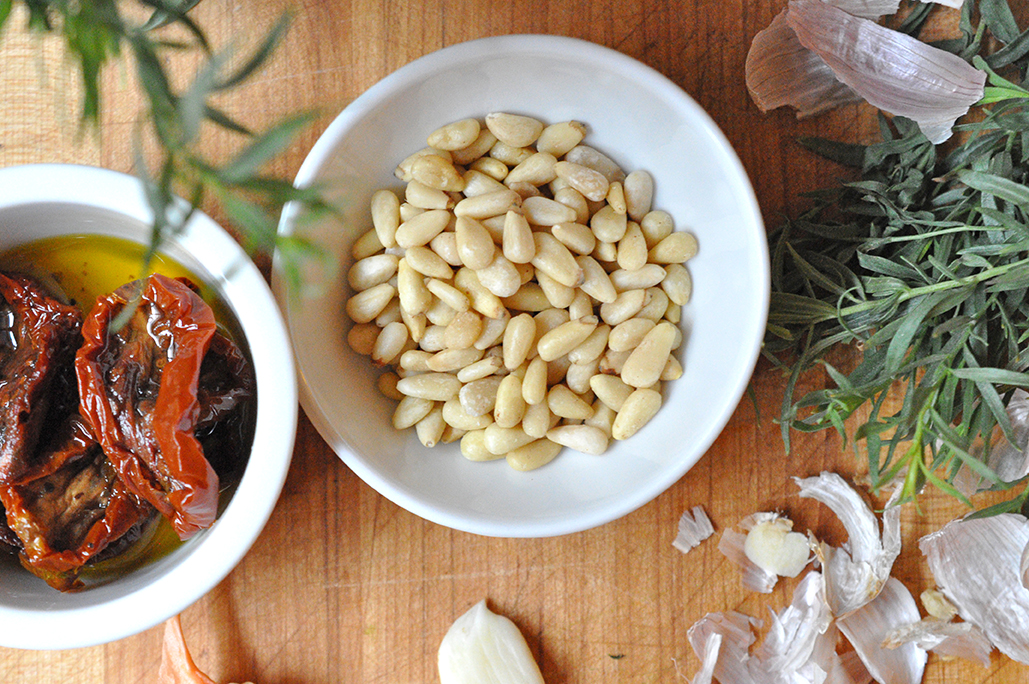
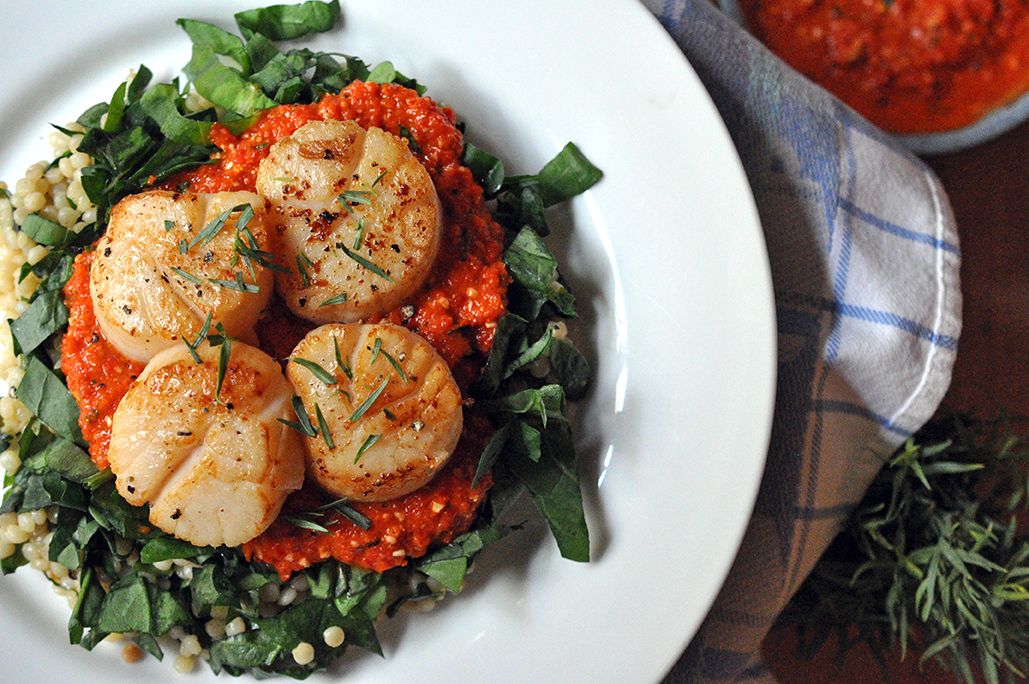
  Red Pesto + Sea Scallops Salad PRINT [Prep: 15 mins / cook time: 25min / TOTAL: 40 mins] [Serving size: 2 dinner portions, 4 app portions]
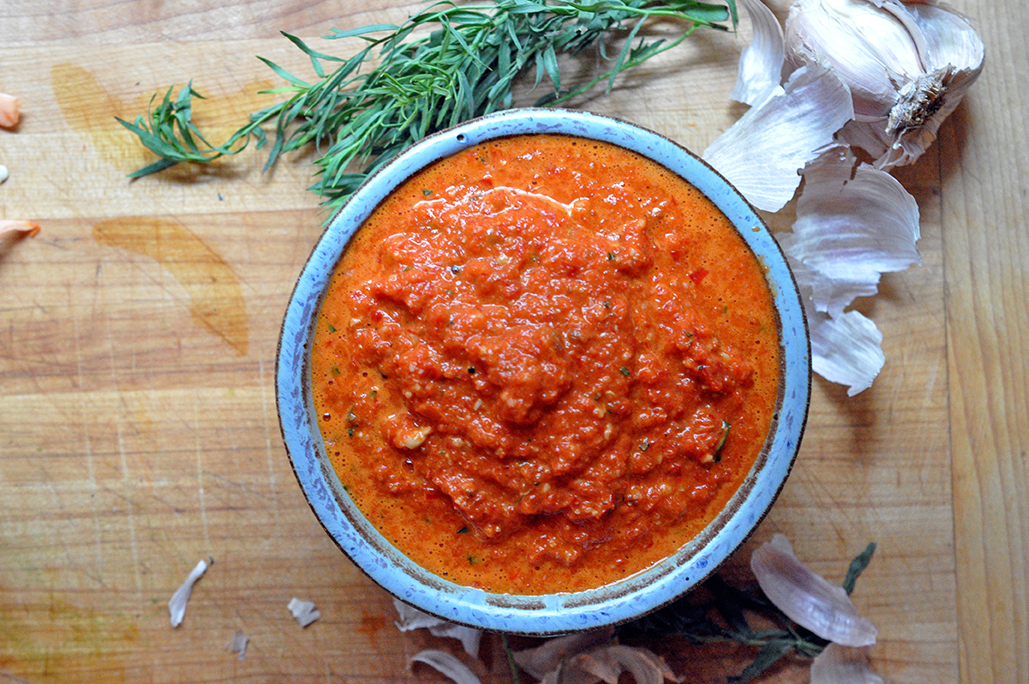
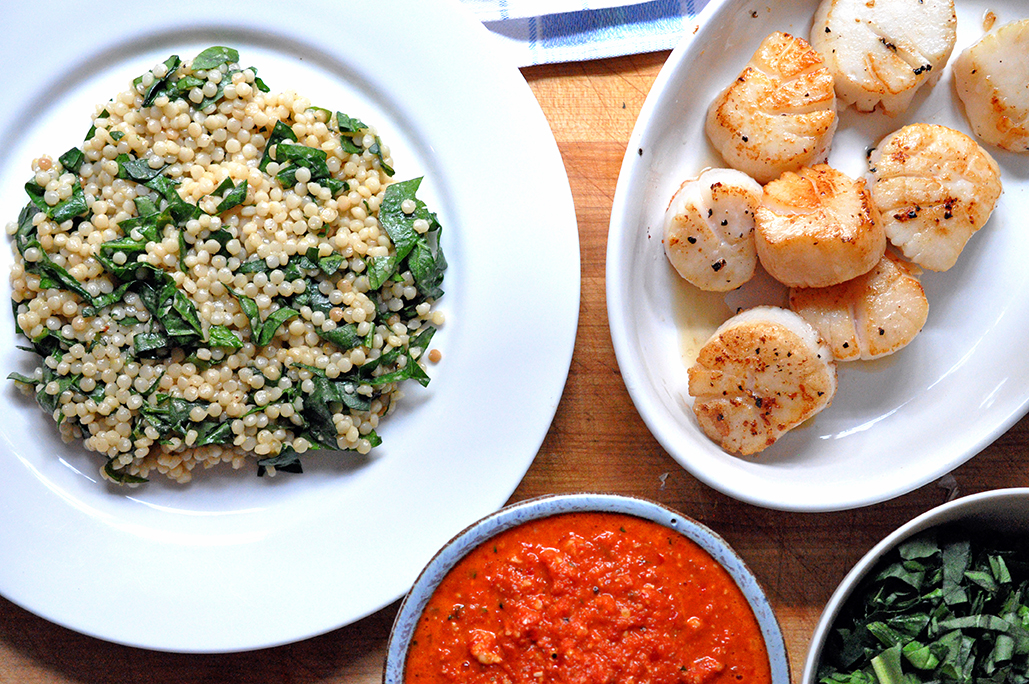
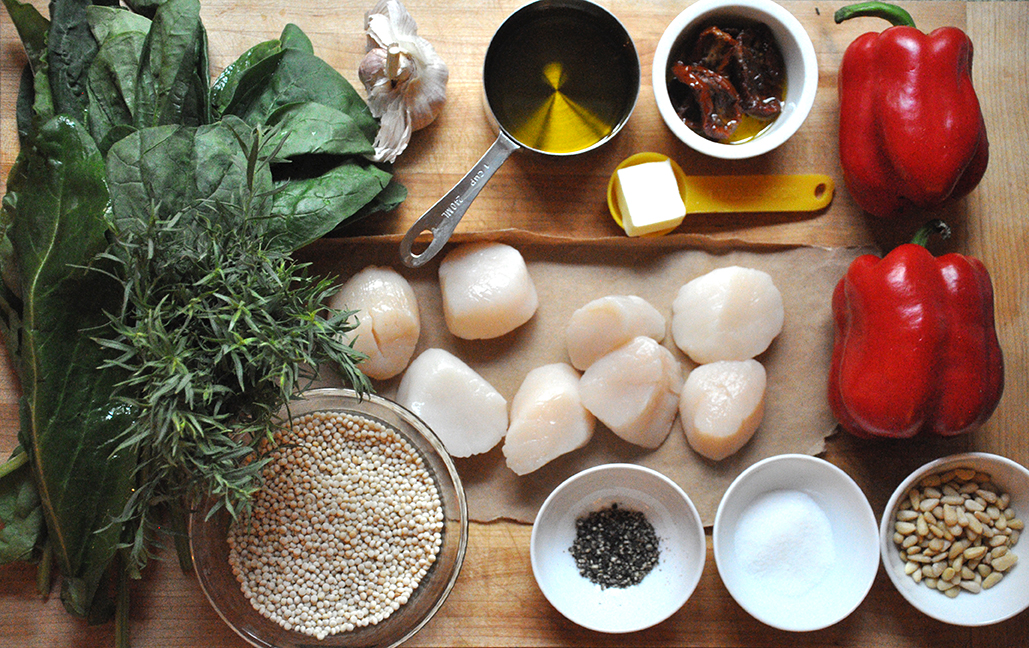
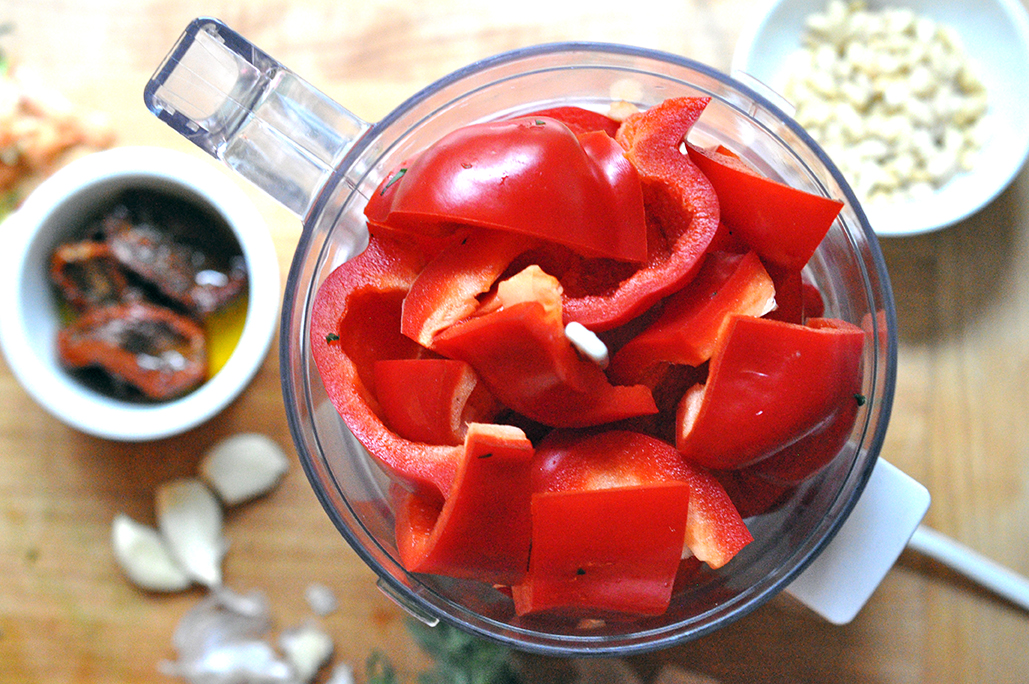
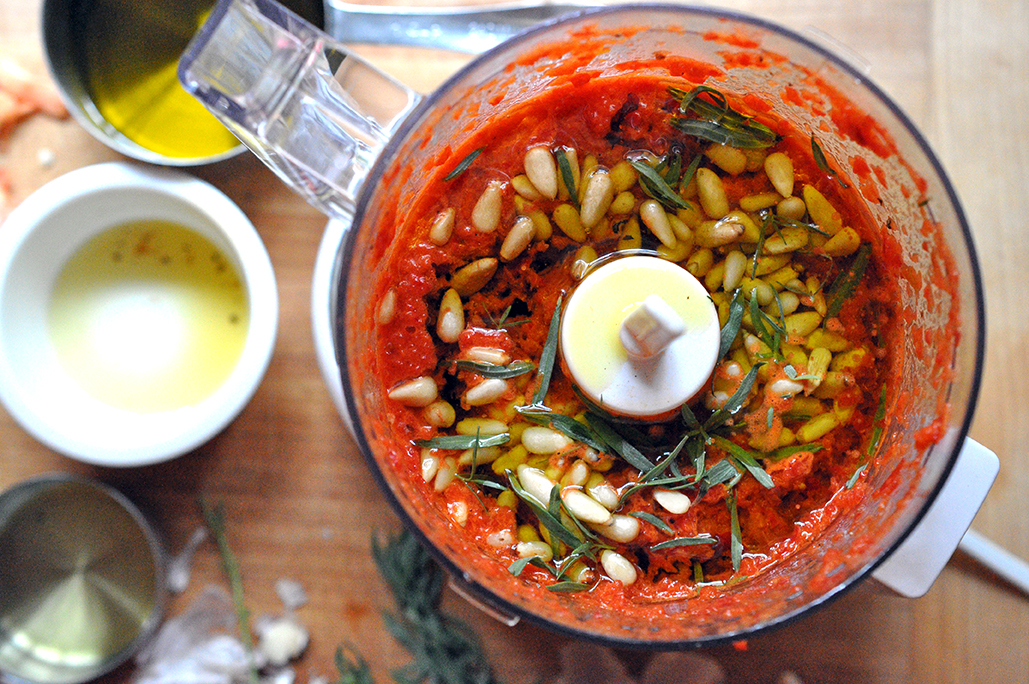
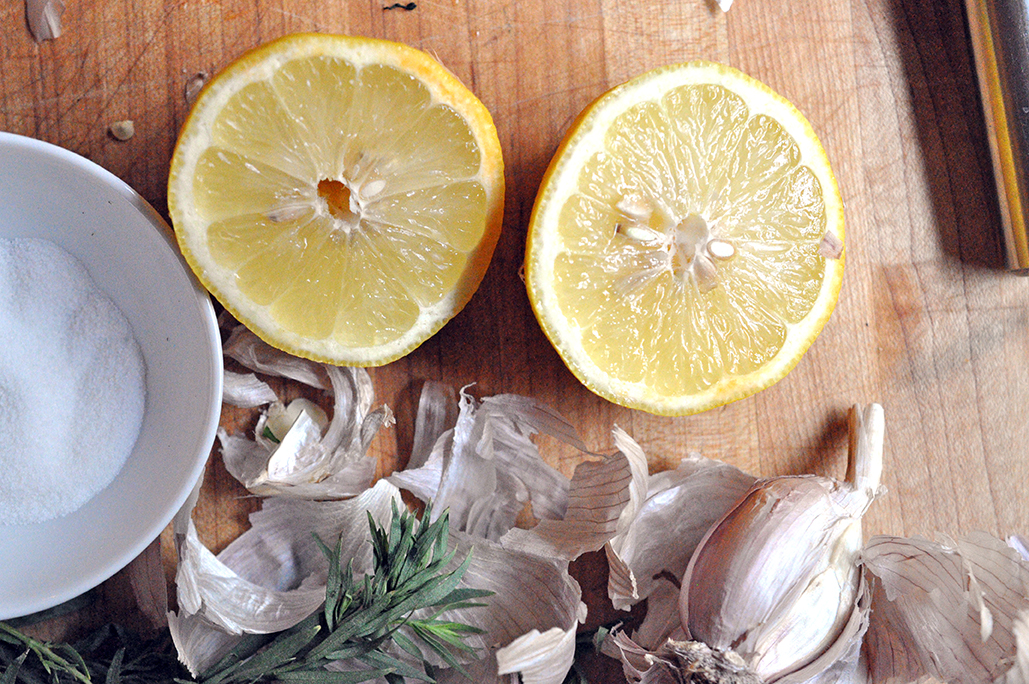
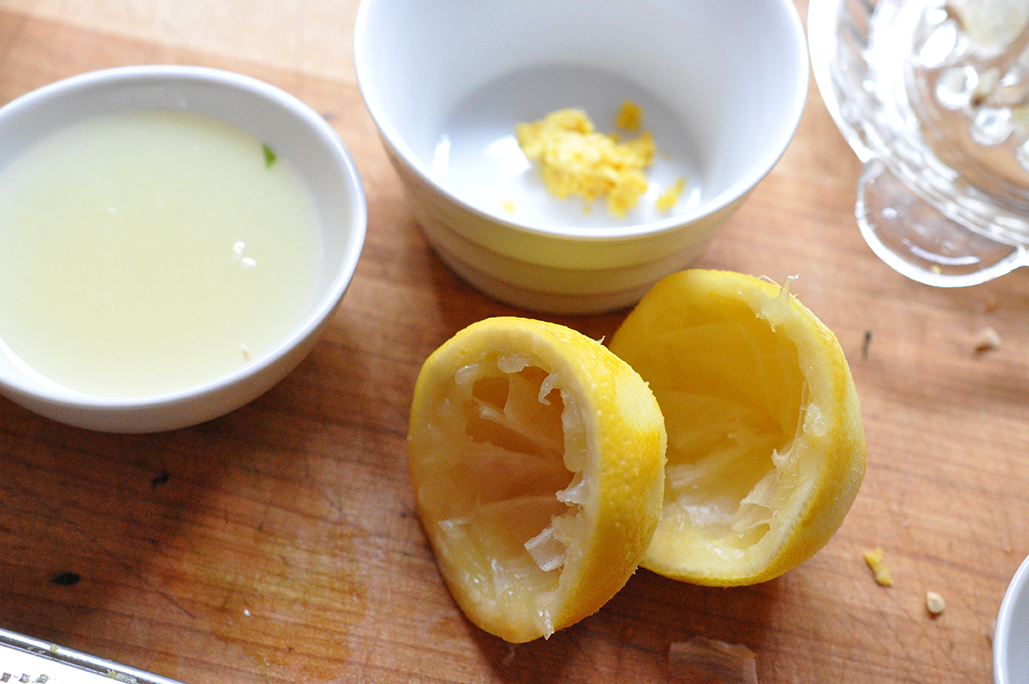
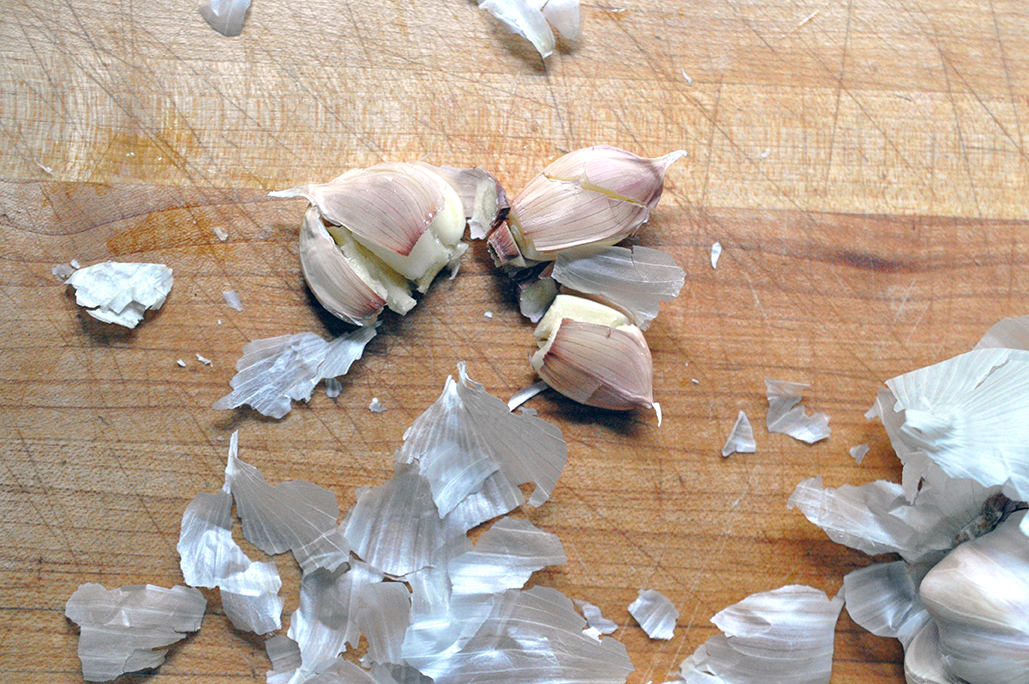
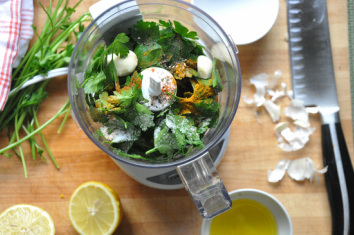
Toast the pearl couscous in a 3-quart [medium sized] pot with 1/2 tablespoon butter until slightly browned, about 3 minutes. Add1-1/4 cup water and a dash of salt. Bring to a boil over med-high heat then cover and let simmer for about 10 minutes. Wash and core red pepper. Add to blender/food processor along with sundried tomatoes, 1/4 cup olive oil, garlic, tarragon, pine nuts, a few grinds black pepper and 1/2 teaspoon salt. Blend until smooth and all ingredients are well incorporated. After washing the spinach and sorrel, cut both into thin ribbons. [Note: sorrel is more common in the spring and fall, it doesn't love the heat, so if this is hard for you to find this summer you should sub in any flavorful green you like...basil, arugula, curly endive...get creative, go crazy!] Zest and juice the lemon. Pat dry the scallops and season lightly with salt and pepper. Heat a large skillet over med-high heat and add 1/2 tablespoon butter and a 1 tablespoon olive oil. When the butter begins to foam and brown slightly add the scallops to the skillet, spacing them out generously. Let sit for 3-4 minutes until the underside is golden brown. Flip, cover and wait one minute more. Turn off the heat, remove the scallops from the skillet, add lemon juice to the skillet and step back – it will smoke a little – this will deglaze the pan and pick up all the flavor from the scallops. By now the pearl couscous should be finished cooking. Add 1 tablespoon olive oil, the drippings from the deglazed skillet and the lemon zest, a dash of salt, a few grinds black pepper and 1/2 of the greens and mix well. Plate each dish starting with the couscous, the greens, a generous layer of the red pesto and the scallops, garnish with a few leaves of tarragon and….Enjoy! 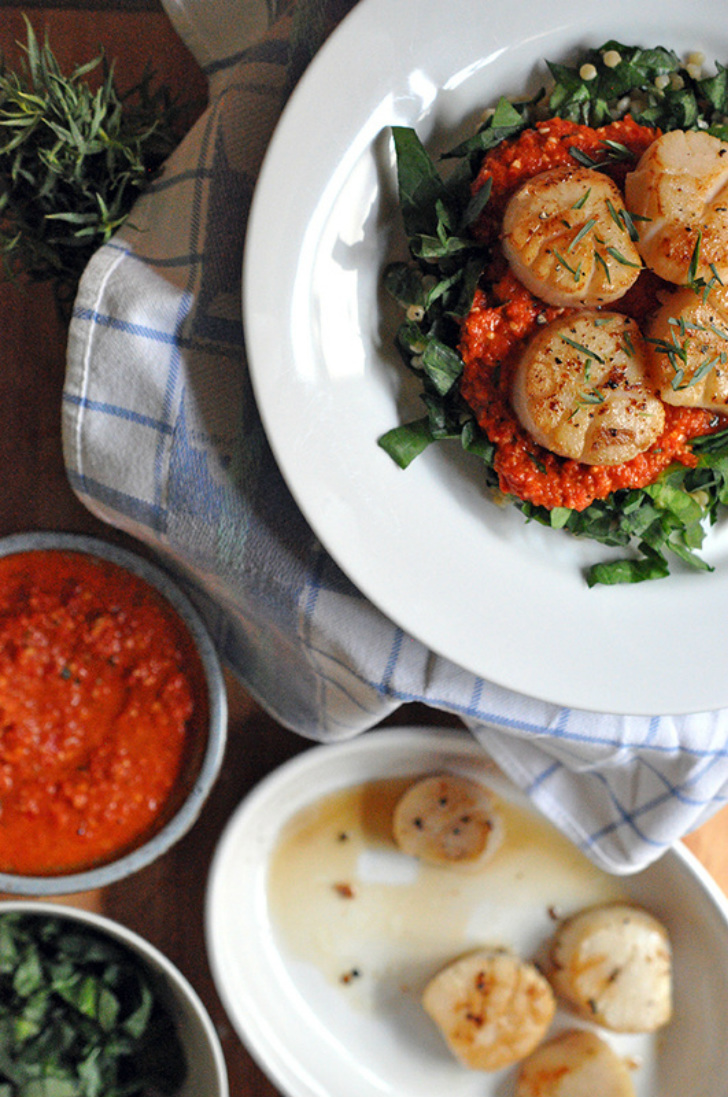
3 Comments
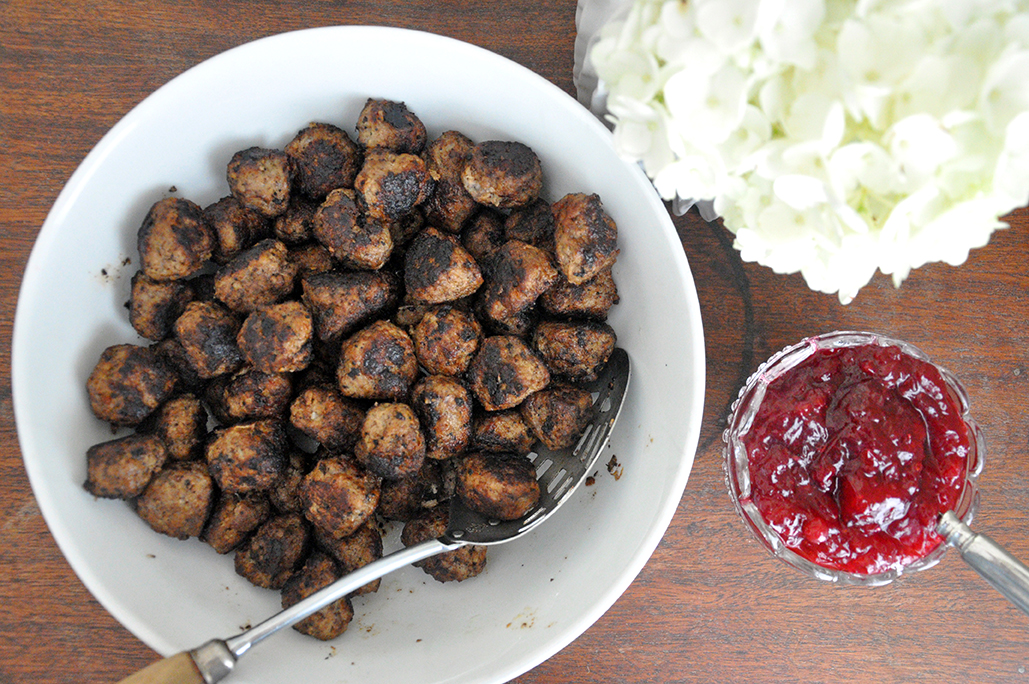
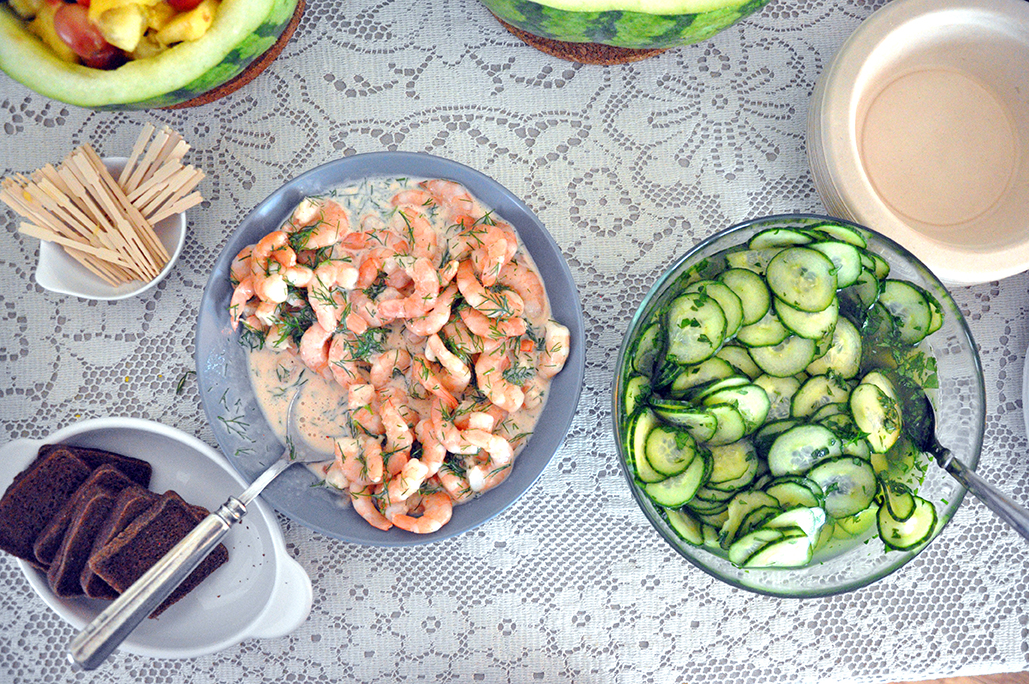
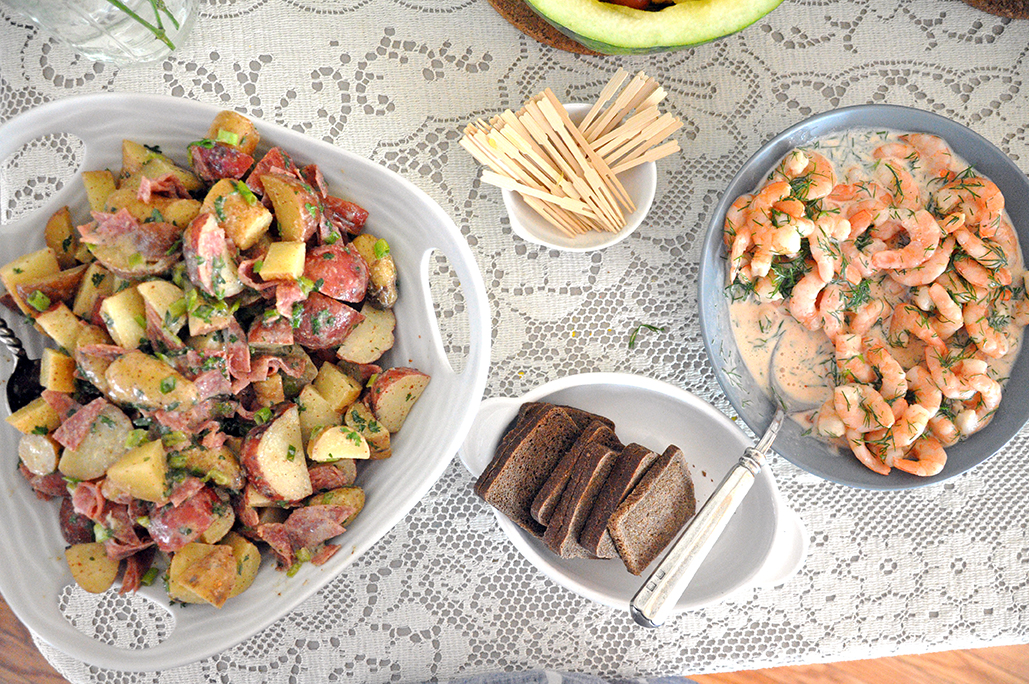
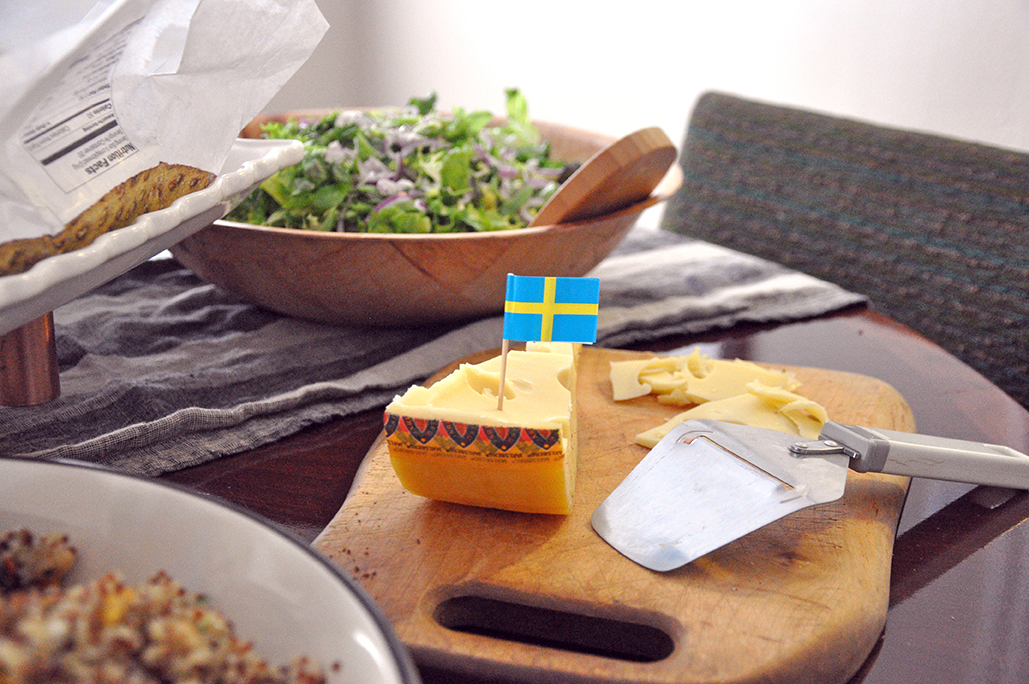 We all have those cringe-worthy holiday family traditions - great Aunt Bethany’s jello molds at Christmas or being forced by your parents to wear lederhosen in family photos. Sometimes they are founded in fact or history, many times they remain shrouded in mystery…yet we still accept them. Why? Because it’s tradition! As children we sighed and stomped and tried to run away from them, not taking part because it was our moral obligation not to. But then we realized that we miss these silly rituals, we no longer live at home or no one makes the effort anymore because we are all adults…and soon you fear they may be forgotten. Of course some people may never even consider this, but being the nostalgic sucker that I am, I do. In fact I am the unrelenting family member encouraging a constant stream of new traditions; the few days before Christmas have become the felt decoration making time [well it happened one year]. Making cocktails with my sister and mother, any time we see each other – yes let’s turn that into tradition too! So I guess I should get to the point. When I was a little girl, my sister and I would go with my mother to Stockholm in the summer. We were visiting her sister and would get to experience the awesomeness that is Midsummer, or Midsommar as they say. It happens all over Sweden on the third Friday of June, the eve of Midsummer’s Day…whole towns of towheads in traditional Folk dress, flowers in hair, jumping dancing running around a green leafy maypole, while singing in a language I still don’t know that well – never quite understanding what was going on, but wanting to be a part of the celebration, this is Midsummer to me. It is a celebration of light, of the longest, sunniest day of the year. For Swedes it is a magical day filled with wild flowers, aquavit, herring and fresh picked strawberries – a weekend long celebration really. But no, this was not really my tradition growing up, but it was my mother’s and so by proxy over the years I have taken it on. So when my good friend and fellow foodie said she wanted to have a summer solstice party – I said, Yes! Midsommar! It happened and it was awesome. We sang Swedish drinking songs and sipped caraway flavored Aquavit, poked at Swedish meatballs with Swedish flag toothpicks. We ate pickled herring and snacked on knäckebrot with jarlsberg cheese. Why did everyone join me so wholeheartedly? Well, because it’s tradition. Just a few links in case you're curious... Swedish Midsummer Traditions A Midsummer Night's Feast at The Tasting Table Nordstjernan - Most popular Swedish Drinking Song Helan Går NYTimes 36 Hours in Stockholm 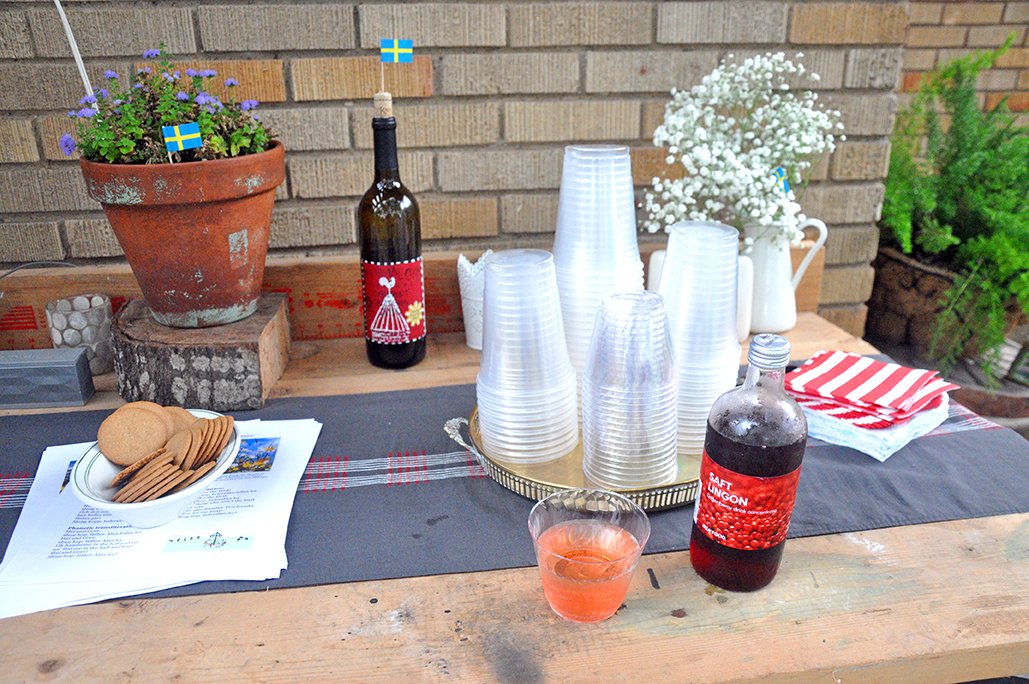 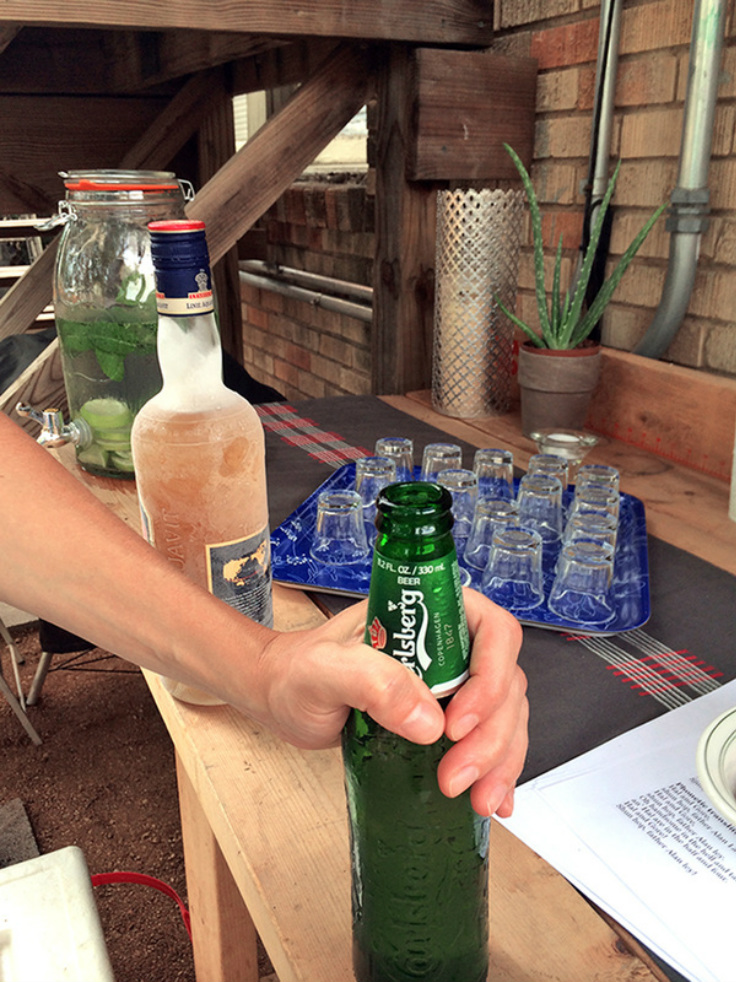 Photo by Brandon Thibodeaux  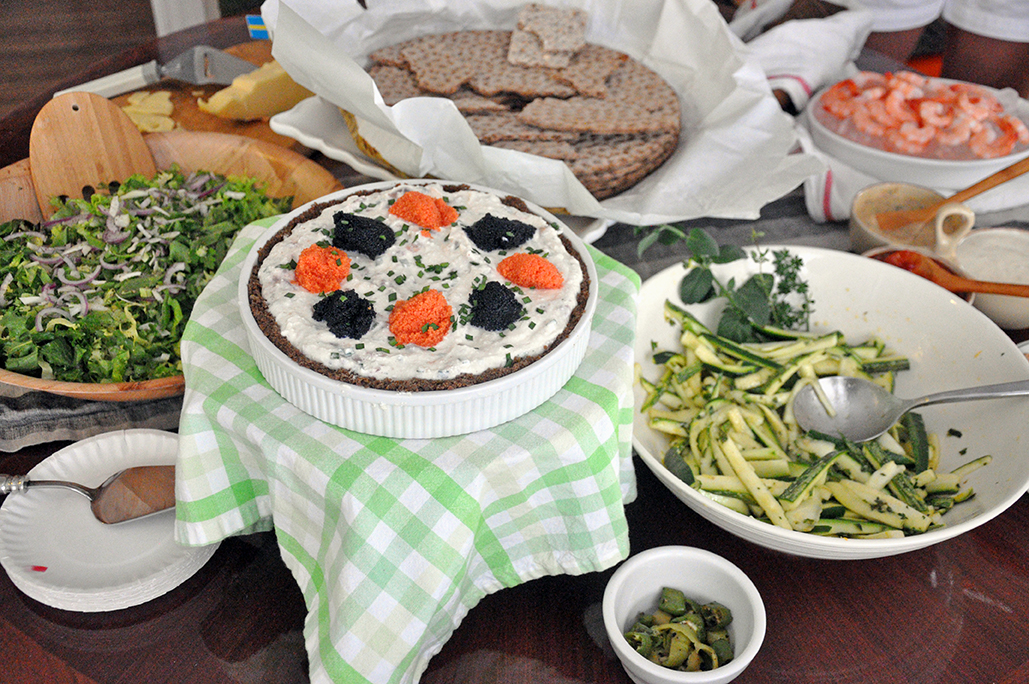 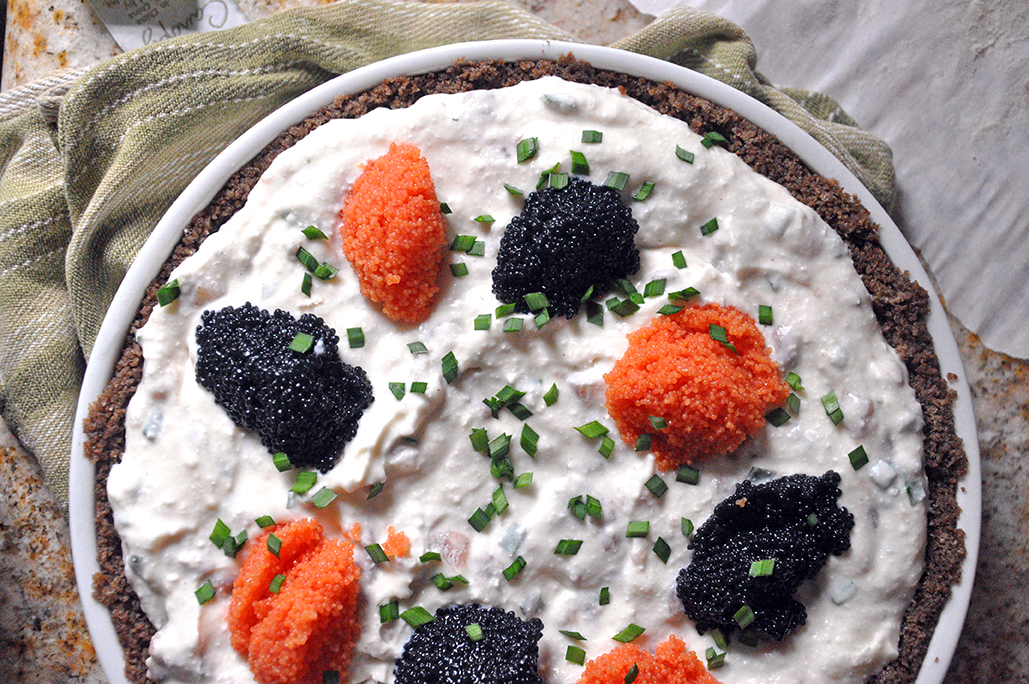
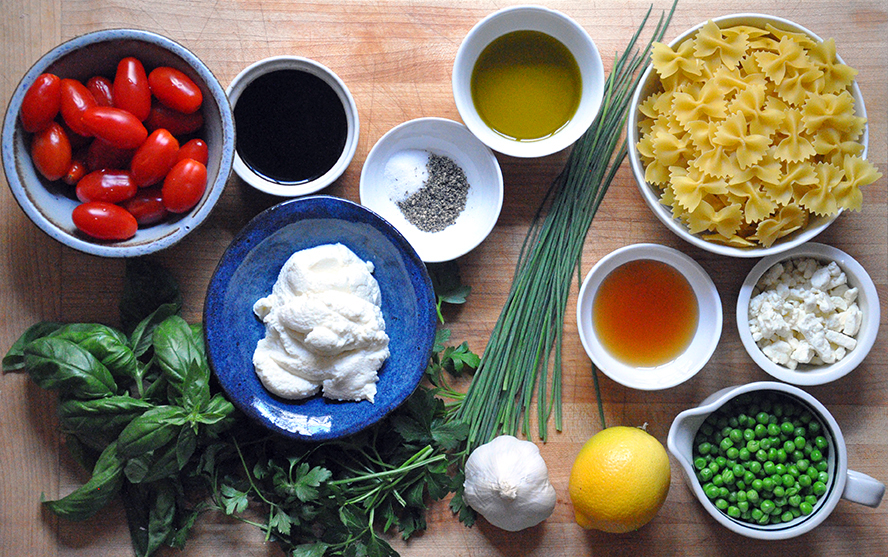
  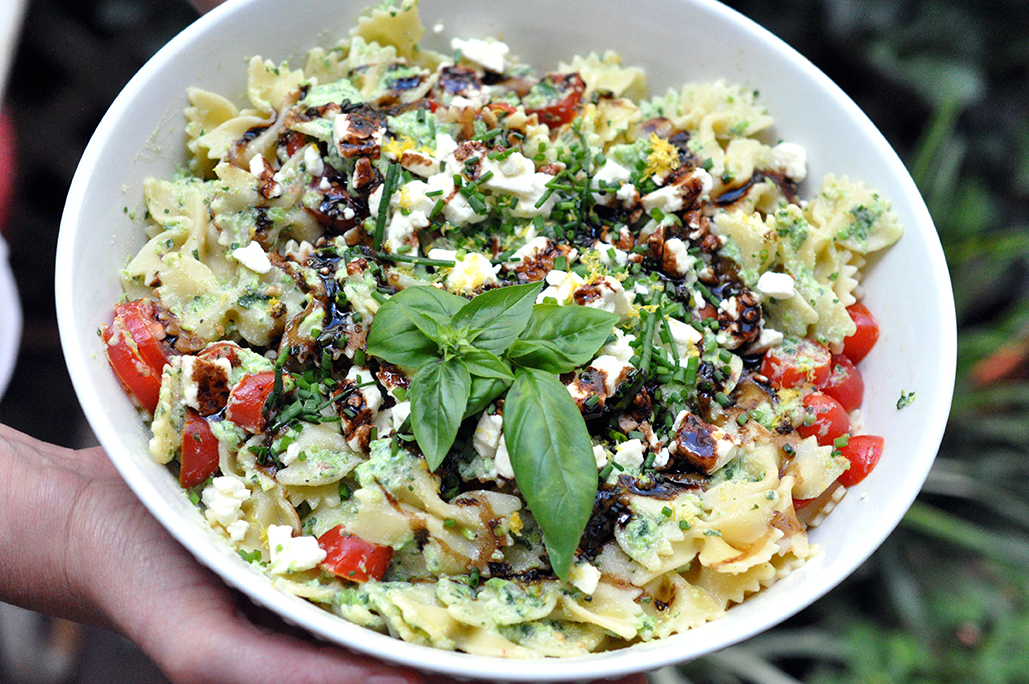 I was on the road a lot this spring but now I’m ready to relax and settle into summer. Relax into morning iced teas and late night ice creams, into sun hats and flip flops and smelling like sunscreen. Relax into the poolside beers and dinner parties where the sun refuses to go down. So I though I would share a good potluck dish that tastes like summer, but is so easy to make it doesn’t keep you from enjoying it! Remember how I said that summer begins and ends with basil pesto…well, enter summer! I know it’s not official, we have a little over a week to go, but I decided to bring out the basil pesto. It’s a little different than the one I made for you guys before; it’s still a no cook, delicious the next day, pasta salad. Cue, sweet peas and grape tomatoes, more summer staples, then throw in some parsley, lemon and top it off with chives and you’ve got something special. The sweet pea herb ricotta sauce – a non traditional take on a pesto – is still a simple blender sauce, which is good because it leaves more time for you to make a little something extra like…a sweetly tart honey balsamic reduction that makes this dish a little fancy. A good looking well dressed pasta salad is always welcome at any party. Sweet Peas are made of these… 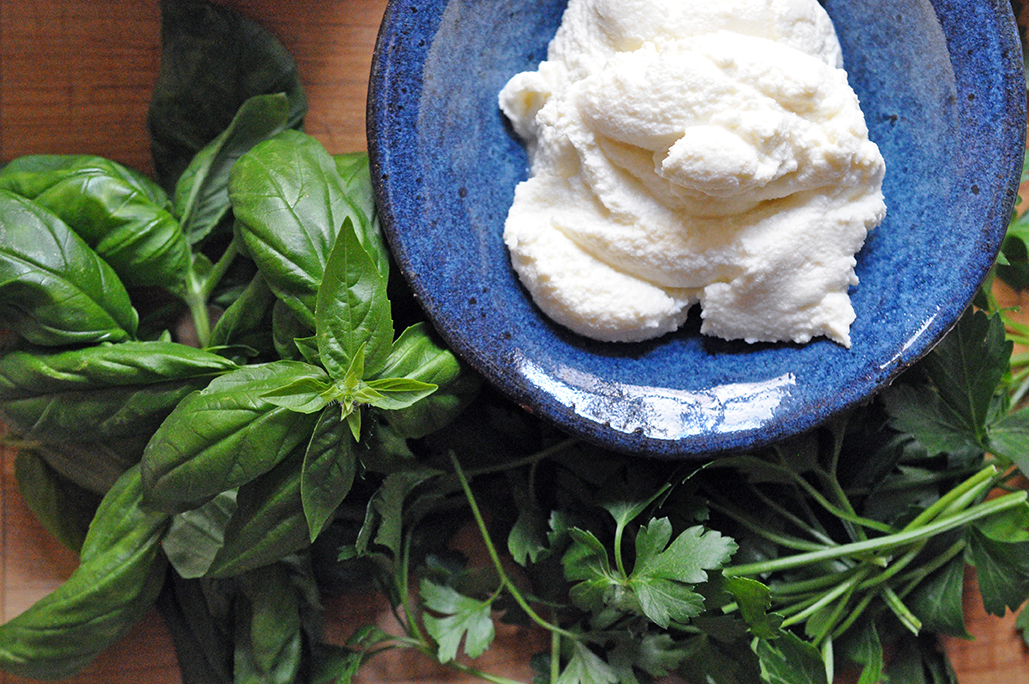 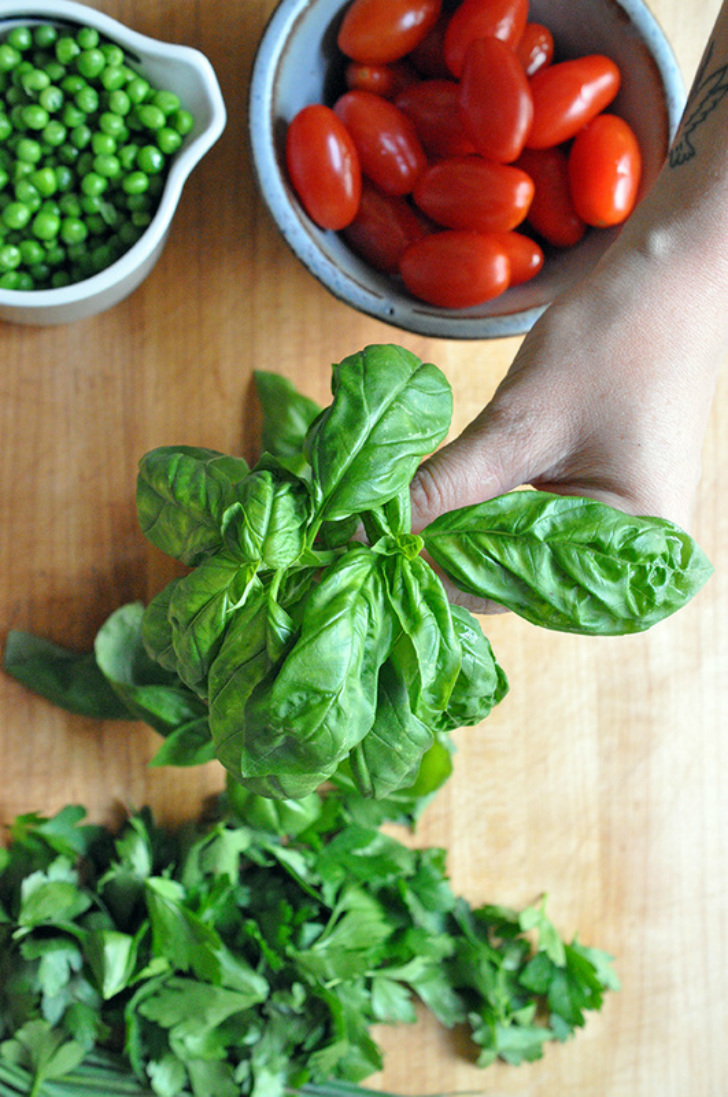 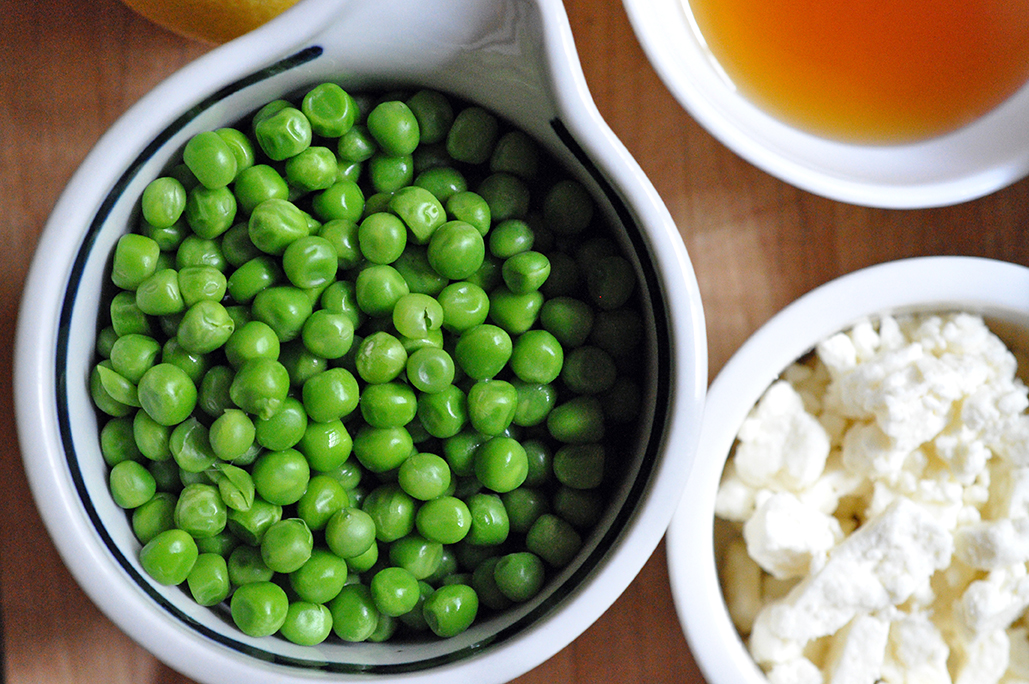 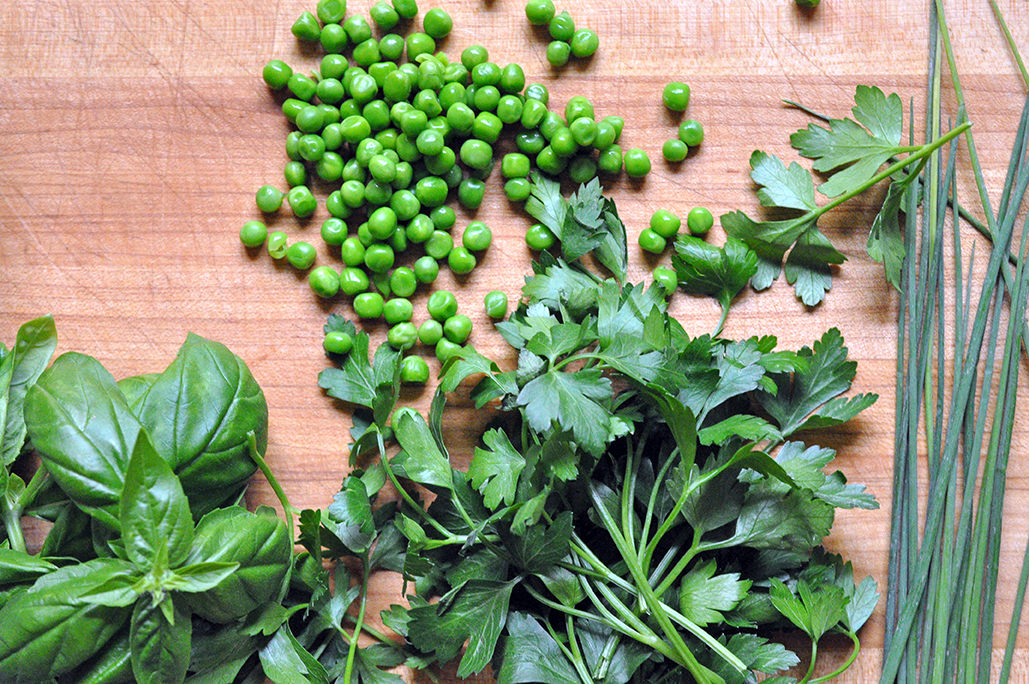 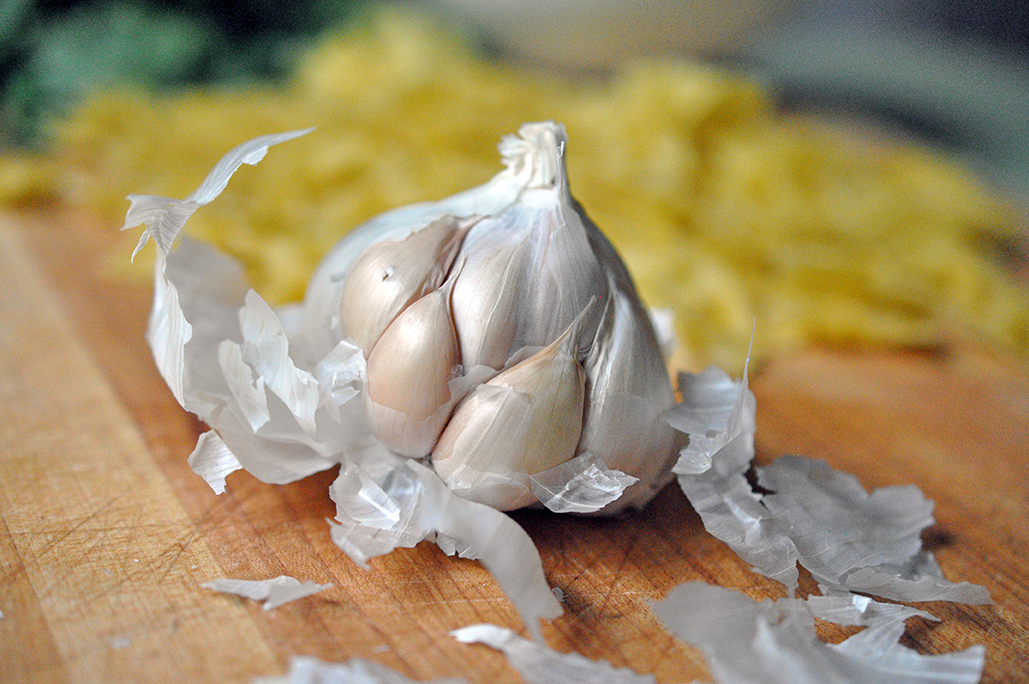
 Sweet Pea and Ricotta Pasta Salad PRINT RECIPE [Prep: 15 mins / Cook: 10 mins / TOTAL: 25 mins [Serving size: 4 dinner sized portions]
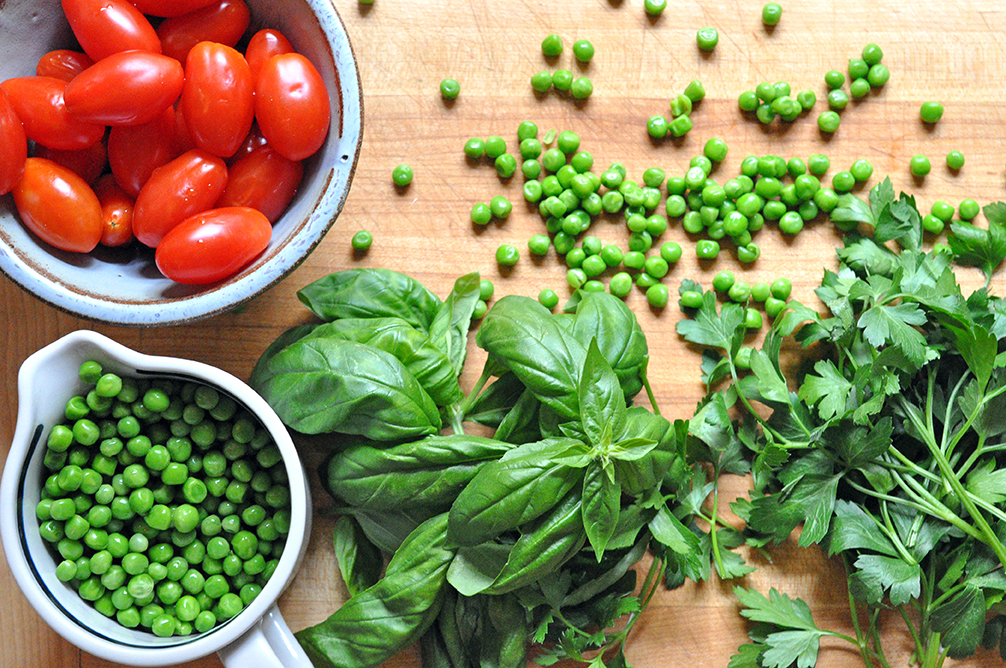
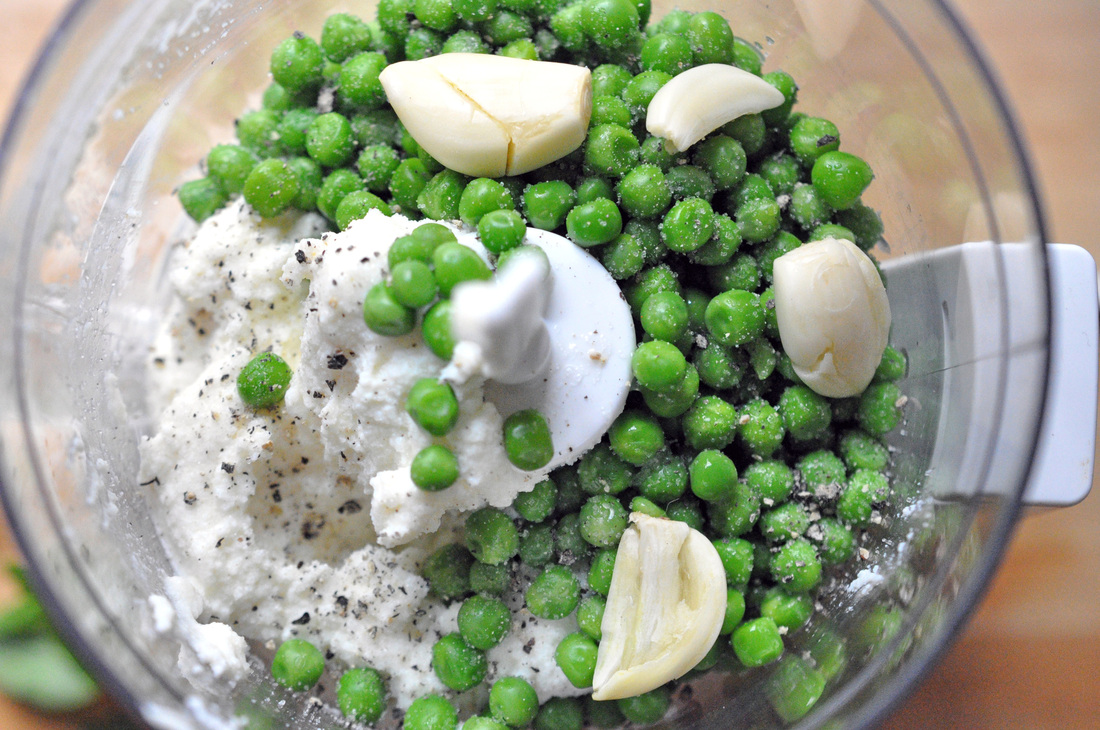
If using frozen peas make sure to take them out ahead of time so that they can defrost. If using fresh peas give yourself a little extra time to shell them. Fill up a large pot with about 5 quarts of water - or until water is about 3 inches from the top. Salt generously - at least 1 tablespoon - cover and set heat to high. Wash tomatoes and slice thinly. Marinate the tomato slices in 1/2 tablespoon olive oil and a pinch of salt. Wash and stem the basil and parsley, zest and juice 1 lemon, and peel 3-4 gloves of garlic [I like a lot of garlic, but it is used raw here so it gives a lot of kick, so use less if you want the flavor to be milder]. Chop the feta into small pieces and mince the chives. The feta, lemon zest and chives will be used as a topping, you can put them aside to use at the end. In a small food processor combine the ricotta, sweet peas, washed and stemmed basil and parsley, lemon juice, 2 tablespoons olive oil, garlic cloves, a few pinches of salt and a few grind of fresh cracked black pepper. Blend until all ingredients are incorporated and the texture is smooth. Let sit in the food processor. When water begins to bowl add the pasta and set timer to 8 minutes. Pour the balsamic vinegar and honey into a small skillet and cook over high heat until it begins to bubble/boil. Lower the heat and let the mixture simmer until it has reduced to half of its volume and is thick enough to coat a spoon, about 10 minutes. When pasta is done cooking, reserve 1/3 cup pasta water before draining. Transfer pasta to a serving bowl and toss with a splash of the pasta water and a tablespoon of olive oil, mix well. Add the reserved pasta water to the sweet pea ricotta sauce and blend – this will help to thin out the sauce a little. Toss the pasta as well as the marinated tomatoes and the sweet pea ricotta sauce. Top the pasta with feta, lemon zest and chives, drizzle the balsamic reduction over the top. Enjoy! 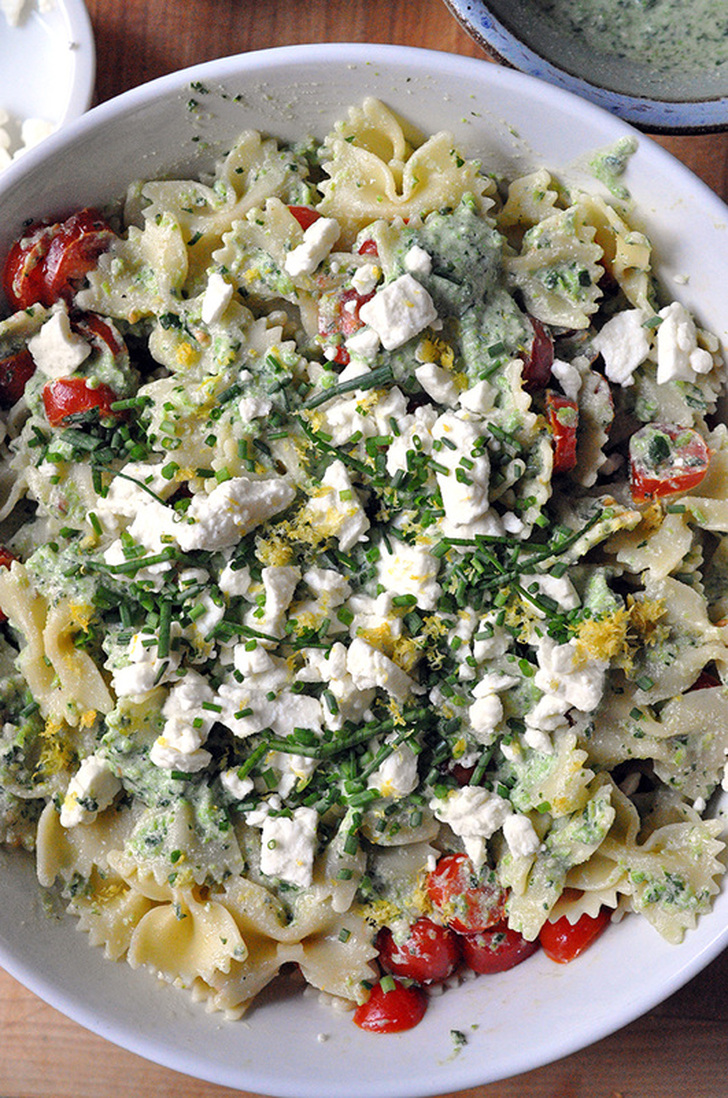 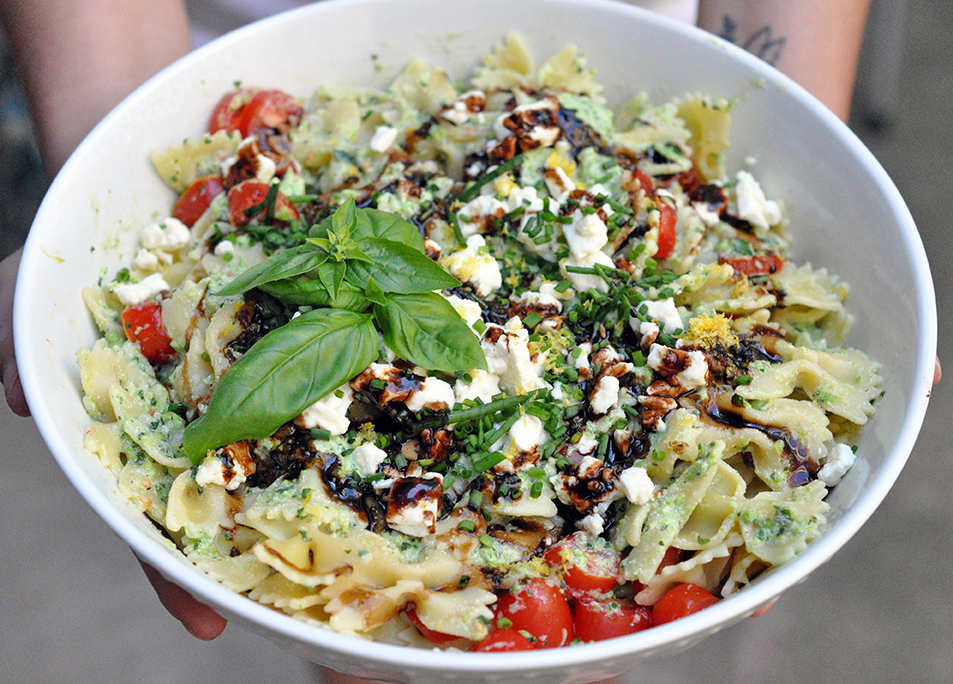 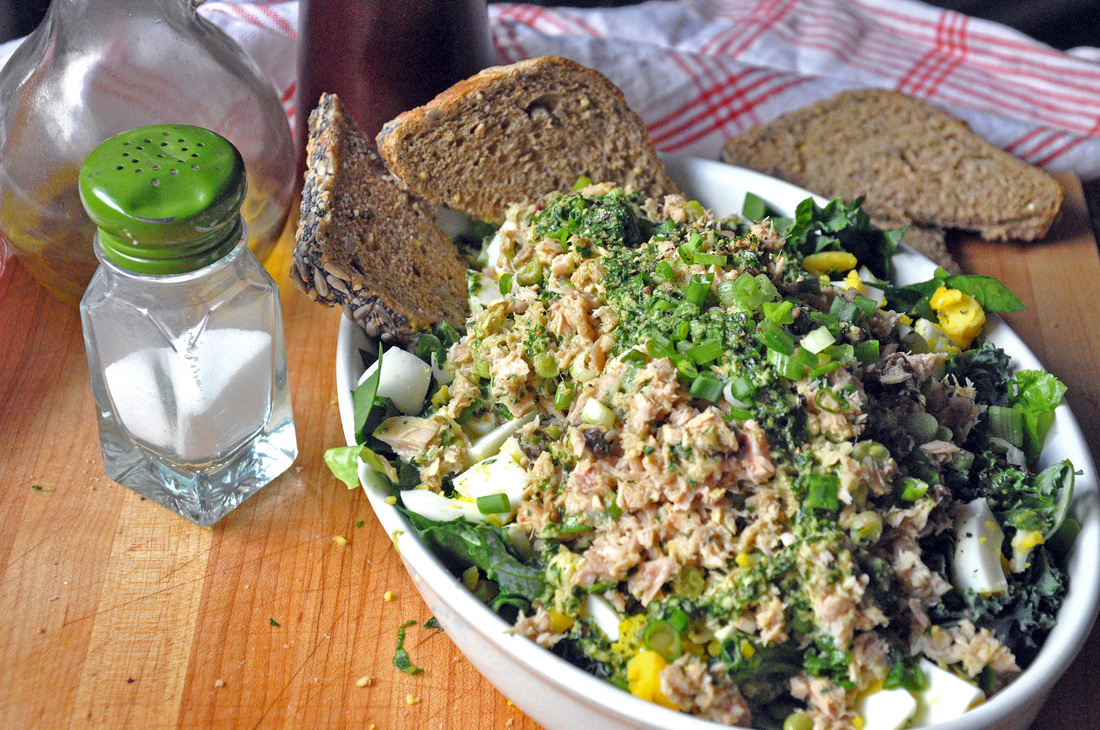 Hey so I’m back! I’m not quite sure who out there is following me yet, but to those who are, I am sorry I left you hanging…Amidst post holiday fatigue, a baby shower, cleaning out my childhood apartment (sniff) so they can be sold, travelling to see family (see two previous items mentioned), a rockin’ ladies weekend in Memphis, and a stronger desire to eat food instead of holding on a sec and documenting it…I haven’t been a good friend to you all. It’s also been super cold, no wait it was springtime last weekend…annnnnd now it’s cold again. So I haven’t been quite sure what I wanted to make for you. So finally I decided on this: tuna salad with raisins and hard-boiled eggs! I call it Eggy Tuna Salad. I have a feeling your first reaction isn’t going to be all that great, its ok I’ll wait. Sound good yet? No? Well it may never actually sound good, but it tastes good and that’s all that matters. Come to think of though, I’ve had this one in the back of my mind for a while. Ever since I first tasted this combination, tuna salad with hard-boiled egg on raisin grain bread, I’ve been a bit perplexed. It was a few years ago now and having put some space between that sandwich and my palette I can quite remember the seasoning, but I thought I’d give it a try and put my spin on it. Oh and I used to think a boiled eggs was just you know…a boiled egg. But check out this diddy from Bon Appetite if you what to know what’s what about cooking an egg. 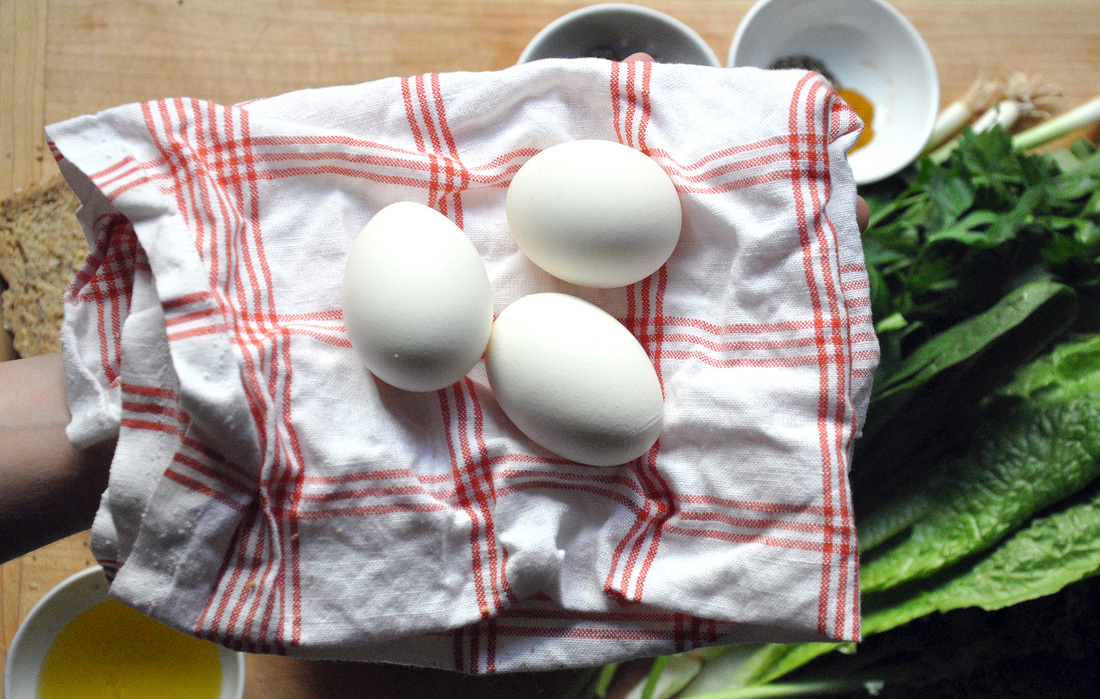 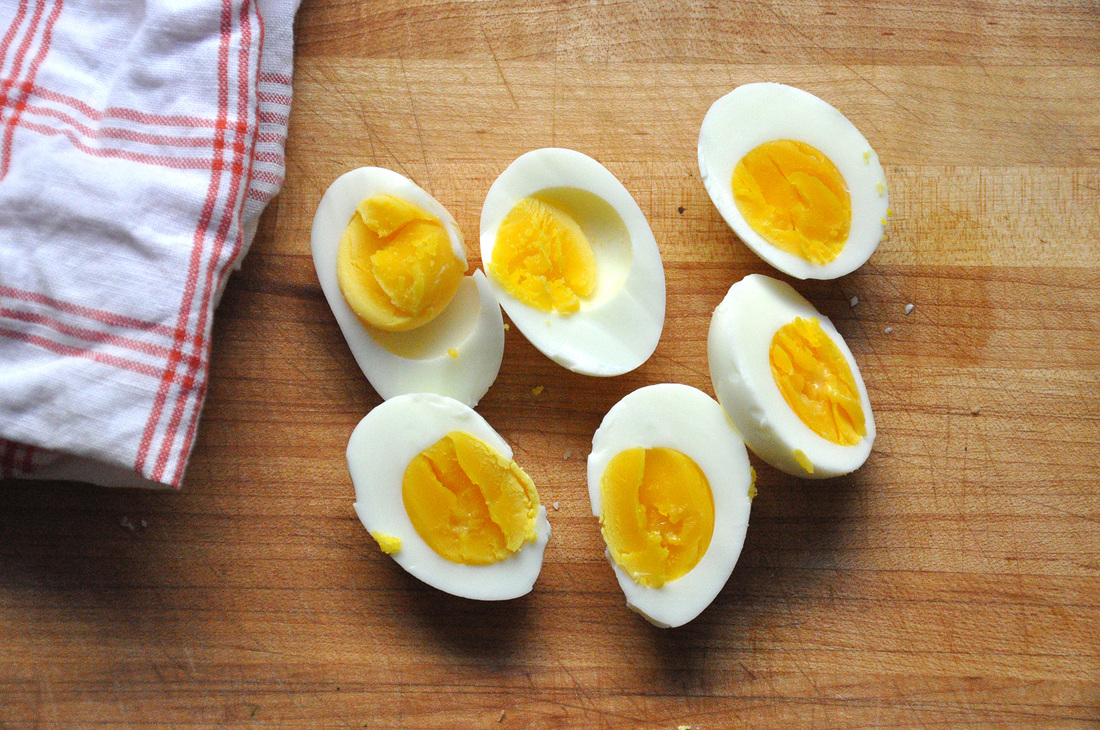 
Eggy Tuna Salad PRINT RECIPE [Prep: 20min / Cook: 5min / TOTAL: 25min [4 small servings]
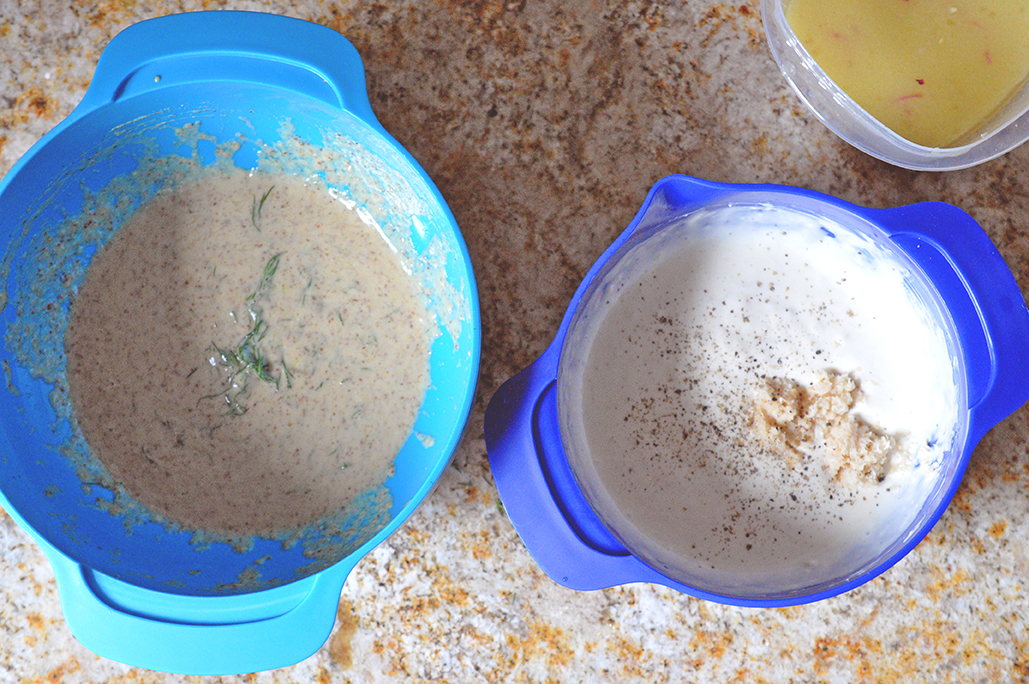
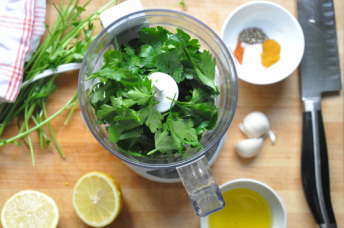
Place eggs in a pot, add enough water to cover the eggs, cover and set over high heat. You want to let the water come to a boil, when this happens, wait one minute, then remove from heat and let sit covered for 10 more minutes. After this they will be hard-boiled but not overcooked or dried out. Before peeling you can put them in a cold-water bath so they will be cool enough to handle. After the eggs have been boiled and are resting you can make the salad dressing. Using a mini food processor (you can do this by hand but you’ll need to mince or press the garlic and finely chop up the parsley first) add parsley, olive oil, lemon juice, water and spices. Pulse until parsley leaves are broken down. Now onto the salad greens. After they have all been rinsed and stemmed where needed (only the stem of the kale really needs to be taken out), roughly chop up the spinach and romaine, finely chop the kale and thinly slice up the scallions. Add all, reserving about half of the sliced scallions, to a large mixing bowl and incorporate a few tablespoons of the salad dressing. Toss until well mixed. In a small mixing bowl, incorporate the tuna, raisins, remaining scallions, 2 tablespoons of the salad dressing, a dash of salt, pepper, cayenne and curry powder. Mix well. Put your toast into the oven/toaster and get started with peeling the cooled eggs. Once peeled chop them up into big chunks. To assemble the salad, place the lightly dressed greens on the bottom of your serving platter, next the hard boiled eggs, and finished it off with the tuna salad. Drizzle the remaining dressing over the Eggy Tuna Salad. Slice up your toasted bread and enjoy! 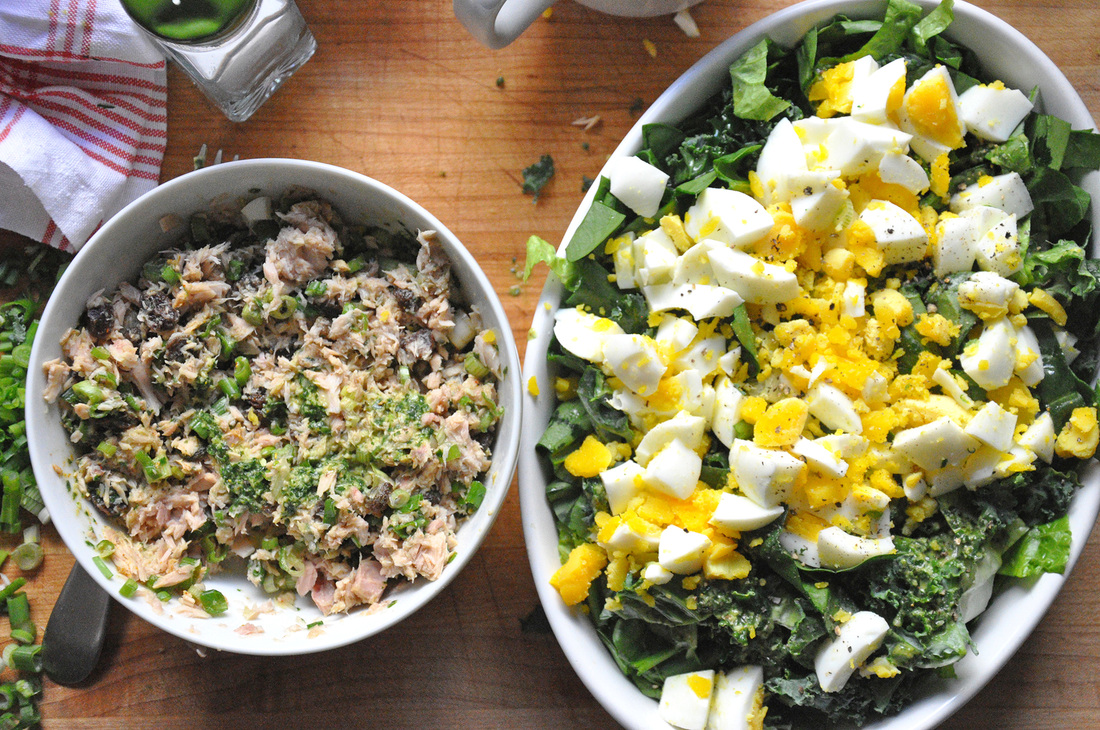 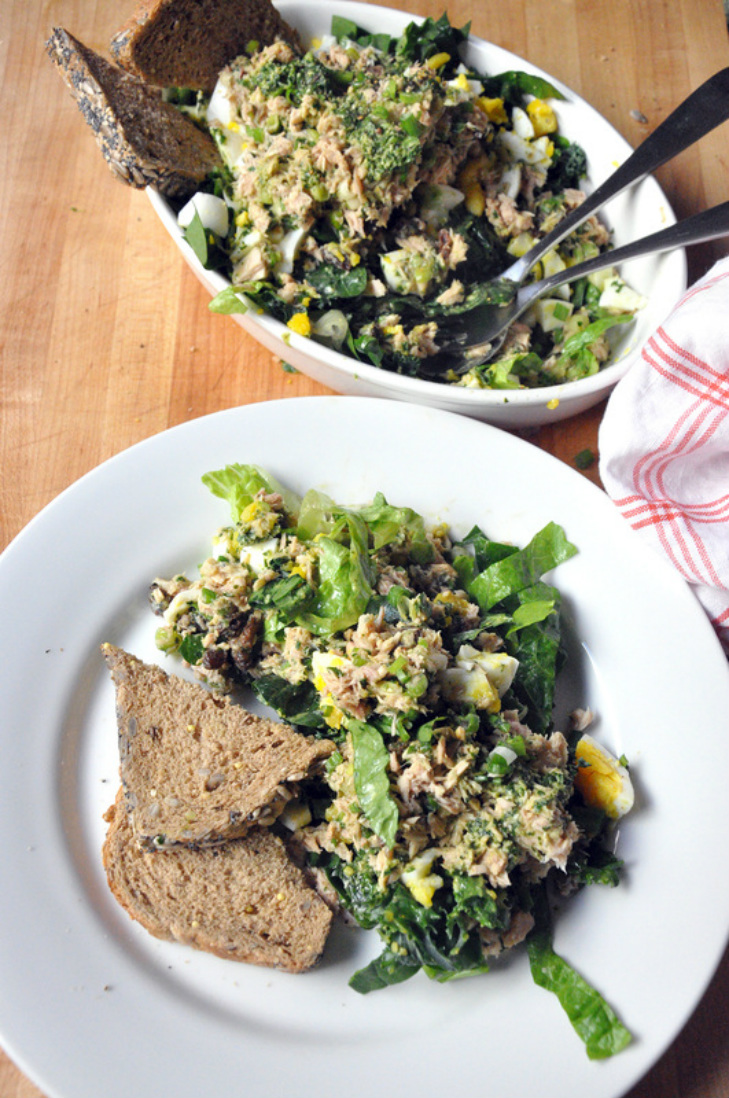 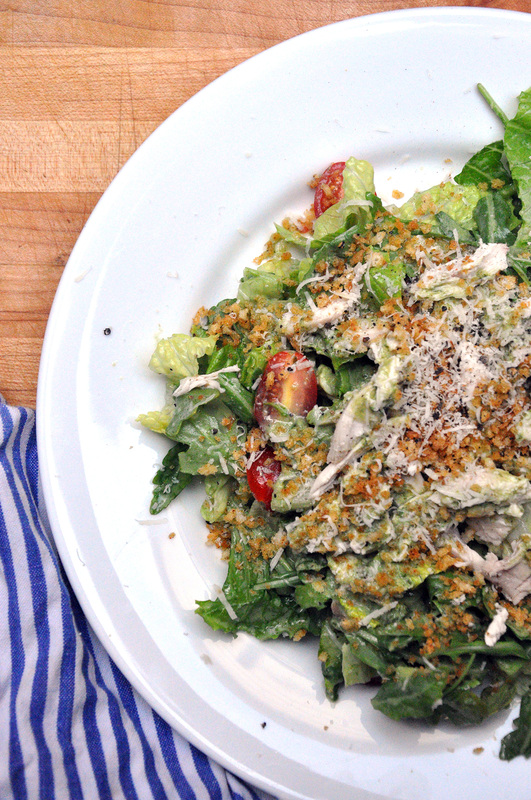 I apologize – I haven’t been posting recently, but I have been cooking and eating – a lot. You see that’s been the problem either I don’t stop to take photos for my blog, or I’m trying something out for the first time – either a random concoction of my own or someone else’s recipe that I just cant stop thinking about. I even tried my hand at home made pasta. Excuse # 3 is that my sister was visiting – just in time to catch the last weekend of the Texas State Fair and all the fried food you could dream up. Again, I was all set to take photos, but I quickly got distracted by said fried food, and my good intentions fell by the way side. Therefore I’ve decided to dedicate this post to left overs based on some killer recipes I’ve tried out. The first is a smoothie, the Green Machine Smoothie to be exact taken from Whole Living’s website, it yields about 3 cups worth of healthy goodness. It combines parsley, romaine, kale, pineapple and ginger perfectly – I know I’ve gone on about parsley before but who knew it could taste so good in a smoothie? The recipe also calls for mango, but I’ve subbed in apple juice and apricot juice, it’s just as good. Have coconut water hanging around, you could add a little of that too! So I’m getting off track and could very easily end up wandering into my kitchen and see what else I can throw into my blender. My point is that I have some romaine lettuce and purple kale in my fridge and whenever I have romaine I always want to make a creamy caesar salad. 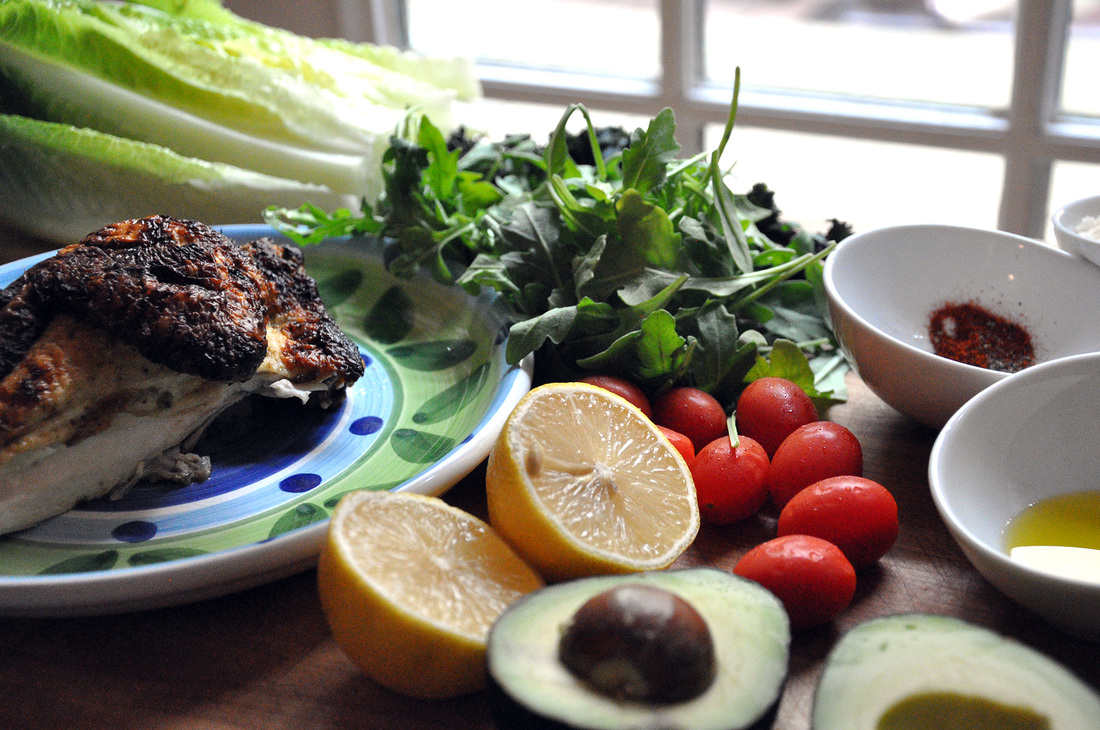 This brings me to the next recipe that I was literally talking about for days - Melissa Clarks’, Green Goddess Roasted Chicken from the New York Times. I don’t cook chicken often much less a whole chicken, but the photos from this NYTimes story where pretty ridiculous. All you had to do to was blend a few ingredients, Buttermilk, basil, chives, green onion, garlic, and a little salt and pepper, do a spatchcock number on that chicken [butterfly it] and let it marinate over night. Then roast in the oven for about 40 minutes at 500 degrees. You reserve a little of the marinade sauce at the beginning to drizzle on the finished bird and its pretty close to roasted chicken perfection. The only suggestion I would make is that if your bird is small enough after it’s been flattened, brown the underside in a cast iron skillet and then transfer it into the oven. Basically what I am left with is, some leafy greens, left over roasted chicken, and a badass basil chive buttermilk sauce. So yes, in my mind this equals a rockstar version of the good old traditional chicken caesar salad. 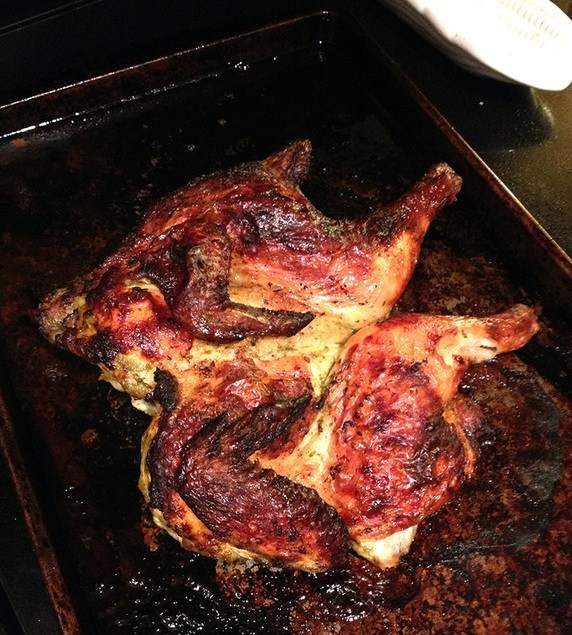
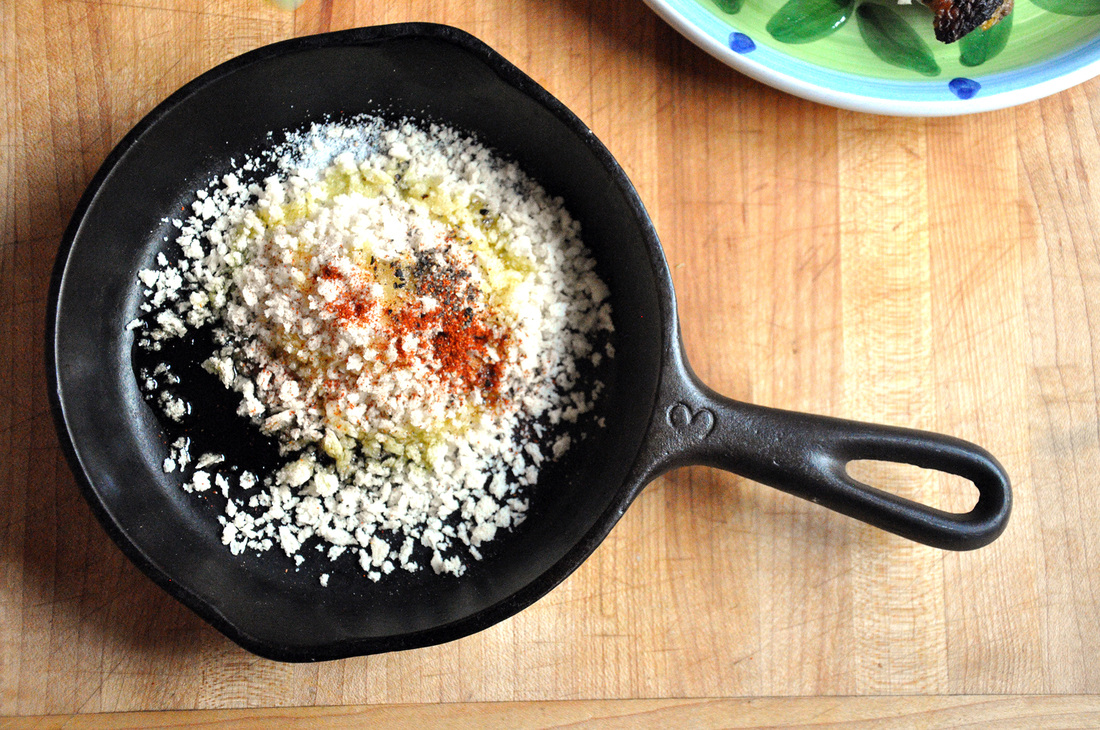 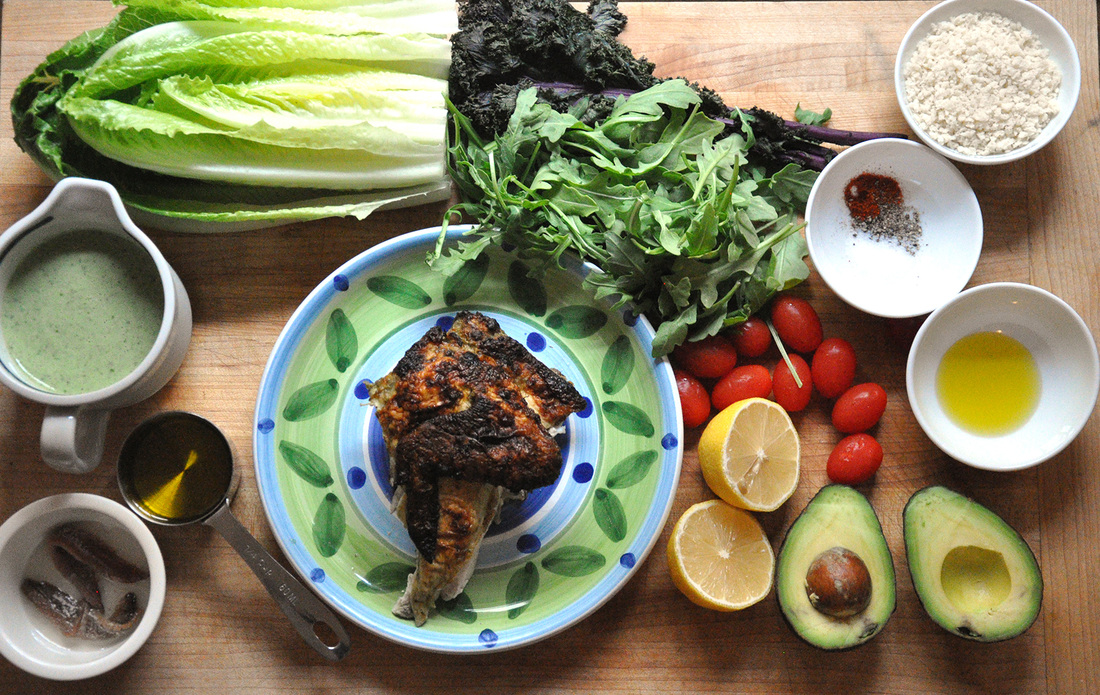 Rockstar Chicken Caesar Salad PRINT RECIPE [Prep: 20 / TOTAL: 20] [Serving size depends on home much chicken is left over]
Dressing:
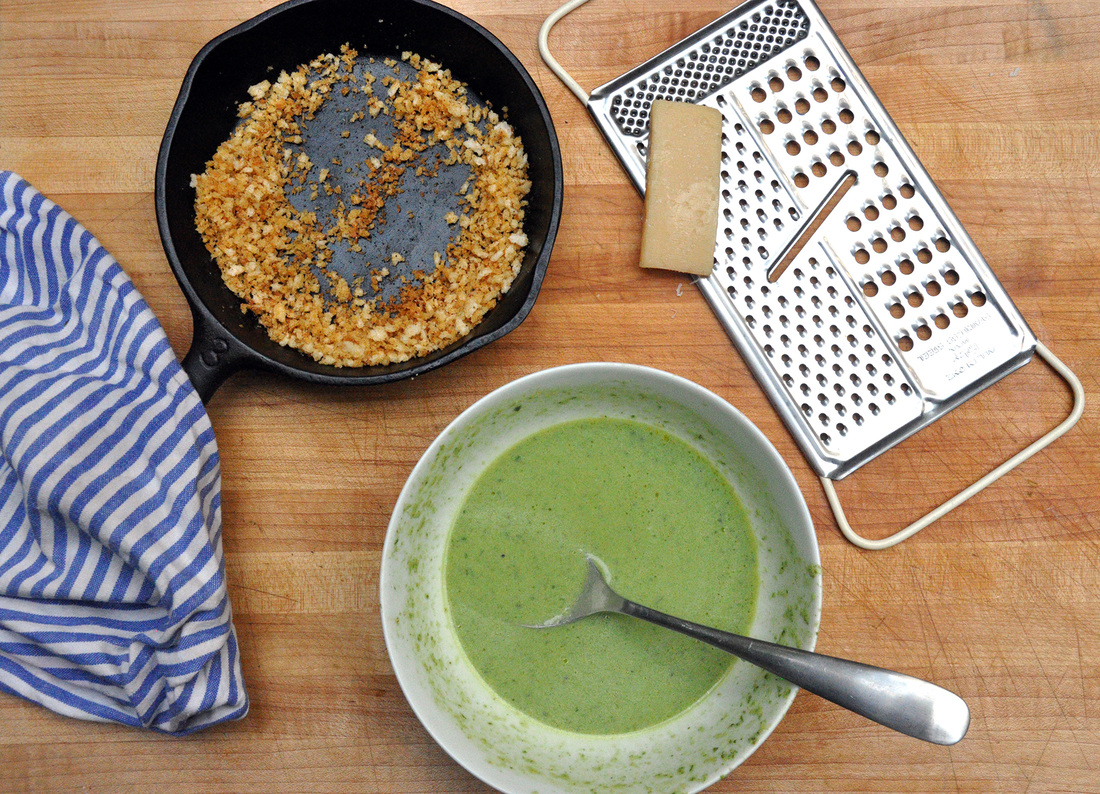 For the basil and chive buttermilk dressing, whisk all of the ingredients together in small bowl except for the olive oil. The oil you should slowly incorporate a little at a time while whisking, so it can emulsify and the dressing can become thicker. This dressing won’t become as creamy as a traditional caesar salad because of the volume of buttermilk already in the sauce – it will still taste darn good. To assemble the salad just wash and chop up the romaine, kale [stem it first] arugula and put into a large mixing bowl. Wash and halve the cherry tomatoes, pit and cube/slice the avocado and mix both in with the greens. Here you can pre-mix the salad with a few tablespoons of the dressing – just enough to coat everything. In small skillet or saucier pan toast a 4 tablespoons of panko crumbs on medium-high heat. Add a dash of olive oil, a pinch of salt, a little cracked pepper and a pinch of cayenne pepper. Toast for 4 minutes, stirring a few times so it doesn't burn. Pull the roasted chicken off the bones and slice it up. [You should save all the bones, skin and other inedible pieces from the whole roasted chicken, it will make killer stock. You can always save them in a Ziploc bag in the freezer until you are ready to make a homemade stock.] Plate the mixed salad and top with the sliced chicken. Drizzle more of the dressing on top and finish off with the toasted panko, the shaved parmesan and a few grinds of cracked pepper. 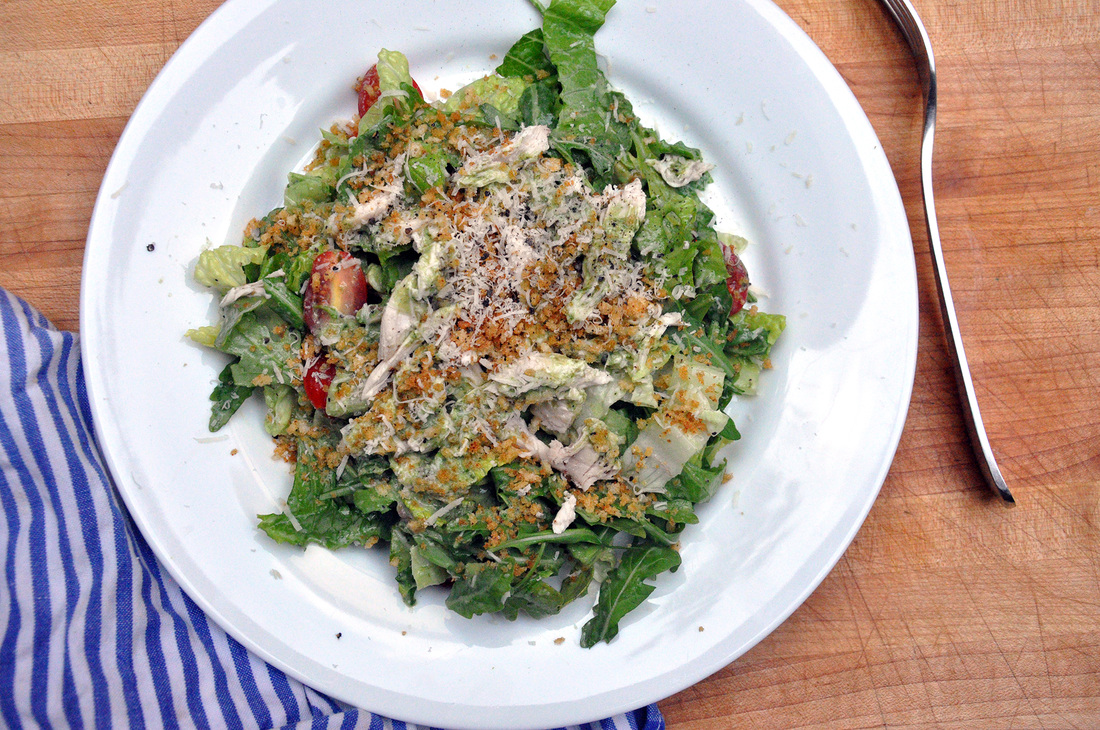 [If you see something missing in this photo it's because I had to ditch the purple kale, it smelled pretty bad – it had gone funky. It’s always a bummer when food goes to waste...] NOTE: If you have some leftover chicken but no buttermilk sauce (so sad) no worries, here’s a basic caesar dressing that’s easy to whip up:
Classic Caesar Dressing [Should make enough for 2-4 salads, depending on serving size]
Blend all the ingredients together in small food processor, except the olive oil, or mash anchovies and pressed garlic together in a mortar and pestle and incorporate all the ingredients – again, except the olive oil. Transfer to a small bowl or measuring cup and slowly drizzle the olive oil while whisking the mixture. The slow drizzle will help the dressing come together and become creamy. If it becomes too thick for your liking you can always add a little water or vinegar to thin it out to be more like a vinaigrette. 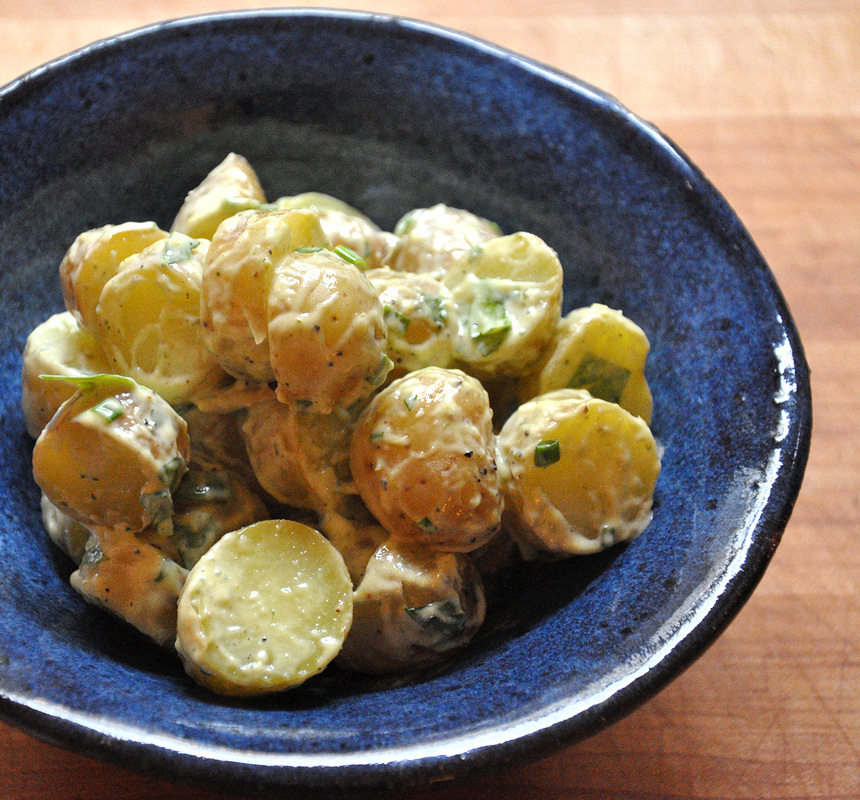 The varieties of potato salads are endless. Some are light and fresh, others tangy and vinegary with chunks of cornichon, some are heavy on the mustard seeds, other the mayo. Everyone has a favorite. I never turn down potato salad; I have to try them all. This general understanding is what brought me to my latest creation. This past summer I was lucky enough to be invited to an out of this world, celebratory, indulgent, week long vacation in Normandy with cherished old friends. We stayed at a chateau…yes I am still pinching myself. There was an abundance of good food…it was one of those experiences where everything simple just tasted better. The bread, the brie, the saucisson, the wine…and apparently the potato salad. One of the nights we stayed in and cooked. Grilled meats, roasted veggies – charcuterie, olives and cheese were plentiful, as were fresh crusty baguettes. And then there was this simple potato salad with the tiniest potatoes I’d ever seen. It was lemony and chivy, a little creamy and gone way to quickly. I never got the recipe – perhaps there wasn’t even one, perhaps it was the creation of whim. Though potato salads are a thing of the summer, I recently I saw these same potatoes in the grocery store and knew what I had to do with them. 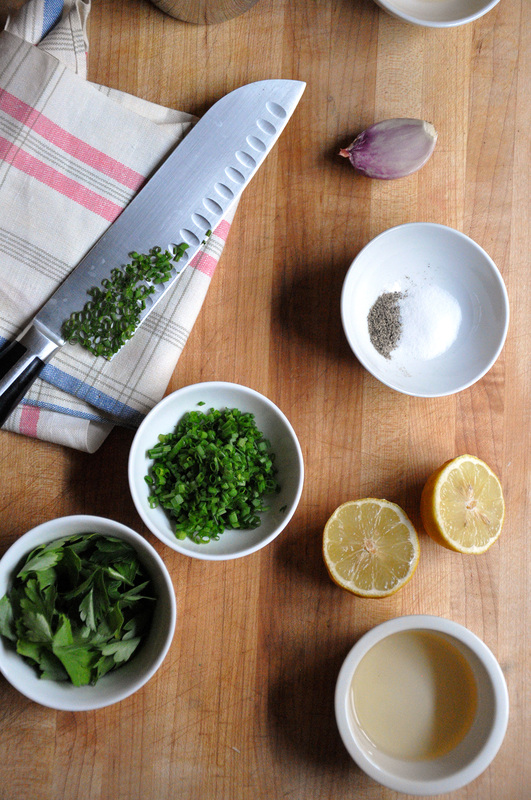 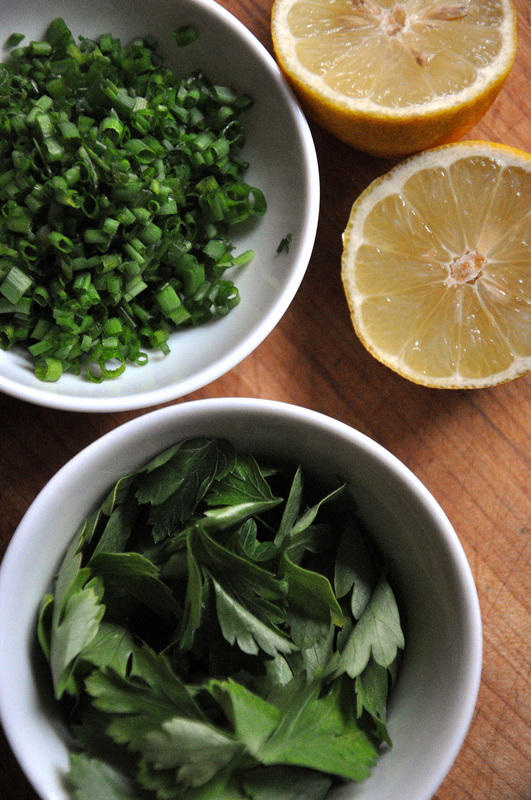 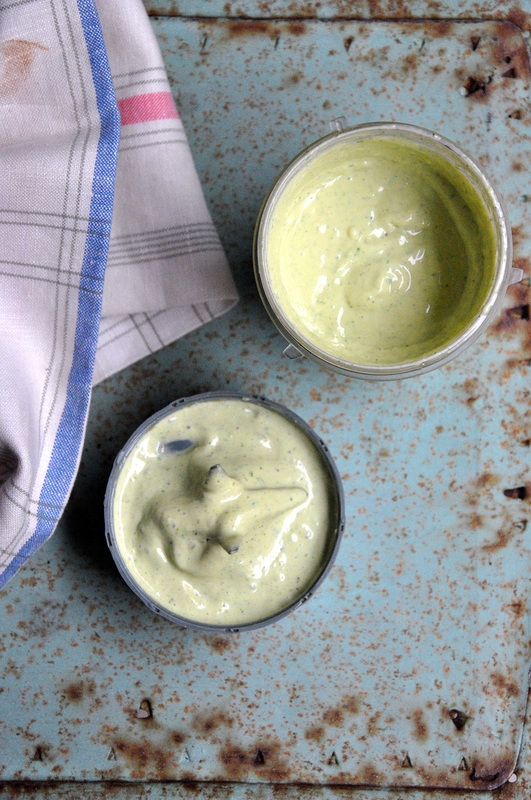 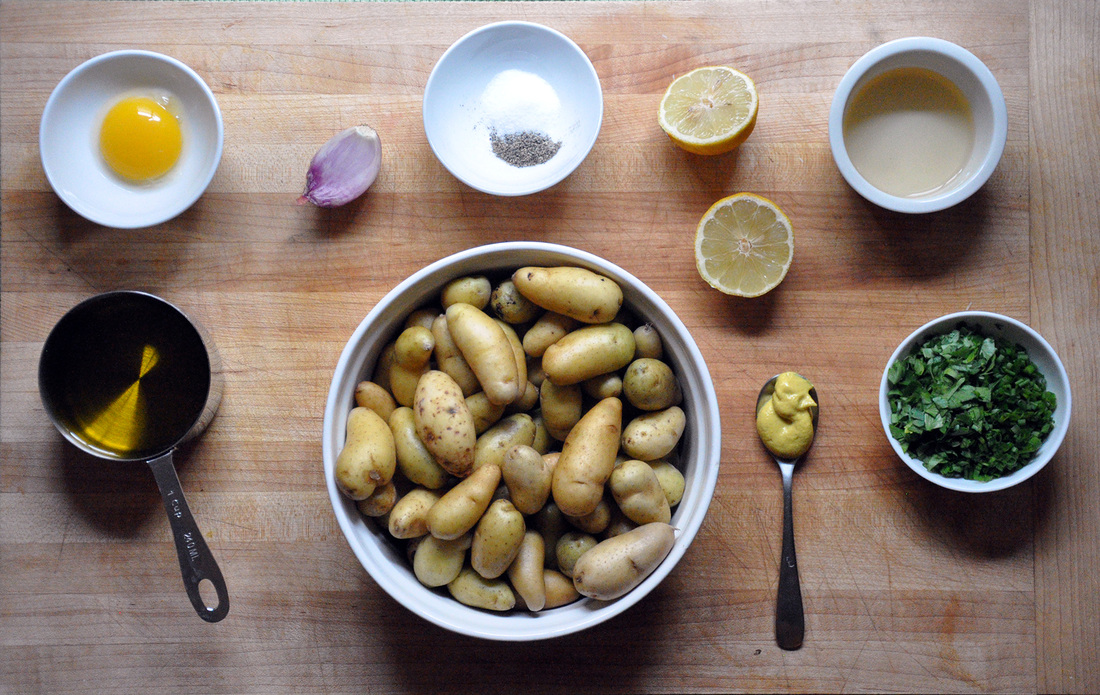 Three Herb Aioli Teeny Tiny Potato Salad PRINT RECIPE [Prep: 10 / Cook: 15 / TOTAL: 25 minutes] [makes about 1 cup aioli and 6 side servings of potato salad]
Start out by washing the teeny tiny potatoes thoroughly under cold water. We will wait to cut them until after they have been cooked. Place potatoes in a large saucepan and fill with cold water until just covered. Salt water generously [at least 1 teaspoon], put on high heat and cover. It should come to a boil after 4 minutes. As soon as this happens lower heat to medium and leave uncovered simmering for 10 minutes. You can check for doneness by piercing the potatoes with the point of a paring knife, it should slide in easily. If you think they are ready, it’s always a good idea to do a taste test first. While the potatoes are coming to a boil, incorporate the peeled and quartered shallot, half of the chives, half of the parsley,1 cup olive oil, 1 egg yolk, 1 teaspoon of salt in a small food processor. Blend for 30 seconds. Now add to the food processor, 2 tablespoons of tarragon vinegar, lemon juice [from one of the lemons], cracked pepper and mustard and blend for 30 seconds. This combination will make an aioli. The longer you blend the thicker it will become. You can always thin it out with some water. This step can also be done by hand. You would whisk together all of the ingredients except for the oil. Once the mixture is well combined, add the olive oil, dribbling it in slowly while whisking the egg yolk and vinegar mixture. The aioli should start to form as the yolk soaks up the oil. When the potatoes are finished remove them from the heat and pour into a colander placed in the sink. Let the potatoes rest in the sink until they are cool enough to handle. If you’re tight on time, you can run cold water over them for 1 minute so they are cool enough to handle faster. Cut the potatoes into ½ inch rounds. Pour juice from the second lemon, 1 tablespoon of tarragon vinegar, and 1 teaspoon salt over the potatoes, mix and let sit for a few minutes. Add the aioli and the chopped parsley and chives, toss well. Taste and season with sea salt or fresh cracked pepper – and enjoy! 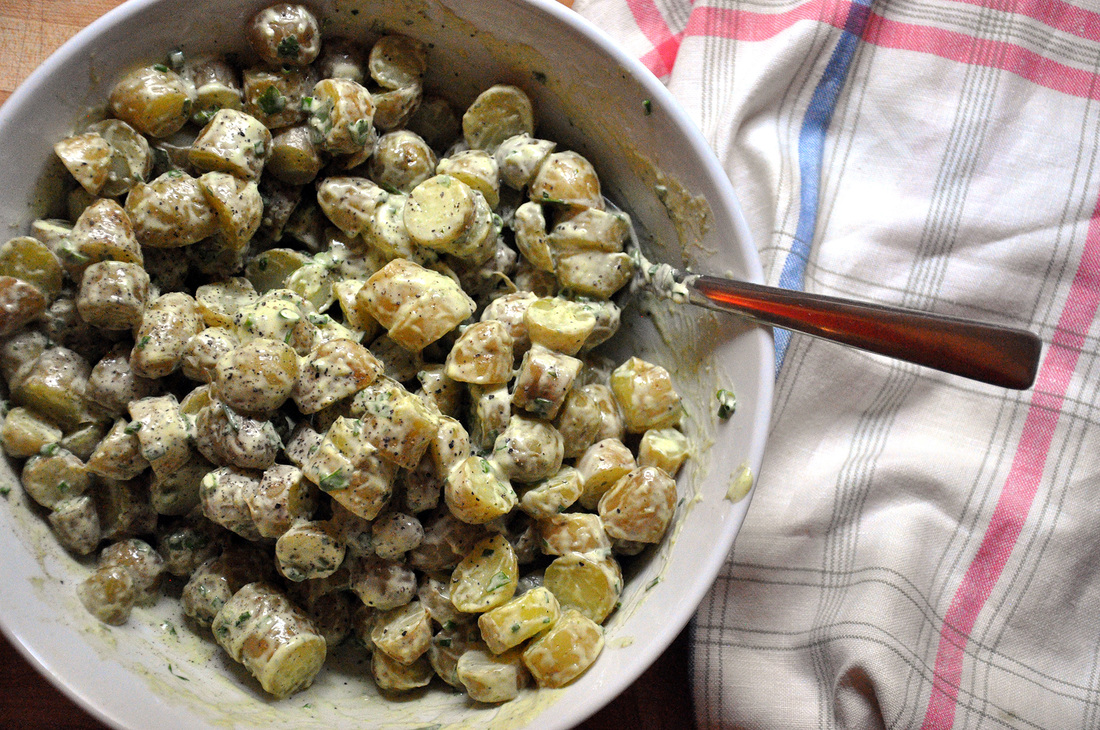 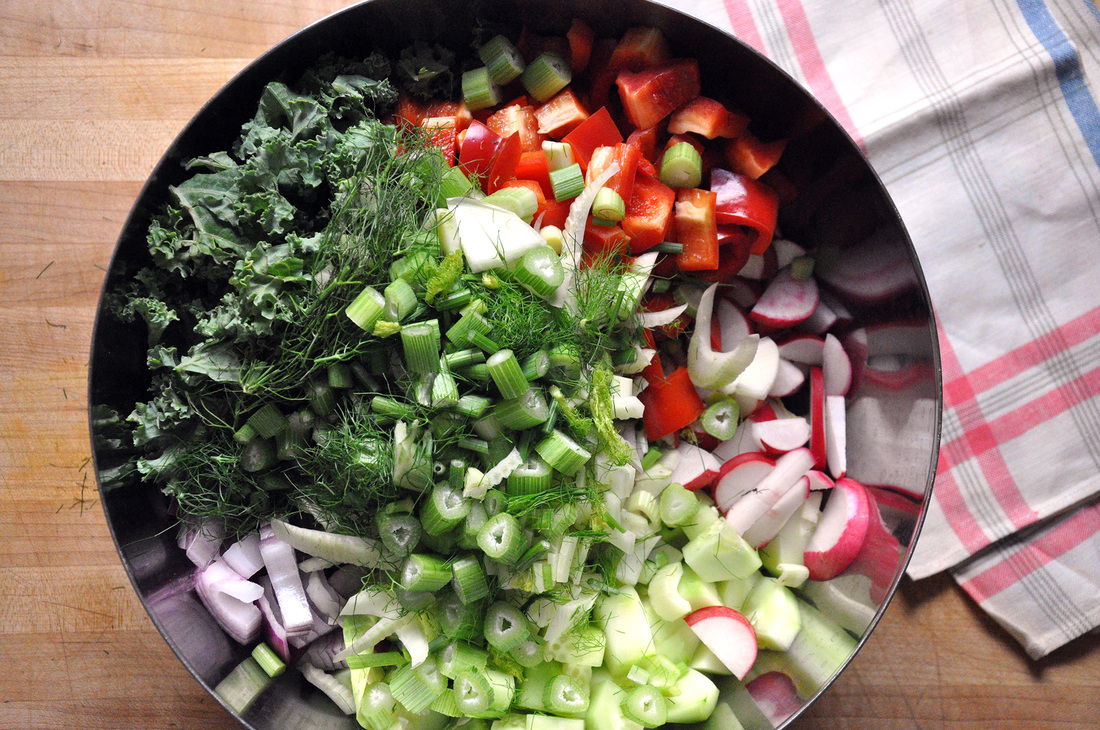 This ain’t no side salad. If you’ve never had fennel before, then welcome. What about radishes? My love affair with fennel began a few years back. My mother had roasted a whole chicken with carrots, onions, and this thing called fennel. When roasted in the oven it melts in your mouth and makes you feel good. It took me a while to try fennel raw. Why? Because it smelled just like licorice, which, despite my Swedish heritage, I cannot stand. Fennel raw is a whole other food than when its cooked. When raw it’s sweet and tough, it’s flavor a far off distant twice-removed cousin of licorice. Don’t get me wrong, it’s a strong flavor and I sometimes use it up a little at a time, like a topping…on pizza, or a burger… Ok now onto anchovies. I promise that even though you say you don’t like ‘em, you’ve eaten something with anchovies and just had no idea. I bet you even said….hmm there’s some ingredient I just can’t place but this is delicious. Well if you’ve eaten at my house you have. Simply put, they are super awesome sea-saltiness in a can. So start using them! Salads like this help you to remember how vegetables taste fresh. Radishes are peppery and bright, red bell peppers are sweet and happy. Bok choy has that mild cabbage flavor, but it’s packed with water like cucumbers – which has that super calming scent. Red onions are sharp, endives are bitter and kale is, well it just tastes so darn healthy. So all together it’s a pretty awesome medley. A salad can be a meal. Here’s the proof. 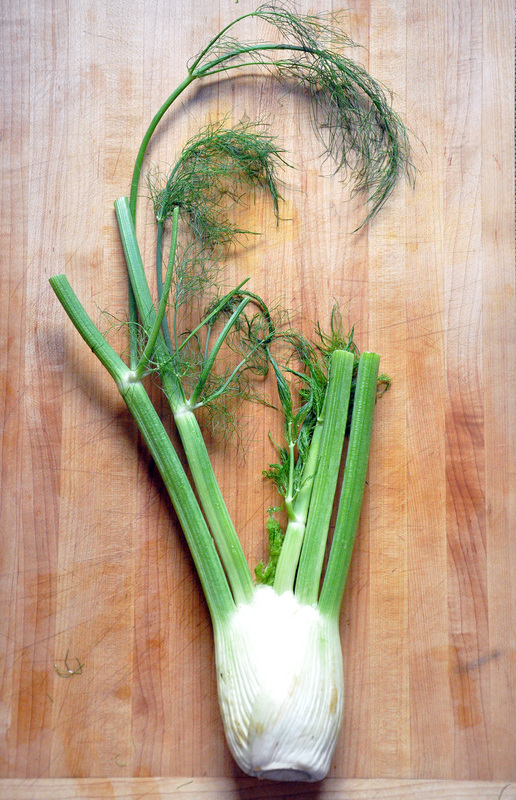  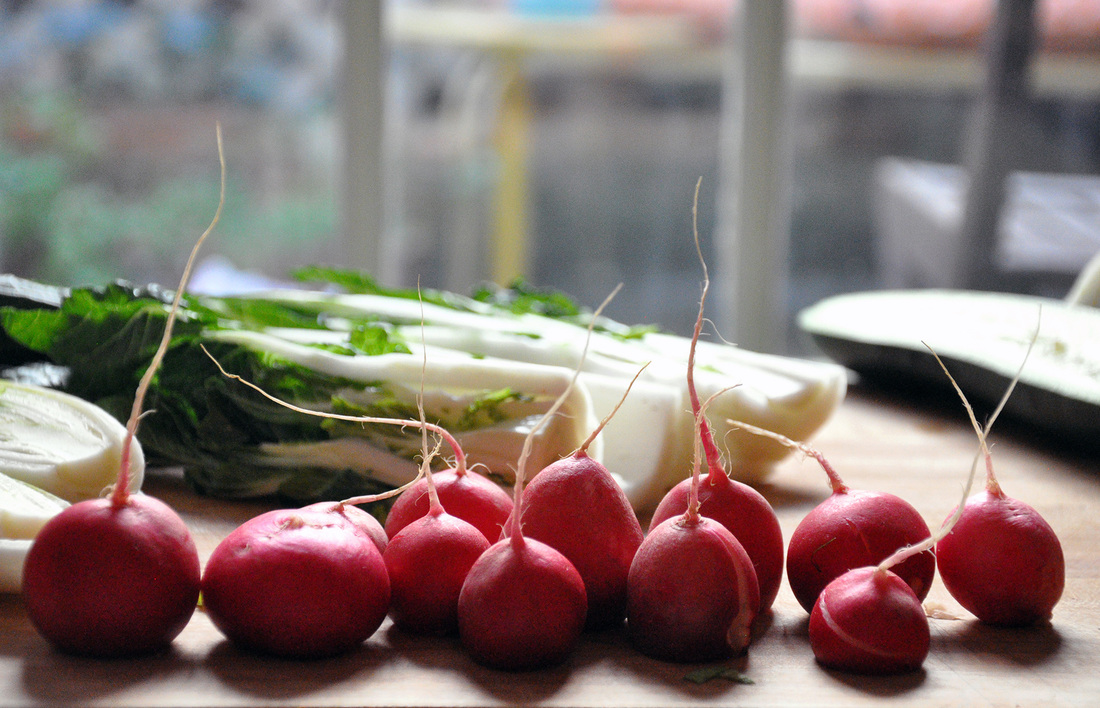 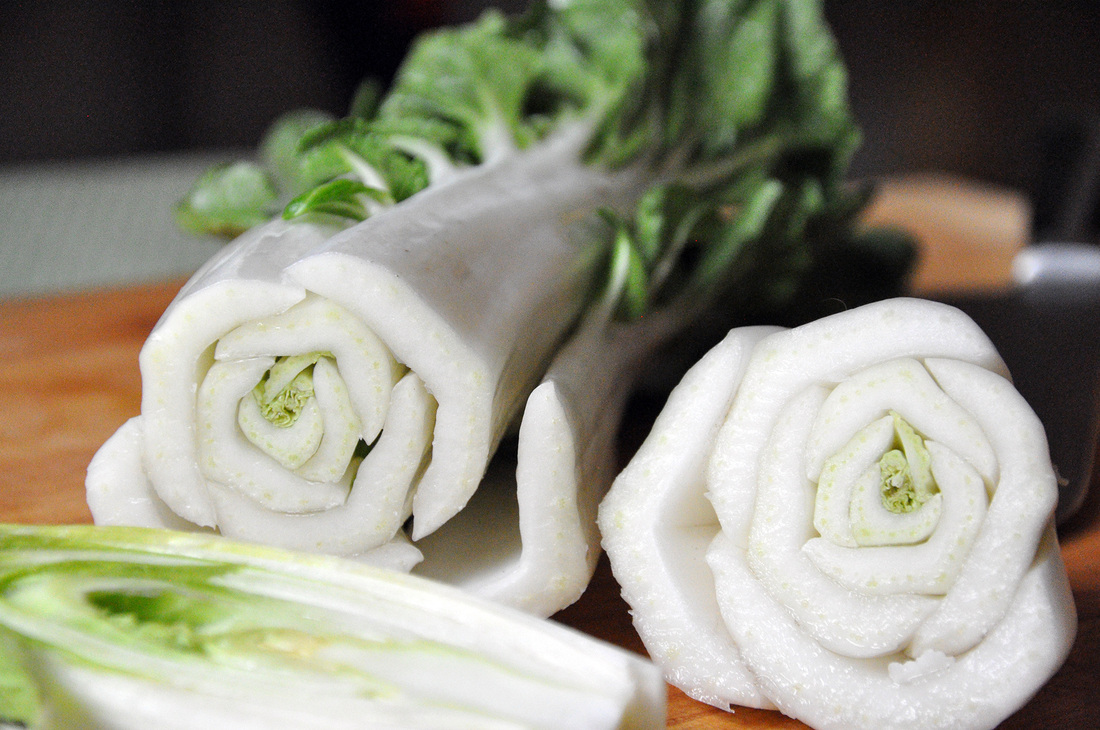 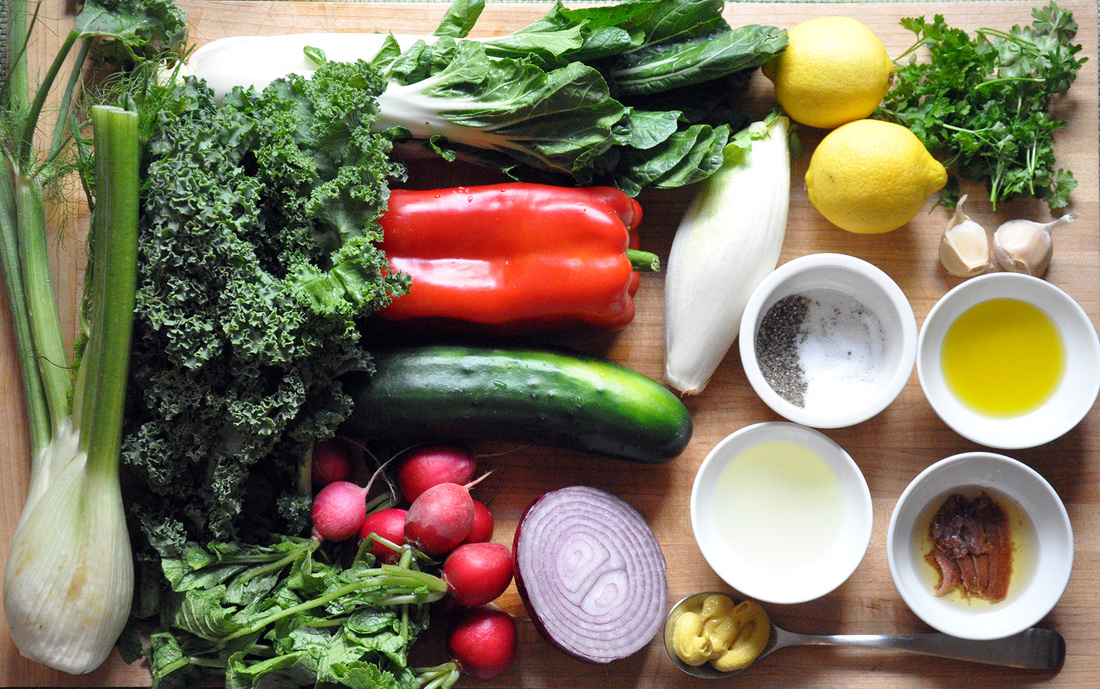 Fennel salad with Garlic Anchovy dressing PRINT RECIPE [Prep: 30 minutes / TOTAL: 30 minutes] [Serves 6] Salad:
Dressing: [yields almost 1 cup]
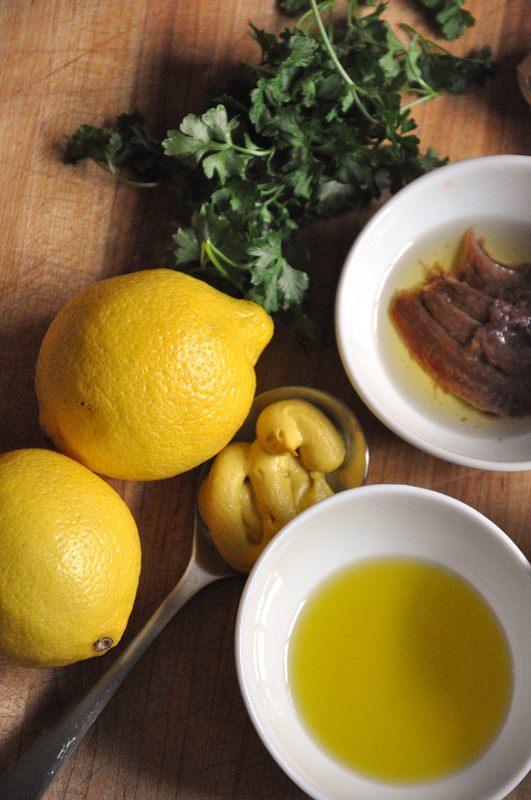 This is a hearty hearty salad. It holds up so well that I even think it’s better the next day. It goes well with a hunk of crusty bread [or with some left over mac and cheese] but is also pretty satisfying on its own. There’s really not much to the prep for this salad. If you’ve never worked with fennel before, no worries, it’s very easy. Start by rinsing the whole root, making sure to get rid of any dirt or grit that likes to get stuck in the grooves. Then pull off any of the delicate leafy part that looks dark, mushy, or rotten. Take your knife and peel off any brown spots at the bulb and chop off any dried ends of the stalk. Now cut that sucker in half lengthwise and de-core it [the tough part in the center]. Do this by making two deep slices on either side of the core, like an upside down “V” and then pull the core out with your fingers. This part is tough and not fun to eat raw. De-core the endive the same way. The kale should be washed and de-stemmed – just slice the leaf along the stem nearly to the top on each side, discard and then chop up the rest. The outer leaves of the bok choy can look a little worse for the wear, you can throw those out, slice about 2 inches off the bottom and you are good to start chopping. If you are using baby bok choy, discard sparingly since there isn’t much to these little guys and only cut about a ½ inch off the bottom. The radishes need to have their leaves and roots removed and then they are ready to chop. The prep for the rest of the veggies is pretty straight forward. There will be so many textures to this salad so I like to chop everything roughly the same size. If you cut everything really small it becomes more of a slaw. Now onto the dressing. I toss all of the ingredients into a small food processor, any kind will work. I like to press the garlic cloves into this mixture so that there are no chunks in the dressing. Now all it needs is about 15 second of blending. This dressing is very lemony and zesty; if it’s a little strong for you, add a little more olive oil. 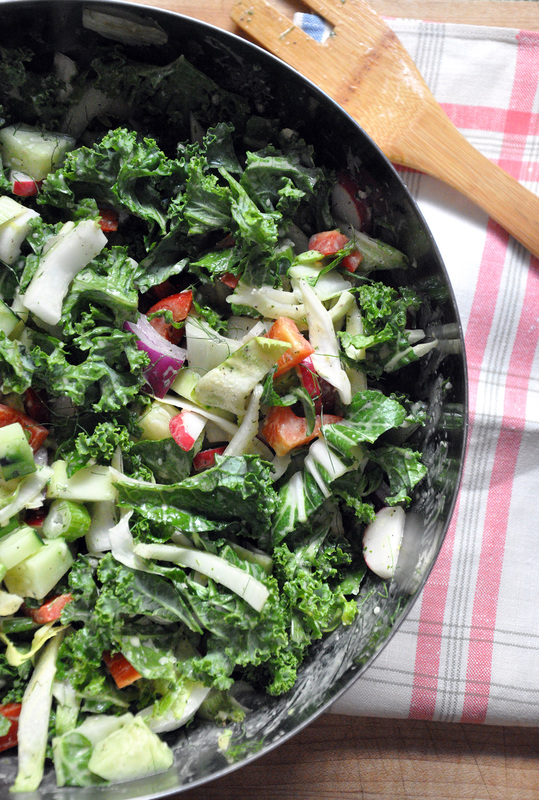  It was a few years ago when I realized that I never seemed to have the right ingredients on hand for recipes like this. They can be hard to find and over priced in your average grocery store. I make it a habit now to go once a year to a Chinese supermarket and stock up on all the sauces, noodles, oils and pastes I can carry. So when I came across a tasty looking sesame-peanut recipe I was ready to play and make it my own. It was few months ago that I tried this dish for the first time and since then I’ve made it three times. It’s the sort of meal you can serve any time of the year and it’s definitely on my current [mental] list of go-to dinners. So what do I want to say about this noodle salad? It goes quickly. Who knew that peanuts went so well with so many contrasting ingredients? Ginger, lime, rice wine, soy sauce, tahini – they all come together to make a nutty-tangy sort of sweet and salty perfection. This is simple kitchen chemistry at its best. Since the sauce is a little decadent –the yummy peanut butter and tahini sauce are to blame - I like to play around with hearty power vegetables like kale and broccoli and bright refreshing ones like cucumber and red onion. The color combo ain’t to bad either, the greens and purples make a pretty palette. This is a feel good, comfort food dish and since it makes really good leftovers, you might find that you’re feeling good the next day or two. Its quite filling so I serve it in a small bowl, oh and I eat it with chopsticks – so it feels a little like take out, but healthier. 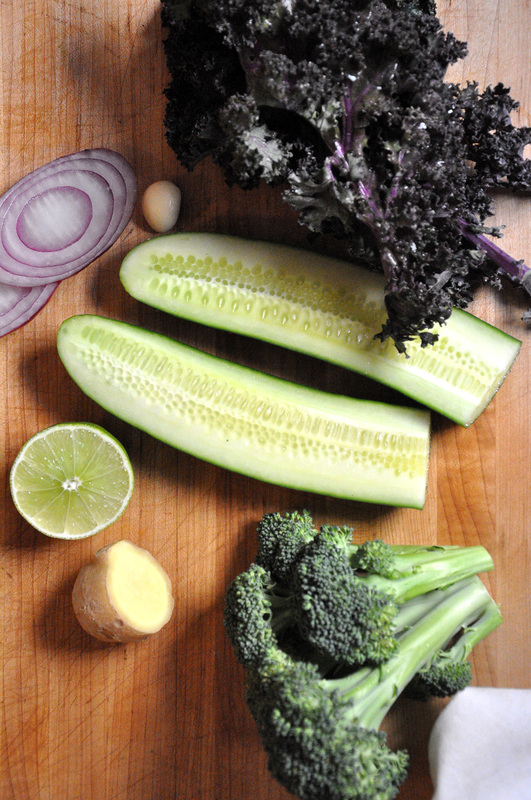 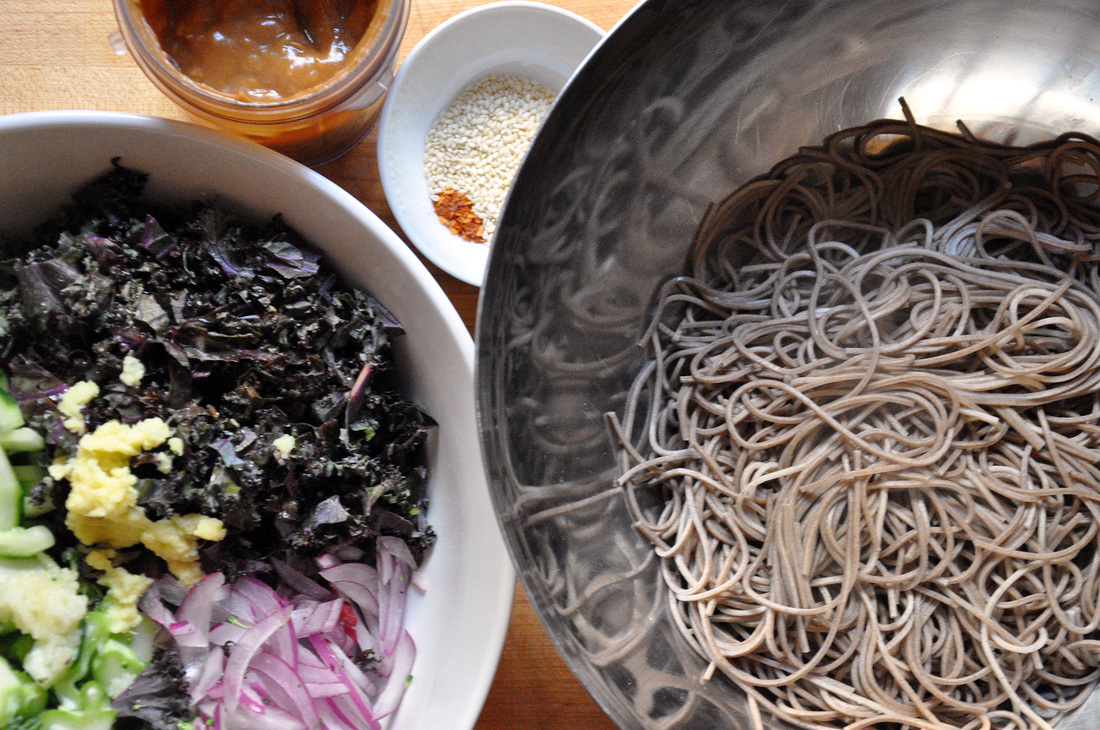 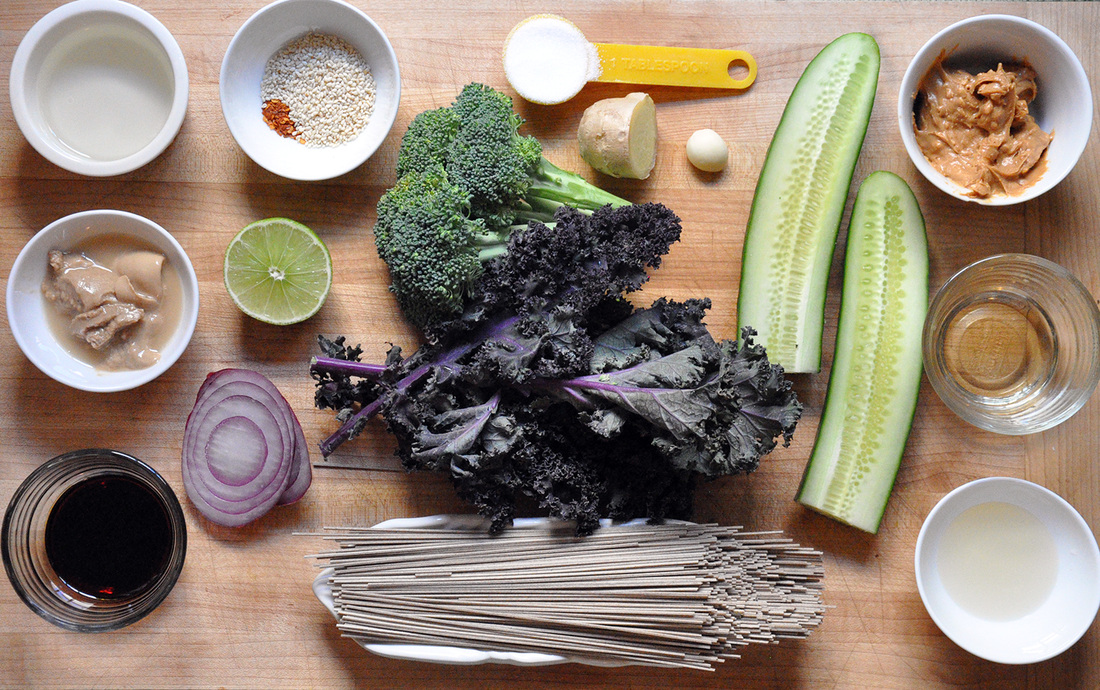 Chilled Sesame-Ginger Peanut Noodle Salad PRINT RECIPE [Prep: 25 minutes / Cooking: 5 minutes / TOTAL: 30 minutes] [Serves 4 small dinner sized portions] Noodle Salad:
Sauce:
[This recipe was inspired by Andrew Zimmerman’s version as seen in Food and Wine.] 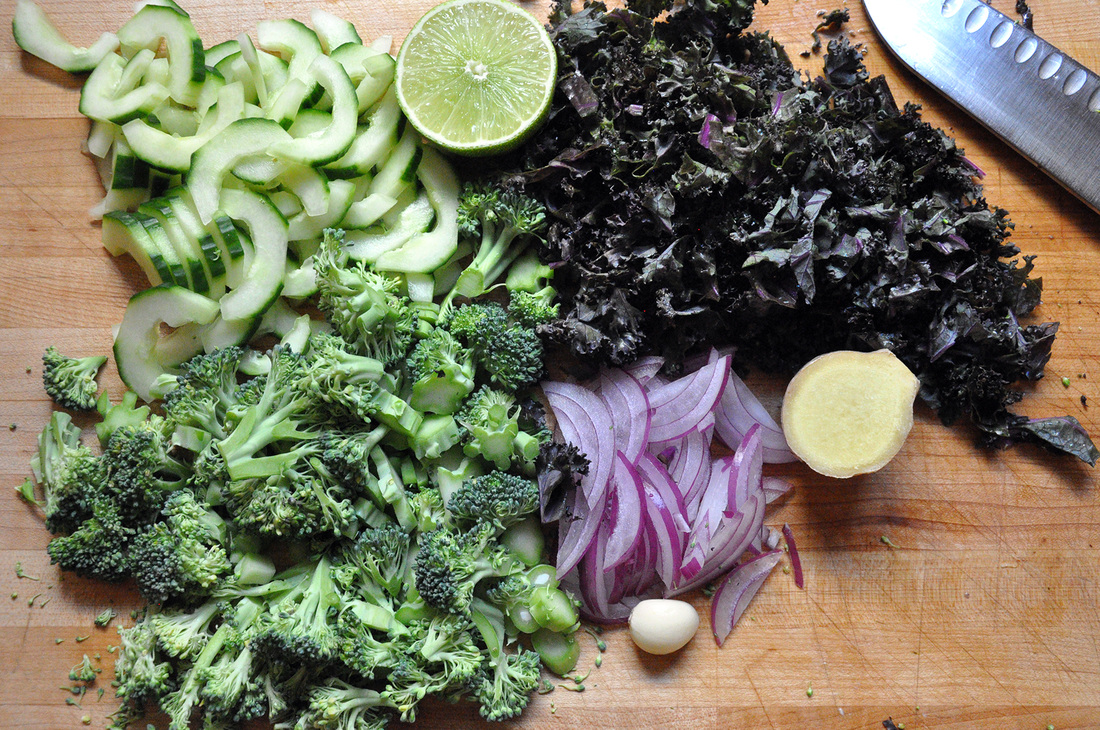 This noodle salad recipe is super easy and there’s literally no cooking involved. Start out with the veggies. The broccoli should be washed and cut into bite sized pieces, the cucumber peeled, de-seeded and cut into little half moon slices. Likewise with the red onion, it should be peeled and slivered – here you could use scallions instead if you like. The kale should be washed and de-stemmed – just slice the leaf along the stem nearly to the top on each side. The stem can be tough and bitter, especially if uncooked. I should point out here that the kale doesn’t have to be purple – it just creates a nice color contrast with the rest of the greens, any other leafy green can be substituted. Put all of the veggies in a large bowl – large enough to accommodate the noodles that will be mixed in at the end. These last three steps should be done over the large bowl: squeeze the ½ lime, press the peeled garlic clove and grate the peeled ginger with a zester/micro grater. Mix all the ingredients together. The acidity in the lime will help to break down the tougher veggies a little – think of it as a marinade. There are many types of noodles that will work for this dish. I had half a packet of soba noodles in my pantry, but you could even use linguine – though I would break the pasta in half before boiling. I was happy to only have half a packet because I wanted this to be more of a noodle salad than noodle heavy dish. Fill your pot with 8 cups of water, cover and turn the heat on high. It should take about 5 minutes to come to a boil. [You should have enough time to prepare the sauce while waiting for the water to heat up – see the directions below]. Once it’s boiling, add the soba noodles and leave uncovered. Wait for the water to come back to a boil and then add 1 cup cold water and wait for the water to boil one last time. [These directions are specifically for those using soba noodles]. Before straining the noodles in a colander over the sink, reserve about a 1/3 cup of the noodle water. Now onto the sauce. I use a small bullet blender for the next step but a mini food processor will also work. As for the peanut butter I tried to find one with no sugar and low salt, but all I could find was a low sugar and salt variety – because of this I used 1 tablespoon of sugar and no extra salt. Add the peanut oil, peanut butter, tahini paste, sugar, mirin, rice vinegar and soy sauce to the blender and mix until all the ingredients are well incorporated. The consistency should be thick - it will be thinned out with the reserved noodle water later. All that’s really left to do is mix everything together. First toss the noodles with the veggies, add the sesame seeds and red pepper flakes and then alternate incorporating the Sesame-Ginger Peanut sauce and the reserved water a little at a time. Mix well each time. Everything should be coated well with the sauce. If you have time to wait to eat, put the noodle salad in the fridge for about 15 minutes so it gets chilled. If not, eat it warm tonight and then cold tomorrow! 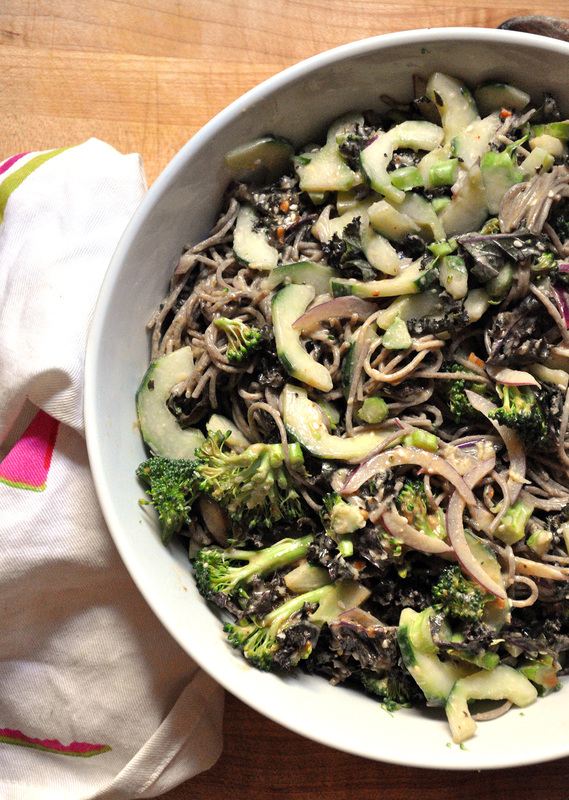 |
All
Stuff I follow...
Not Without Salt
My New Roots Sprouted Kitchen Thug Kitchen Lady and Pups A CUP OF JO The Daily Meal Melissa Clark ...always 3191 Miles Apart The Sartorialist Garance Dore The Nourished Kitchen Archives
October 2014
|


 RSS Feed