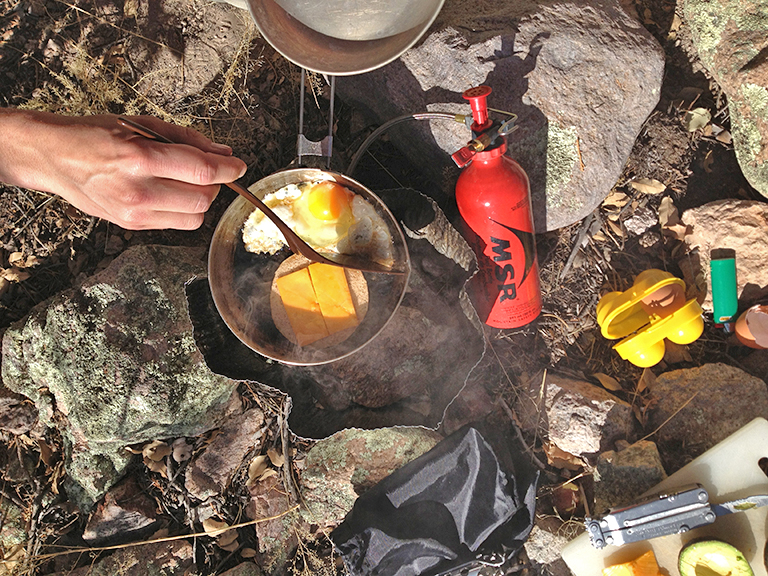
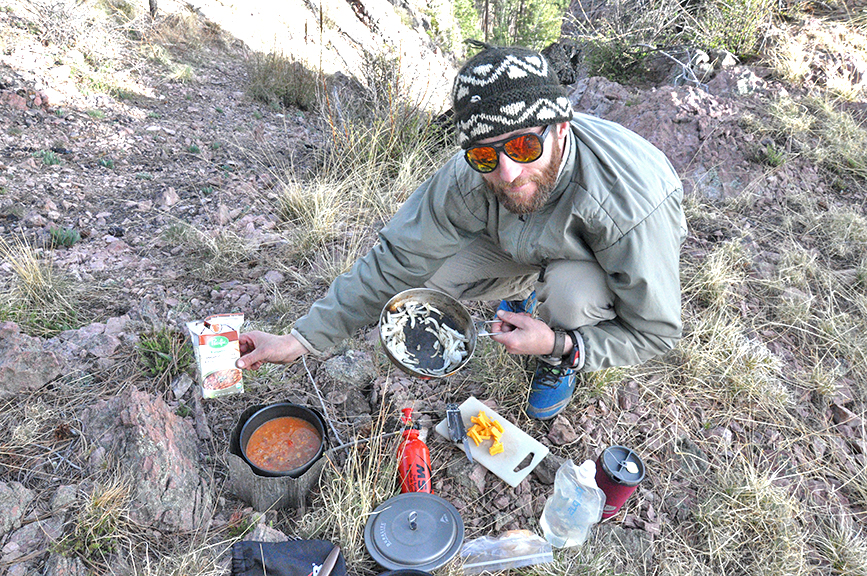
 Sorry for the long absence, life's been a little bit busy - in the good way. In early May Kaspar and I took a road/camping trip tour of New Mexico. We encountered a little snow, saw some amazing skies, dipped in a few natural hot springs and ate some good food along the way. We try not to let camping sacrifice the taste or quality of our food. Though it can be a bit tricky when you are out in the mountains for days at a time, there is always some way to spruce up a boxed soup or spice up a package of ramen noodle soup - mac and cheese has always been a go to for us. In fact I usually start to anticipate the bright orange meal days before we head out on our trip. Food that honestly wouldn’t be on our radar at the supermarket takes on a new significance – simply because you cant make everything from scratch when you are camping, it just isn’t practical. Along with pre-packaged food you can take a lot of good ingredients along with you – a sort of semi home made situation. You'll need a cooler and should try to cook the most perishable items first. Overall, it takes a fair amount of planning, but then when you’re out there in the wild or just car camping you already have your meals planned and there’s no stressing about what’s for dinner. Prepping and cooking becomes a matter of efficiency and waste becomes next to nil. It’s an interesting phenomenon – when I go camping with Kaspar, I get to relax [!] and let him take the culinary reigns. So I’ve decided to feature him in this post. He’s been camping for longer than I, and I thought we could learn a few tricks from him and enjoy his wisdom. From here on out this post is brought to by Kaspar, photos and all. Enjoy! [Disclaimer.. we wrote our entries separately - so any similarities is not meant to be redundant, just a coincidence. Perhaps its just evidence that we finally have camping routines down, we've been doing this for almost 8 years now!]
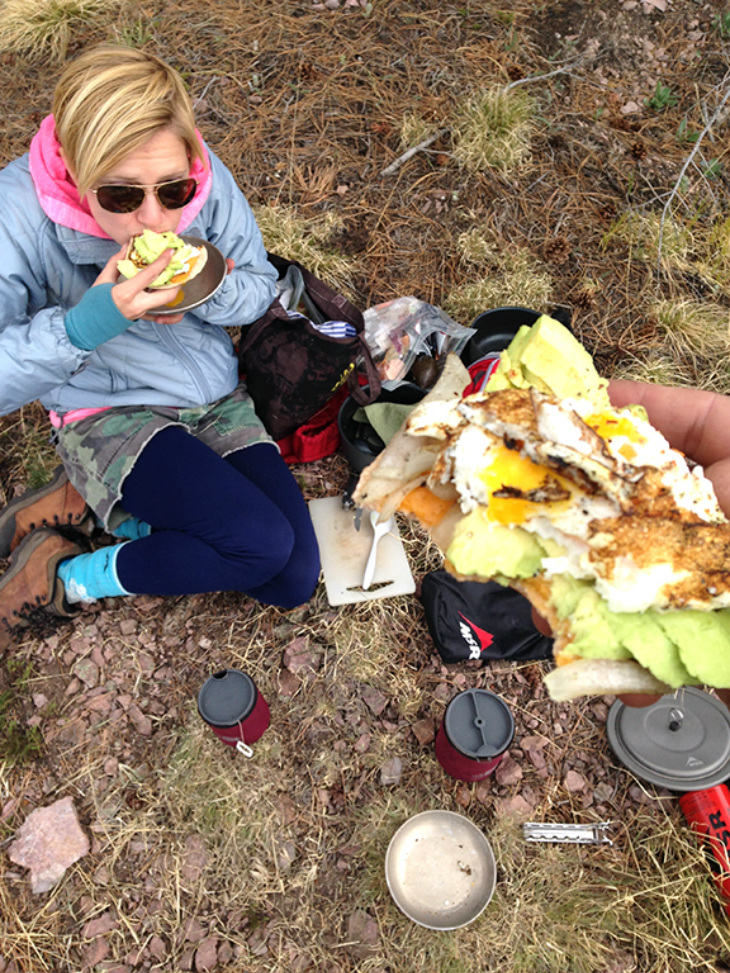
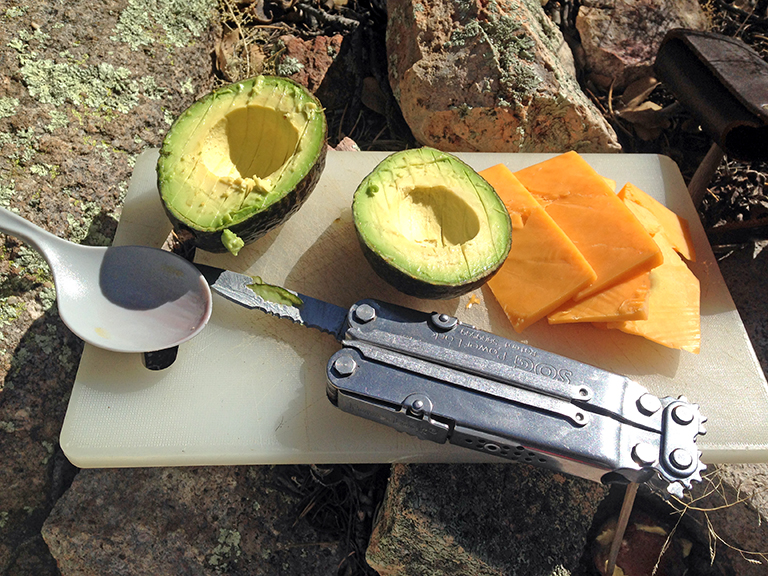
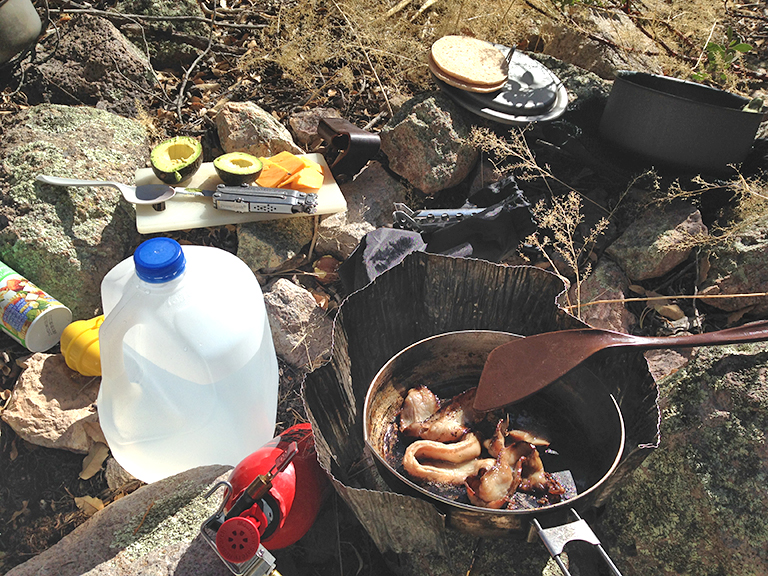
The great thing about cooking in the backcountry is that it is the only thing other than making sure you have shelter that matters. Nothing else even needs to enter your mind; you know all you need is food, water and a place to sleep. The reality is that those three things are all we ever really need, but we tend to over complicate things. When it comes to camping I get to handle the cooking and show off my domestic side. I do it all, the meal planning, cooking and cleaning. I think it blows Ali's mind that when we are in the outdoors all of a sudden I decide to be neat and tidy with the dishes and fastidious about the food. We have some "go to" meals we like to cook, but ultimately you really have to be able to freestyle when you get to the bottom of the food bag. 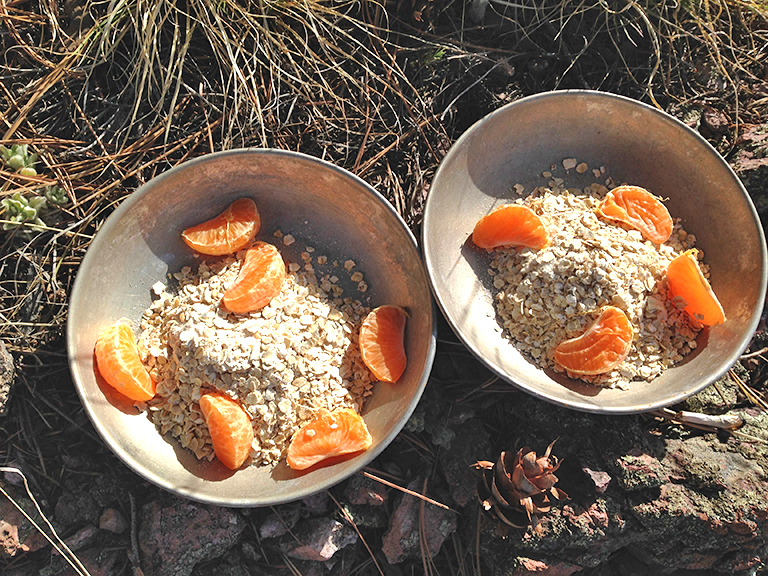 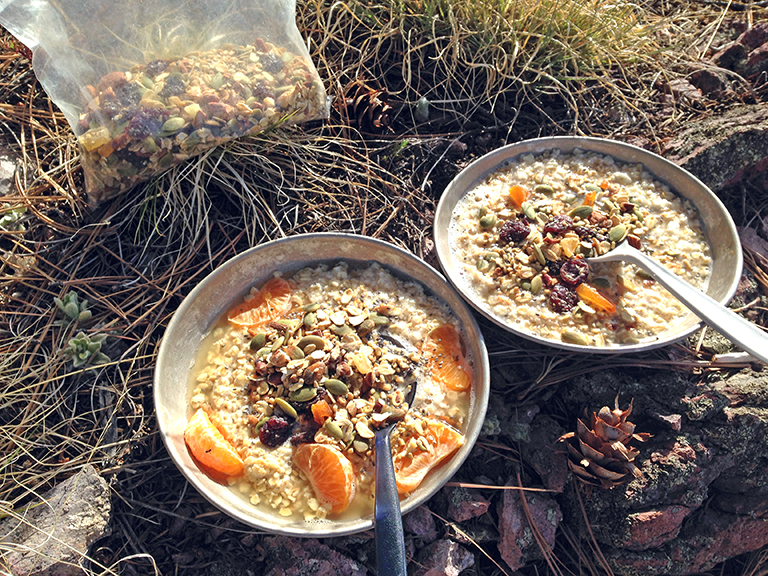 Breakfast: Coffee or tea is a must-there are quality camping French presses out there, we've been using the GSI Coffee Press for a few years now, Make sure to pack sugar and powdered milk! Sweet: Instant oatmeal base - Optional additions: homemade granola, fruit (sometime you can find wild blueberries or strawberries). This is a great way to wake you up and make sure you do your business at the beginning of the day so you don't have to worry about it once you hit the trail. Savory: Bacon Egg and Cheese on toast - Optional additions: avocado or leftover grilled veggies from the night before. This is the best protein bomb you can make to repair your legs. Tip-we’ve been liking One Bun for a bread option. 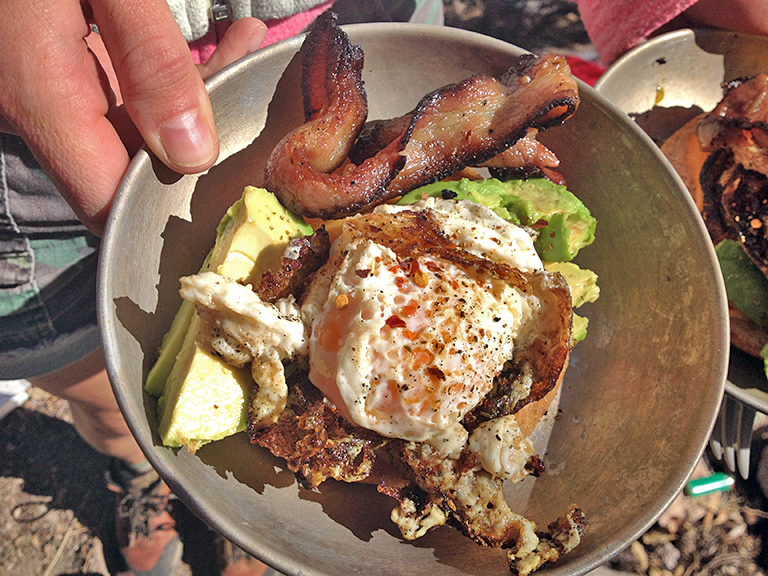
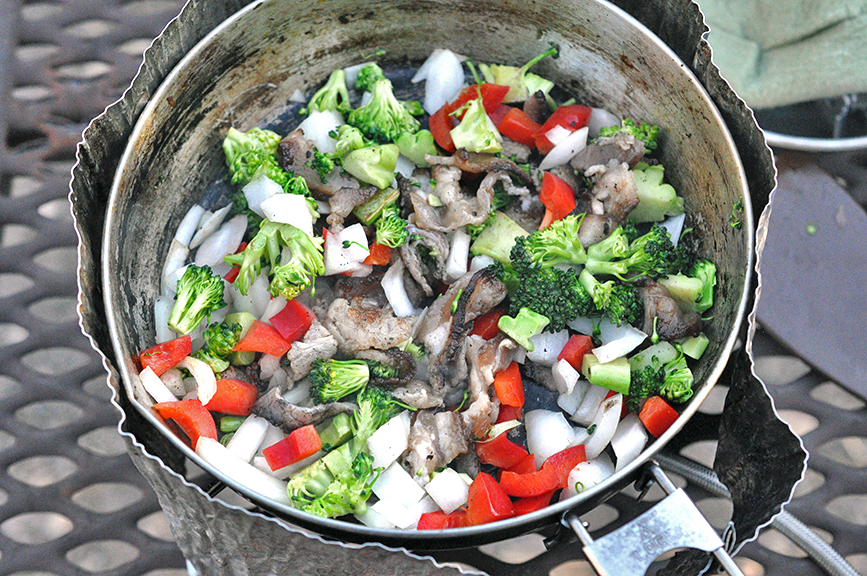
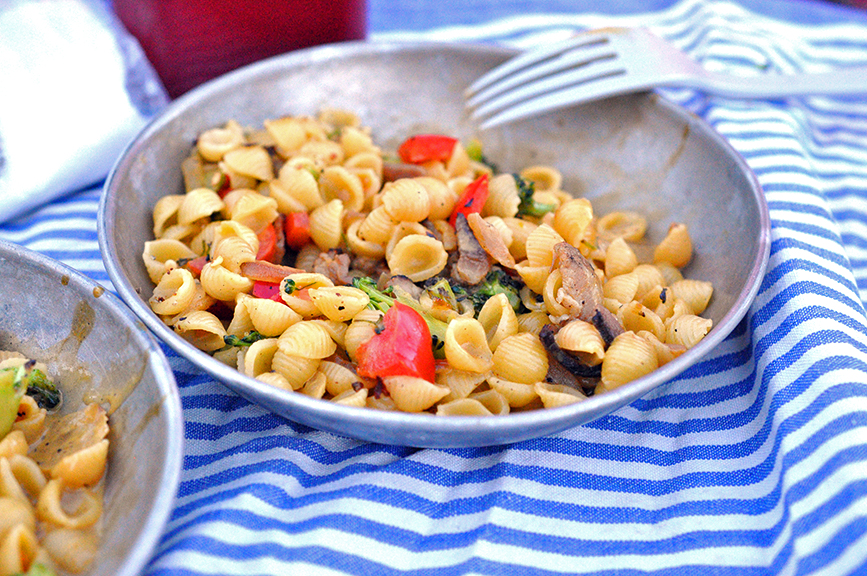
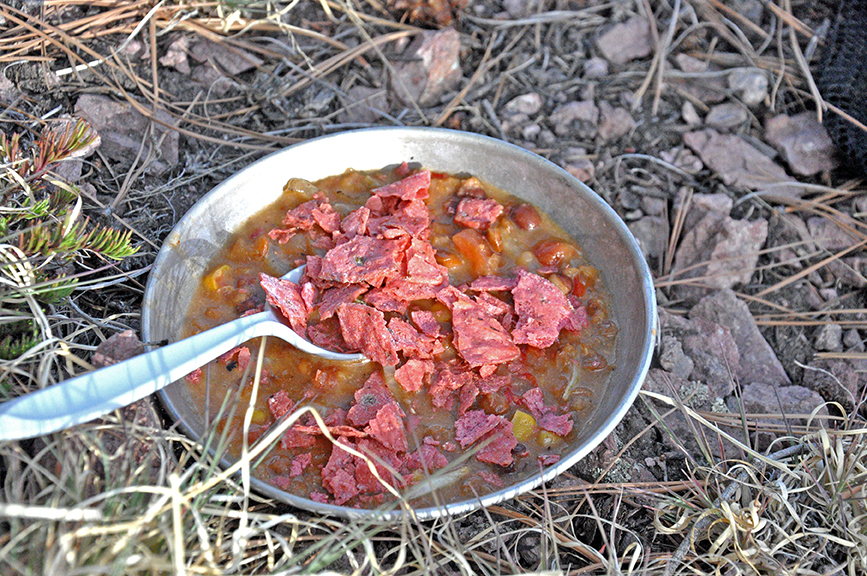
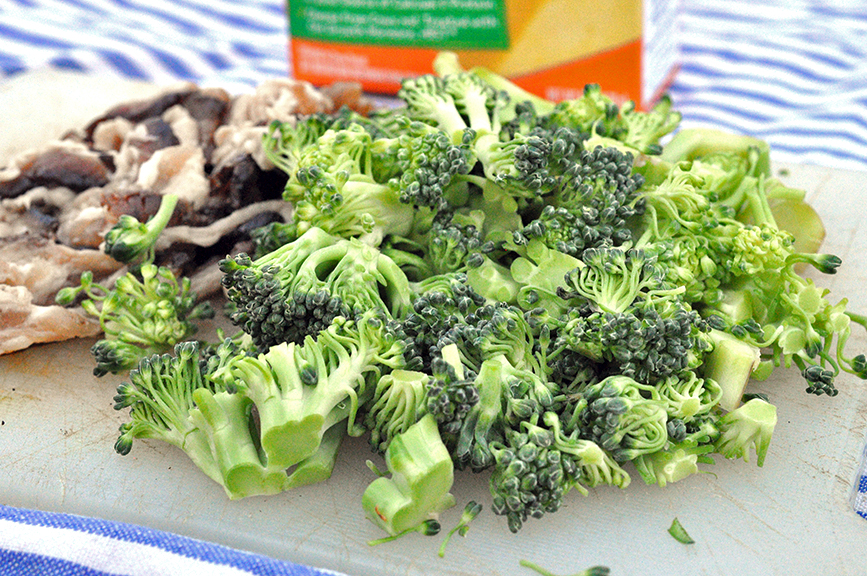
 Lunch is usually on the go, a granola bar, trail mix or piece of fruit. Dinner: Sausage and Vegetables - Optional additions: spicy mustard, horse radish, onions, carrots, broccoli and peppers will all keep for a few days without refrigeration so chop up what you got and toss it in. Tip-don't forget to pack spices for seasoning. Pre-mix them at home and store them in mini zip-lock bags. Mac and Cheese, Ramen or Boxed Soup - Be sure to get a good mac and cheese like Annie's - Optional additons: peppers, garlic, onion. Tip – when boiling water for the noodles or shells you can place the skillet with sautéed veggies on top of the water, this keeps the veggies warm and act as a lid to speed up the boiling process. 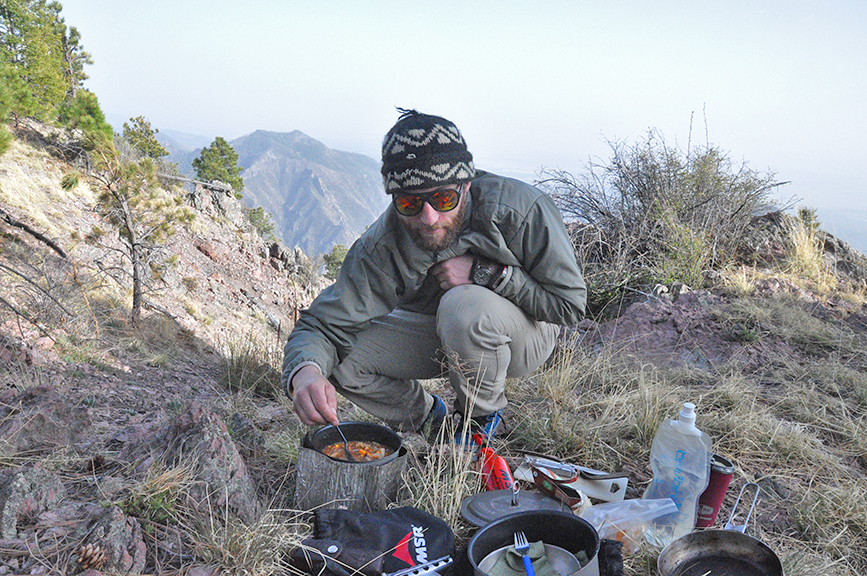
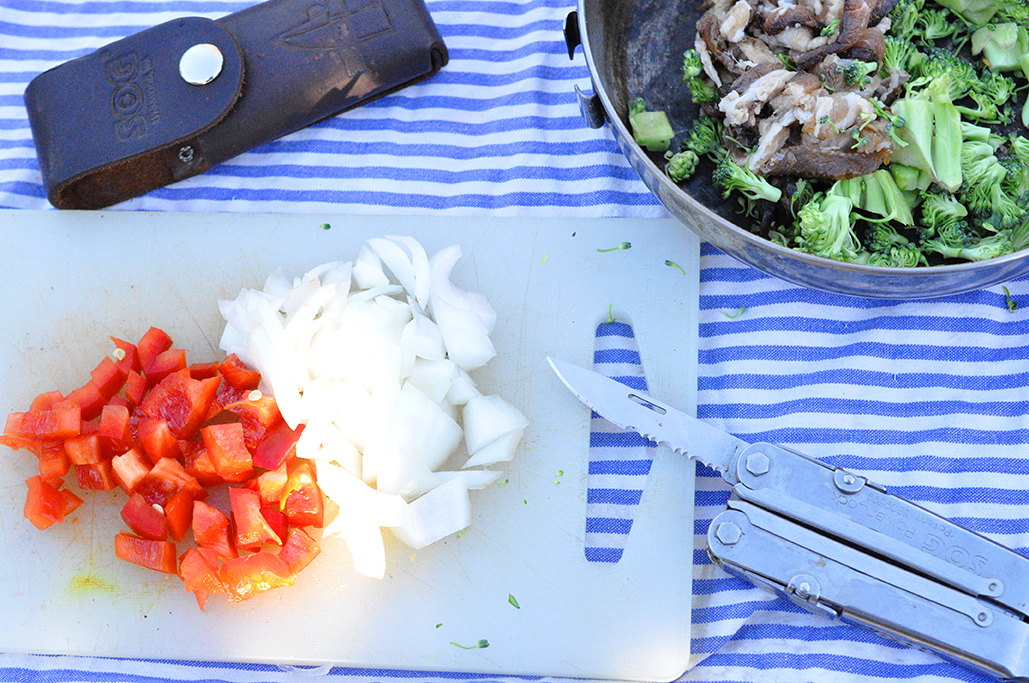
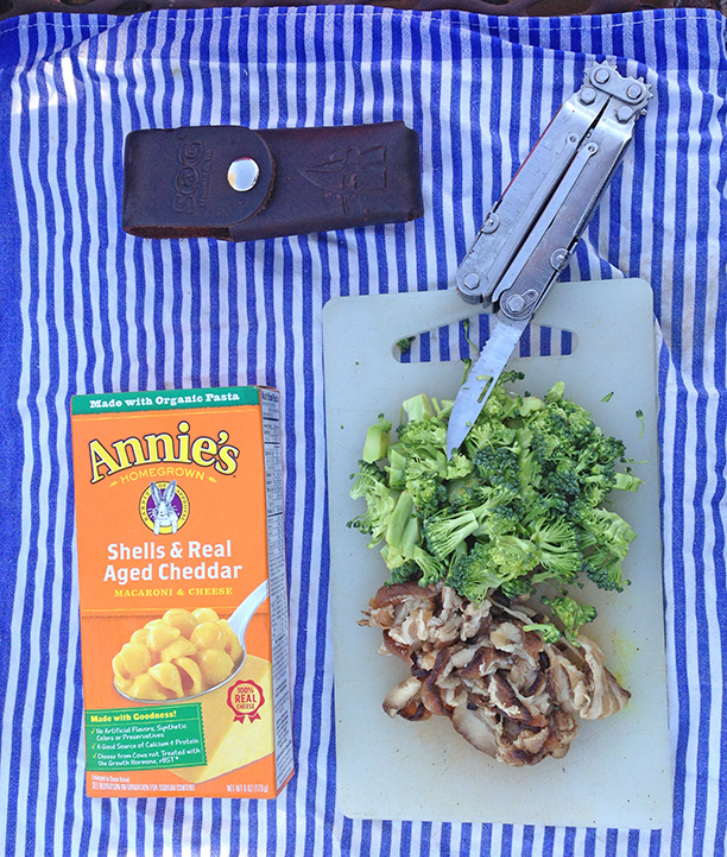 a multi-tool comes in super handy while prepping a meal
  Don’t forget your flask with your liquor of choice. Ours this time was some home made moonshine that we infused with strawberries to make it into the camping version of a desert liquor. 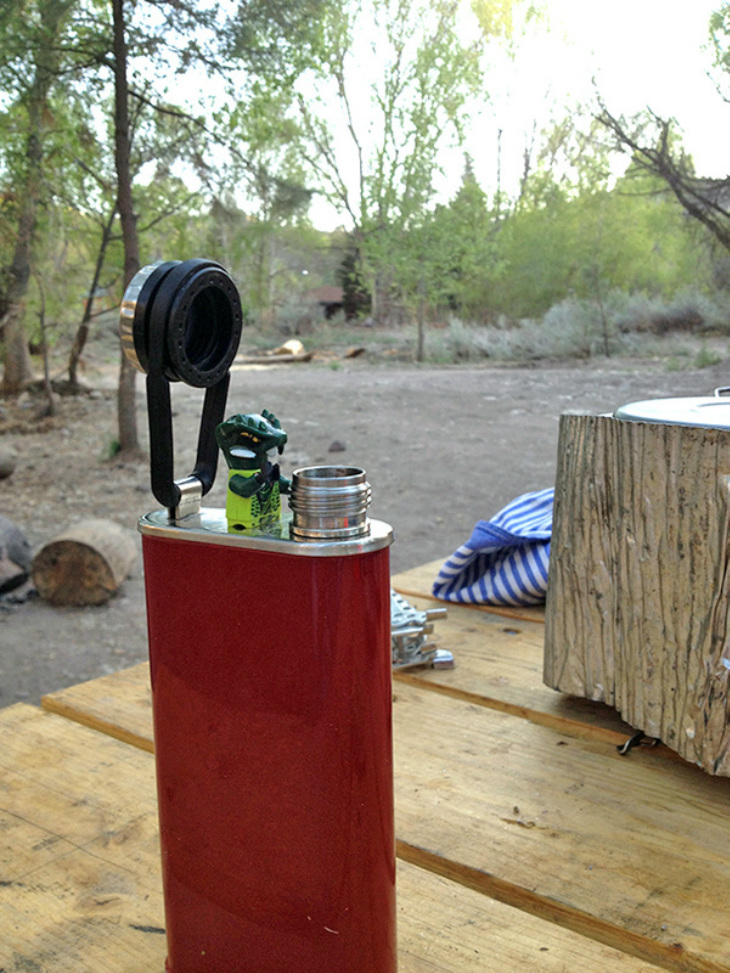 don't forget to share And of course there's the long road home - where all bets are off. When you've been hiking, trailblazing, and just generally exhausting yourself in the great wilderness - you deserve a treat. These donuts, hole included! are from Buns N' Roses in Marfa, TX. 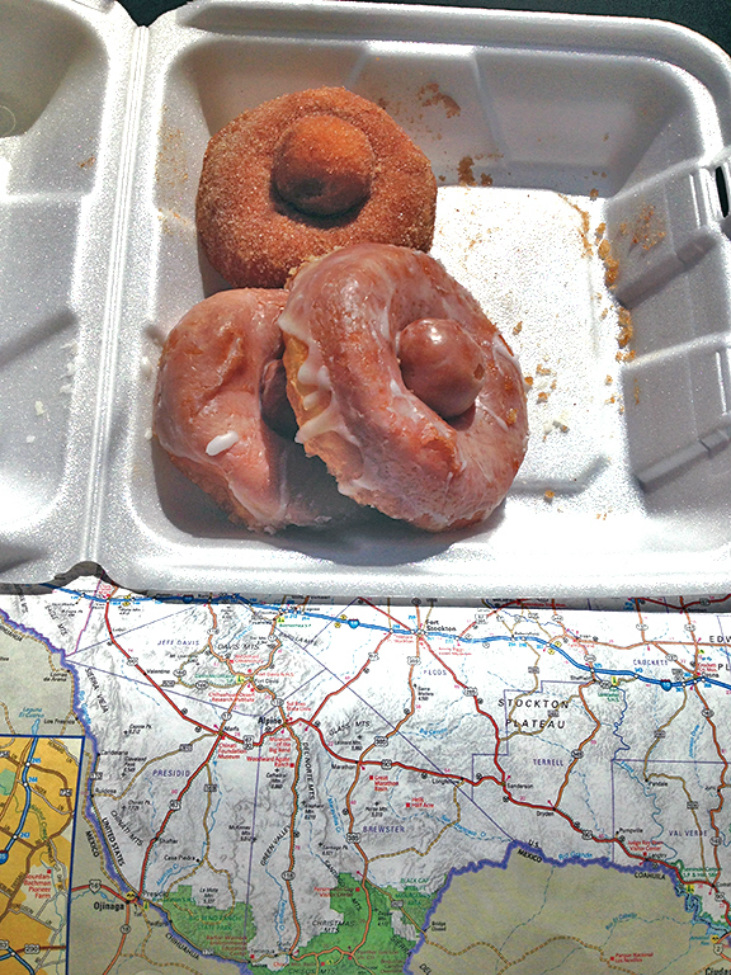 Please submit any questions you have about food and camping! Also to see more photos from our trip find me [Ali] on instagram @borninaford.
6 Comments
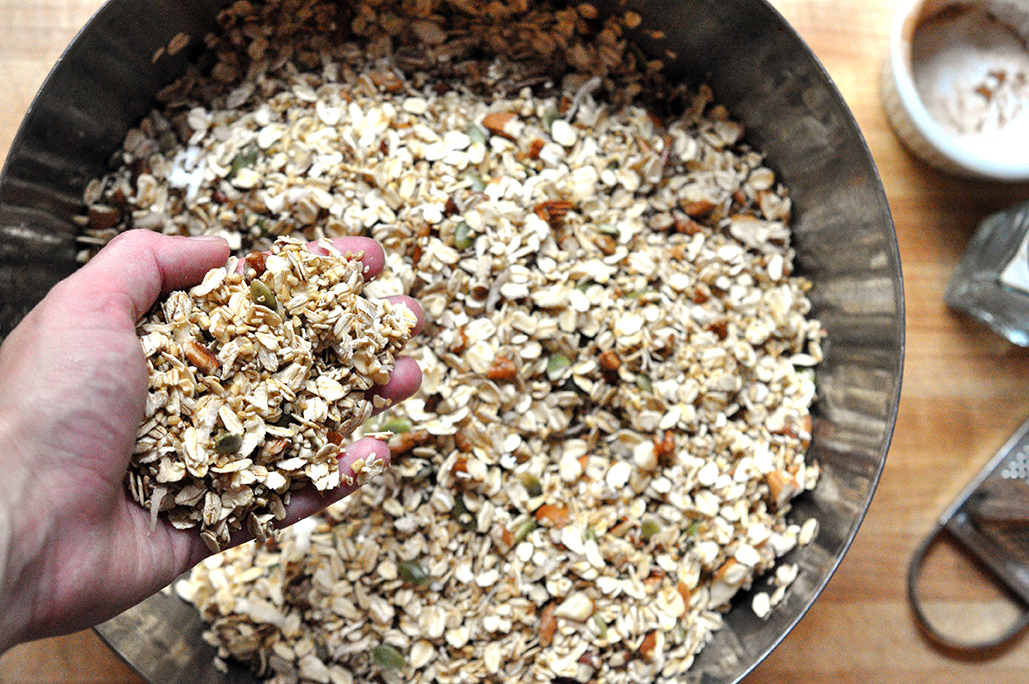
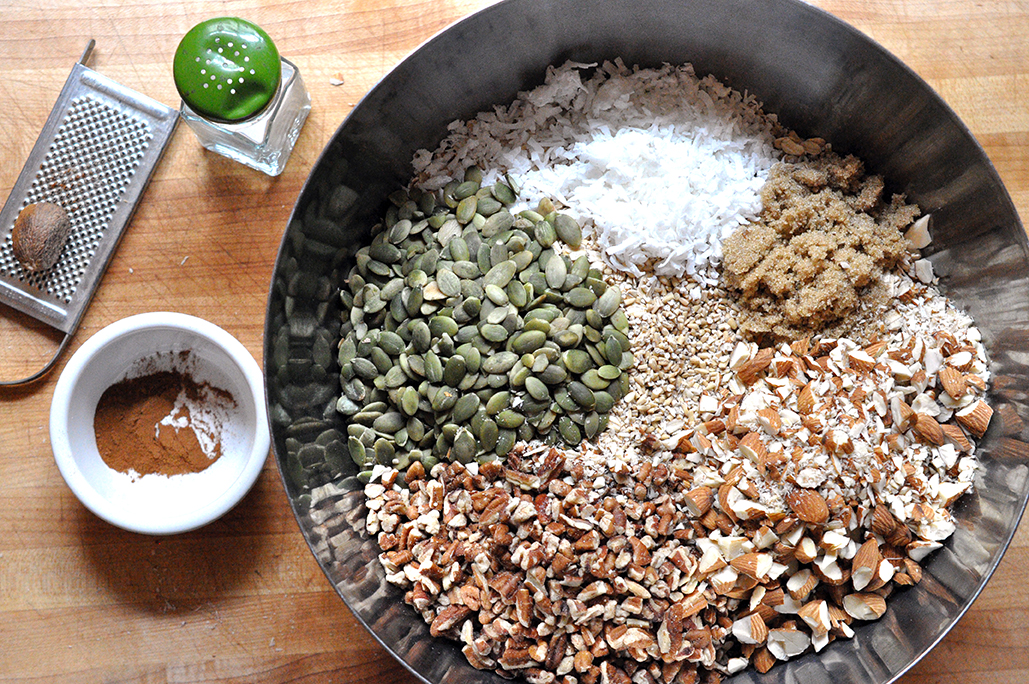
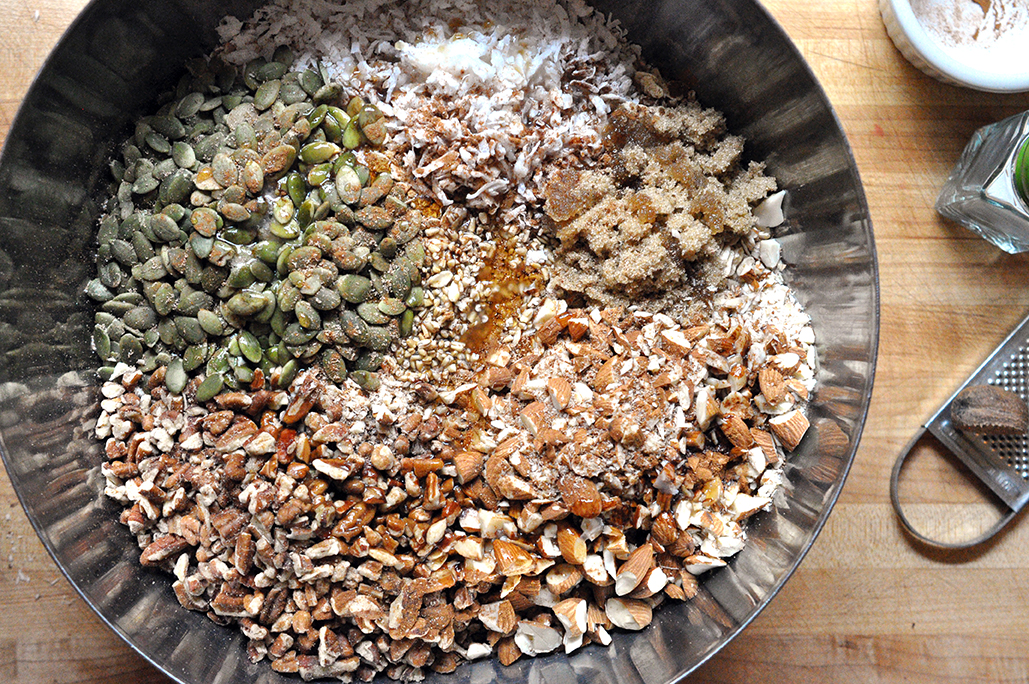
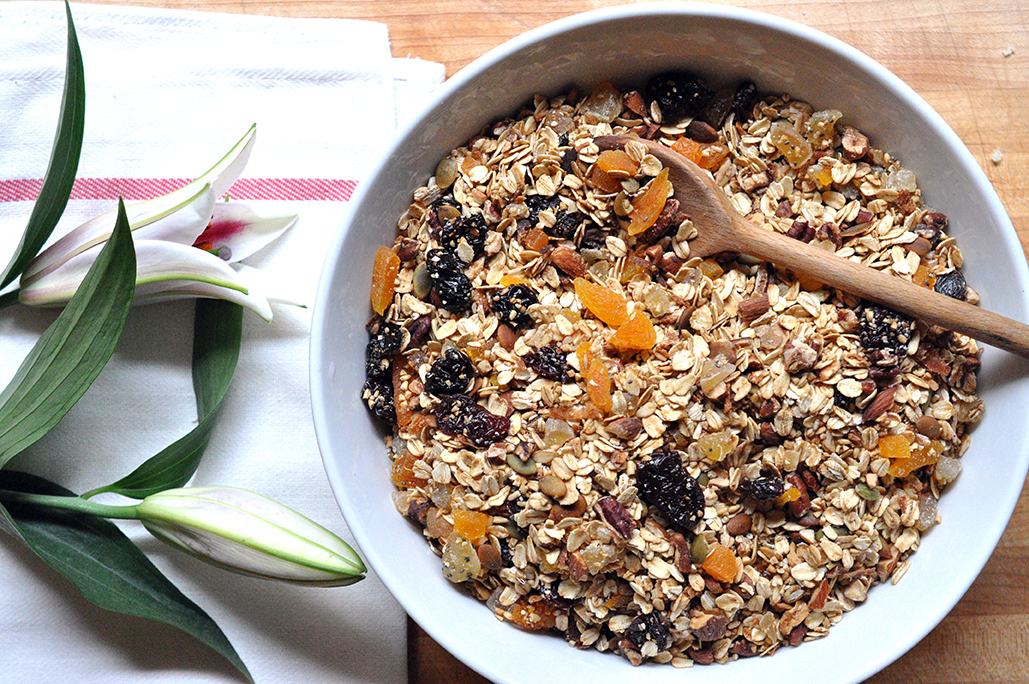 It’s been glorious outside and I haven’t really wanted to spend a ton of time in the kitchen. You see there’s this small window here in Texas where the weather is perfect before it turns to fry-an-egg-on-the-sidewalk hot…and I’m trying to enjoy every last second of it - case and point, I'm headed off on a week long camping/road trip in New Mexico this weekend! So before I continue packing I wanted to share a quick recipe with you that you can eat off for days - for breakfast, a snack at lunch, a crunchy dessert after dinner - or a perfect bring along on a road trip. Meet granola. Granola ranks pretty high up there on my deserted island list. I know it’s not the most practical of things and won’t even come in handy, but I’d want to have it none the less. Homemade granola is so easy to make and to customize. You can make it super nutritious or more of a late night sweet snack. It’s also become my go to, get well/thanks for hosting me/yay you had a baby! gift. Friends seem to love it and don’t often make the effort to whip up a batch of their own. Now many people may have their hands and days more full than I, but it’s really really easy, I promise. You can nuke it in the winter with a little milk for a morning treat, or it’s really good if you add a few chunks of cold apple and buttermilk in the summer. It can be a crumble on your next tart or a healthy topping on your ice cream...you get the point, it's versatile. You don’t even have to use that many ingredients, just toast the oats in the oven with some spices and maple syrup and viola, no frills oatmeal. The options are endless… Keep an eye out over the next week for pics from my trip on instagram you can find me @borninaford. Why that handle...well because I was, but that's a story for another time. Until next time... 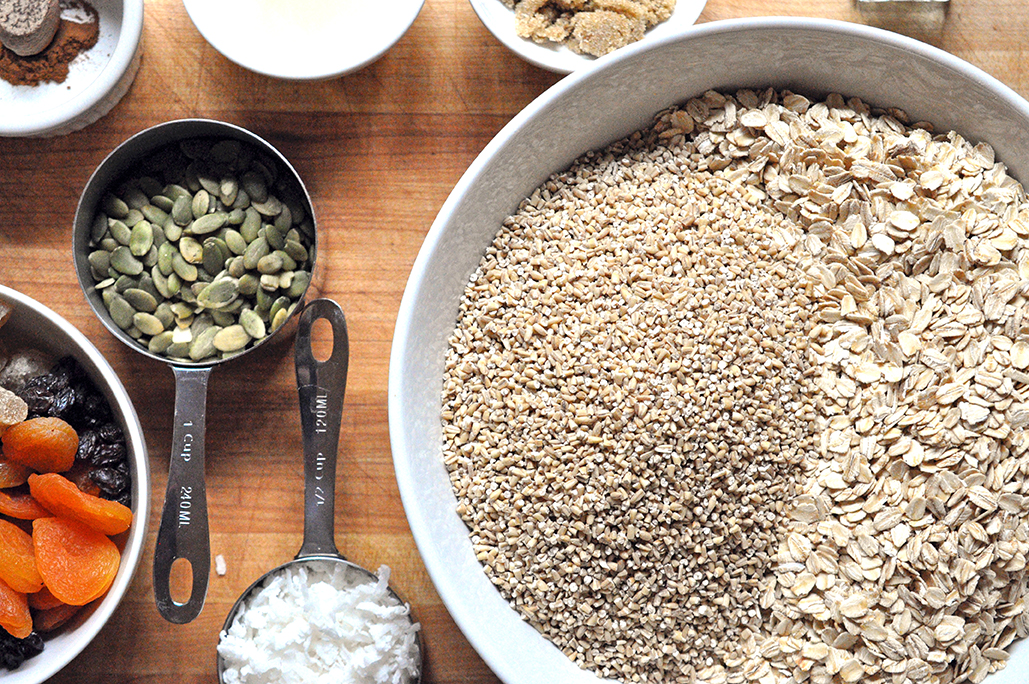 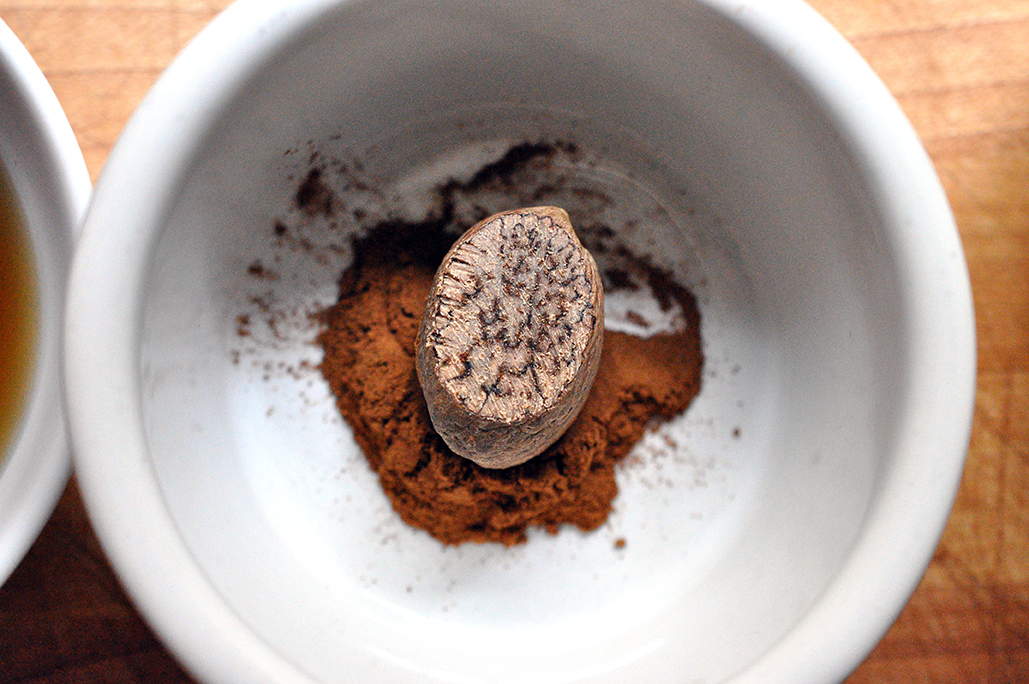
  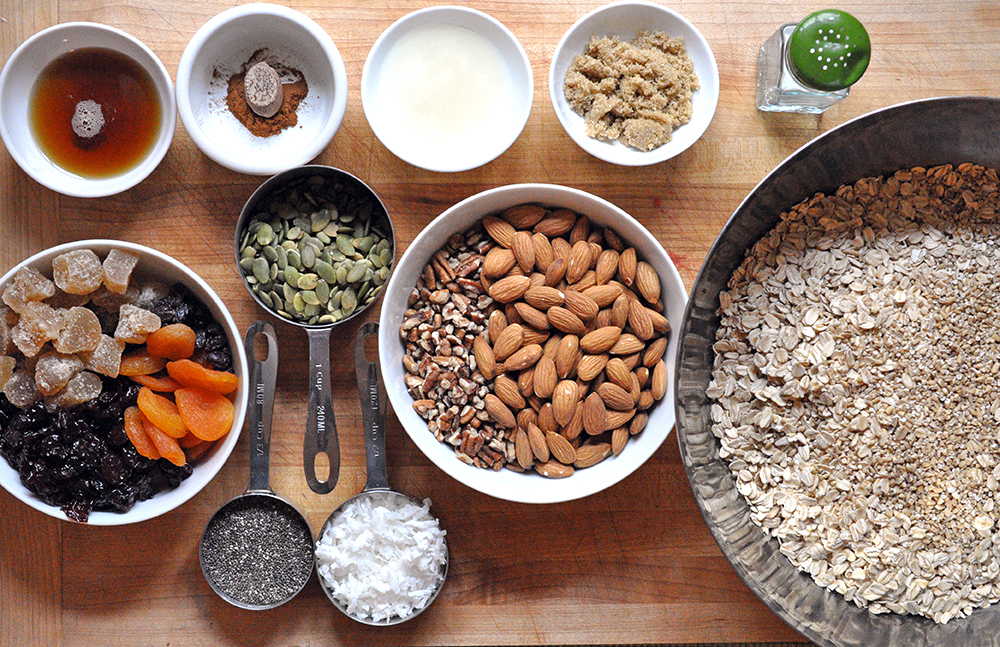 Homemade Granola PRINT RECIPE [Prep: 5mins / Cook: 35 / TOTAL: 40mins [Serving size about 8 cups]
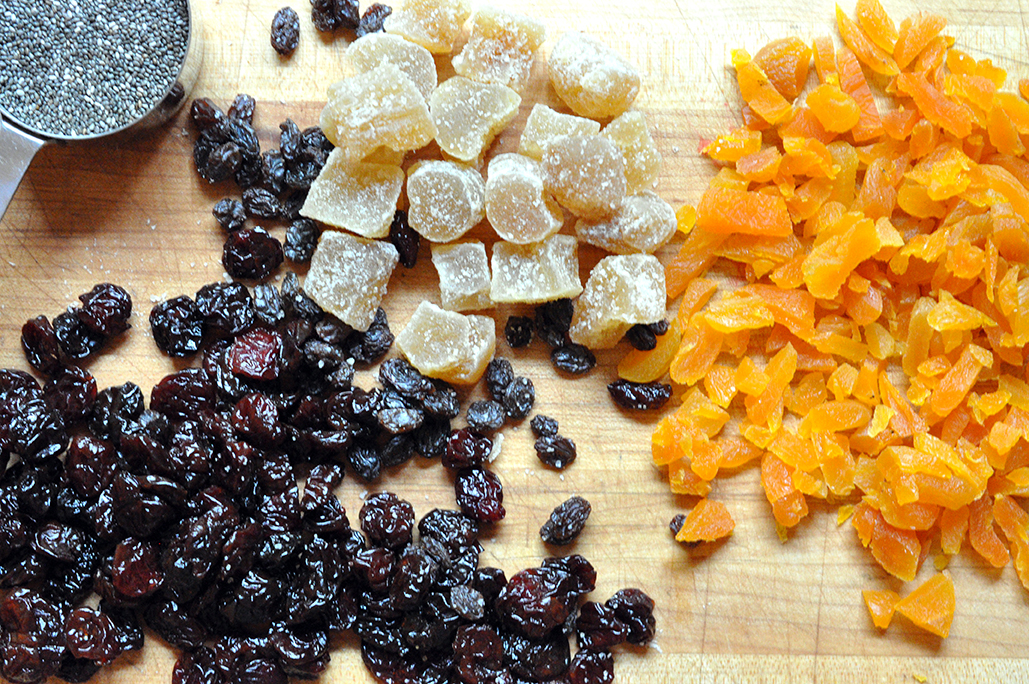
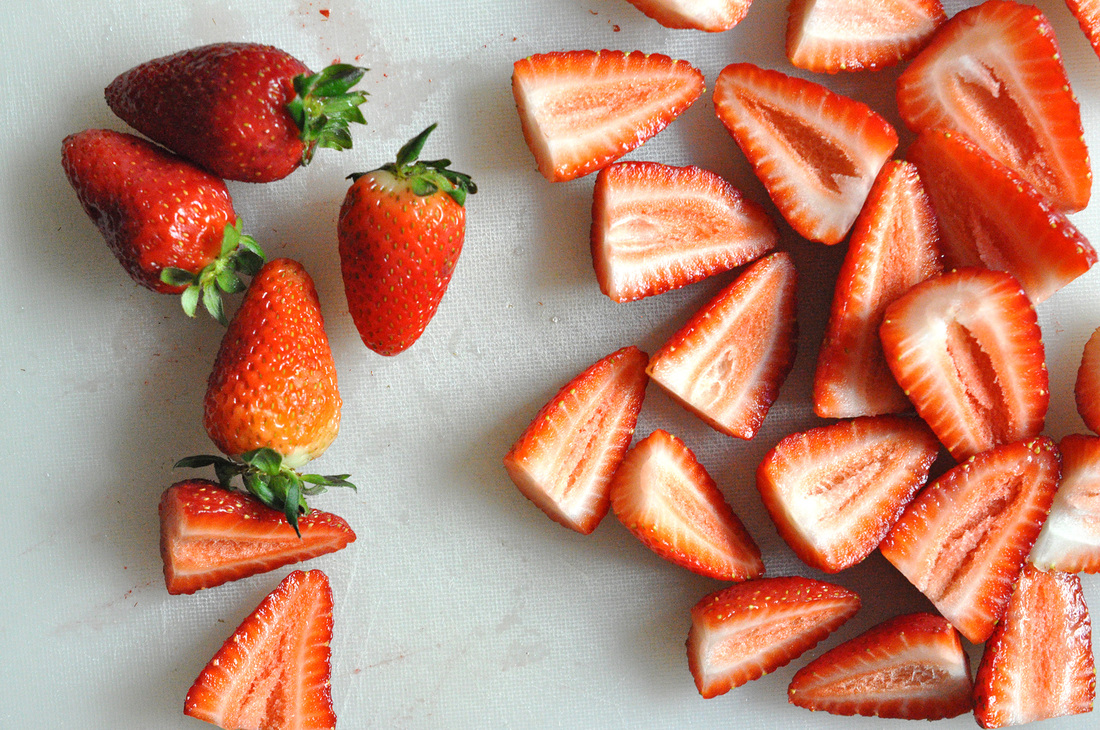
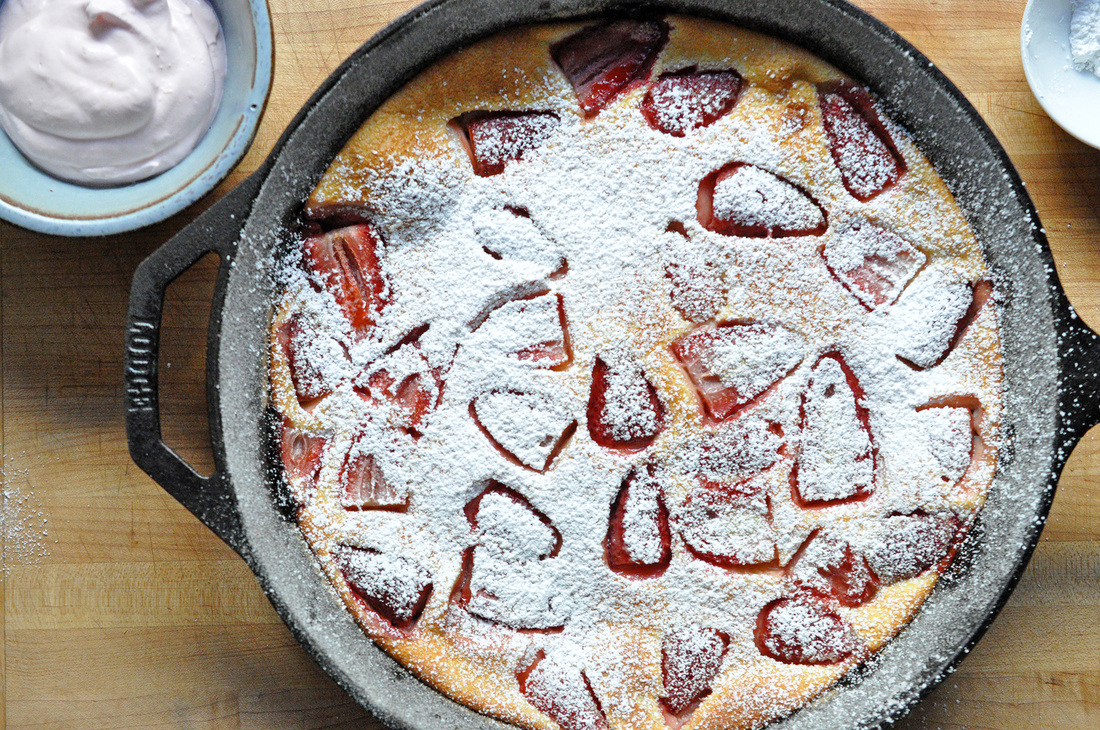
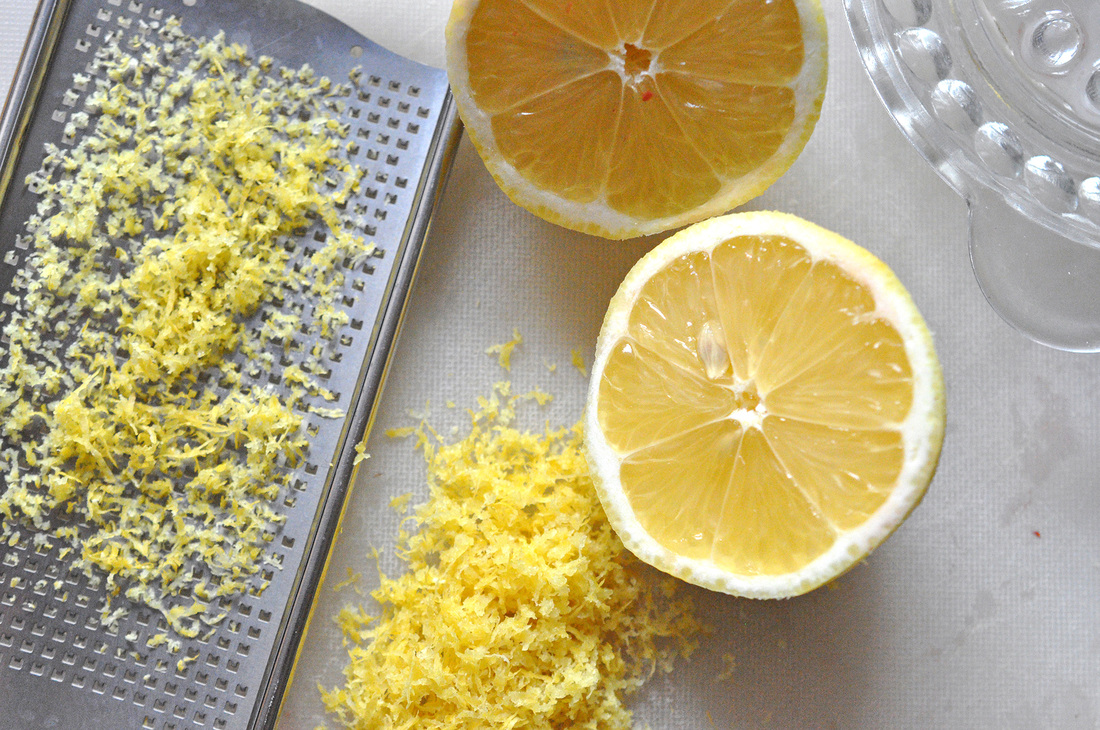
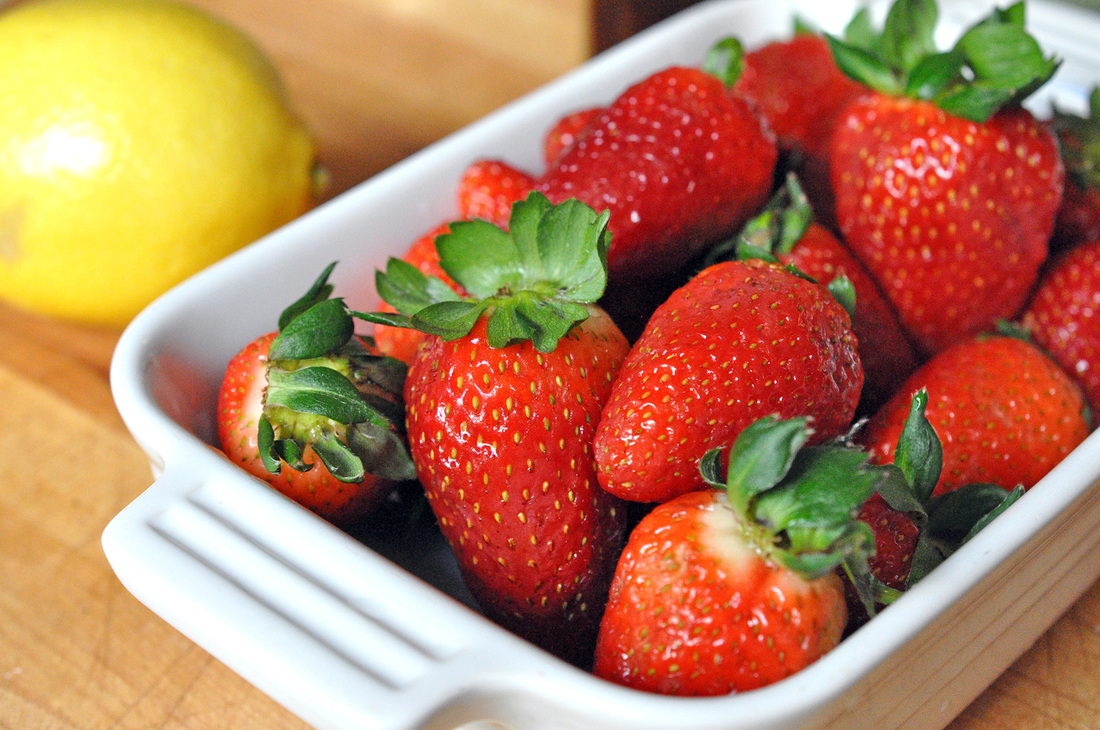
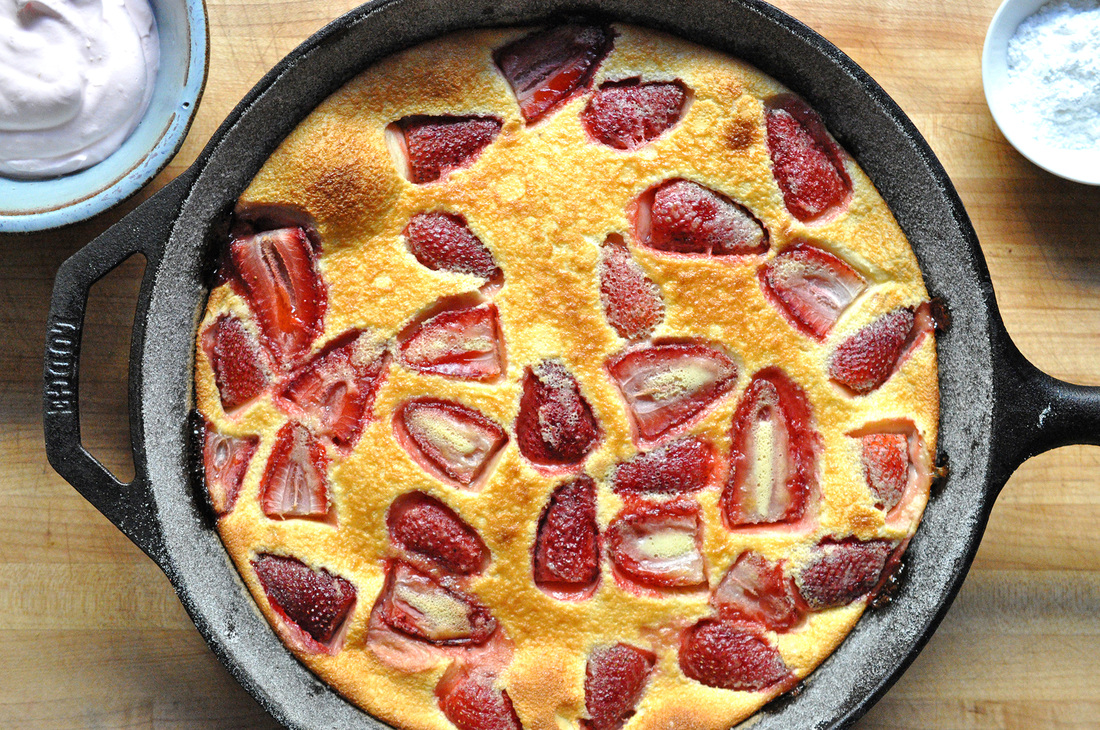
Preheat oven to 350° You will need 2 large baking sheets to roast the oatmeal on. In a large prep bowl combine all of the dry ingredients, except for chia seeds and the dried fruit - mix well. Add the coconut oil and maple syrup, toss gently to coat. Spread the oatmeal mixture evenly onto the 2 large baking sheets. Bake for 30 minutes, checking every 10 minutes to stir. While the oatmeal mixture is baking prep the dried fruit. Only the larger fruit needs to be chopped, the raisins and cranberries can be added whole. When the oatmeal is finished, let cool for about 10 minutes on the baking sheets. Transfer the oatmeal mixture to a large bowl and add the dried fruit and chia seeds. Mix well and you have granola! [You can play around with proportions here; I like my granola not too sweet and a little drier. This granola doesn’t clump together but the ginger, cinnamon and coconut are a super flavorful combo that tastes pretty awesome!] 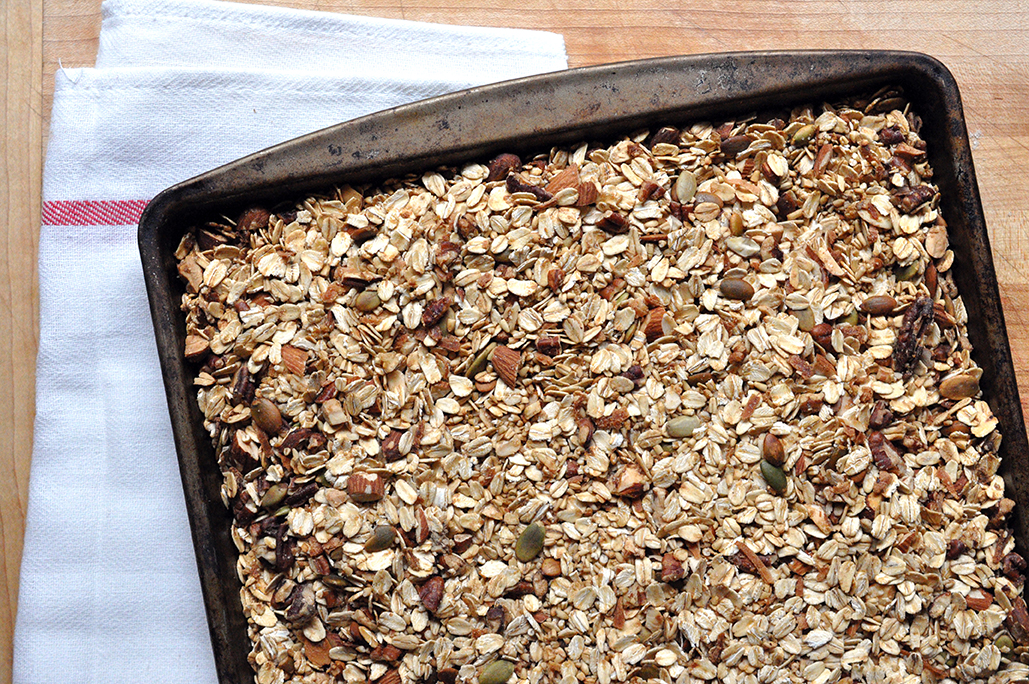 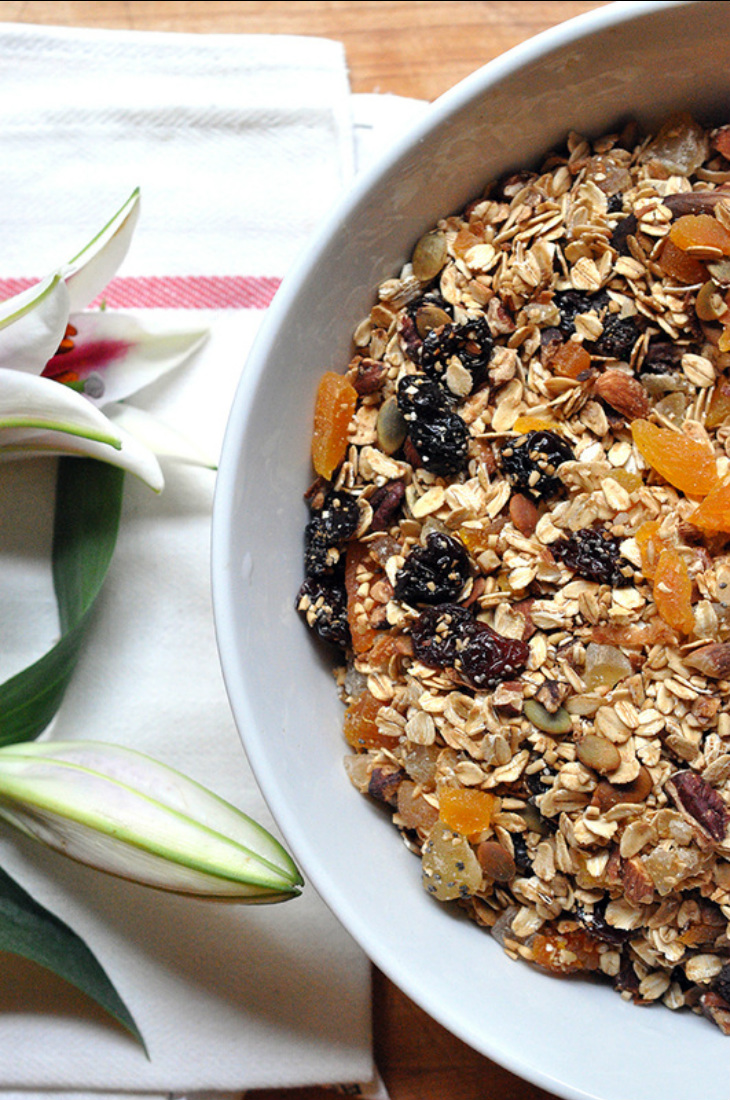  I established in my first post from last summer that I wasn’t a baker. This fact shouldn’t be confused with me not liking to eat baked goods. Because I do. A lot. I just happen to be lucky enough to have found a guy who likes to bake - and who eats sweets more than anyone else I know. Seriously. He has a weakness for donuts and cheese filled danishes. I also do my fair share of sweet treat eating – my weakness though, definitely cinnamon buns. The problem with a lot of baking and pastry making is that there are so many steps to follow, in a very specific order, in very specific measurements to be conducted at very specific temperatures. I just can’t do it…so I try to stick to the basics and make them nice and flashy so you don’t notice how easy it was to do. When I came across a recipe for Clafoutis last summer [pronounced Cla-foo-tea, not Clawfoodie, like I had originally thought…], I was so happy because I could make it! I knew I could and it wouldn’t take me all day. Clafoutis is a French dessert originally baked with whole cherries, but you can swap the cherries with pretty much any ripe seasonal fruit. Essentially it’s a fancy pancake with fruit cooked into it, topped off with sugar, either confectioners or granulated, and finished with a dollop of whipped cream. I mean come on… I’ve tried making it with cherries, I’ve tried it with fresh figs [YUM], but right now, other than citrus, it’s sort of slim pickins down in Texas, so I found some good looking strawberries and went at it. I think this dessert – or breakfast, is a true show stopper. It looks all puffed and golden brown when it comes out of the oven and once you dust it with sugar it looks so darn pretty. I think it’s probably the near instant satisfaction of this dessert that wins me over. 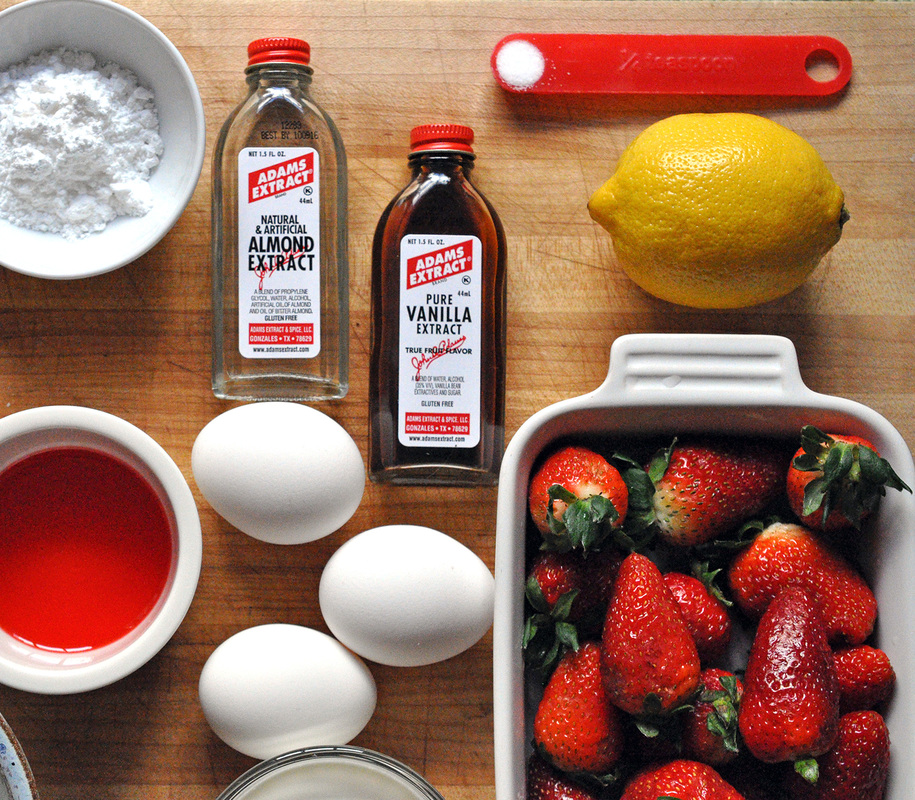
  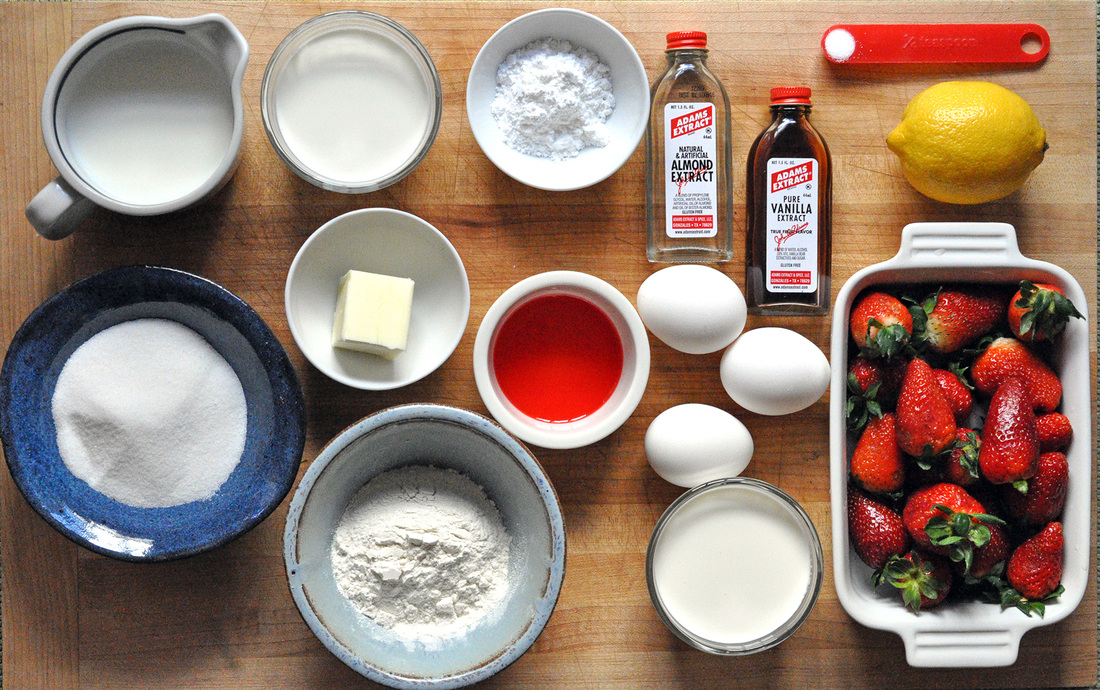 Strawberry Clafoutis with Grenadine Cinnamon Whipped Cream PRINT RECIPE [Prep: 20mins / Cook: 40mins / TOTAL: 1hr [8 servings]
Grenadine Cinnamon Whipped Cream [Total: 3 mins] [3/4 cup]
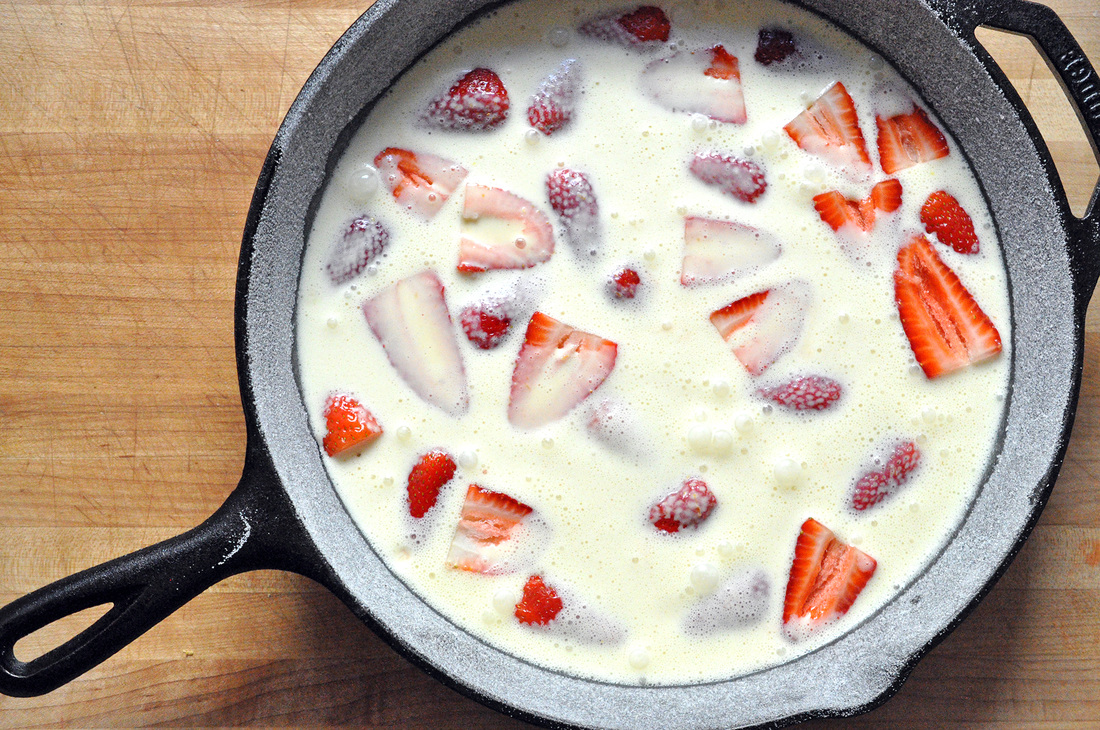
Zest the lemon and melt the butter [microwave it for 20-30 seconds]. Combine milk, heavy cream, granulated sugar, flour, eggs, melted butter, vanilla and almond extract, salt and lemon zest [reserve a pinch of zest for the whipped cream] into a blender or food processor and mix for 1 minute. Let this batter sit for 20 minutes. Rinse and stem the strawberries and cut in half lengthwise. In a small mixing bowl add the berries, 1/2 tablespoon granulated sugar and 1 tablespoon lemon juice, mix well. Preheat oven to 425°. Butter 9 -10 inch cast iron skillet or baking dish, including sides and coat with granulated sugar. It’ll take about 1 1/2 tablespoons. [If using a skillet make sure the handle is oven-proof.] Place strawberries in the skillet, spacing them out evenly. After batter is done resting, add to the skillet and put it into the oven. Bake for 15 minutes at 425°, then lower heat to 375° and bake for 20-25 minutes more. The clafoutis is finished when it is a dark golden brown at the edges. While the clafoutis is baking, combing remaining cream, lemon zest, 1 tablespoon grenadine and ¼ teaspoon cinnamon in a small mixing bowl. Beat until stiff peaks form. If using an electric blending this will happen quite fast, if beating by hand it will take about 3 minutes. When the clafoutis is done baking let it rest for a few minutes. [It is best served warm, but if served right out of the oven it looses its shape.] When ready to serve, dust the cake with the confectioners sugar and add a dollop of whipped cream to each portion. Enjoy!
 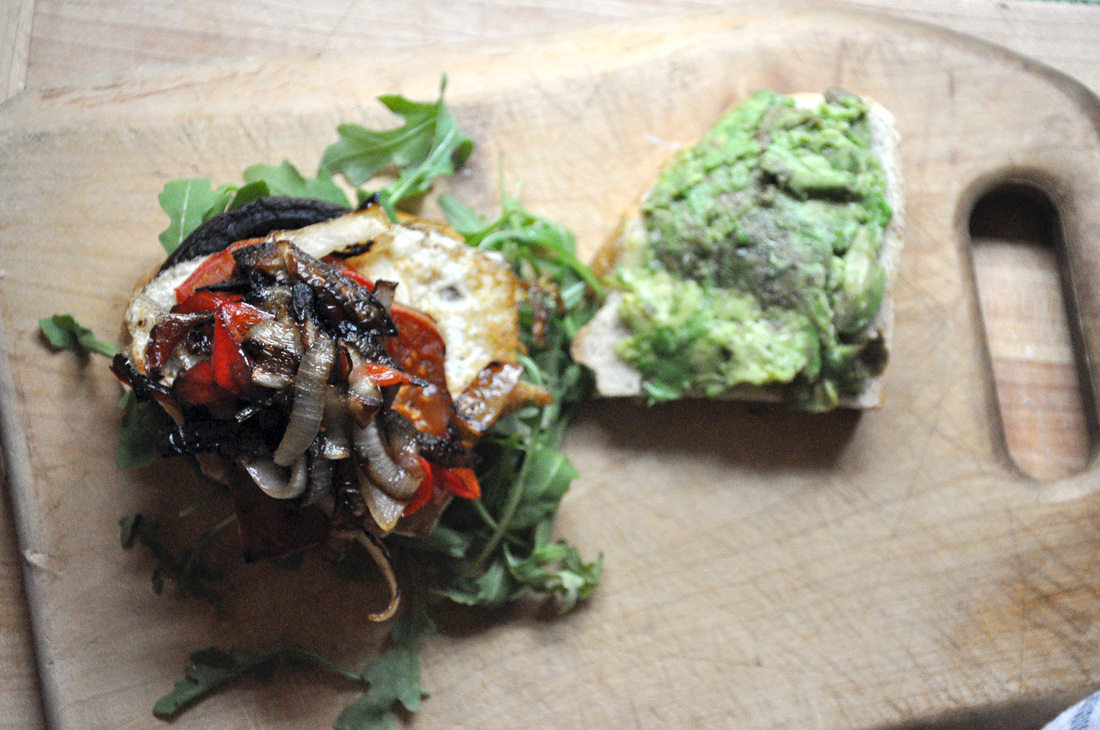 So picture this – you’re hungry and out of ideas for what to eat – be it breakfast, lunch or dinner. I’m not saying that you have to feed a whole army – it’s not that kind of dire situation – you just have to feed yourself and maybe a hungry boyfriend/wife/roommate. I secretly love this scenario. You’re desperate and think you have nothing to make, but then ingredients start popping up in the fridge as ideas start lighting up in your head. Bread – check, random assortment of half used veggies – check, small piece of smelly cheese – check, one egg left…- check! So I start picturing this epic meal – just a sandwich really - in my mind and I get hungrier by the second. How can I maximize efficiency and cut down on time…enter trusty cast iron skillet. Well hello my hefty well-seasoned problem solving friend – lets get down to business. It's at this point I realize that I can pretty much add all of my ingredients into the skillet and cook them at the same time – I am feeling pretty self-satisfied. Ok enough about my feelings and talking to my kitchen cookware. I’ve made this sandwich a few times now and it’s yummy and satisfying. You don’t need to use the same exact ingredients that I used, that’s exactly NOT the point - It’s to use up what you have in your fridge and make an awesome sammie. There are too many options to even try and cover here. So go on now, go on and try it for yourself! 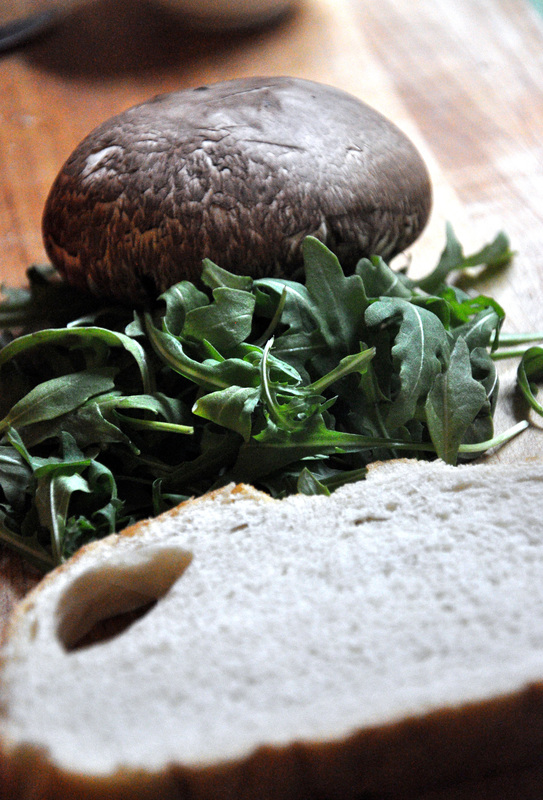 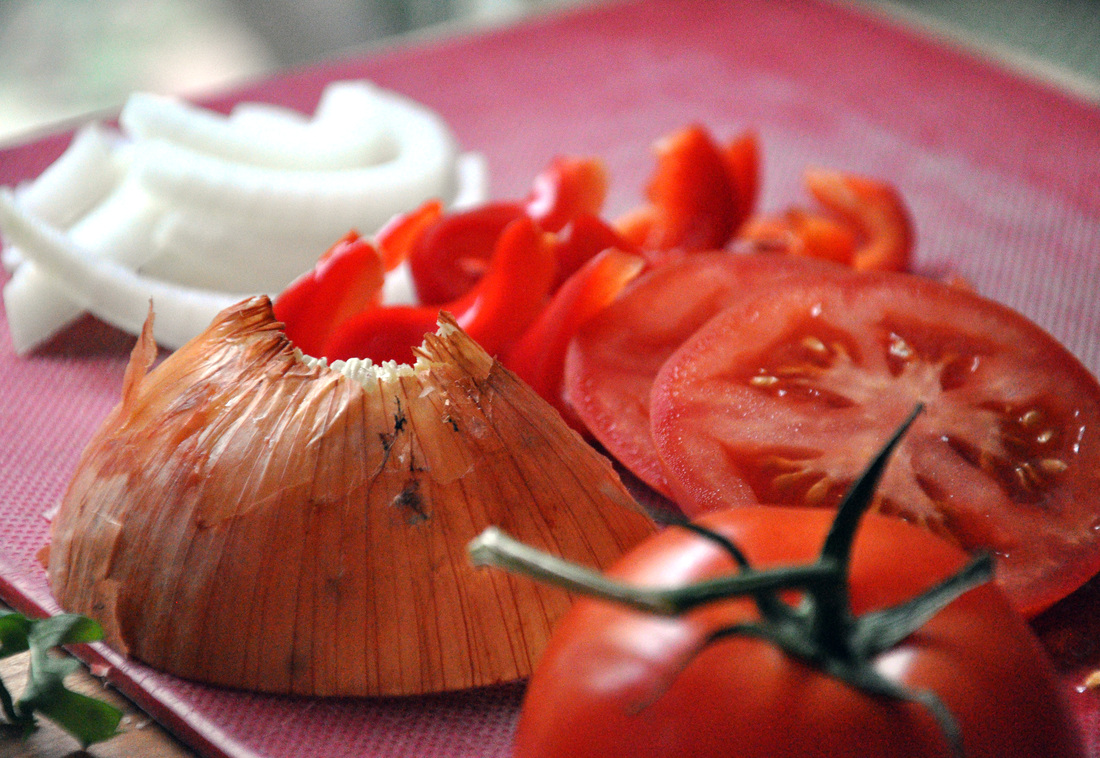  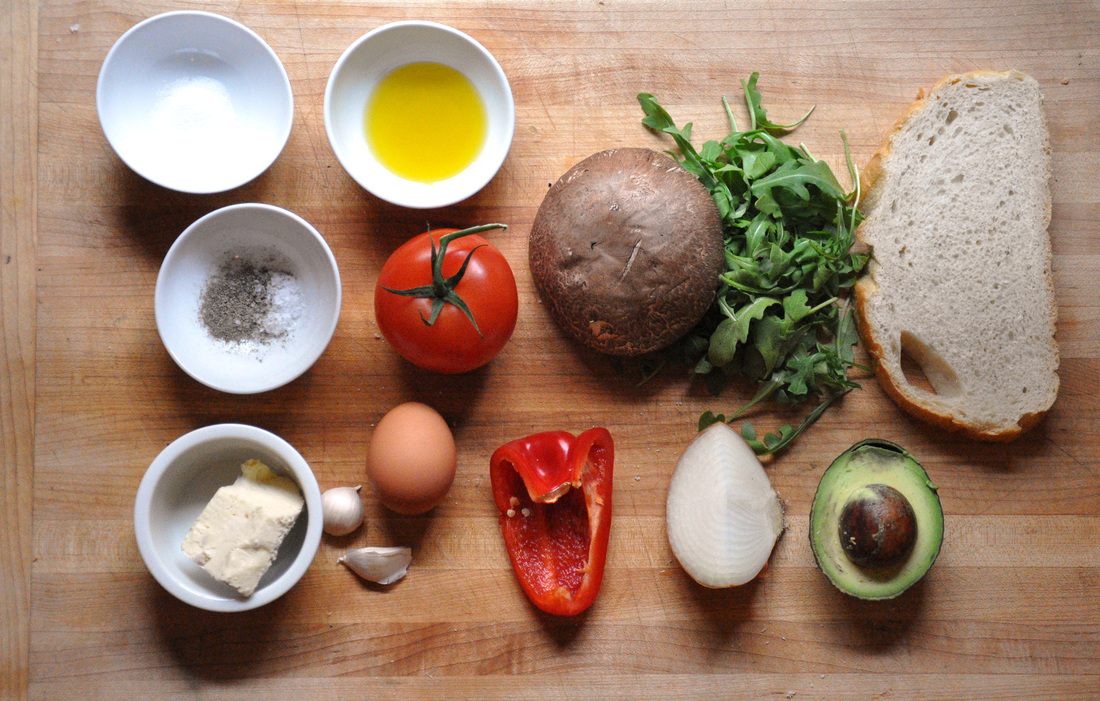 Portabella Skillet Sammie PRINT RECIPE [Prep: 10 / Cook: 20 TOTAL: 20 (the prep can take place simultaneously to cooking)] [one serving]
Heat the oven to 350° - this is only necessary if you don’t have a toaster oven. Place a large cast iron skillet over medium heat and add 1 tablespoon extra virgin olive oil. Wait a few minutes for it to heat up and then add the portabella cap face down. Let this cook on its own for a few minutes - 5 minutes should be enough. While the mushroom is cooking, put the sliced bread in the oven - set your timer to 5 minutes - slice up the onion, pepper and tomato. To the same skillet add the sliced onions, red peppers, and tomatoes. Keep them separate from each other. The idea is to caramelize the onions and blacken the peppers and tomatoes. The peppers and onions should be stirred up and can mix a little with each other, but the tomatoes will fall apart if you are too rough with them. When the onions start to turn a warm golden color and the peppers start to blacken, carefully flip the tomato slices over. [Check to see if the toast is ready!] Now you can flip the portabella slice over and add a pinch of salt to everything and a pinch of sugar just to the onions. Then you can let everything sit in the skillet for 5 more minutes, stirring up the onions and peppers every now and then. While you are waiting on the veggies in the skillet, spread on the still warm toast whichever soft cheese you’ve decided to use - I had a rich triple cream on hand. Take the halved avocado and mash it up with a fork while still in its skin. Take the peeled garlic clove and rub all over the other half of toast, then smear it with the mashed avocado and season lightly with salt and pepper. Add the piece of toast smeared with cheese to the skillet and crack your egg into any empty space you can find – you may need to do a little rearranging for everything to fit – and cover. Since the skillet should be nice and hot the egg shouldn’t spread out too much once it hits the pan, if it does, just coax it back a little before covering. The egg should be done after a 2 minutes or so, flip it – waiting about 30 seconds, and then scoop it up with a spatula and place on top of the portabella. Now the fun part - carefully stacking the sammie. I chose the creamy triple brie smeared side to be on the bottom, dressed it with the arugala and then the portabella with egg. Next, I added the fried tomatoes, peppers and onions, and topped it off with the garlicky avocado toast. So yes it’ll become sort of a mouthful for a sandwich, but you can press down a little on it, cut it in half and watch the yolk spread and mix with all the yummy ingredients. [If runny yolk isn't your thing just let the egg cook another minute (instead of 30 seconds) after you’ve flipped it.] If you have some potato chips to throw on the side, even better! Oh and it’s a pretty hearty sandwich – so if you feel like sharing – a half is probably enough to fill a hungry belly. Enjoy! 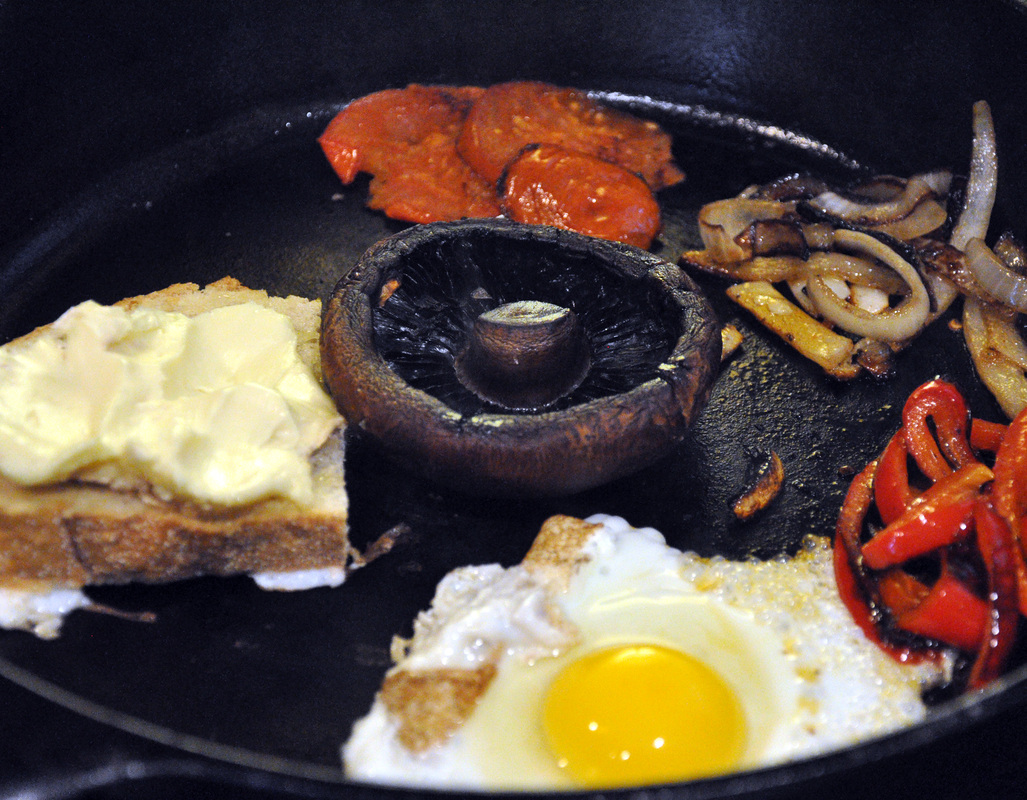 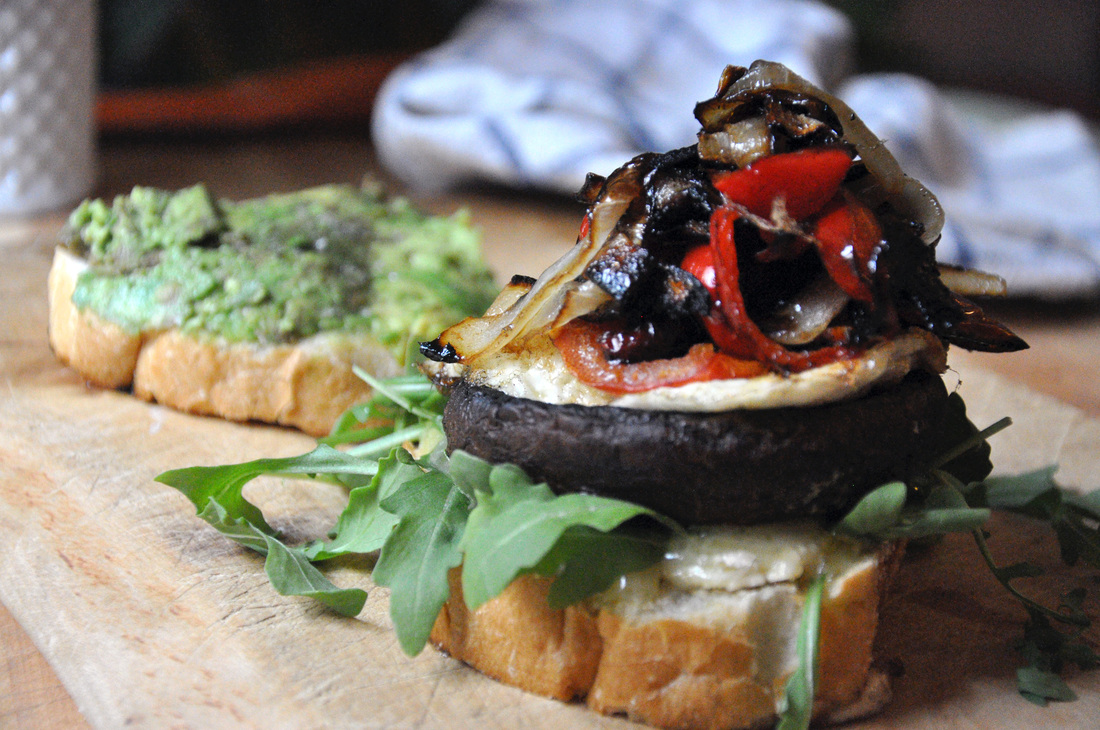 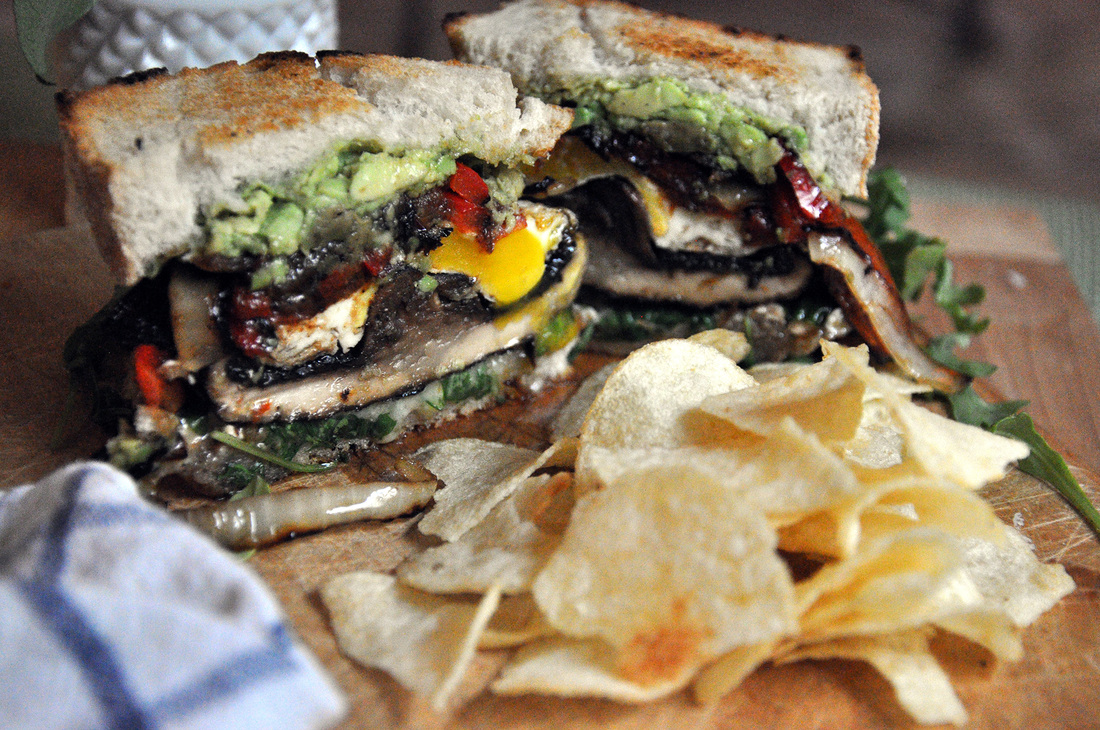 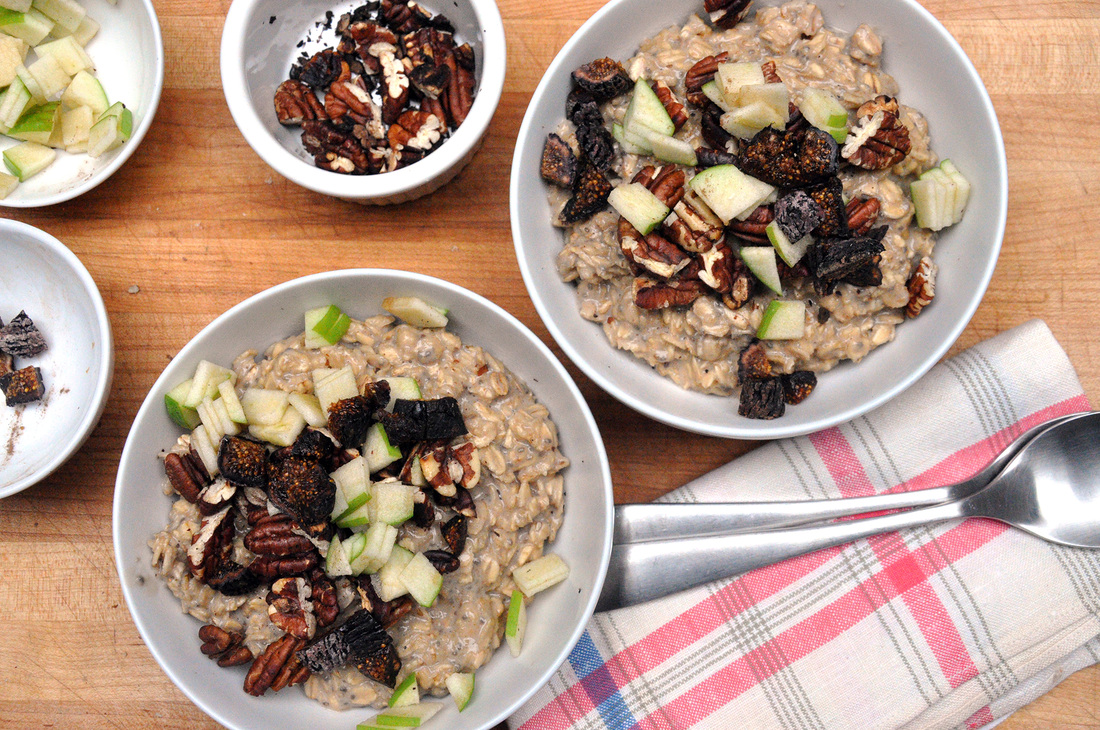 What to make on a chilly fall’s morn? Why oatmeal of course! Though because I normally have some form of oatmeal throughout the week I wanted to make it extra special. I’d recently made a version of Not Without Salt’s [Ashley Rodriguez’s] home-made chai recipe and was blown away with how good it was. Much better than any chai I’d had from a tea bag. Even my boyfriend who’s had his share of good chai while hiking around Nepal [lucky dog] was impressed. So when I lounged in bed this past Sunday morning thinking of what lay in my pantry and in my fridge I thought why not cook some old fashioned oats in some homemade chai and see what happens…so I shuffled downstairs in my shearling slippers and got cooking. It takes a little more effort but I think it’s worth trying. I mean who doesn’t want the smell of simmering home-made chai filling their kitchen? 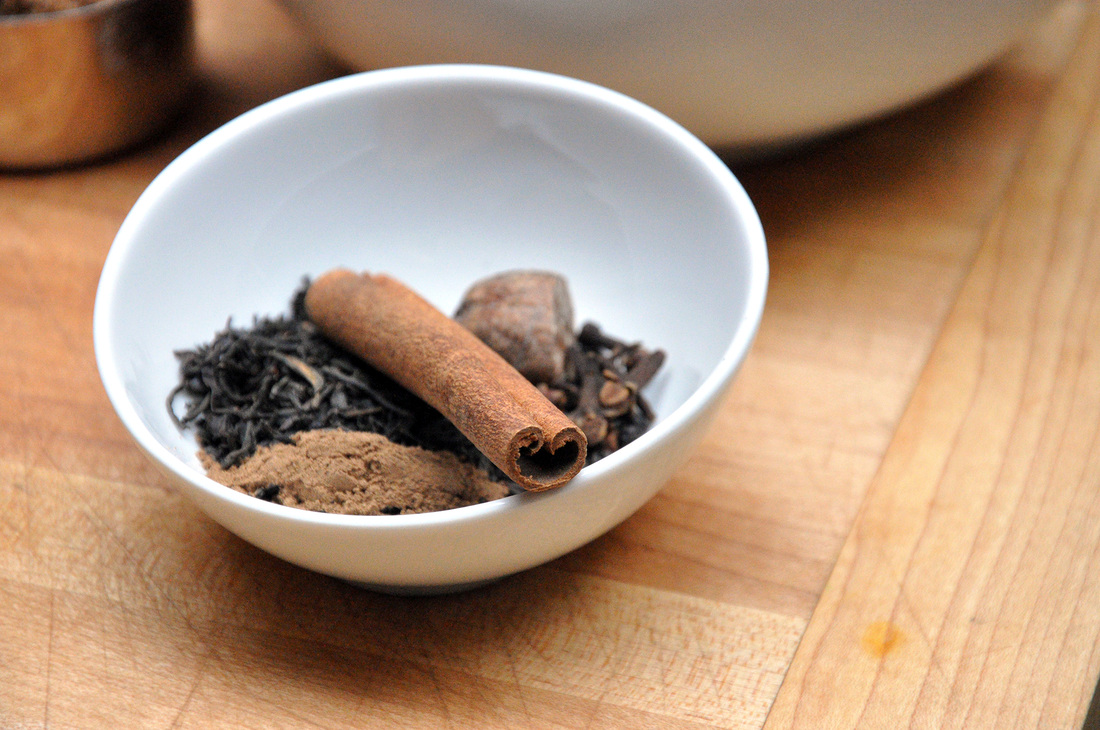 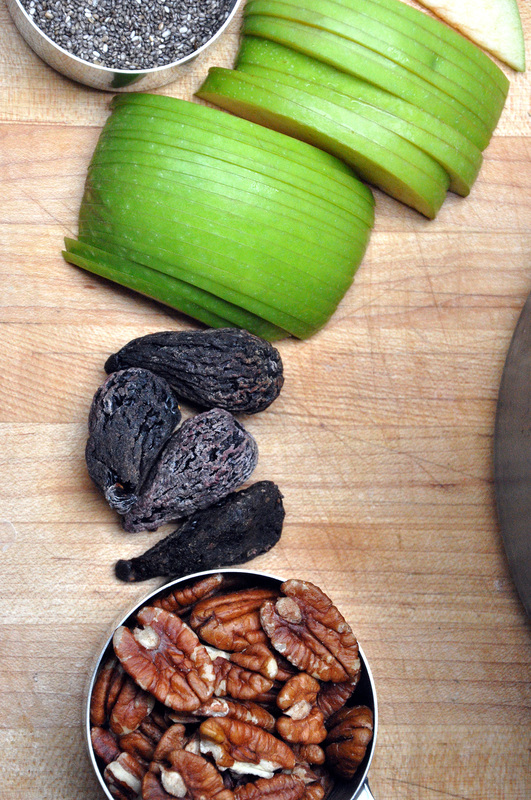  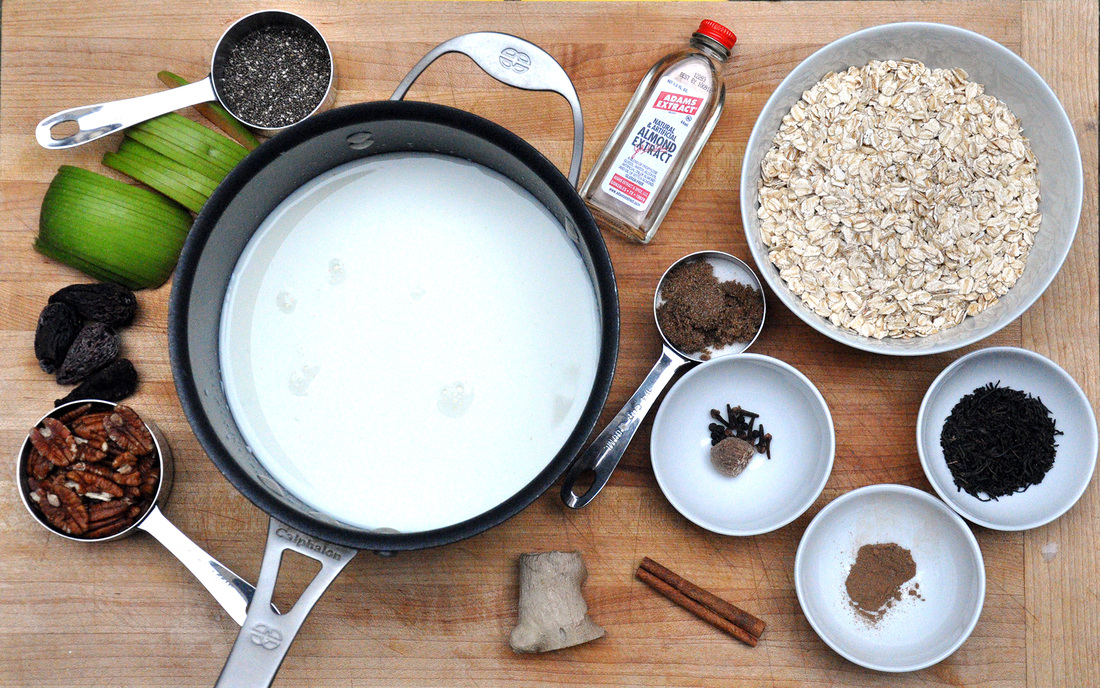 Sunday Morning Chai Oatmeal PRINT RECIPE [Prep: 5 / Cook: 30 TOTAL: 35] [Two servings]
Pour milk into a medium sized saucepan. Add sugar, cinnamon stick, peppercorns, whole cloves, cardamom pods, grated nutmeg, all spice, black tea leaves, and slices of peeled ginger. For this recipe I used a ¼ teaspoon of almond extract, mostly because I was out of vanilla extract [it still tasted good!]. Carefully bring mixture to a simmer over medium high heat. I say carefully because milk likes to boil over-quickly. It should take about 8 minutes for the mixture to come to a simmer; you should keep an eye on it and stir often so the milk doesn’t stick to the bottom. Once it has come to a simmer, remove the chai mixture from the heat and let sit 20 minutes to steep. While the chai mixture is steeping prep the toppings for the granola. Wash and dice up the granny smith apple and chop the dried figs. Cut the pecans in halves or thirds. You don’t want the pieces to be too small because they will burn when toasted. Put the pecan pieces into a small cast iron skillet and lightly salt. Toast for 3-5 minutes on medium heat stirring occasionally. Keep an eye on them, once they start to toast – you’ll smell it – they will burn not long after. When they are ready remove them from the skillet or they will keep cooking and burn. When the chai mixture is done steeping, strain it into a small mixing bowl. Discard the used spices and pour the strained chai back into the saucepan. Bring it back to a simmer over medium-high heat, stirring often. Once it simmers, add the oatmeal, turn the heat down to medium and let sit for 2 minutes. Add chia seeds to the chai oatmeal and wait 2 more minutes stirring often. The oatmeal should be done after 4-5 minutes. Serve in a warmed bowl and top with the apple, pecans and figs. 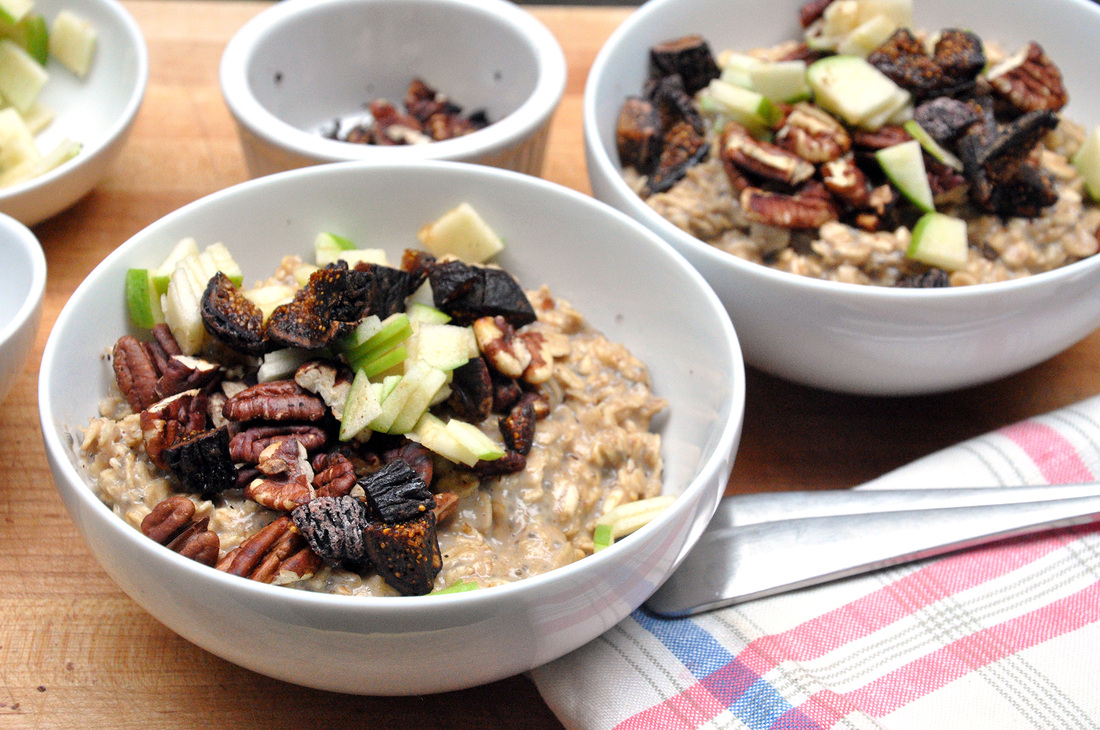 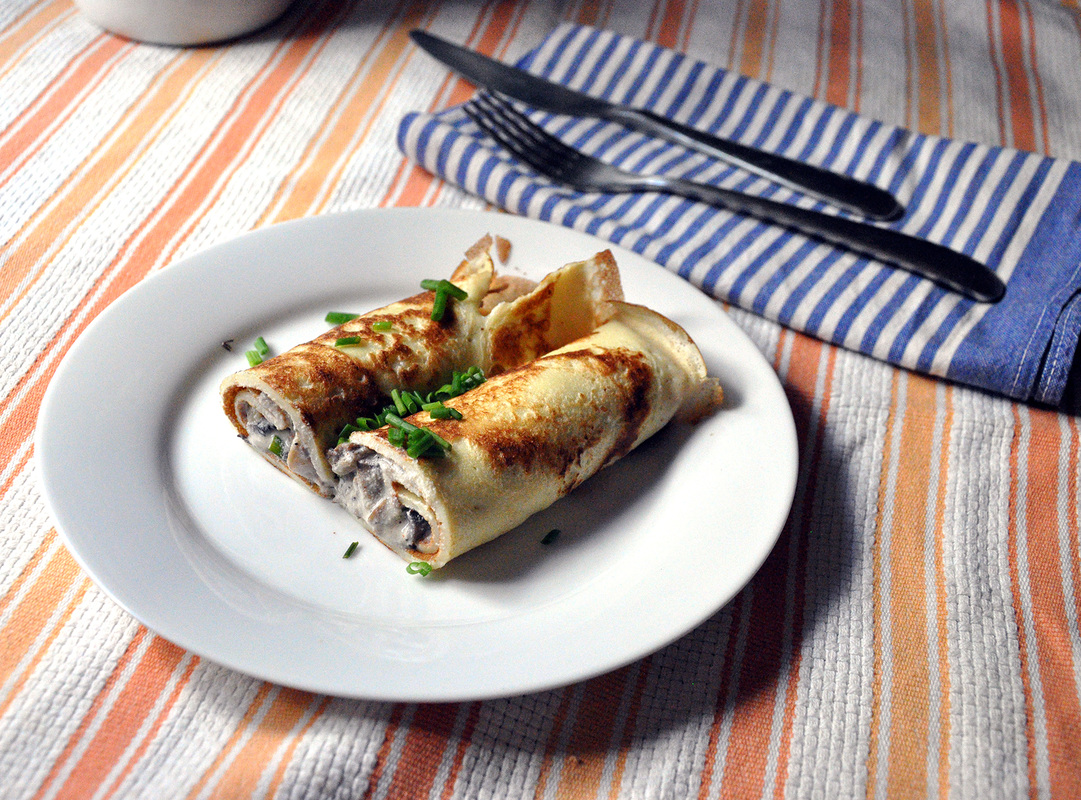 Recently my boyfriend has been on a crepe craze. He’s been whipping them up for years, so I’m a lucky girl. I haven’t tried my hand at them in a while, but the other day I really really wanted some mushroom crepes… My early memories of these thin, delicate pancakes revolve around them being stuffed with mushrooms and cream or baby shrimp and dill. My Swedish grandmother and great aunt would make them when I visited in the summer and fall. It’s not a very strong memory – other parts of my trips to Sweden remain closer to the surface…the cinnamon buns [kanelbullar], gummy candy [goodies], lingonsaft [lingonberry syrup and water] and of course the Äppelkaka – I was young and sweets were always on my mind…Anyways these creamy mushroom crepes have been lingering in my thoughts recently and I had to have them. Unfortunately I don’t have either my grandmother’s or great aunt’s recipe, so with a little help from a Swedish cookbook I sort of come up with my own version. Traditionally the pannkakor med svampfyllning [Swedish pancakes with wild mushroom filling] has just that, wild, fresh picked mushrooms. I had good old white button mushrooms – champignons - on hand. Also the recipe calls for cream; I decided to use some ricotta as well. Add a little lemon, paprika, chives, and onions…and what I ended up with was remarkably close to what I remembered. It was a happy moment. The most amazing thing about crepes is their versatility. You could throw the chives in the crepe batter, instead of the filling, the paprika too. Or save some of the crepes for dessert and make a sweet filling… 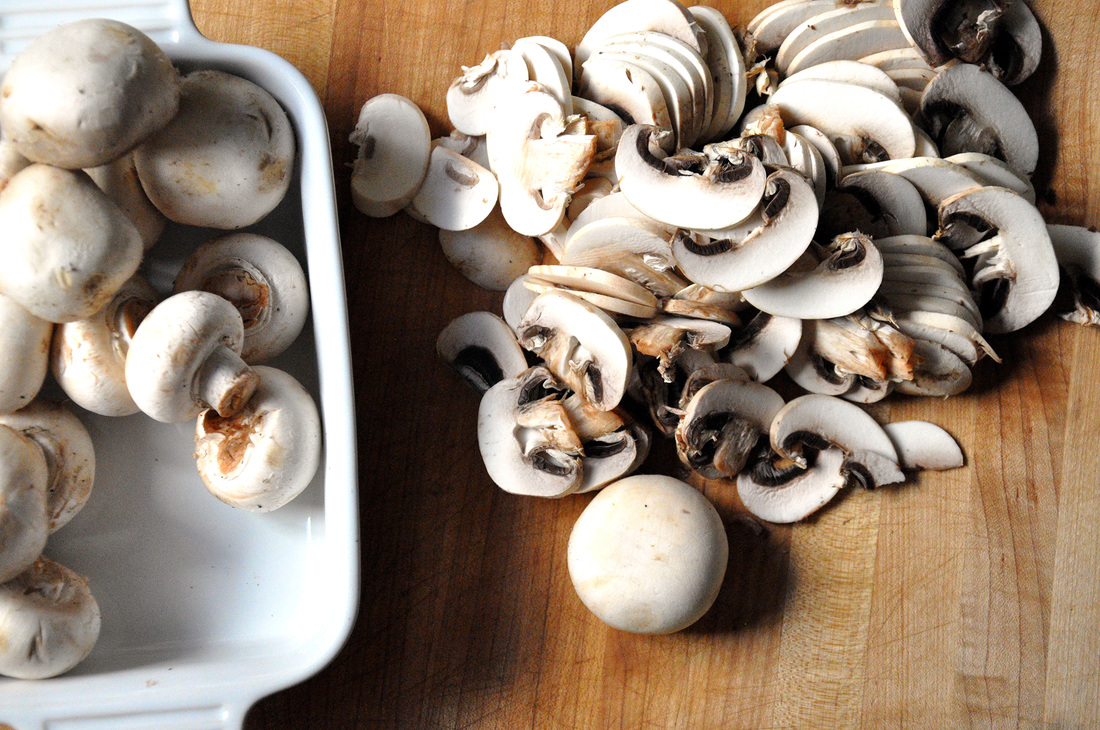 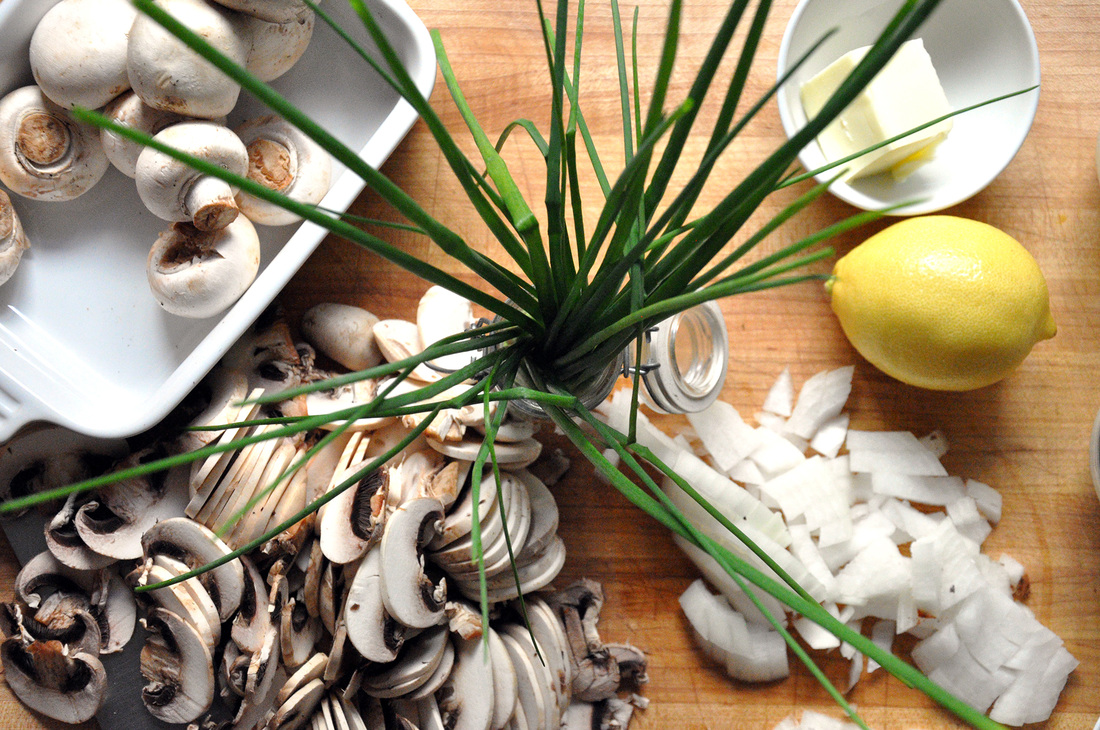 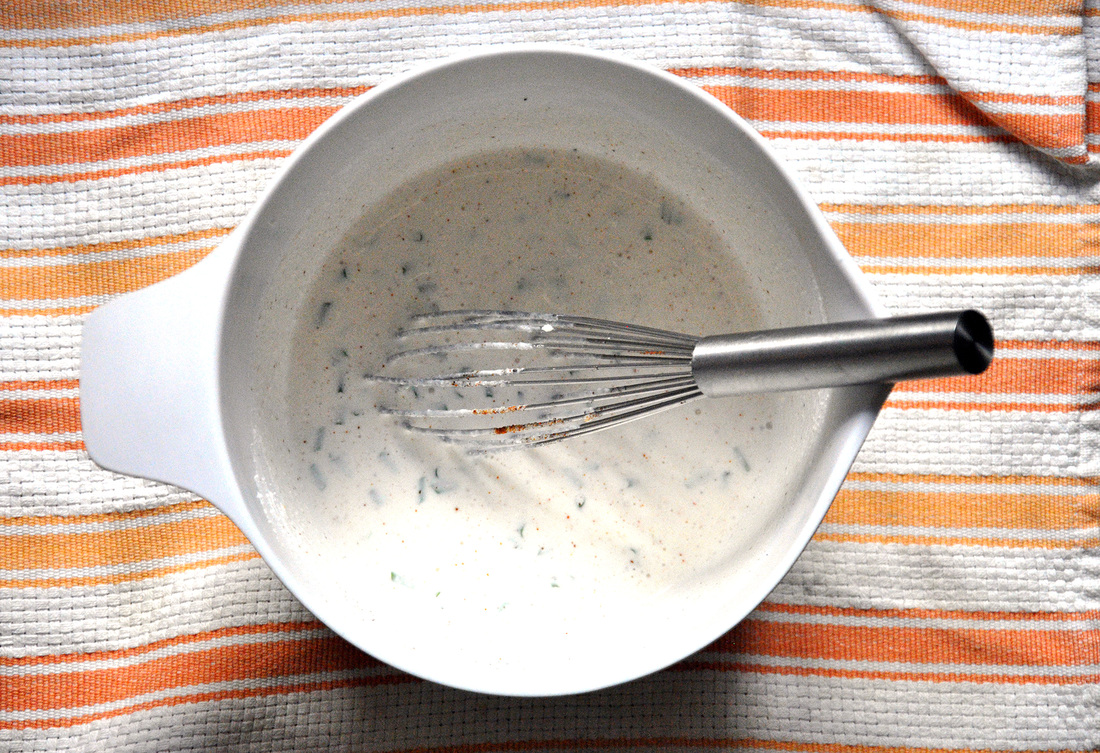 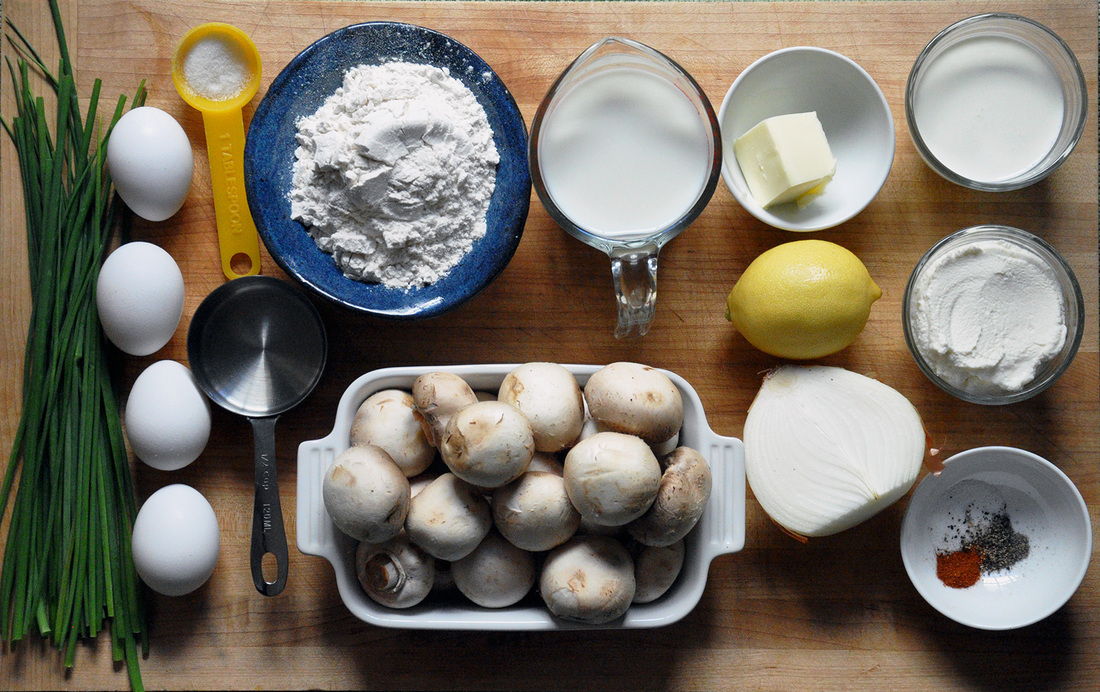 Swedish style crepes with Mushroom Ricotta filling PRINT RECIPE [Prep: 20 minutes / Cook: 25 minutes / TOTAL: 45] [make about 10 crepes] Crepes:
Mushroom Ricotta filling:
To make this crepe batter you’ll need a food processor or blender…then add all of the ingredients and blend! You have your fancy crepe batter ready to go – isn’t it awesome how easy this is. You can keep the batter in the blender and just pour it in to the pan when you are ready to make the crepes. First though, let’s compose part of the mushroom ricotta filling. Combine the ricotta cheese, cream, paprika, chives, lemon juice, salt and pepper – a few grinds of the pepper and a pinch of salt should do. Now whisk this all together and taste. It should have a balanced flavor, not too lemony or salty. The actual making of the crepes can be a little intimidating. Put a sauté over medium heat and add a tablespoon of butter. Make sure to coat the bottom of the pan as well as the sides. Wait until the pan is hot [you can splash a few drops of water to test, it will sizzle when it’s ready] and have a spatula ready. Pour in about a ¼ cup of the batter, or just until the batter almost covers the bottom of the pan. Tilt and rotate the pan so that it is evenly coated with the batter. You will notice that small bubbles rise to the top of the crepe – this is good, it means it is almost ready to flip - depending on how hot the pan is, this could take 1 minute. Take the spatula and gently easy it under the edges of the crepe until you can slide it the whole way around and then ease it towards the center of the crepe. There are a few ways to flip it, you can lift the edge with a spatula and then grab it with your fingertips, or you can try flipping it with the spatula alone. It make take a few tries, but you’ll get the hang of it, and anyways, they don’t need to look perfect – they just need to taste that way. The crepes will need less time on the second side, they should be ready to come out after about 30 seconds. You will need to add a little more butter to the pan as your crepe making process moves along - maybe every third crepe or so. As they finish up you should have a plate nearby that you can transfer them to and cover with a paper towel. You don’t want to cover the crepes with foil, as it will make them soggy. 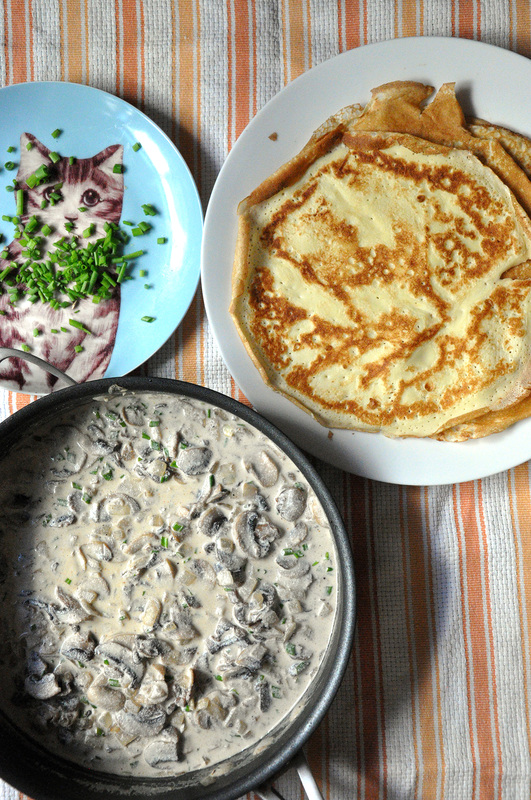 All that’s left to do is finish the mushroom ricotta sauce. Thinly slice up the mushrooms and dice the onions. You can use the same sauté pan; just add a tablespoon of butter and a tablespoon of olive oil. Once this is hot [again you can tell by splashing a few drops of water into the pan – if there’s a sizzle you are good to go] add the minced onion and sauté for 3 minutes. Then add the mushrooms and sauté for 5 minutes longer. At this point you can a pinch of salt and a few grinds of black pepper. After the 5 minutes is over add the ricotta and cream mix to the sauté pan. Cook this mixture for 2 minutes longer, stirring a few times. To compose the crepe, just spoon a few tablespoons of the mushroom sauce into the crepe, roll it up and garnish with some chives. 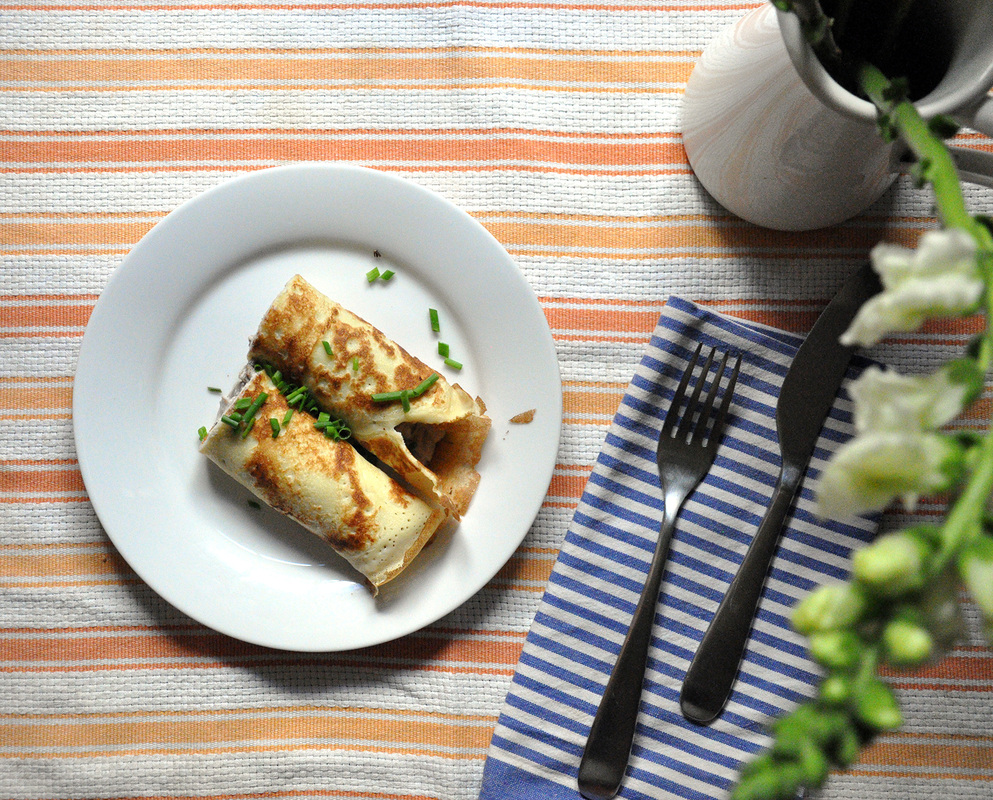 |
All
Stuff I follow...
Not Without Salt
My New Roots Sprouted Kitchen Thug Kitchen Lady and Pups A CUP OF JO The Daily Meal Melissa Clark ...always 3191 Miles Apart The Sartorialist Garance Dore The Nourished Kitchen Archives
October 2014
|


 RSS Feed