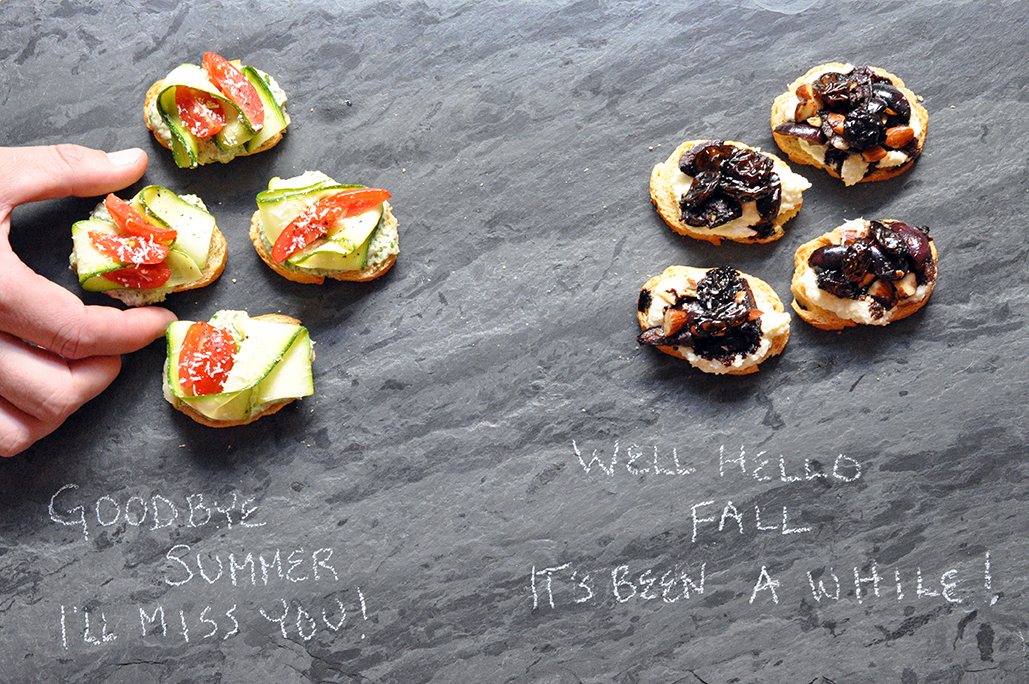
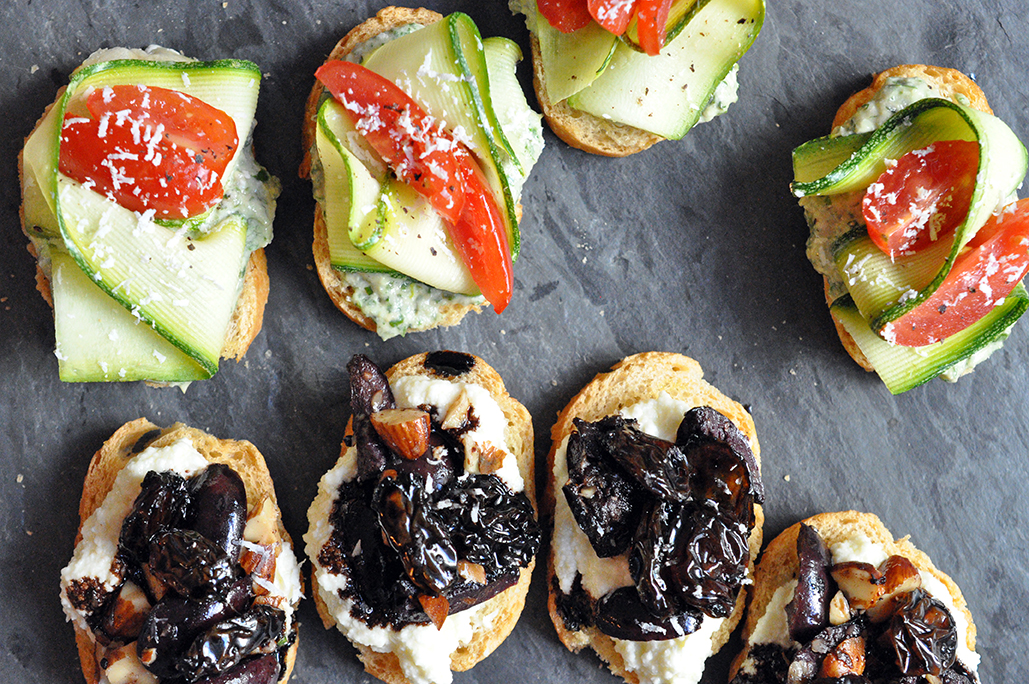
I’m sure you’ve heard it everywhere by now; Summer is over, caput, gone. See you next year, I shout as I watch it walk away, in flip flops, with a suitcase packed full of mismatched bathing suits, sunscreen, cocktail umbrellas, vacation days, grilled corn and sea shells…but wait, while dear Summer departs, your old friend Fall arrives, with a bag full of apples, boots clacking, a cool new scarf and a crisp breeze. Hey, you love time of year, remember? Though, if you’re lucky, there’s a brief period when Summer and Fall overlap a little, what could be better? Two of your favorites getting to hang out over a glass of white wine, and of course you ask them to stay for a snack so the moment will last a little longer. ..And this is what you should serve them, a little something for everyone - Ode to Summer and Welcome to Fall - Crostini. 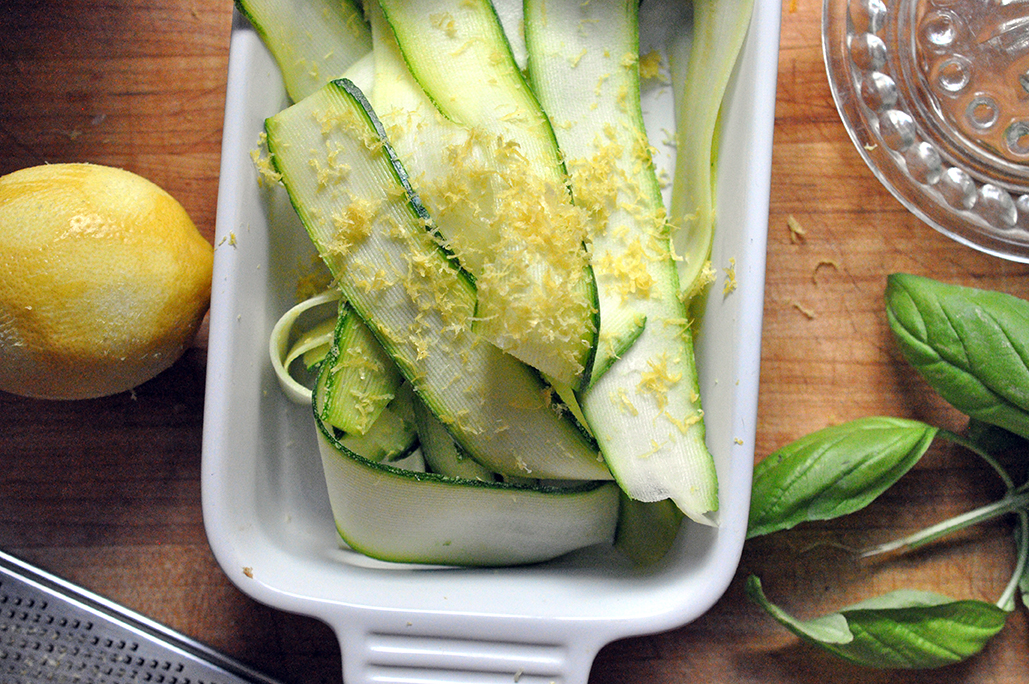
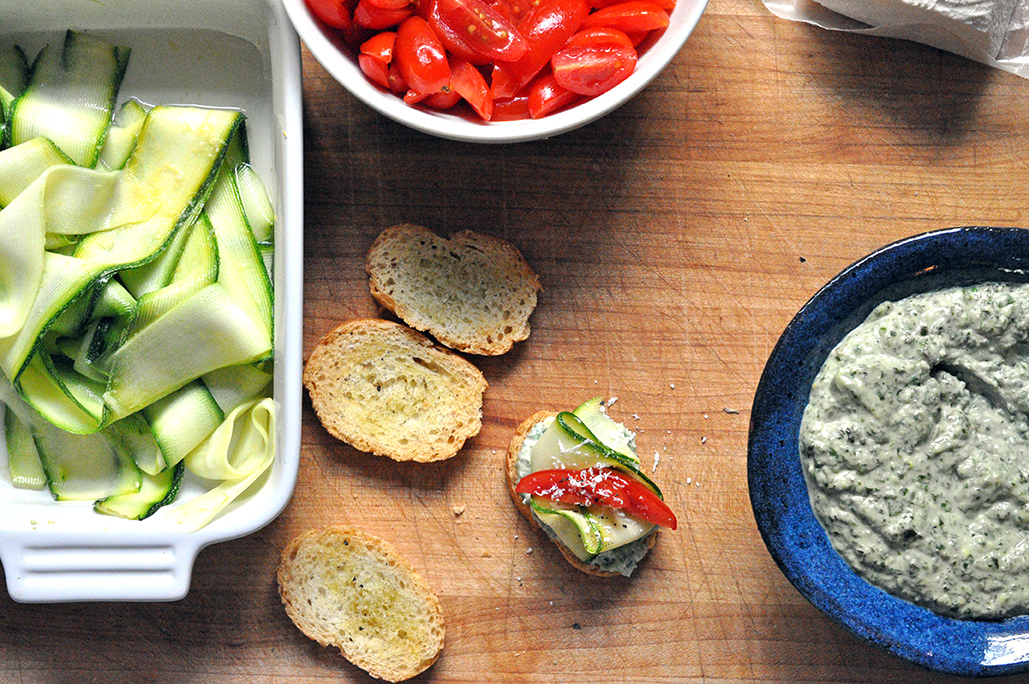
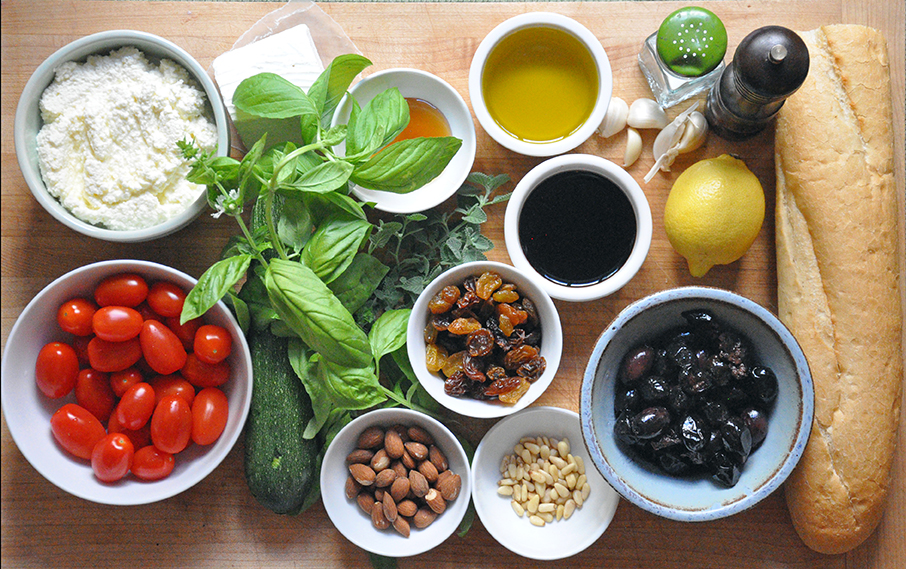
Ode to Summer Crostini (or basil-mint ricotta crostini with fresh zucchini and tomatoes) PRINT RECIPE [Prep: 20 mins / Cook: 10 mins / Total: 20mins] [Serving size: about 16 or half a baguette]
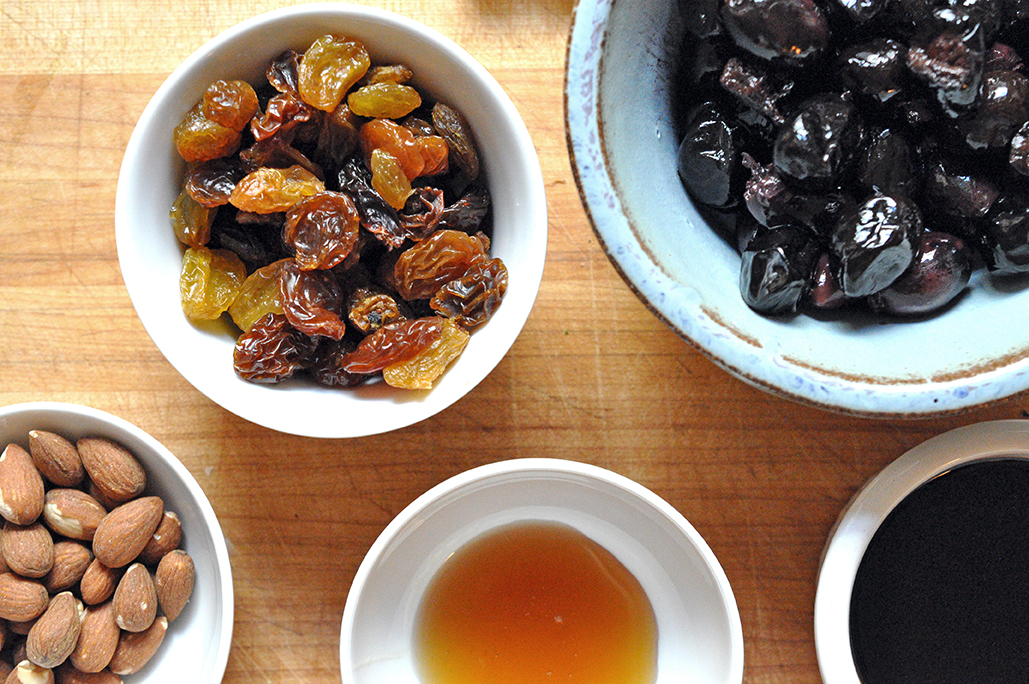
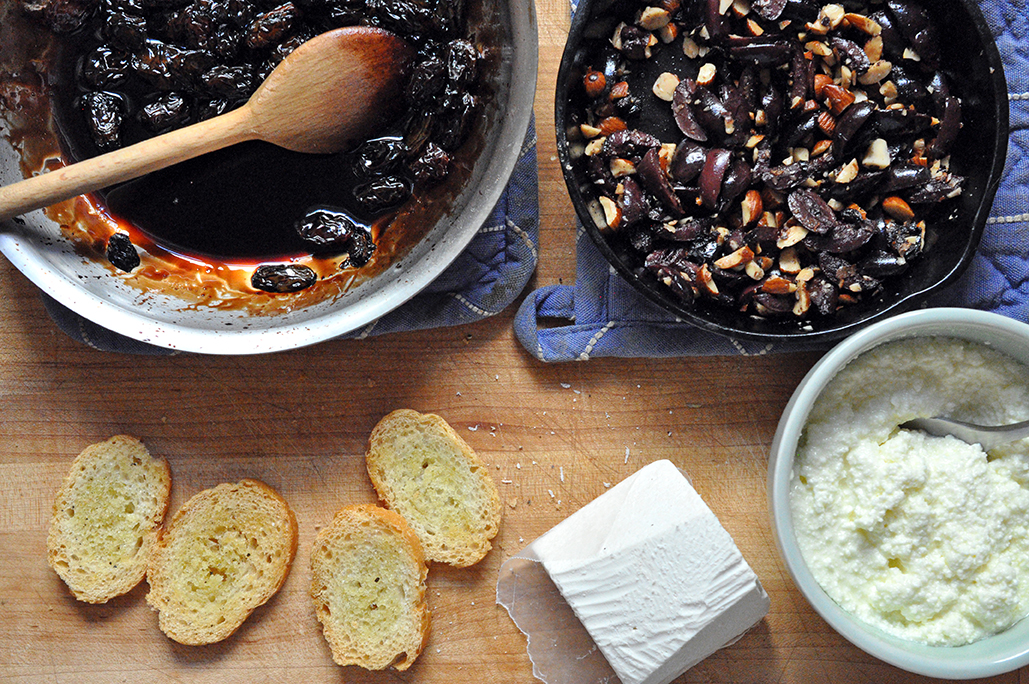
Welcome to Fall Crostini (or balsamic raisins with sauteed olives and almonds crostini) [Prep: 15 mins / Cook: 15 mins / Total: 30mins] [Serving size: about 16 or half a baguette]
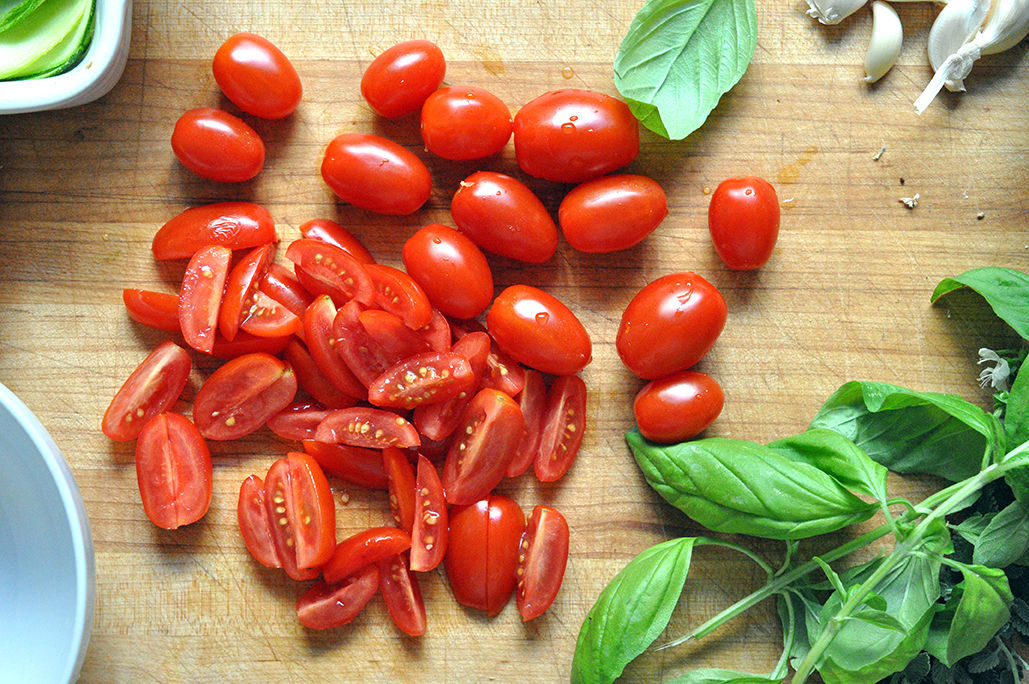
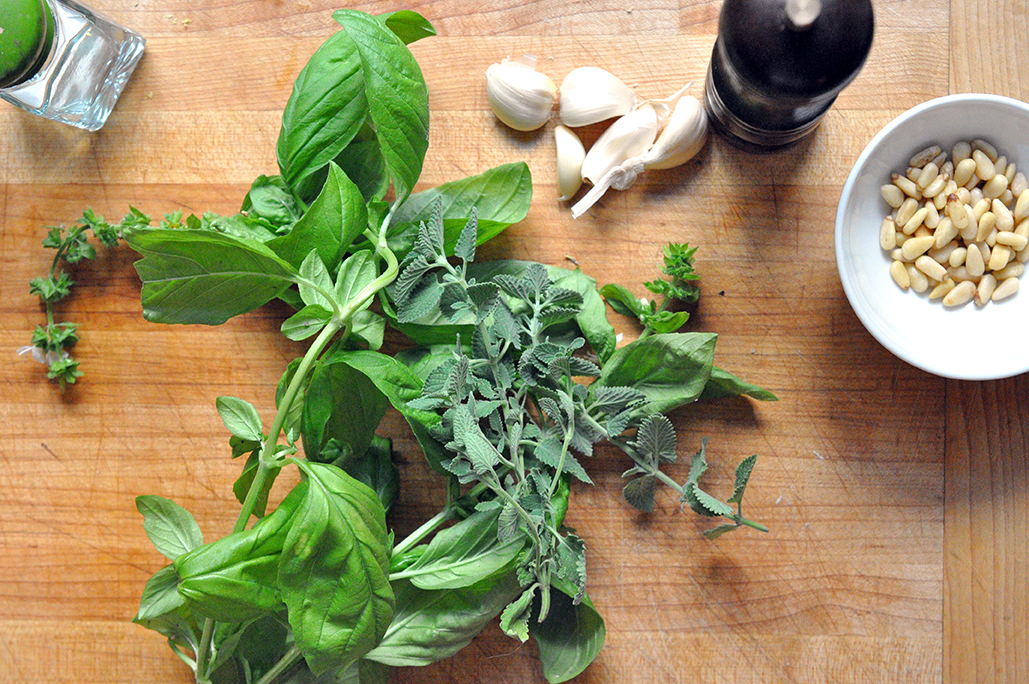
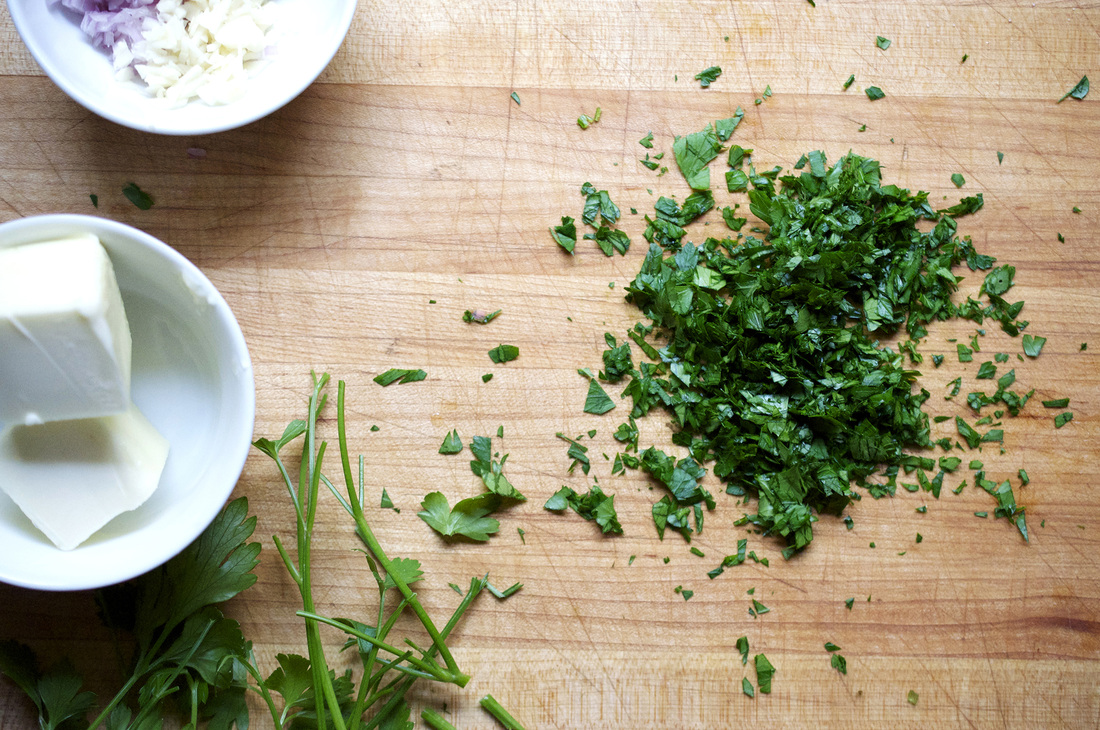
Let's start with the Ode to Summer Crostini: Preheat your oven to 350° slice baguette into 1/4” thick slices, transfer to a large cookie sheet and brush with olive oil and lightly salt. (Note: If you are only making the summer crostini you should pop the bread slices into the oven as soon as it is hot and let them bake for 10 minutes. If you are making both summer and fall crostini you should wait until you are simmering the balsamic reduction to put the bread into the oven) With a vegetable peeler take your zucchini and peel away - I rotated the zucchini 3 times, while peeling it, stopping on each side when I reached the seeds, so that I was left with a core. You can discard the core and now you have a nice fresh pile of zucchini strips. Transfer them to a small mixing bowl, lightly salt and toss with the lemon juice and zest. Quarter your cherry tomatoes and transfer to another small mixing bowl, add 1 tablespoon olive oil and a dash of salt and let sit. In a blender or small food processor add the mint, basil, pine nuts, 2 garlic cloves and salt. Blend until smooth. Add the ricotta cheese and blend again until incorporated. If you are only making the summer crostini, then remove baguette slices from the oven, let them cool for 1 minute, then rub them with the raw garlic clove. Add tablespoon of the basil-mint ricotta mixture, a strip of zucchini, some cherry tomatoes and some freshly grated ricotta salata. Enjoy! 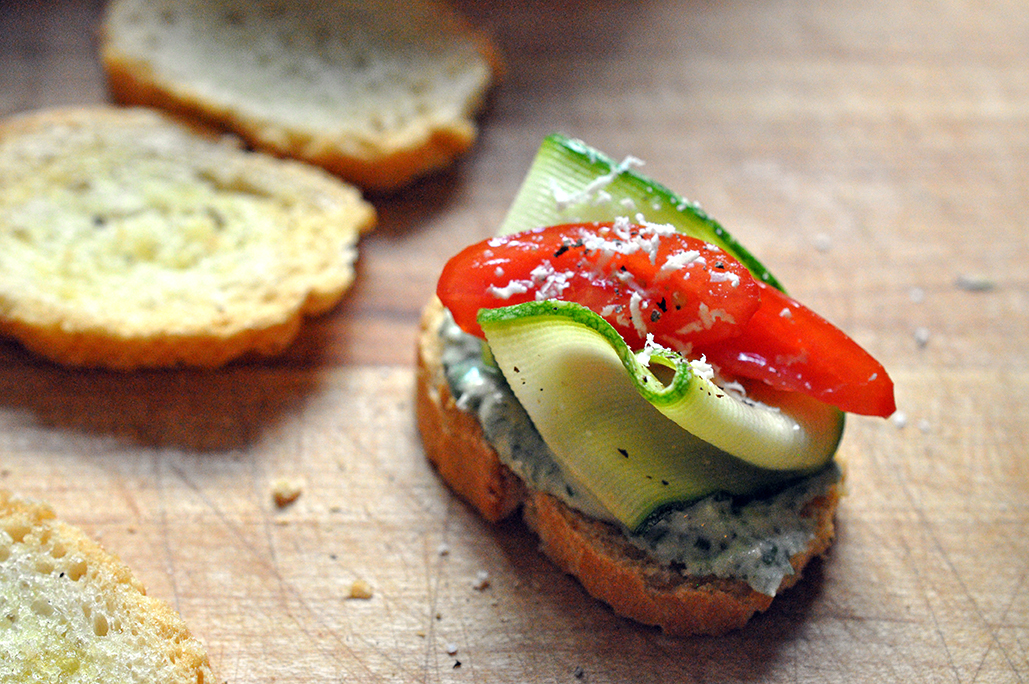
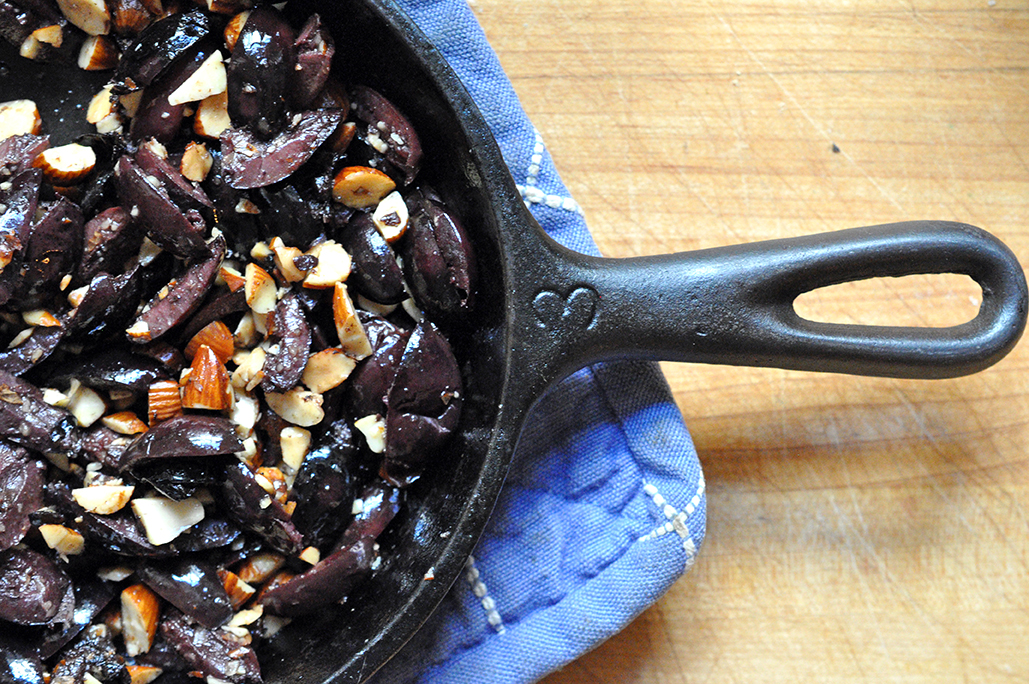
For the Welcome to Fall Crostini: Pour the balsamic vinegar and honey into a small skillet and cook over high heat until it begins to bubble/boil. Lower the heat and let the mixture simmer for 5 minutes, add the raisins and let simmer until the mixture has reduced to half of its volume and is thick enough to coat a spoon, this should take about 5 more minutes. Put baguette slices in the oven and set timer to 10 minutes (Don't forget to lightly coat them in olive oil and a little salt if you haven't already!) Heat 1 tablespoon olive oil in a small skillet over med-high heat. After 1 minute add the olive slices and almond slivers, cooking for 5 minutes stirring occasionally. Remove from heat. In a small mixing bowl whip the ricotta cheese with a little olive oil, salt and pepper. Remove baguette slices – now crostini – from the oven and rub them with the raw garlic. To create the fall crostini, add 1 tablespoon of the simple whipped ricotta, a little bit of the olive-almond mixture and top off with some freshly grated ricotta salata and finish with a drizzle of the raison balsamic reduction. This is how you enjoy two seasons at once! 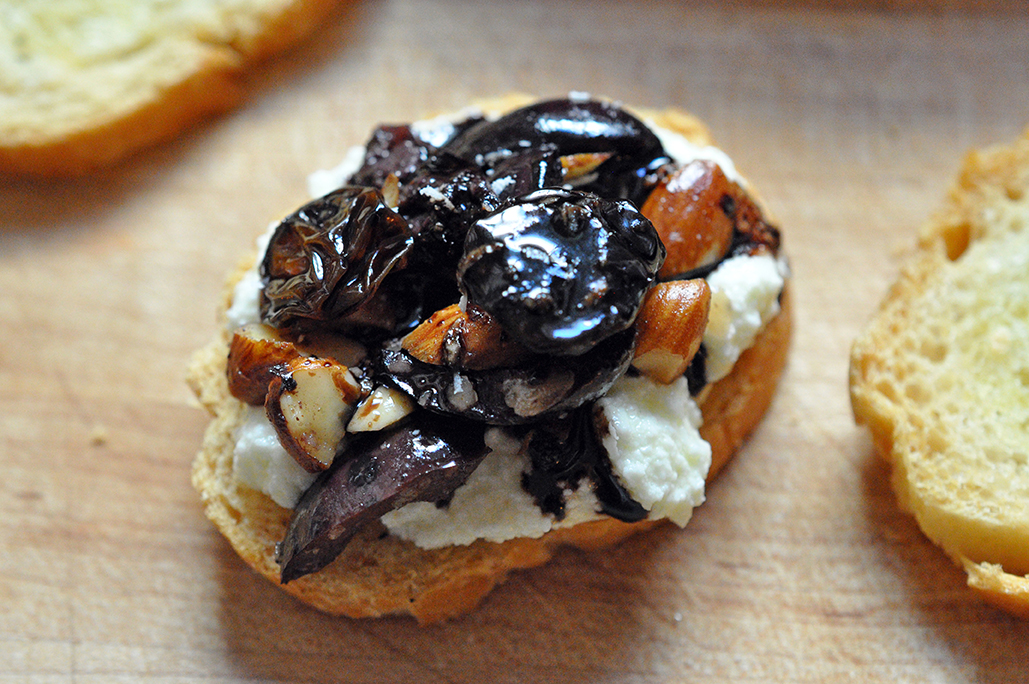
2 Comments
 Another day another dinner…honestly that’s sometimes how I feel. Luckily, on those days I have a wonderful guy to pick up the slack and who can whip something yummy up from the dredges of our fridge and small pantry. Other times, I have planned dinner out to a “T” for the whole week and get annoyed when he uses something up, that (in my mind) I had dibs on. It gets complicated…In the summer though, I get inspired by all the colorful produce and try to do as minimal cooking as possible – essentially leaving the veggies raw, enhancing them with some salt and pepper and fresh herbs. The veggies stay vibrant and presentation can be pretty spectacular without a ton of effort. It’s easier to do than you think, it keeps the kitchen cool (keeping the cook happy) and is super fast…you can make soups, salsas, salads, and pestos galore! I’d been hearing about green goddess dressings a lot recently - I can personally vouch for this one by Melissa Clark - and then a few weeks ago I saw a recipe for a red goddess salad dressing - which I have yet to try, but think looks pretty awesome – which got me to thinking about how my pestos are always green – delicious, but unfailingly green. So why not try a red one, I thought and why not make your first time doing it for your blog…so foolish of me. However, dressings and pestos are sort my thang, my niche, my comfort zone, so I forged ahead and thought the results were quite tasty. This recipe yields about a cup of pesto, more than you probably need for the dish, and if you don’t end up finishing it in a few days, you should freeze it. Then some day when you are spent and have no interest in cooking and are complaining that the fridge is empty anyways, your other (slightly more resourceful) half can pull it from the depths of the freezer and make something annoyingly impressive with it. 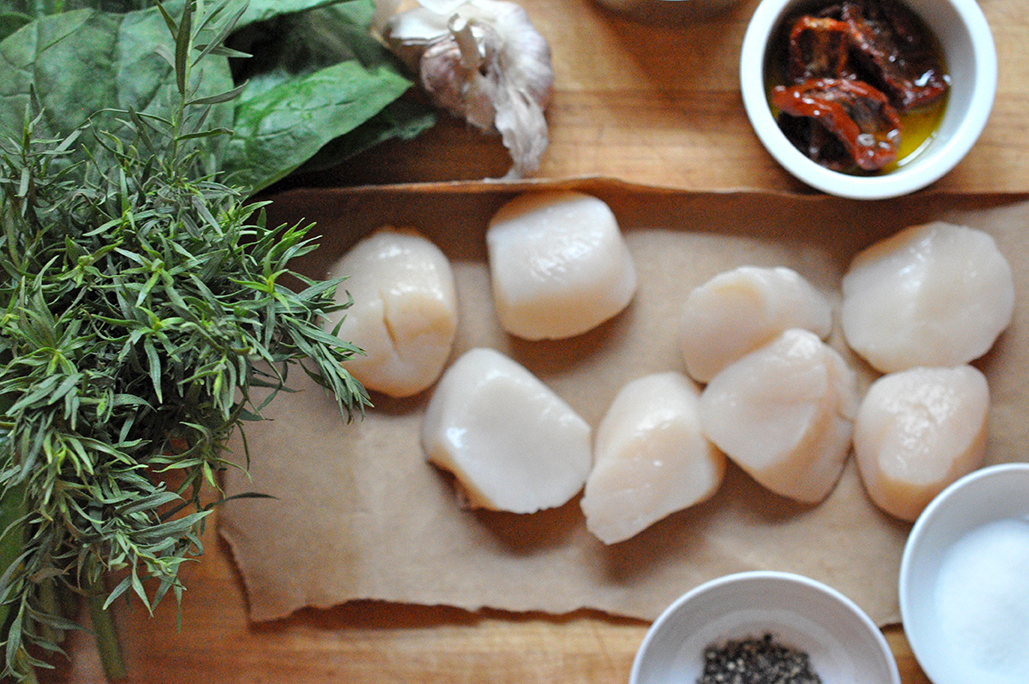 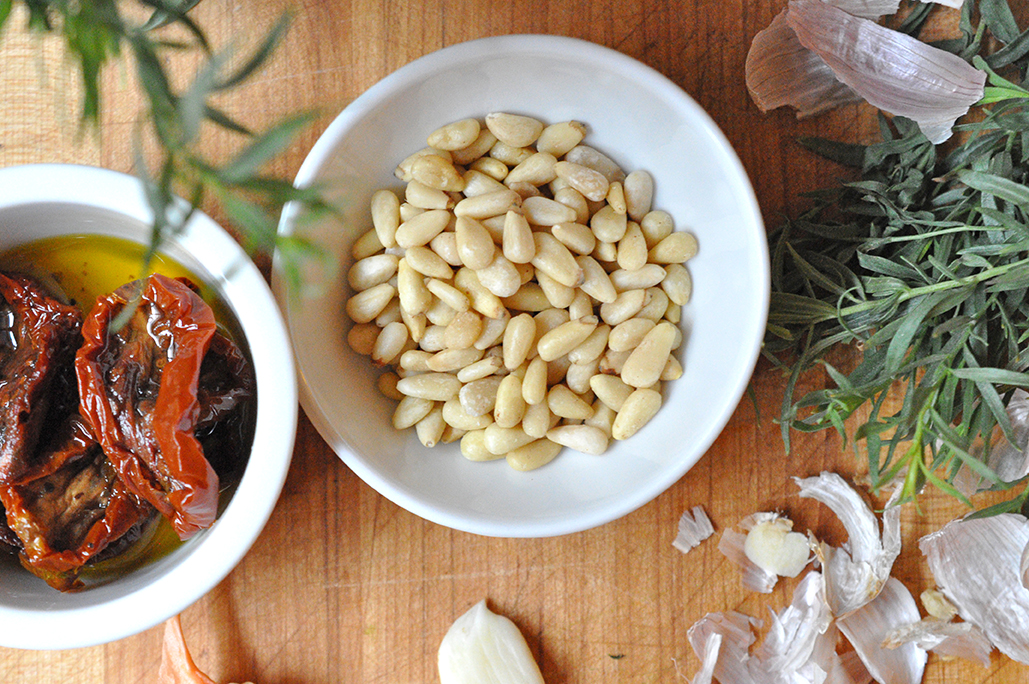
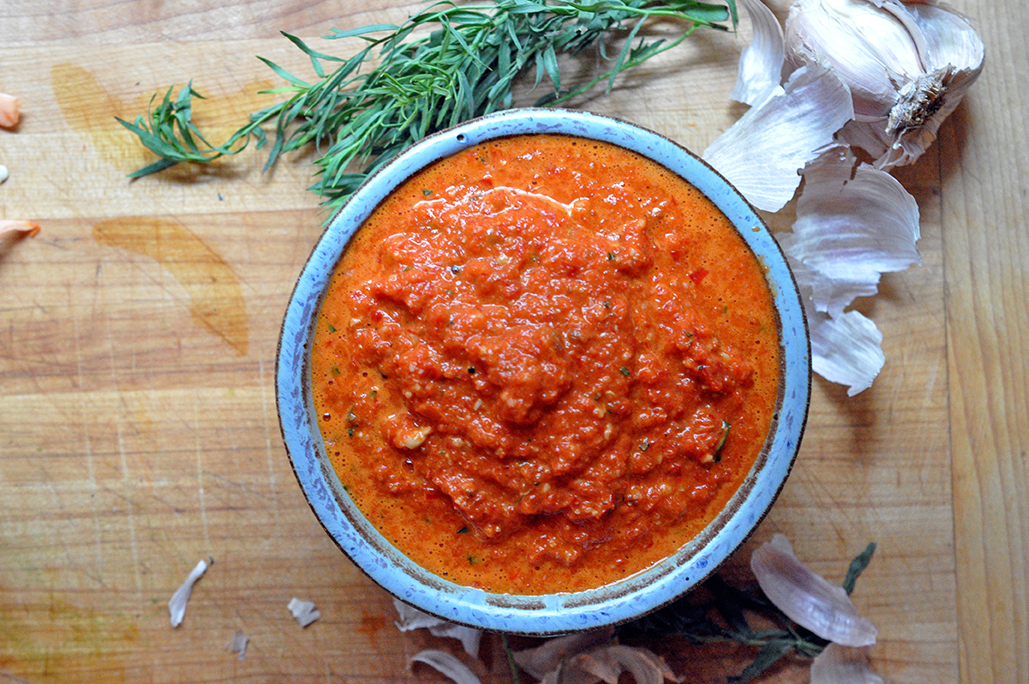
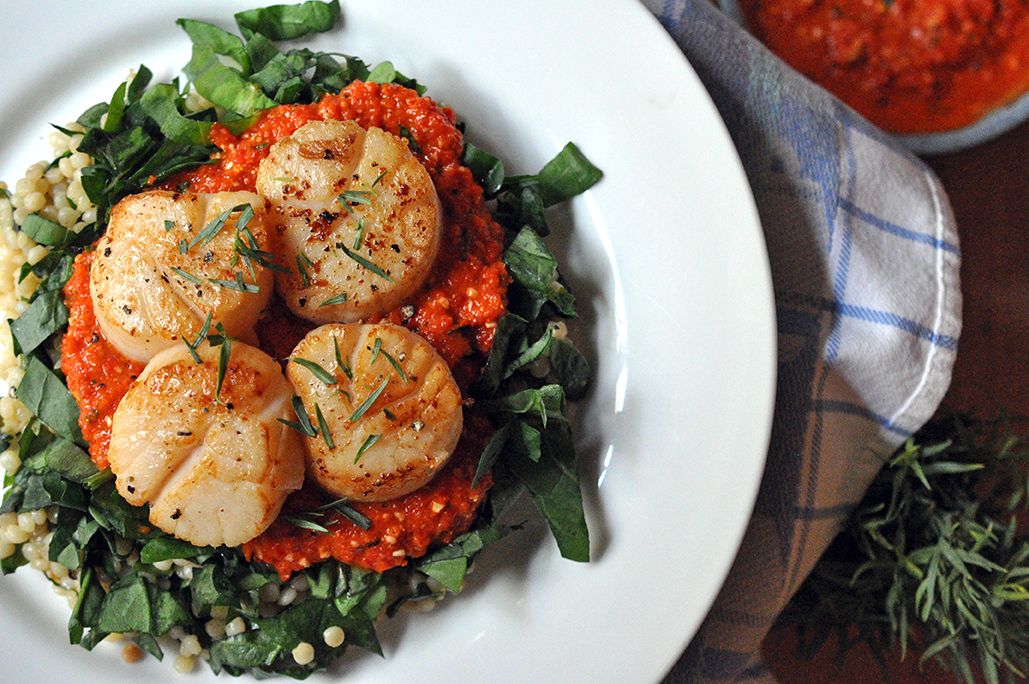
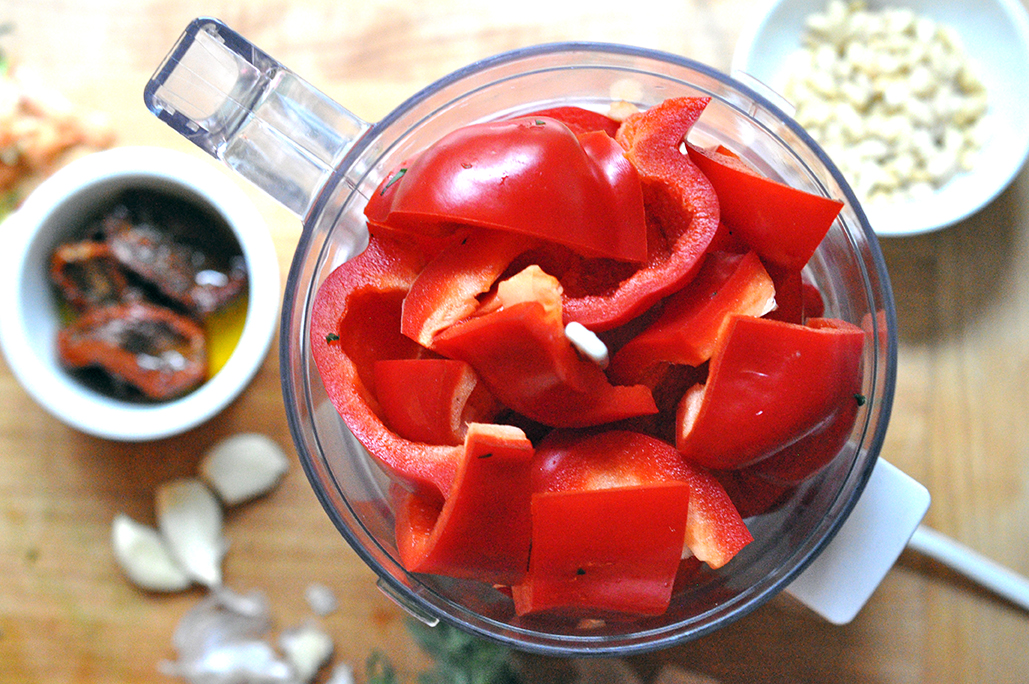
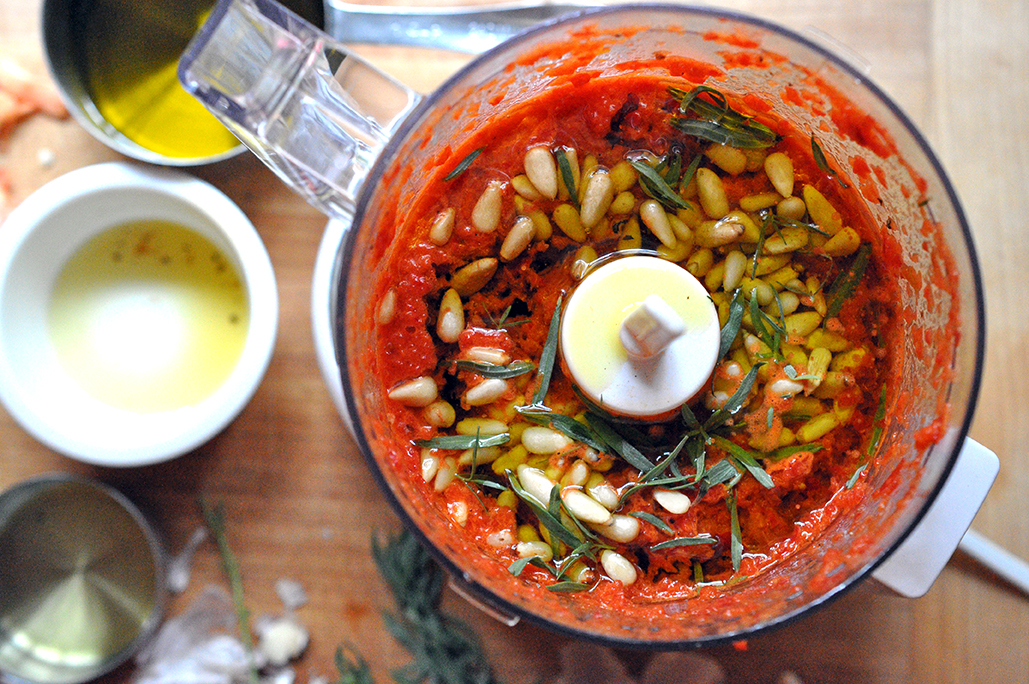
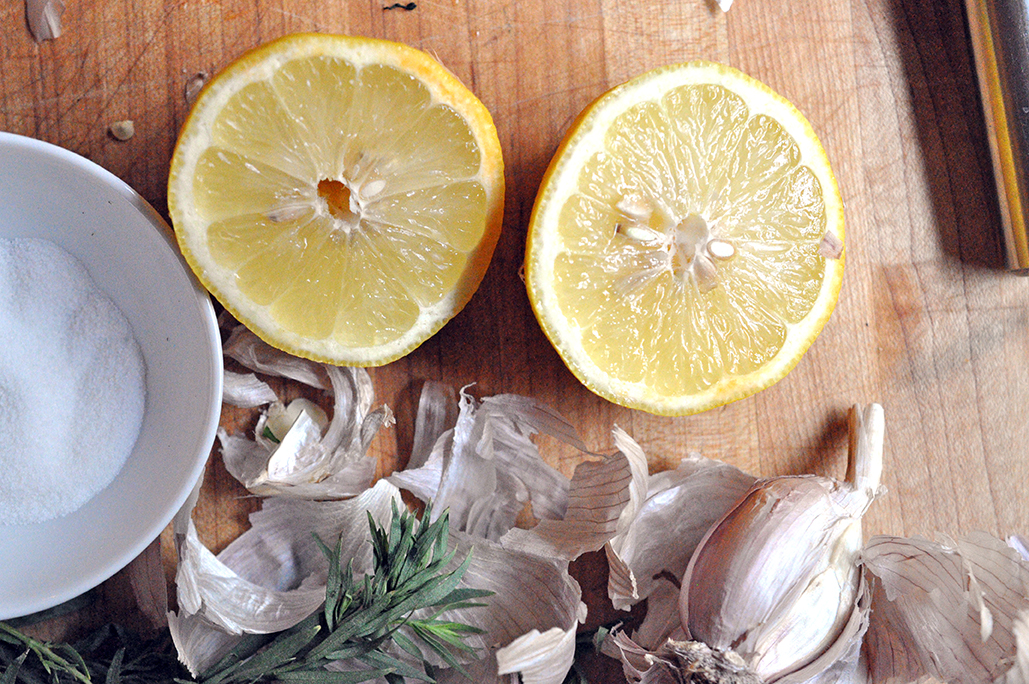
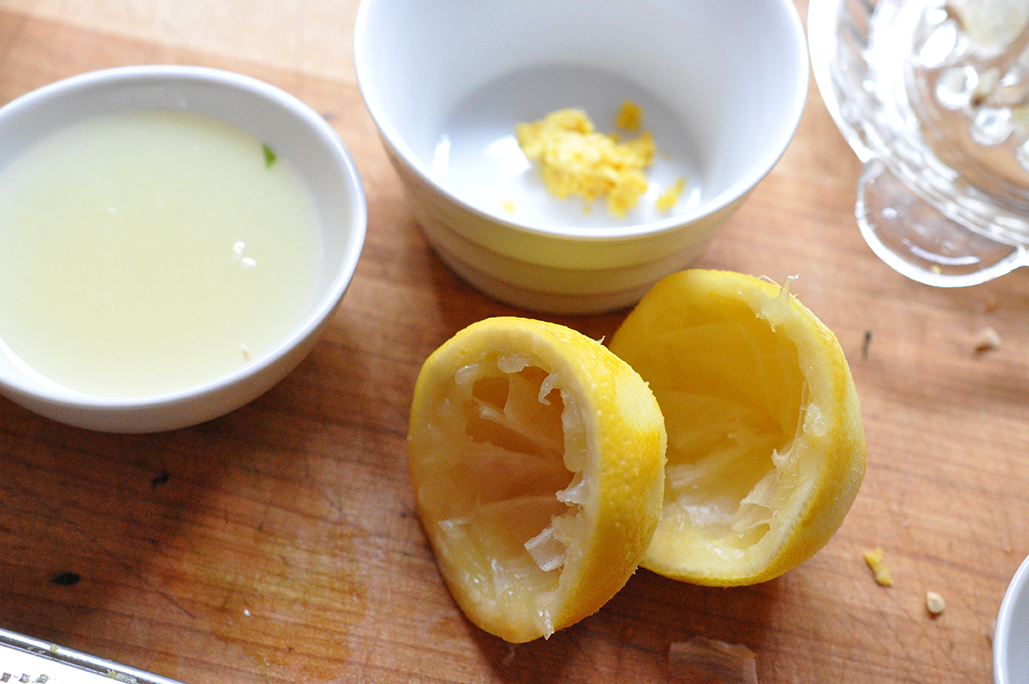
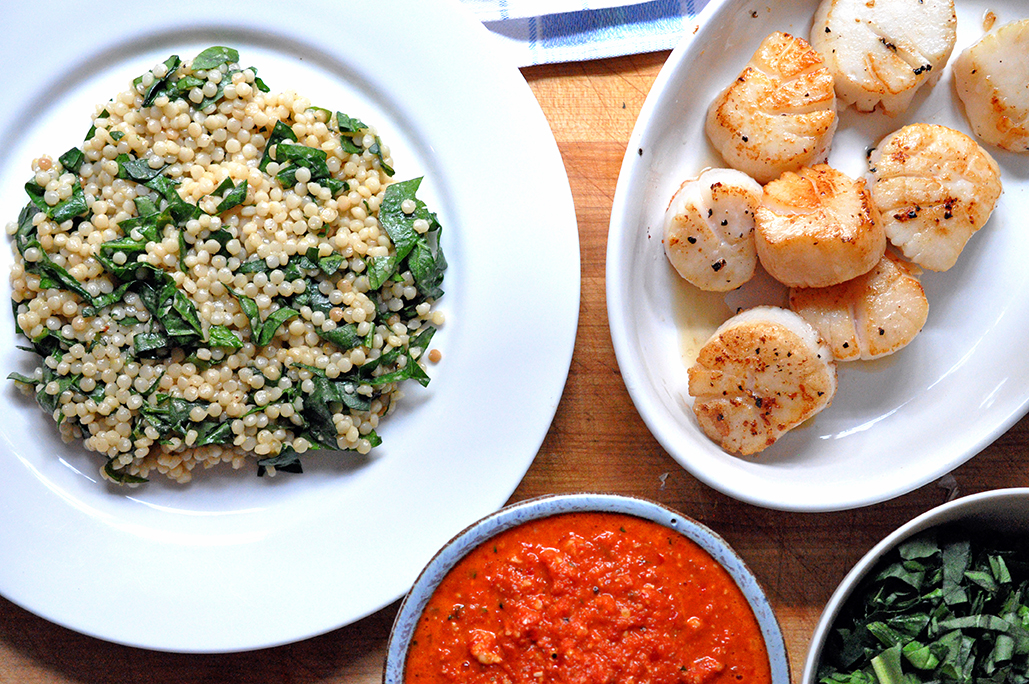 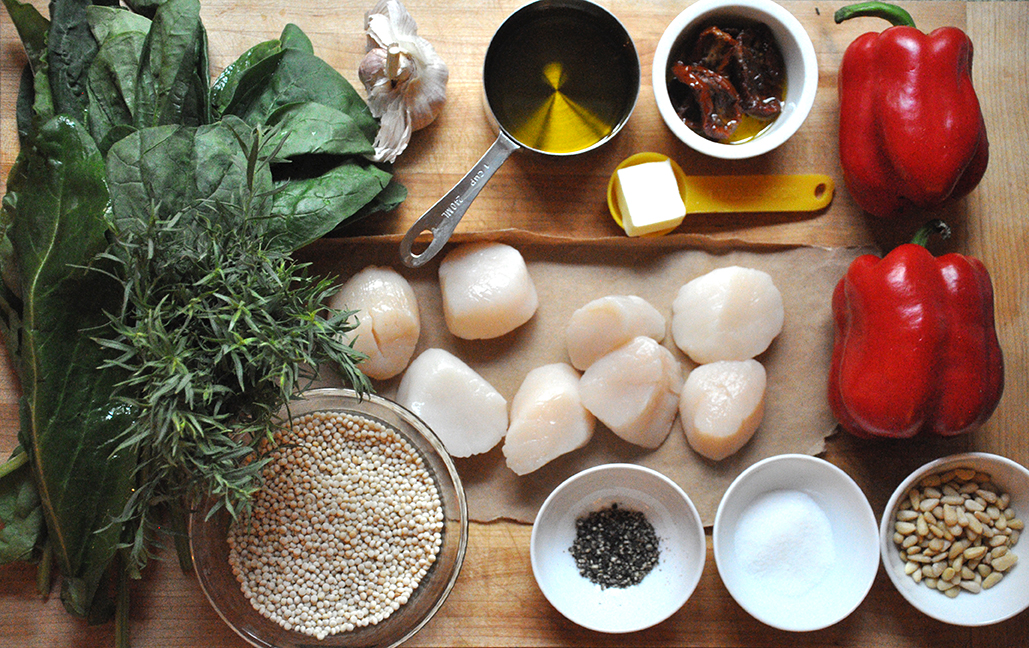 Red Pesto + Sea Scallops Salad PRINT [Prep: 15 mins / cook time: 25min / TOTAL: 40 mins] [Serving size: 2 dinner portions, 4 app portions]
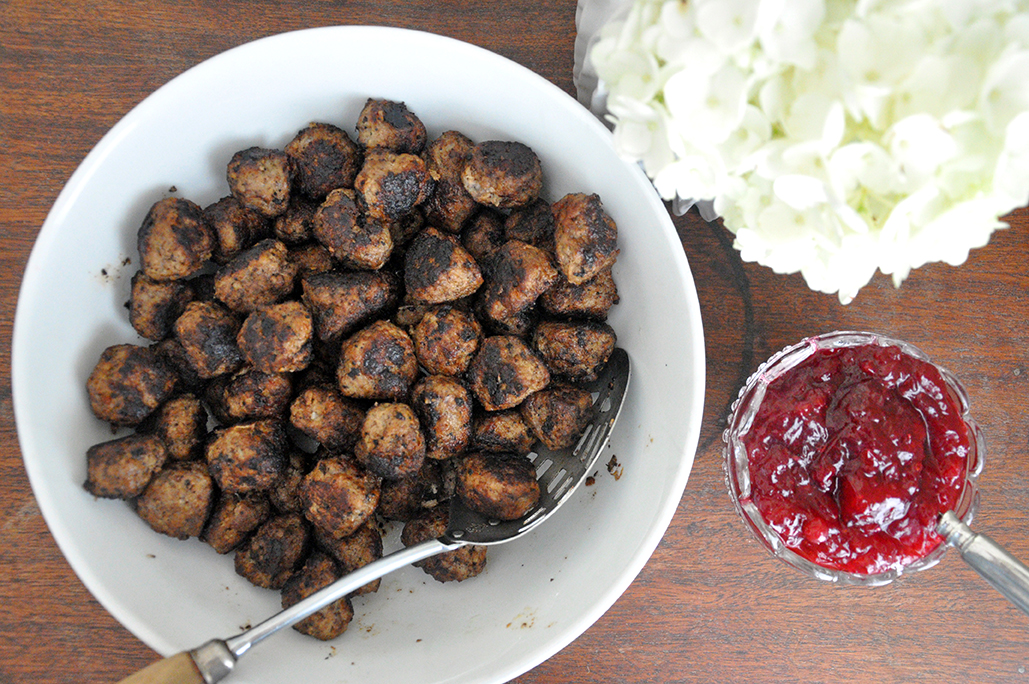
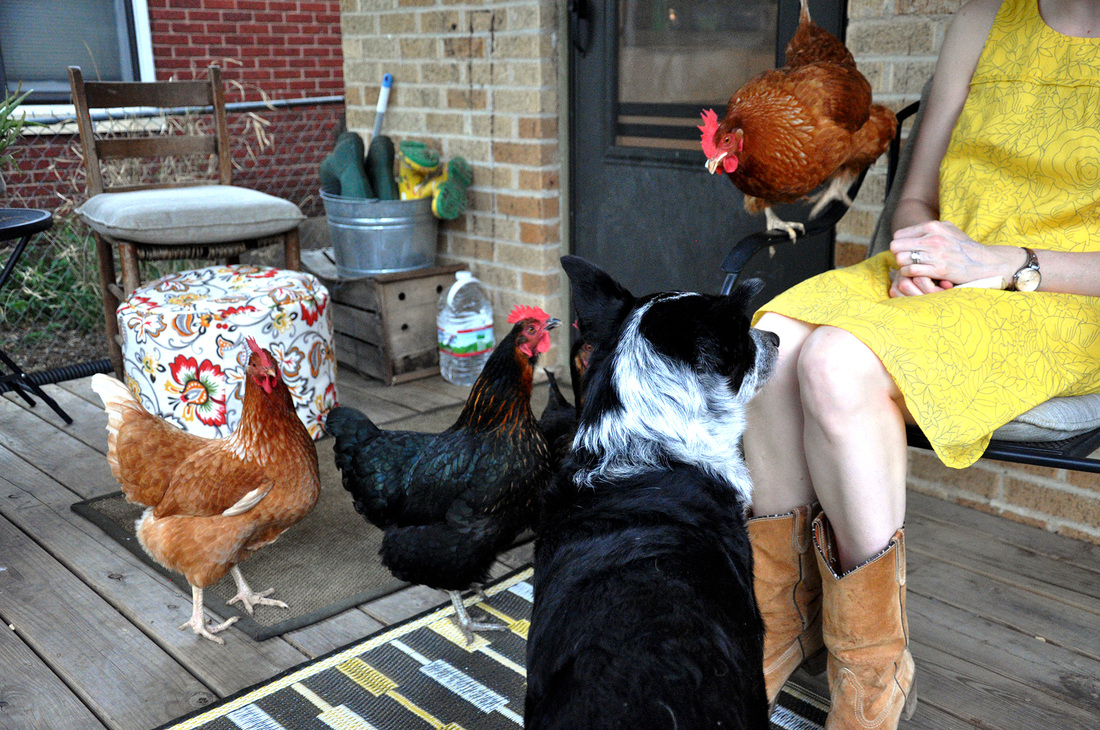
Toast the pearl couscous in a 3-quart [medium sized] pot with 1/2 tablespoon butter until slightly browned, about 3 minutes. Add1-1/4 cup water and a dash of salt. Bring to a boil over med-high heat then cover and let simmer for about 10 minutes. Wash and core red pepper. Add to blender/food processor along with sundried tomatoes, 1/4 cup olive oil, garlic, tarragon, pine nuts, a few grinds black pepper and 1/2 teaspoon salt. Blend until smooth and all ingredients are well incorporated. After washing the spinach and sorrel, cut both into thin ribbons. [Note: sorrel is more common in the spring and fall, it doesn't love the heat, so if this is hard for you to find this summer you should sub in any flavorful green you like...basil, arugula, curly endive...get creative, go crazy!] Zest and juice the lemon. Pat dry the scallops and season lightly with salt and pepper. Heat a large skillet over med-high heat and add 1/2 tablespoon butter and a 1 tablespoon olive oil. When the butter begins to foam and brown slightly add the scallops to the skillet, spacing them out generously. Let sit for 3-4 minutes until the underside is golden brown. Flip, cover and wait one minute more. Turn off the heat, remove the scallops from the skillet, add lemon juice to the skillet and step back – it will smoke a little – this will deglaze the pan and pick up all the flavor from the scallops. By now the pearl couscous should be finished cooking. Add 1 tablespoon olive oil, the drippings from the deglazed skillet and the lemon zest, a dash of salt, a few grinds black pepper and 1/2 of the greens and mix well. Plate each dish starting with the couscous, the greens, a generous layer of the red pesto and the scallops, garnish with a few leaves of tarragon and….Enjoy! 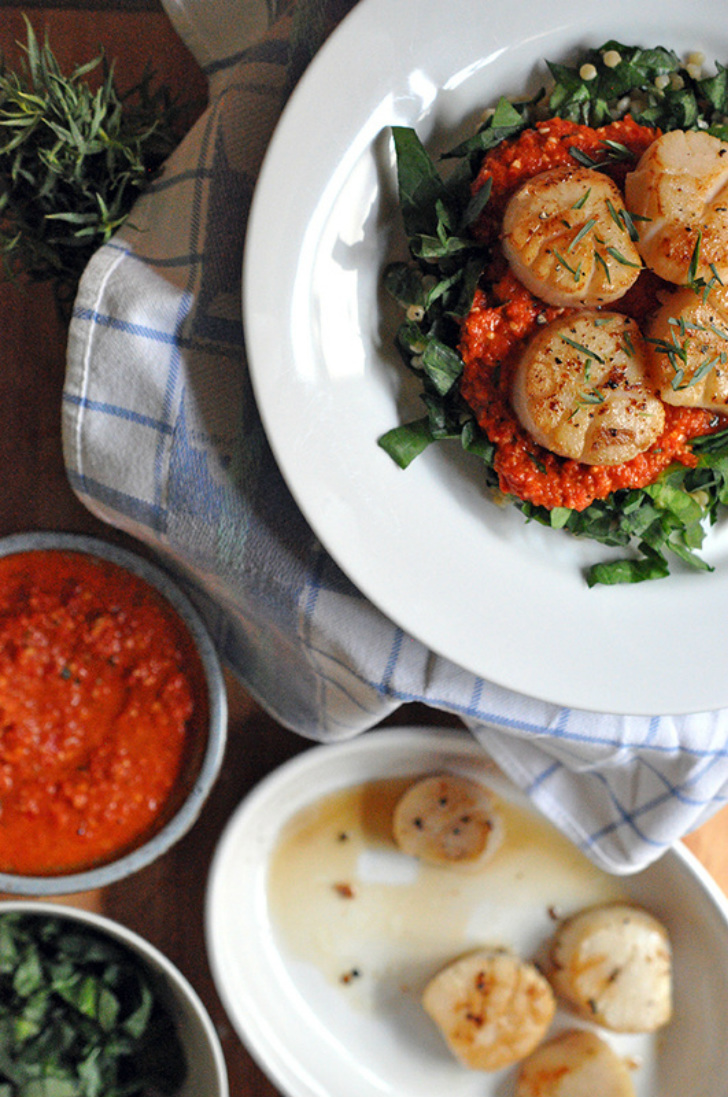 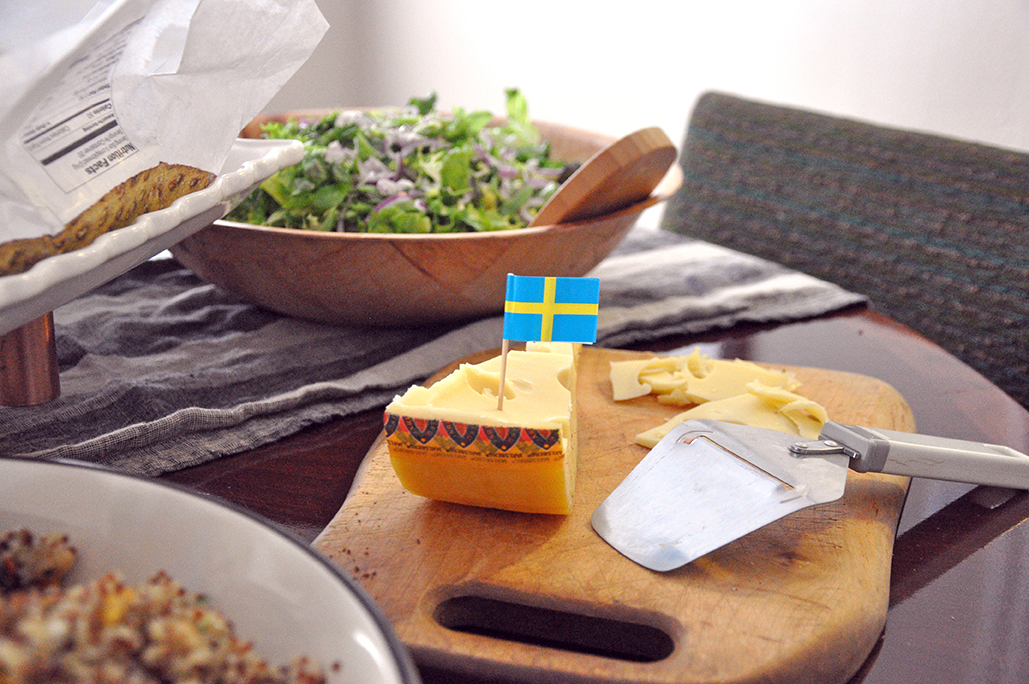 We all have those cringe-worthy holiday family traditions - great Aunt Bethany’s jello molds at Christmas or being forced by your parents to wear lederhosen in family photos. Sometimes they are founded in fact or history, many times they remain shrouded in mystery…yet we still accept them. Why? Because it’s tradition! As children we sighed and stomped and tried to run away from them, not taking part because it was our moral obligation not to. But then we realized that we miss these silly rituals, we no longer live at home or no one makes the effort anymore because we are all adults…and soon you fear they may be forgotten. Of course some people may never even consider this, but being the nostalgic sucker that I am, I do. In fact I am the unrelenting family member encouraging a constant stream of new traditions; the few days before Christmas have become the felt decoration making time [well it happened one year]. Making cocktails with my sister and mother, any time we see each other – yes let’s turn that into tradition too! So I guess I should get to the point. When I was a little girl, my sister and I would go with my mother to Stockholm in the summer. We were visiting her sister and would get to experience the awesomeness that is Midsummer, or Midsommar as they say. It happens all over Sweden on the third Friday of June, the eve of Midsummer’s Day…whole towns of towheads in traditional Folk dress, flowers in hair, jumping dancing running around a green leafy maypole, while singing in a language I still don’t know that well – never quite understanding what was going on, but wanting to be a part of the celebration, this is Midsummer to me. It is a celebration of light, of the longest, sunniest day of the year. For Swedes it is a magical day filled with wild flowers, aquavit, herring and fresh picked strawberries – a weekend long celebration really. But no, this was not really my tradition growing up, but it was my mother’s and so by proxy over the years I have taken it on. So when my good friend and fellow foodie said she wanted to have a summer solstice party – I said, Yes! Midsommar! It happened and it was awesome. We sang Swedish drinking songs and sipped caraway flavored Aquavit, poked at Swedish meatballs with Swedish flag toothpicks. We ate pickled herring and snacked on knäckebrot with jarlsberg cheese. Why did everyone join me so wholeheartedly? Well, because it’s tradition. Just a few links in case you're curious... Swedish Midsummer Traditions A Midsummer Night's Feast at The Tasting Table Nordstjernan - Most popular Swedish Drinking Song Helan Går NYTimes 36 Hours in Stockholm 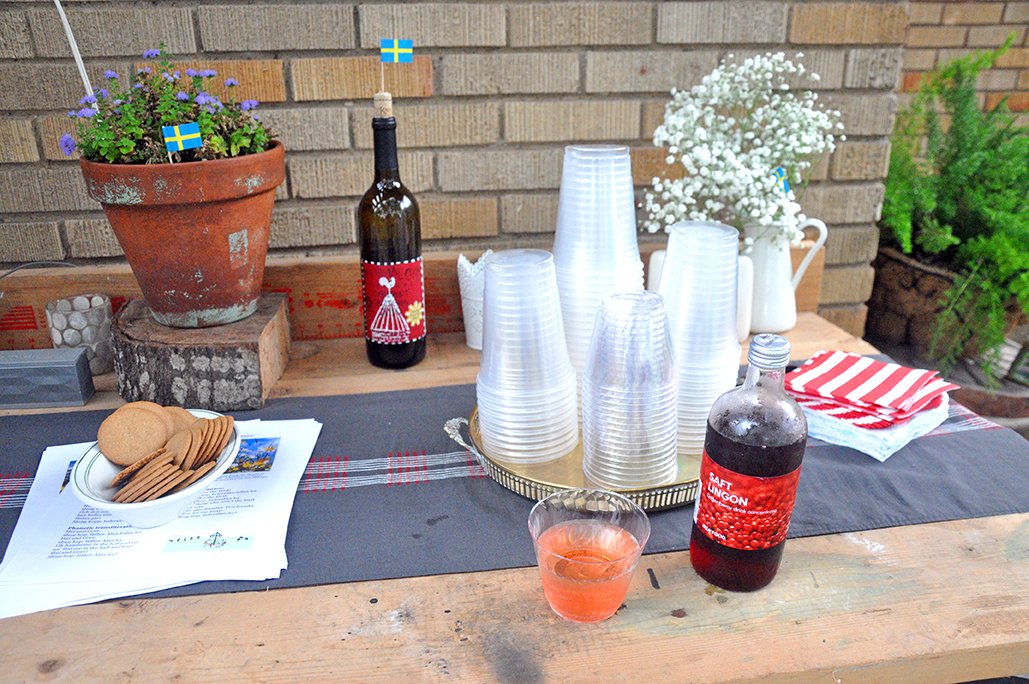 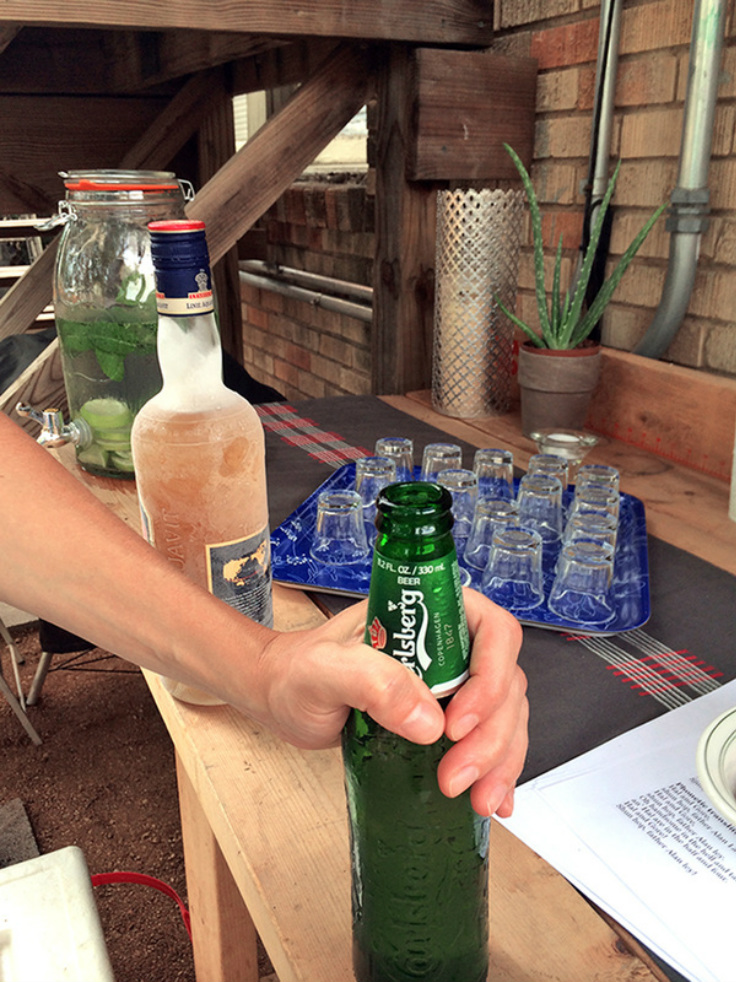 Photo by Brandon Thibodeaux  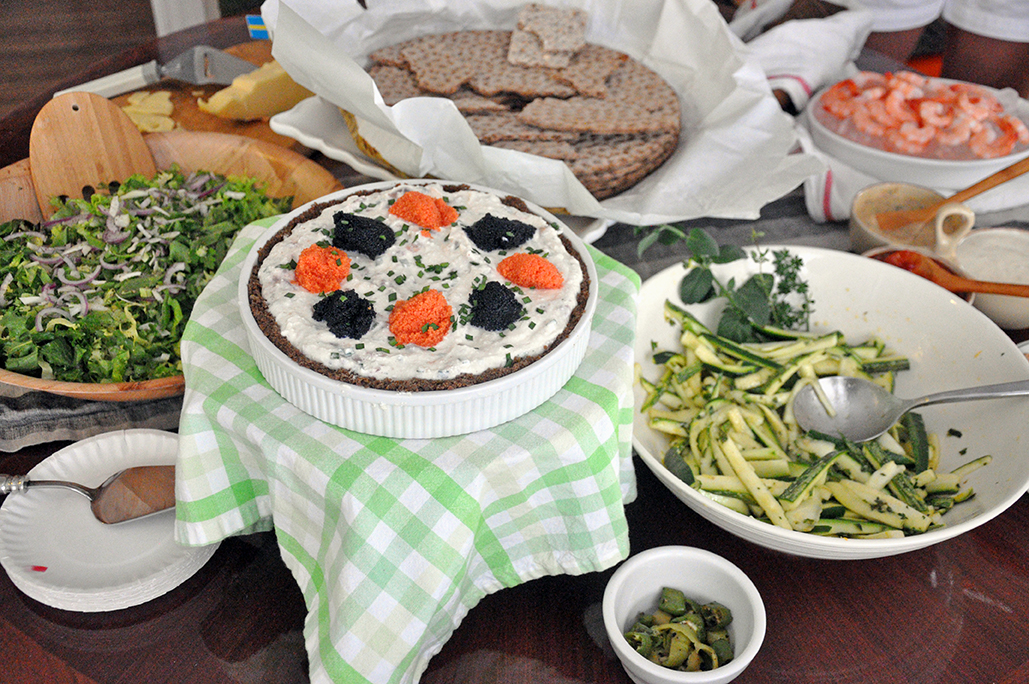 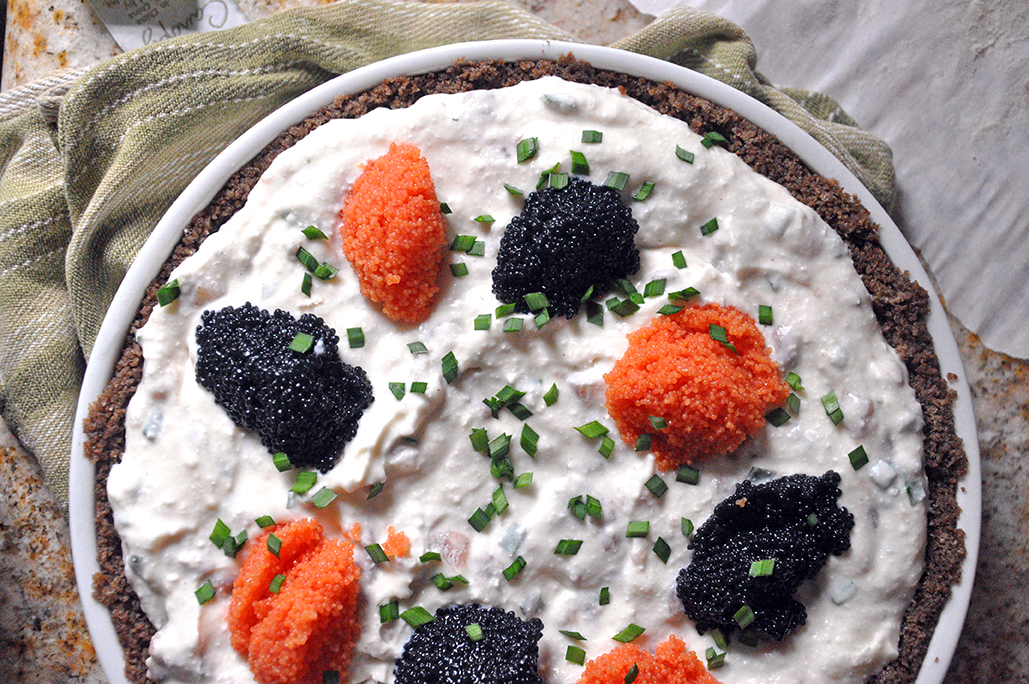
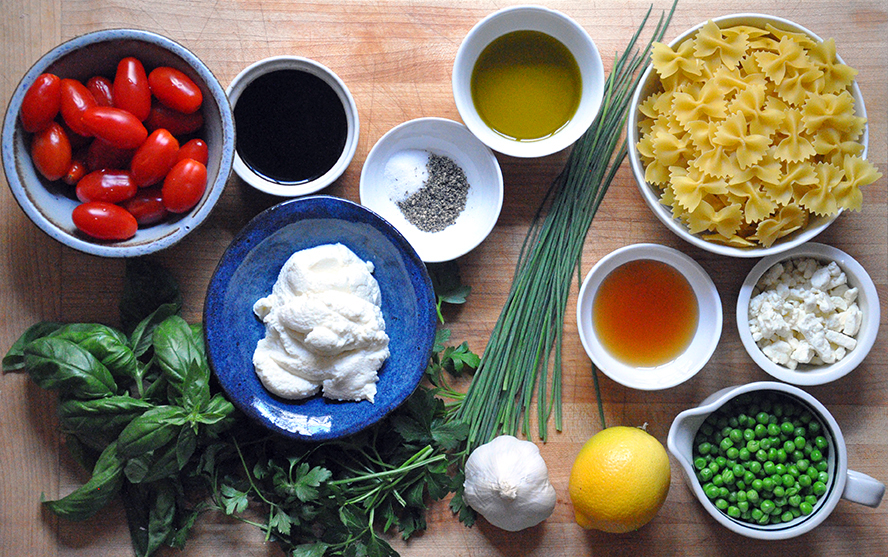
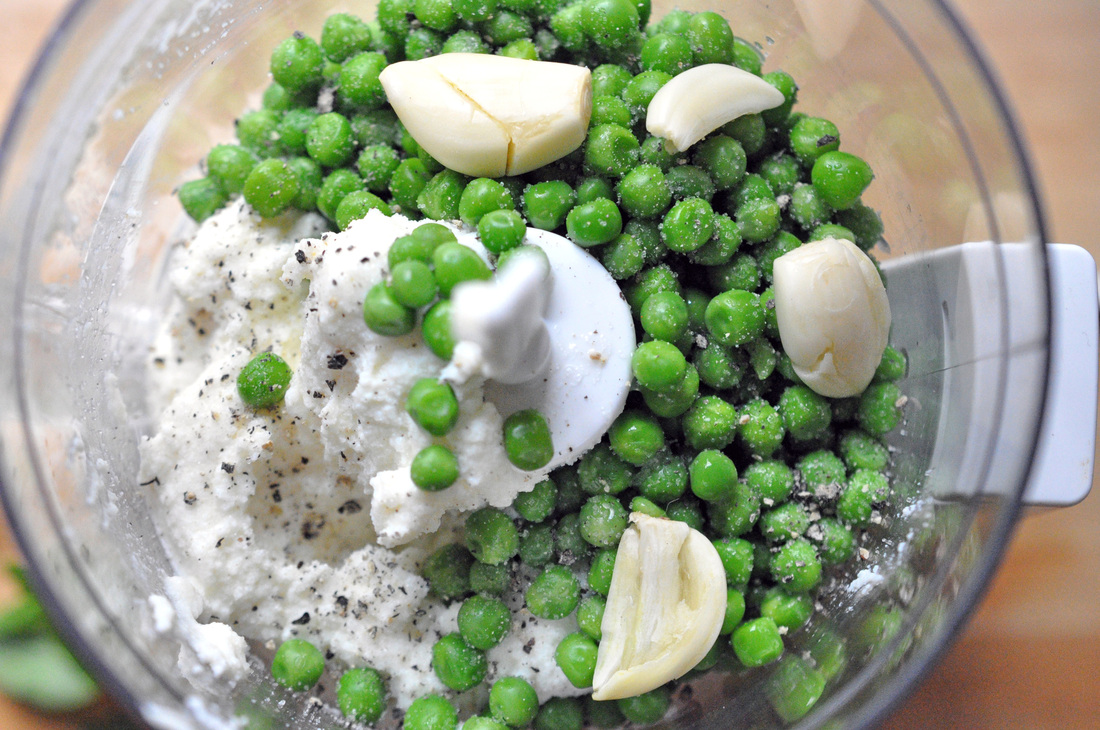
  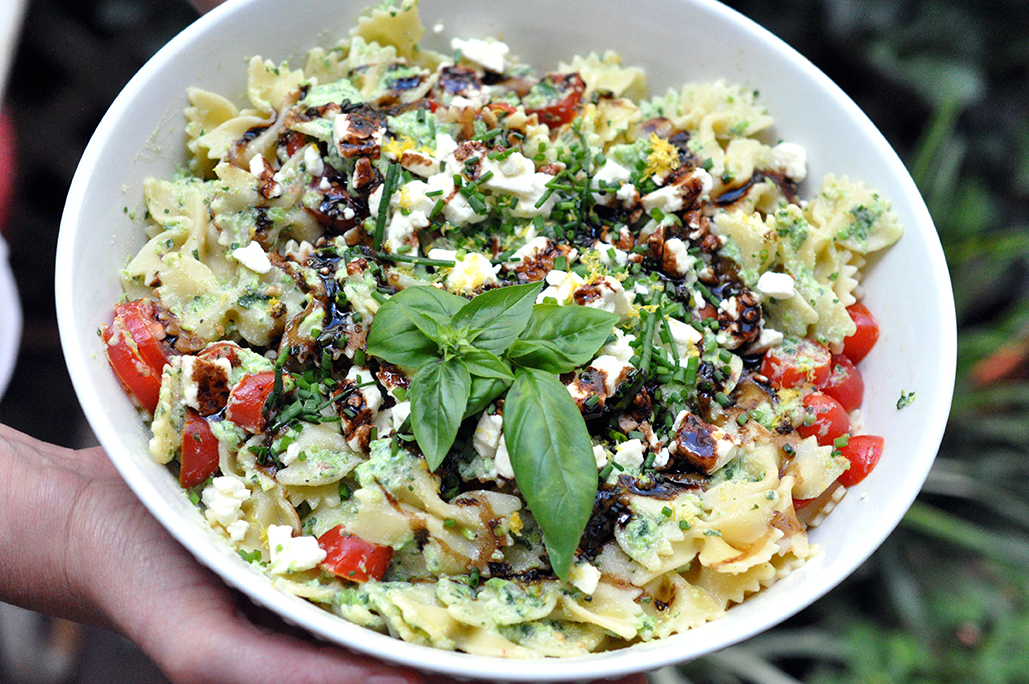 I was on the road a lot this spring but now I’m ready to relax and settle into summer. Relax into morning iced teas and late night ice creams, into sun hats and flip flops and smelling like sunscreen. Relax into the poolside beers and dinner parties where the sun refuses to go down. So I though I would share a good potluck dish that tastes like summer, but is so easy to make it doesn’t keep you from enjoying it! Remember how I said that summer begins and ends with basil pesto…well, enter summer! I know it’s not official, we have a little over a week to go, but I decided to bring out the basil pesto. It’s a little different than the one I made for you guys before; it’s still a no cook, delicious the next day, pasta salad. Cue, sweet peas and grape tomatoes, more summer staples, then throw in some parsley, lemon and top it off with chives and you’ve got something special. The sweet pea herb ricotta sauce – a non traditional take on a pesto – is still a simple blender sauce, which is good because it leaves more time for you to make a little something extra like…a sweetly tart honey balsamic reduction that makes this dish a little fancy. A good looking well dressed pasta salad is always welcome at any party. Sweet Peas are made of these… 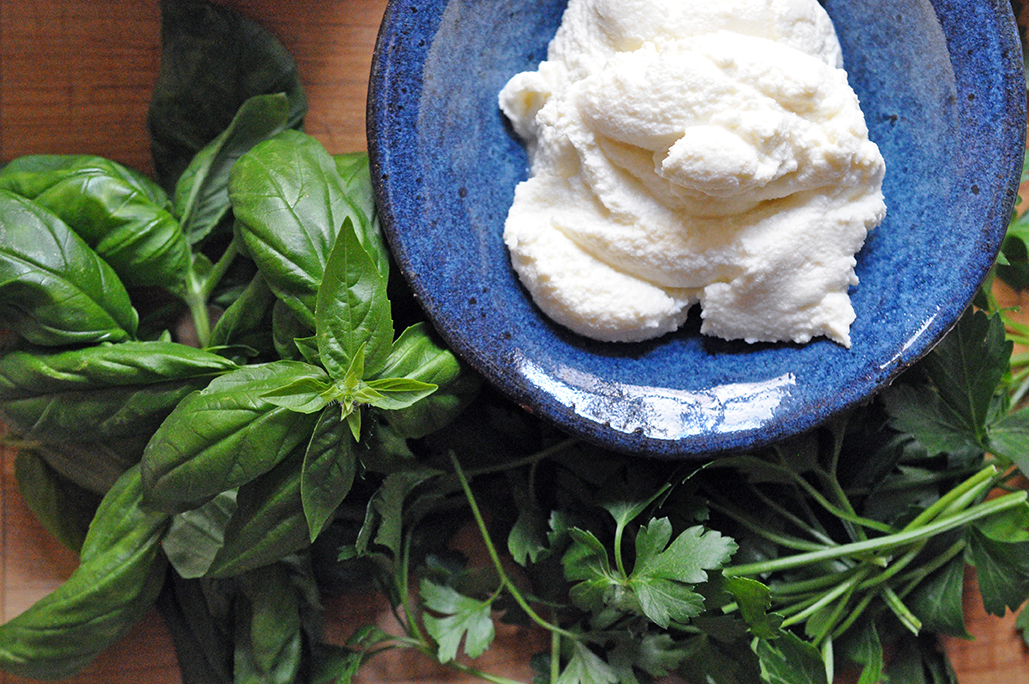 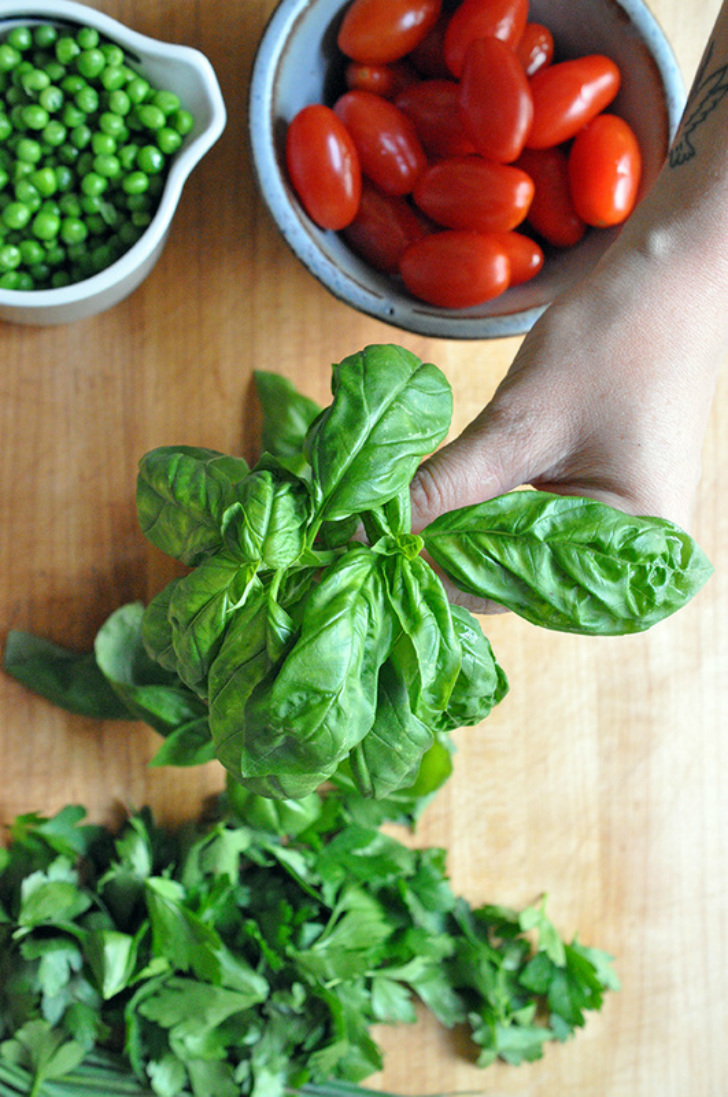 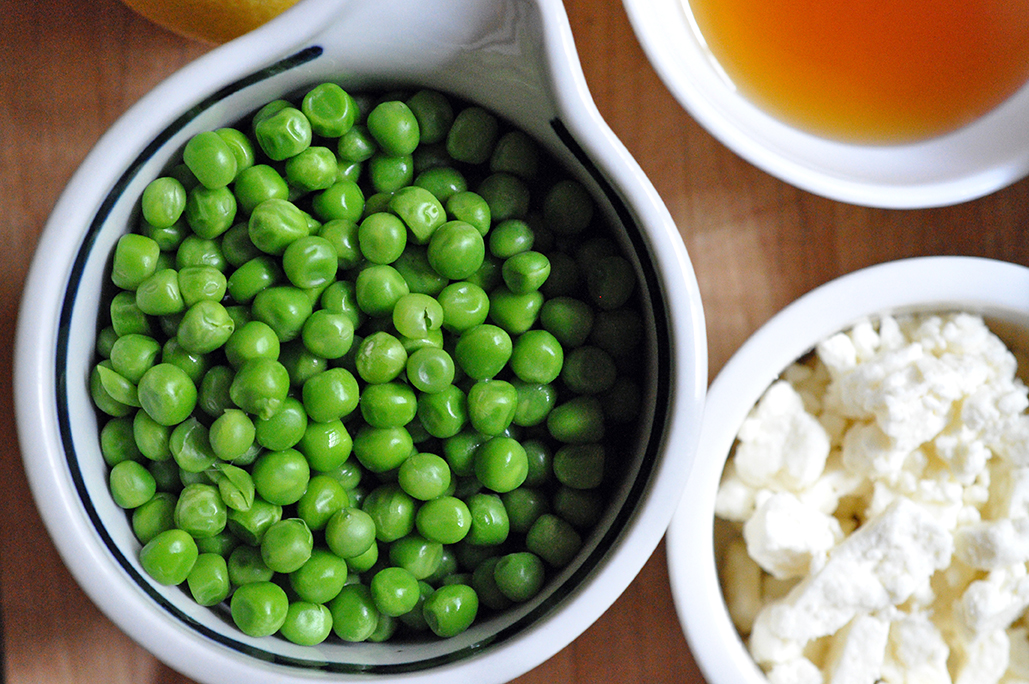 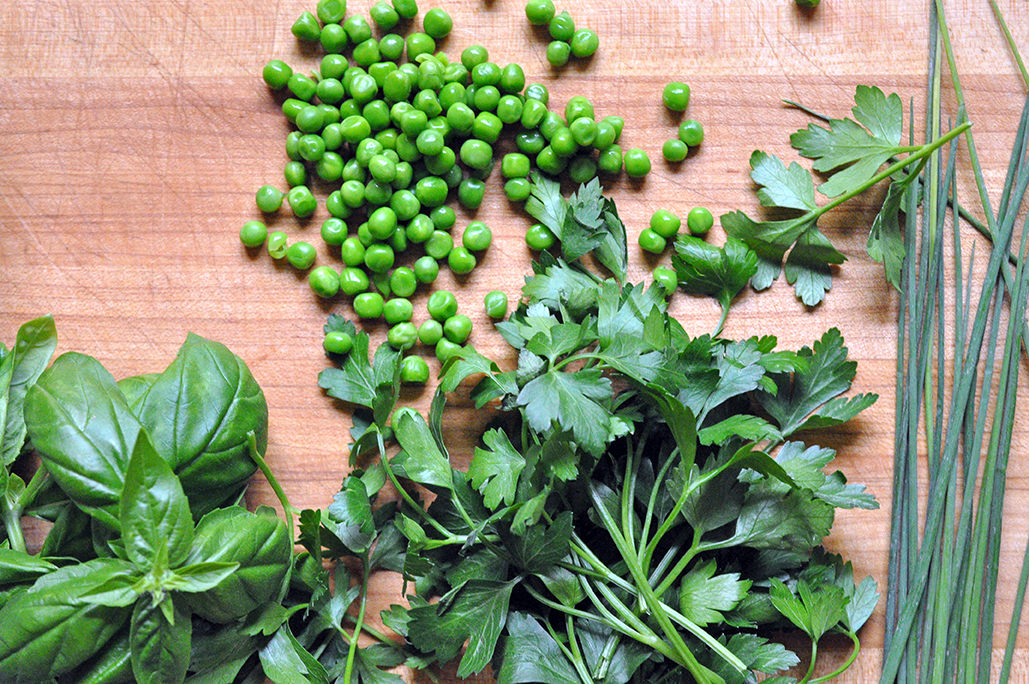 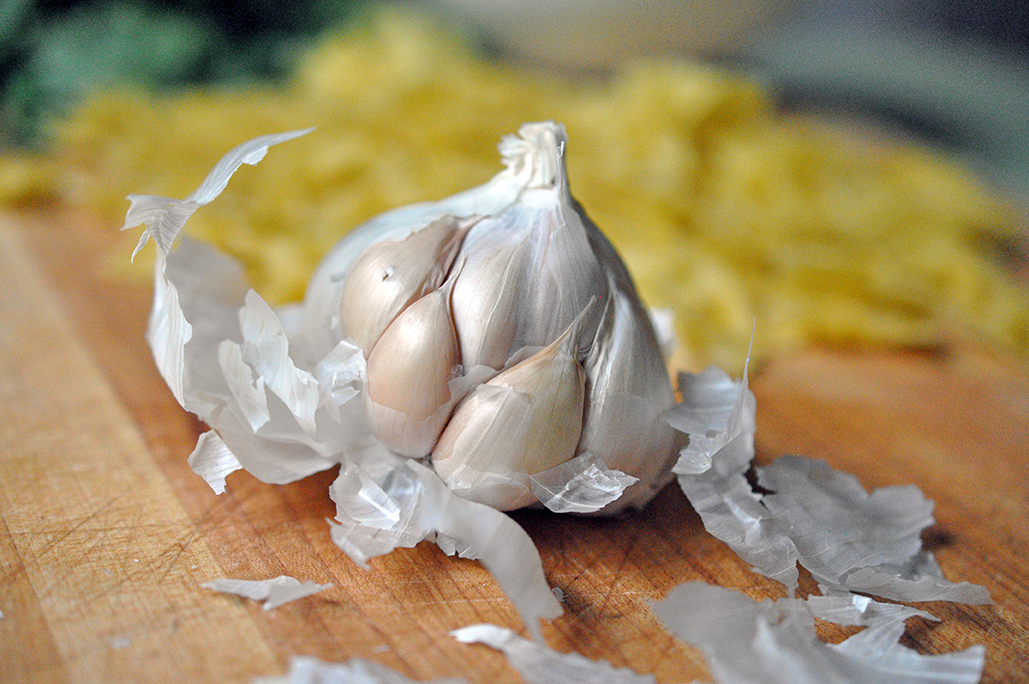
 Sweet Pea and Ricotta Pasta Salad PRINT RECIPE [Prep: 15 mins / Cook: 10 mins / TOTAL: 25 mins [Serving size: 4 dinner sized portions]
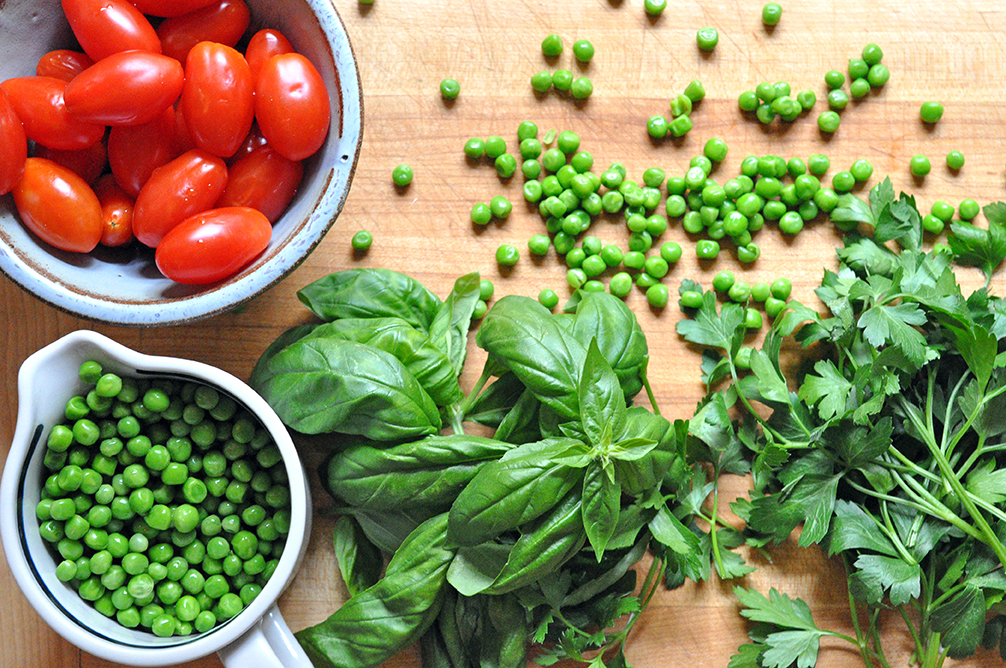
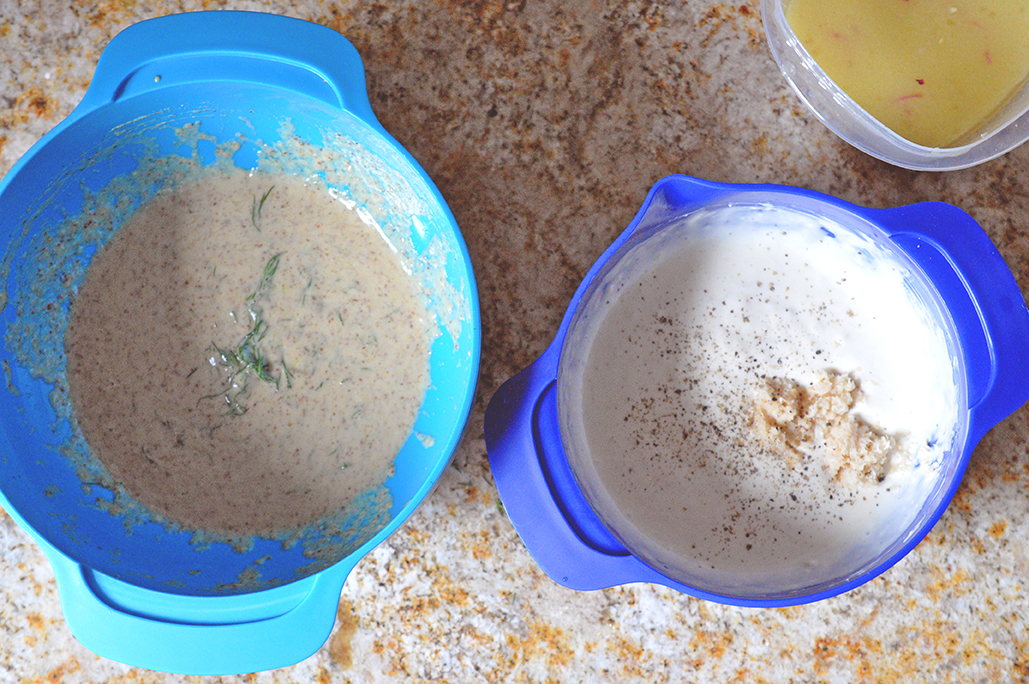
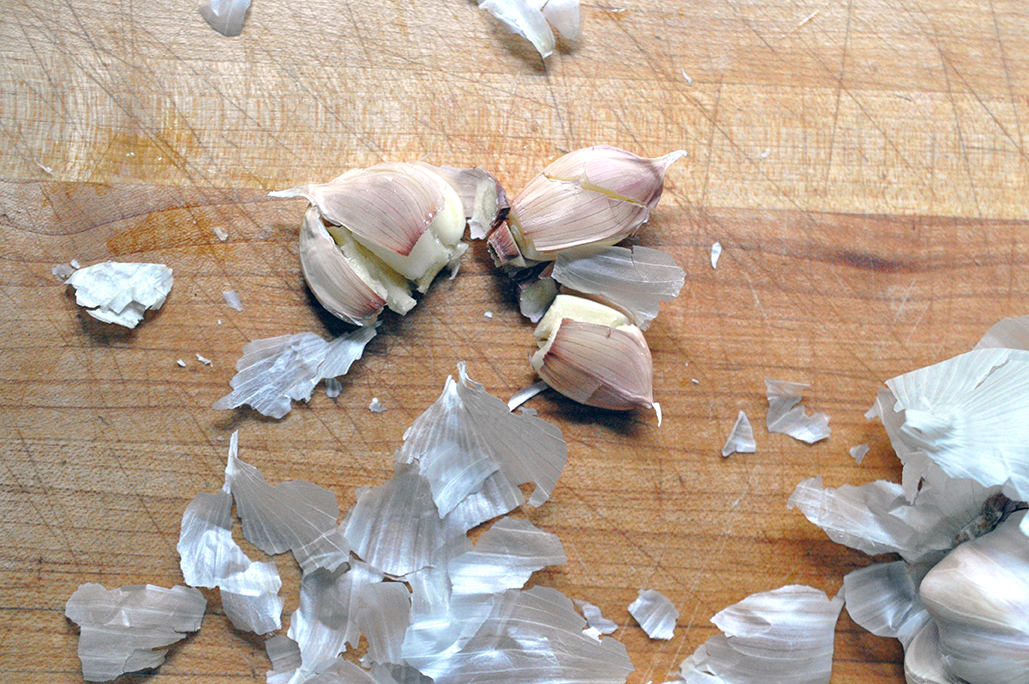
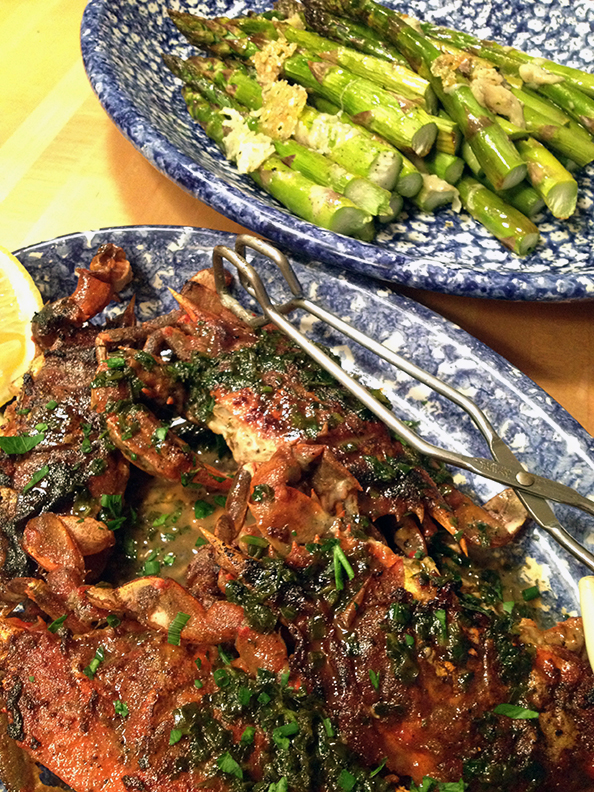
If using frozen peas make sure to take them out ahead of time so that they can defrost. If using fresh peas give yourself a little extra time to shell them. Fill up a large pot with about 5 quarts of water - or until water is about 3 inches from the top. Salt generously - at least 1 tablespoon - cover and set heat to high. Wash tomatoes and slice thinly. Marinate the tomato slices in 1/2 tablespoon olive oil and a pinch of salt. Wash and stem the basil and parsley, zest and juice 1 lemon, and peel 3-4 gloves of garlic [I like a lot of garlic, but it is used raw here so it gives a lot of kick, so use less if you want the flavor to be milder]. Chop the feta into small pieces and mince the chives. The feta, lemon zest and chives will be used as a topping, you can put them aside to use at the end. In a small food processor combine the ricotta, sweet peas, washed and stemmed basil and parsley, lemon juice, 2 tablespoons olive oil, garlic cloves, a few pinches of salt and a few grind of fresh cracked black pepper. Blend until all ingredients are incorporated and the texture is smooth. Let sit in the food processor. When water begins to bowl add the pasta and set timer to 8 minutes. Pour the balsamic vinegar and honey into a small skillet and cook over high heat until it begins to bubble/boil. Lower the heat and let the mixture simmer until it has reduced to half of its volume and is thick enough to coat a spoon, about 10 minutes. When pasta is done cooking, reserve 1/3 cup pasta water before draining. Transfer pasta to a serving bowl and toss with a splash of the pasta water and a tablespoon of olive oil, mix well. Add the reserved pasta water to the sweet pea ricotta sauce and blend – this will help to thin out the sauce a little. Toss the pasta as well as the marinated tomatoes and the sweet pea ricotta sauce. Top the pasta with feta, lemon zest and chives, drizzle the balsamic reduction over the top. Enjoy! 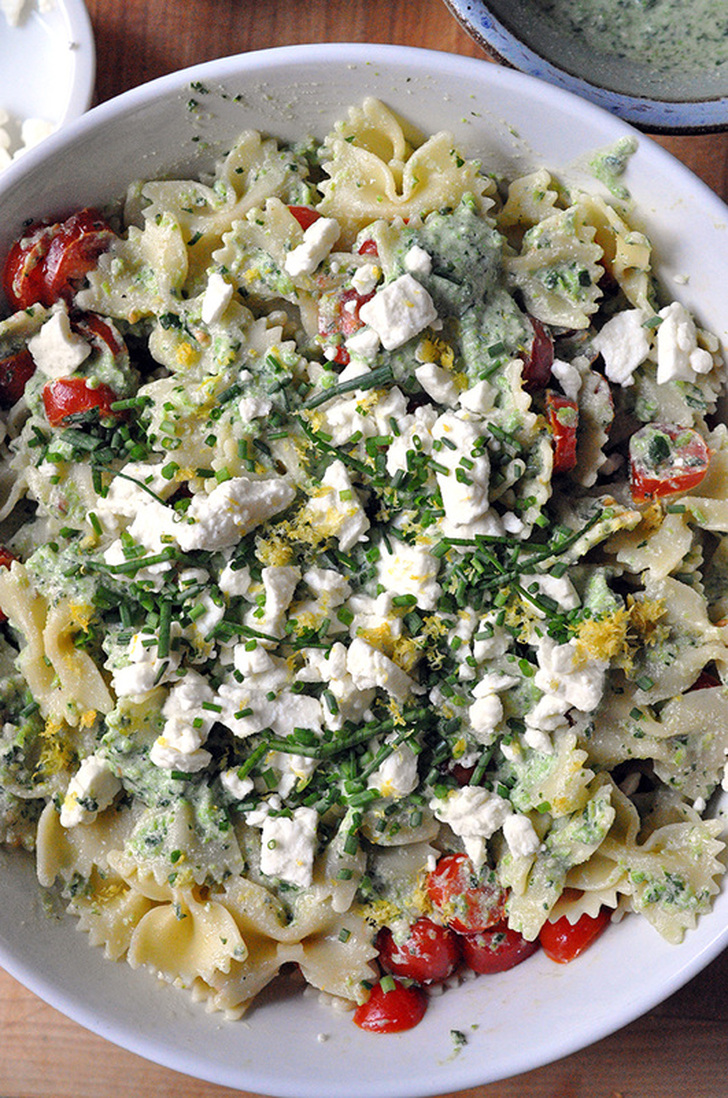 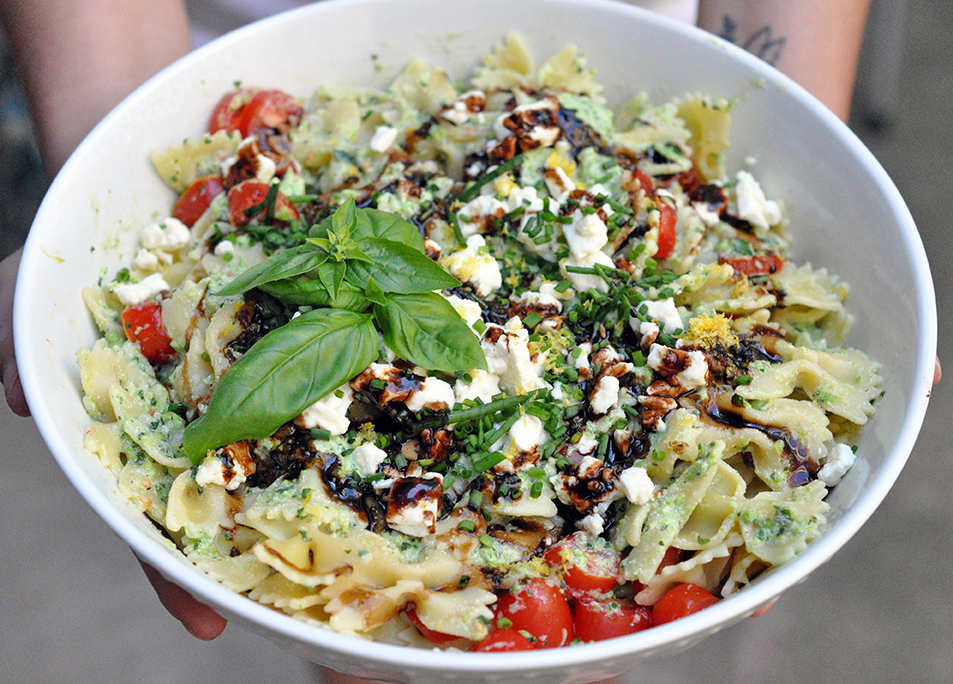 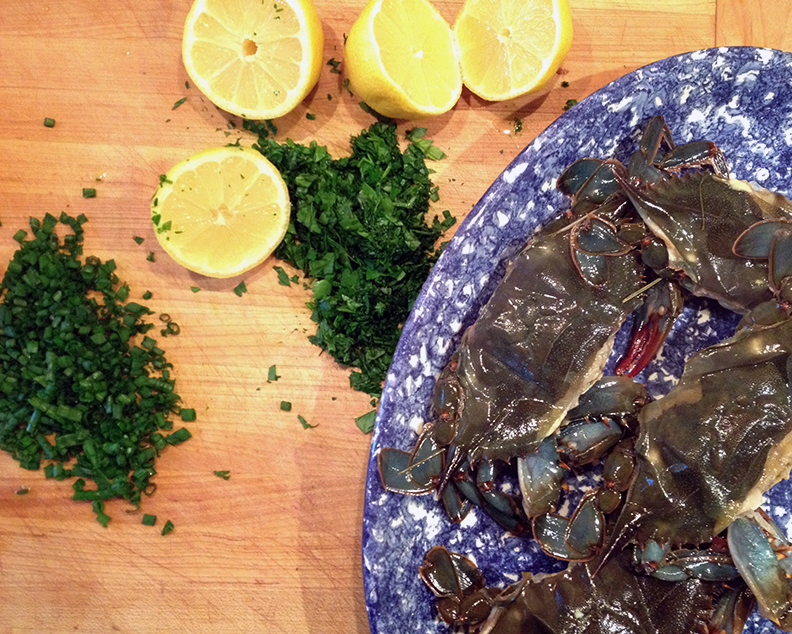 While I love to cook and play around with recipes for you all, I also love to talk to other people about food and check out what they are cooking and feeling inspired by. So I wanted to start a feature series, where every now and then I’ll head over to a friend’s kitchen, poke around and take some notes. Last time I featured Kaspar, by other, sweet-toothed, half on our camping trip, this time…my mom! Two weeks ago I was home in New York visiting my parents. I have a mom to whom I feel pretty indebted for my gastronomic passion and interest. While I may have started out as a frozen pea girl, my tasted buds have luckily developed past this naive phase. It is tradition that when I go home, my mom asks me what we should cook. This past trip I was lucky enough to be treated to some fresh soft shell crabs. These crabs have recently cast off their hard shell or “molted” it and are in season Spring through late Summer. When lightly pan-fried with the right amount of seasoning they are a little bit of heaven…crisp and salty, tangy from lemon and sprinkled with some fresh herbs. But enough, lets get my mom’s perspective... 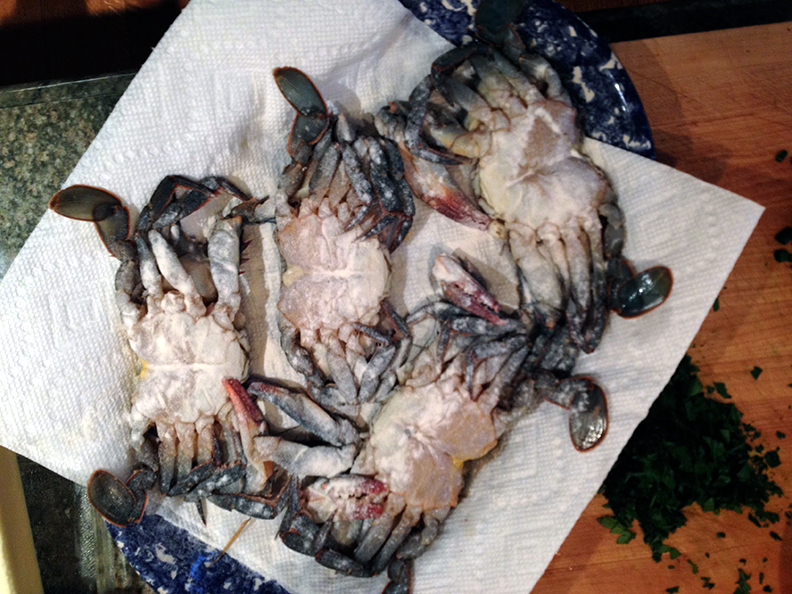 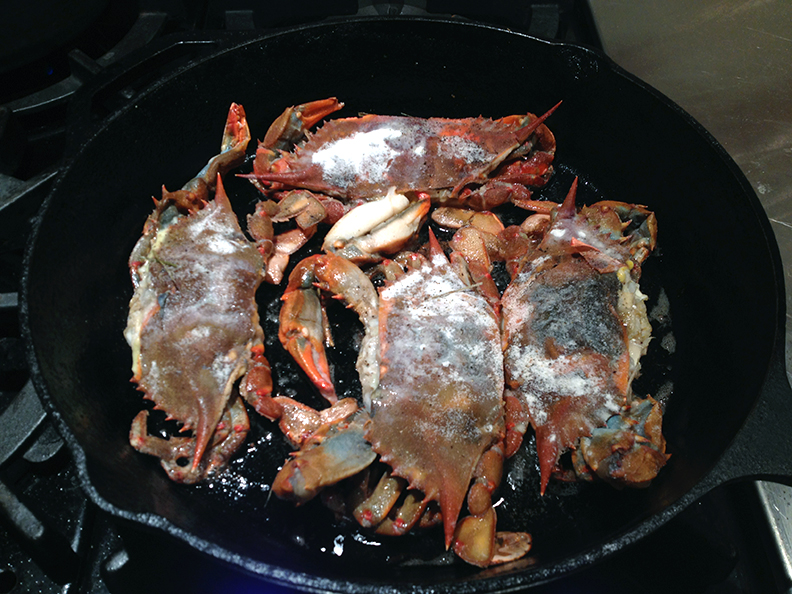 So here's how it all began... When your father asked me one spring day, a long time ago, "are the soft shell crabs in yet ?" I stared at him in confusion, not having a clue what these crabs were, nor that they were considered a seasonal delicacy. 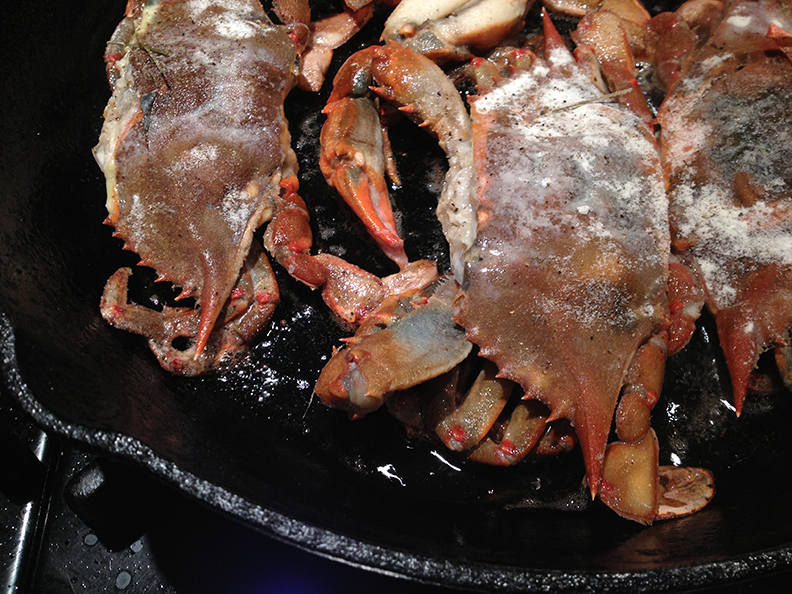 So I went down the avenue to 92 street to Holland Court Meat and Fish Market to find out. I came home with 4 small crabs, minus the heads, and didn't have any idea what to do with them. This was 1971. In those days there was no Internet, no Google , no Food TV - only cook books ! And I took down my fat as bricks 2 volume set of " The Gourmet Cookbook " , so handsome with their burgundy covers with gold scroll…sure enough - I found inspiration there. I learned how to soak them in a mixture of milk, garlic, onions and herbs, then drain them and dredge in flour and sauté them in butter [and learned fast to use a mesh screen - the crabs pop with a cheerful sound and get juices all over!]. 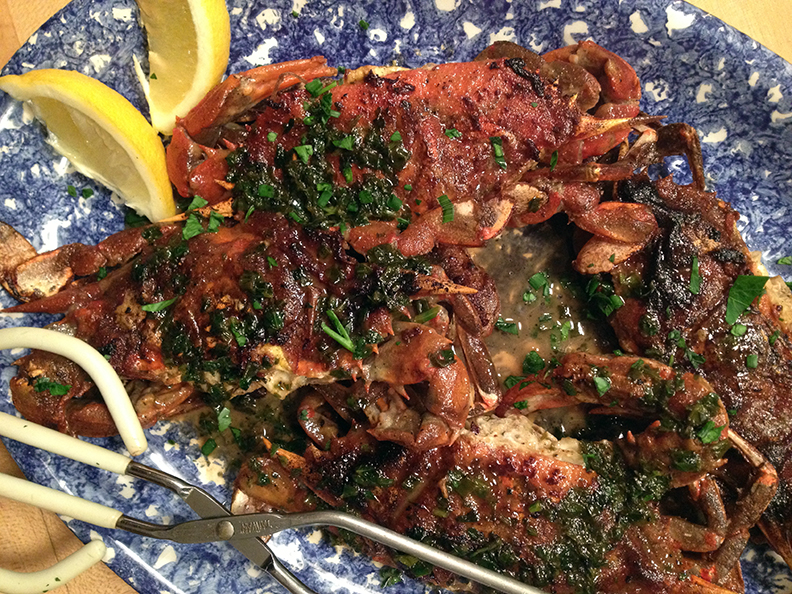 To finish them off, I would melt butter, add lemon juice and parsley [this was my father's go-to for all sautéed fish] and pour it over them - and I was sold! The legs were crunchy and delicious and the body fleshy and moist - truly a seasonal delicacy!! I taught myself how to cook in that bright simple little kitchen... and all these years later I still make the soft shell crabs this way and your father and I look forward to that first bite of the season.
Soft Shell Crab PRINT RECIPE [Prep: 30mins / Cook: 8mins / TOTAL: 38mins] [Serving size about 1 crab per person, earlier in the season the crabs are smaller so you may want to get 2 per person]
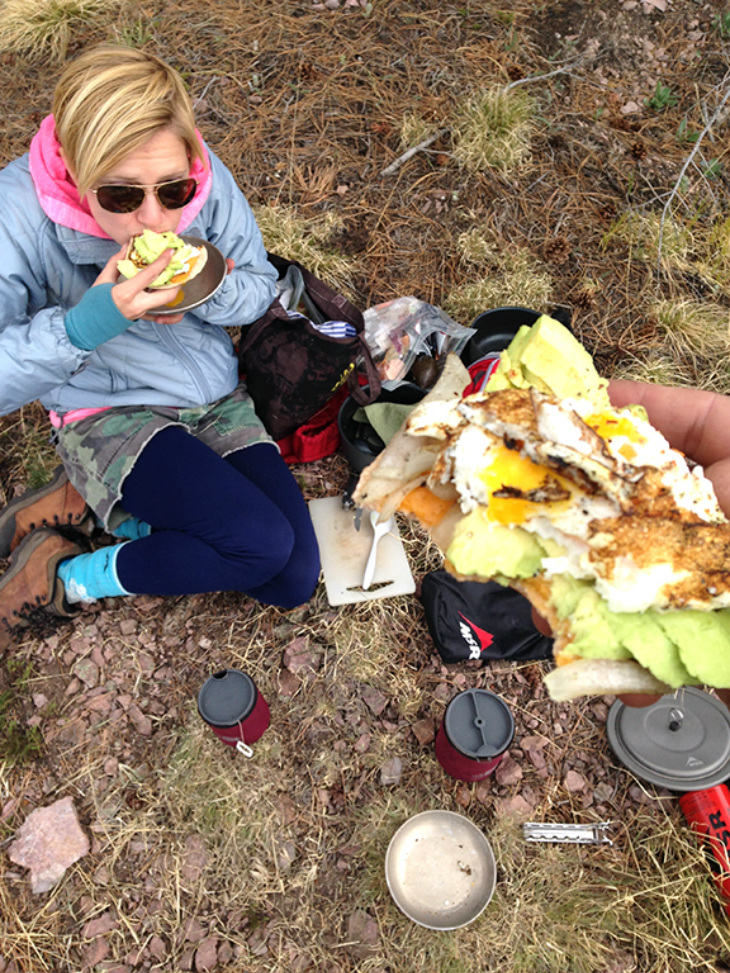
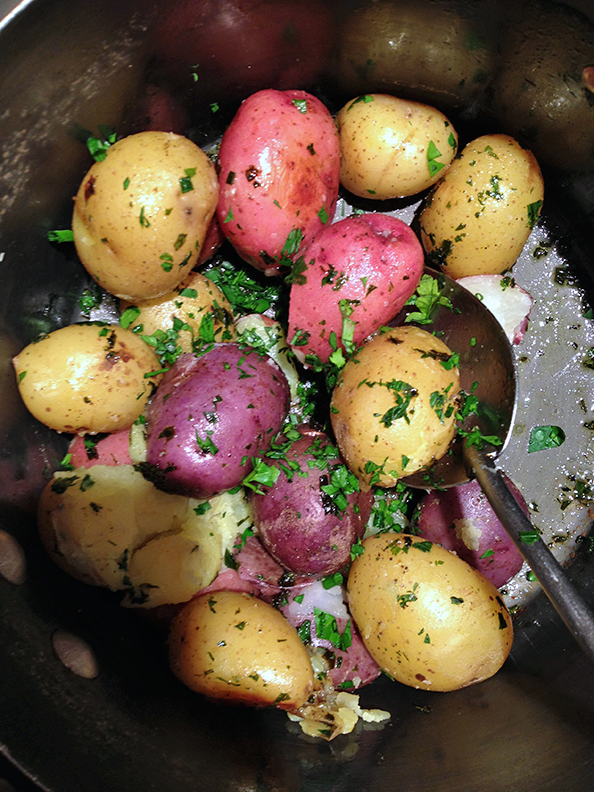
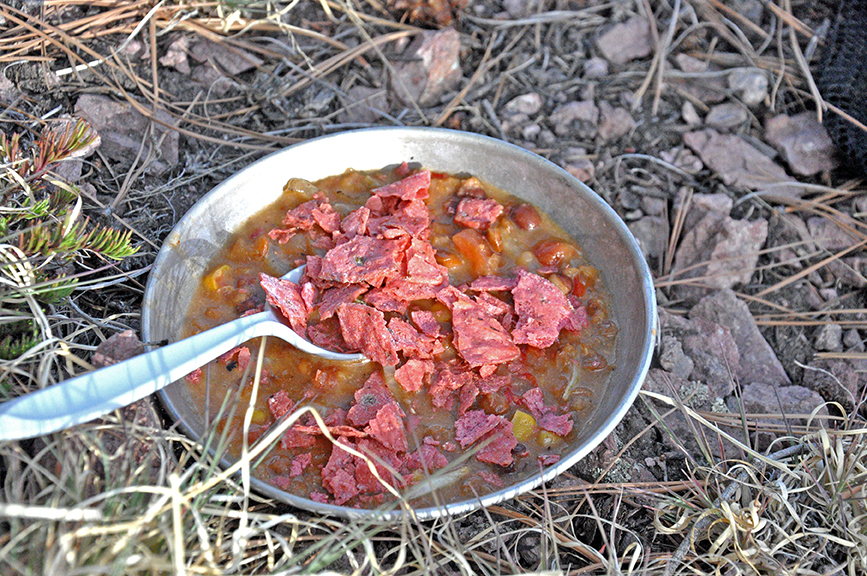
Optional sides: Green beans or haricôt vert: washed and ends trimmed, blanched ahead of time for about 2 minutes with just enough water to cover them. Tossed in ice bath and set out to dry for a few minutes. Then quickly sautéed in olive oil with slivered garlic and red pepper flakes Roasted asparagus with parmesan cheese: washed and ends snapped off, lightly tossed in olive oil and seasoned with salt and pepper, evenly spread out on baking sheet. Cooked in oven at 400° for about 10-15 minutes, depending on the thickness of the asparagus. Remove from oven, turn on broiler and grate enough parmesan to lightly cover the asparagus, return to oven for 30 seconds under the broiler. Boiled small potatoes lightly pan fried with fresh herbs and butter: bring potatoes to a boil over high heat in a deep skillet with just enough water to cover them – you’ll want most of the potatoes touching the bottom of the skillet. Let boil for about 10 minutes. Drain potatoes and turn the heat down to a simmer, add 1 tablespoon butter and toss with herbs of choice. Let them lightly pan fry while you finish cooking the soft shell crabs. Mixed green salad tossed with lemon and olive oil. You can serve the crab on a bed of this salad – makes for a pretty presentation! Most seafood stores will have already cleaned and prepped the soft shell crabs before you bring them home - keep them in the fridge until you are ready to cook them. Pour the milk into a shallow bowl and add 1/4 cup parsley, 1 tablespoon chives, onion, garlic, 1 tablespoon lemon juice, a few dashes salt and a few grinds fresh black pepper. Add the crabs and let soak for about 25 minutes. There should be enough milk to cover the crabs, if not then adjust amount. If you are making side dishes you should prep/cook them now. Remove the crabs from the milk mixture and pat dry. Dust entire crab with flour. Place large cast iron skillet over med-high heat and add 1 1/2 tablespoons butter. When butter begins to foam add the soft shell crabs bottoms down first, evenly spread out and let cook for about 3-4 minutes, or until golden brown - make sure to have a splatter screen ready, you will need it! Flip the crabs and finish cooking top side down for 3-4 more minutes, also until they are golden brown. Remove them from the skillet and add 1 tablespoon butter, scraping up all the browned bits and add a few pinches parsley and chives [leaving a little of both for garnish] the remaining lemon juice and white wine. Stir well and let cook down for 1-2 minutes. Evenly disperse the white wine sauce over the plated soft shell crabs and serve with your sides. Enjoy!  Soft shell crabs please! [early 1970's]  Mom [early 1970's]  Sorry for the long absence, life's been a little bit busy - in the good way. In early May Kaspar and I took a road/camping trip tour of New Mexico. We encountered a little snow, saw some amazing skies, dipped in a few natural hot springs and ate some good food along the way. We try not to let camping sacrifice the taste or quality of our food. Though it can be a bit tricky when you are out in the mountains for days at a time, there is always some way to spruce up a boxed soup or spice up a package of ramen noodle soup - mac and cheese has always been a go to for us. In fact I usually start to anticipate the bright orange meal days before we head out on our trip. Food that honestly wouldn’t be on our radar at the supermarket takes on a new significance – simply because you cant make everything from scratch when you are camping, it just isn’t practical. Along with pre-packaged food you can take a lot of good ingredients along with you – a sort of semi home made situation. You'll need a cooler and should try to cook the most perishable items first. Overall, it takes a fair amount of planning, but then when you’re out there in the wild or just car camping you already have your meals planned and there’s no stressing about what’s for dinner. Prepping and cooking becomes a matter of efficiency and waste becomes next to nil. It’s an interesting phenomenon – when I go camping with Kaspar, I get to relax [!] and let him take the culinary reigns. So I’ve decided to feature him in this post. He’s been camping for longer than I, and I thought we could learn a few tricks from him and enjoy his wisdom. From here on out this post is brought to by Kaspar, photos and all. Enjoy! [Disclaimer.. we wrote our entries separately - so any similarities is not meant to be redundant, just a coincidence. Perhaps its just evidence that we finally have camping routines down, we've been doing this for almost 8 years now!]
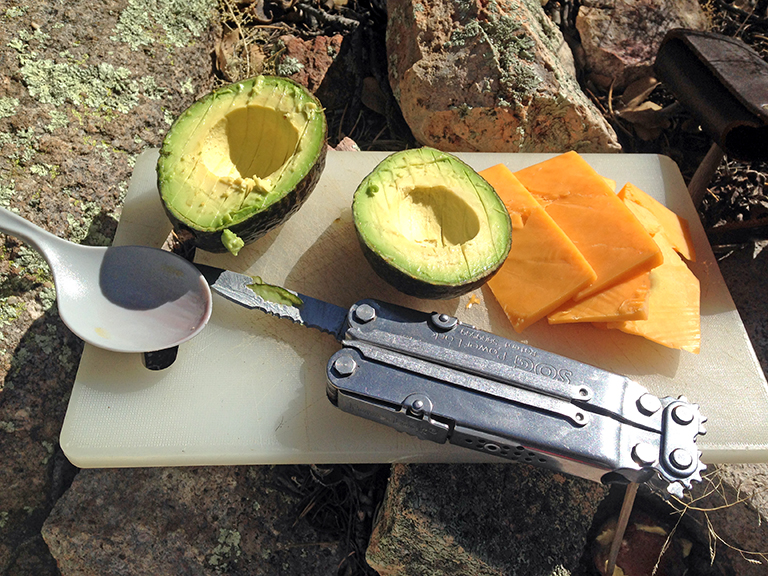
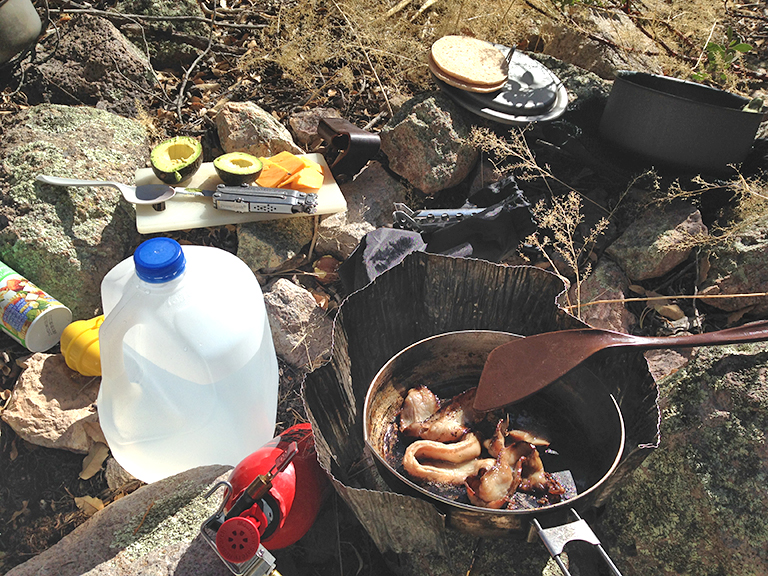
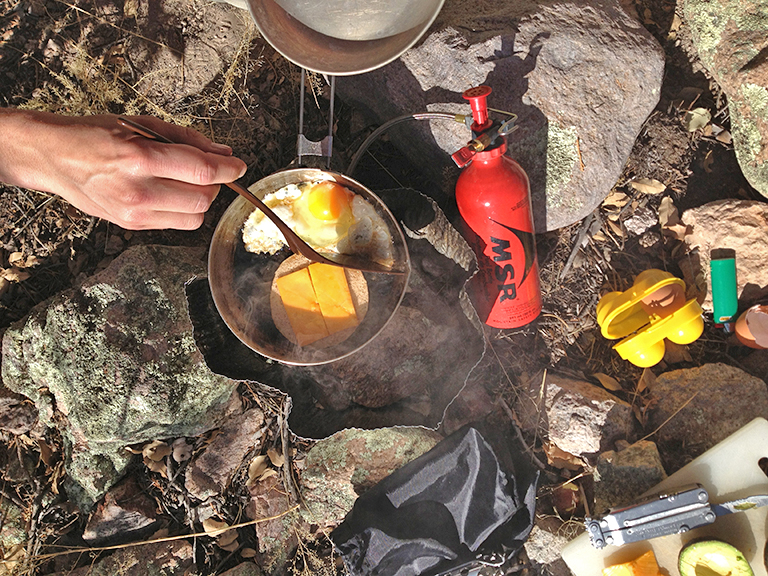
The great thing about cooking in the backcountry is that it is the only thing other than making sure you have shelter that matters. Nothing else even needs to enter your mind; you know all you need is food, water and a place to sleep. The reality is that those three things are all we ever really need, but we tend to over complicate things. When it comes to camping I get to handle the cooking and show off my domestic side. I do it all, the meal planning, cooking and cleaning. I think it blows Ali's mind that when we are in the outdoors all of a sudden I decide to be neat and tidy with the dishes and fastidious about the food. We have some "go to" meals we like to cook, but ultimately you really have to be able to freestyle when you get to the bottom of the food bag. 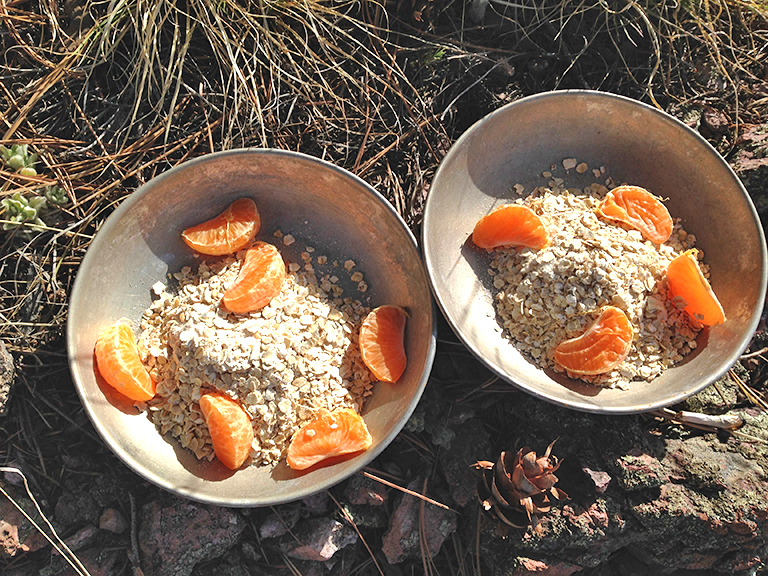 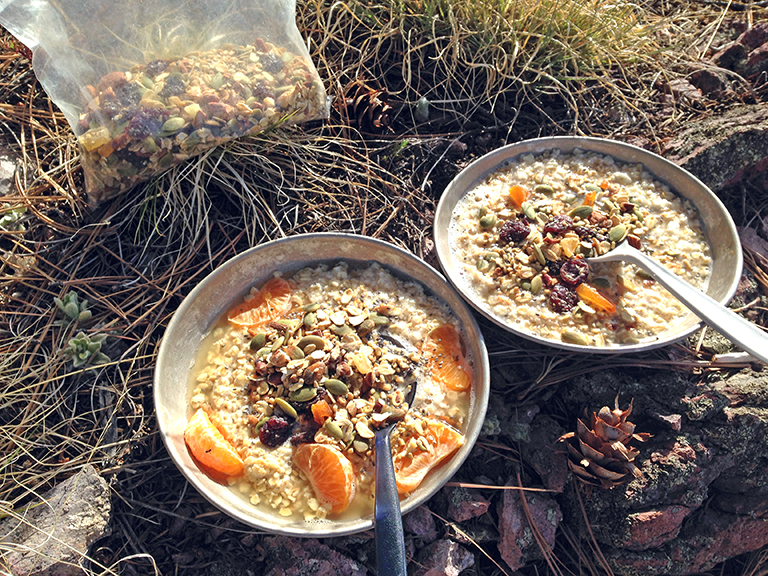 Breakfast: Coffee or tea is a must-there are quality camping French presses out there, we've been using the GSI Coffee Press for a few years now, Make sure to pack sugar and powdered milk! Sweet: Instant oatmeal base - Optional additions: homemade granola, fruit (sometime you can find wild blueberries or strawberries). This is a great way to wake you up and make sure you do your business at the beginning of the day so you don't have to worry about it once you hit the trail. Savory: Bacon Egg and Cheese on toast - Optional additions: avocado or leftover grilled veggies from the night before. This is the best protein bomb you can make to repair your legs. Tip-we’ve been liking One Bun for a bread option. 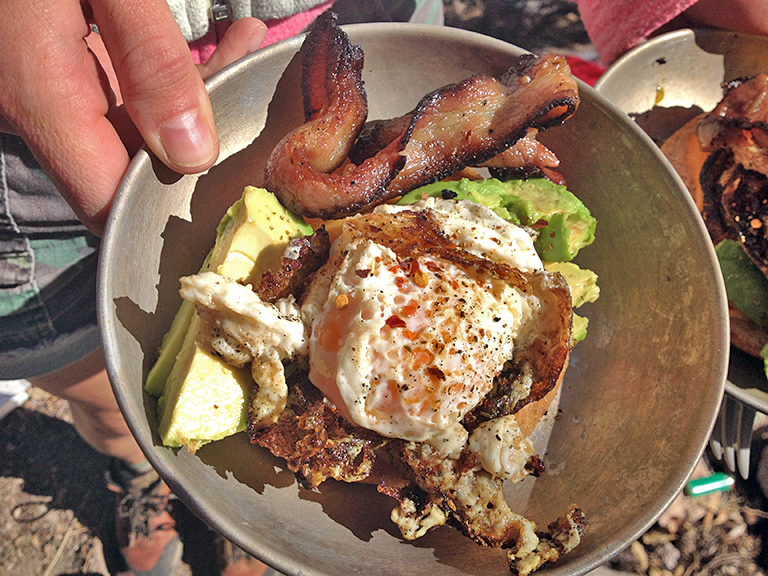
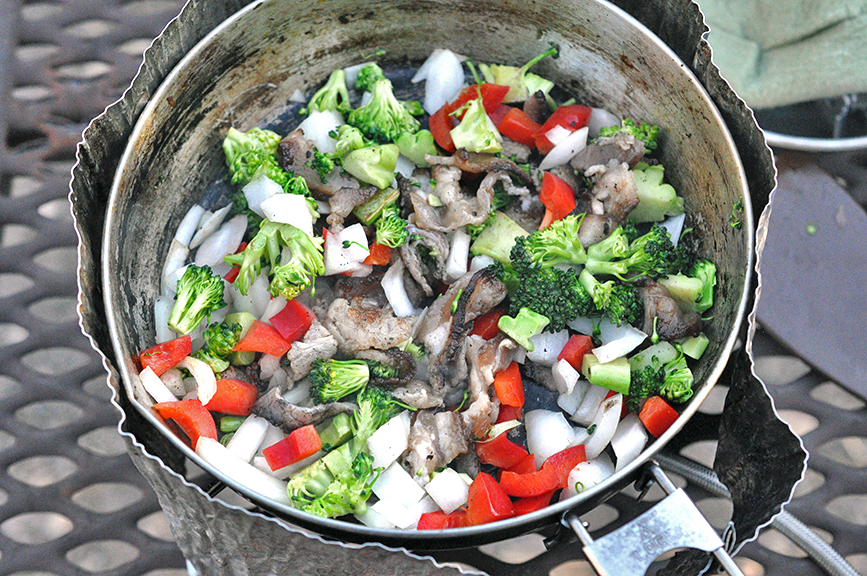
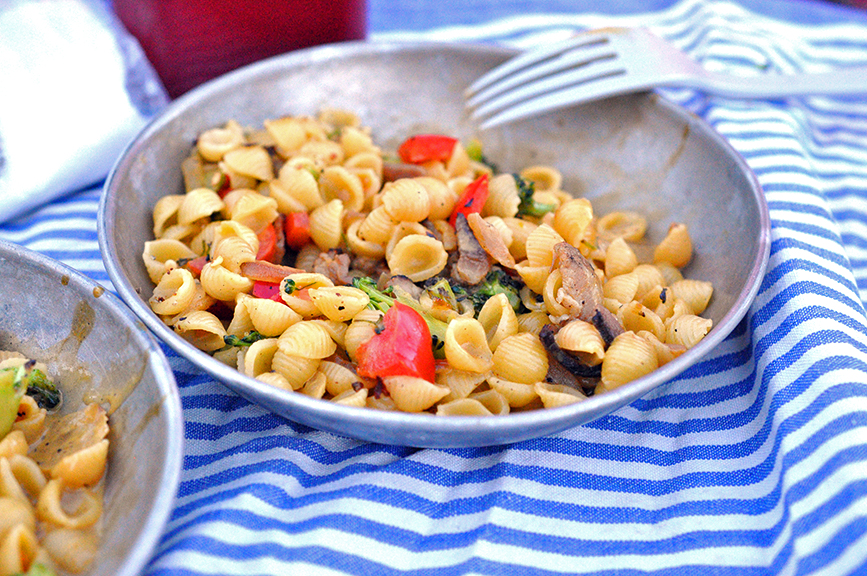
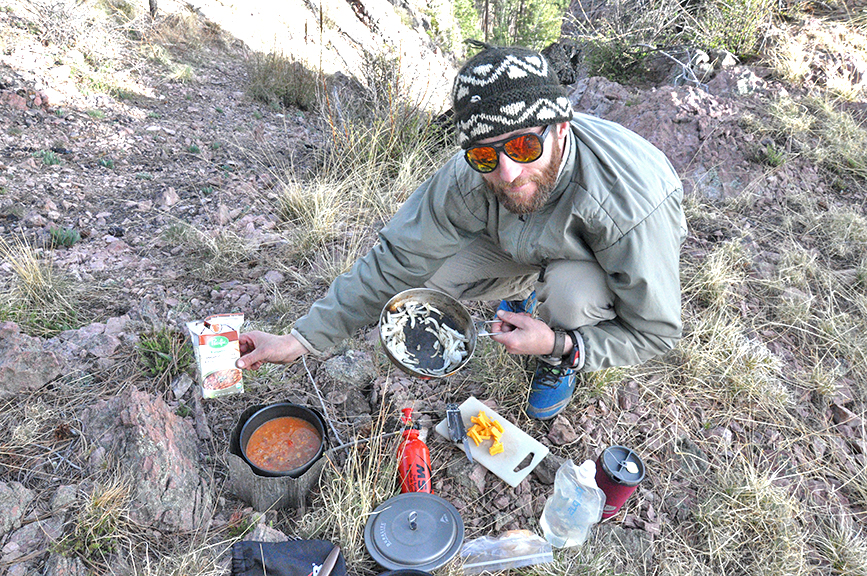
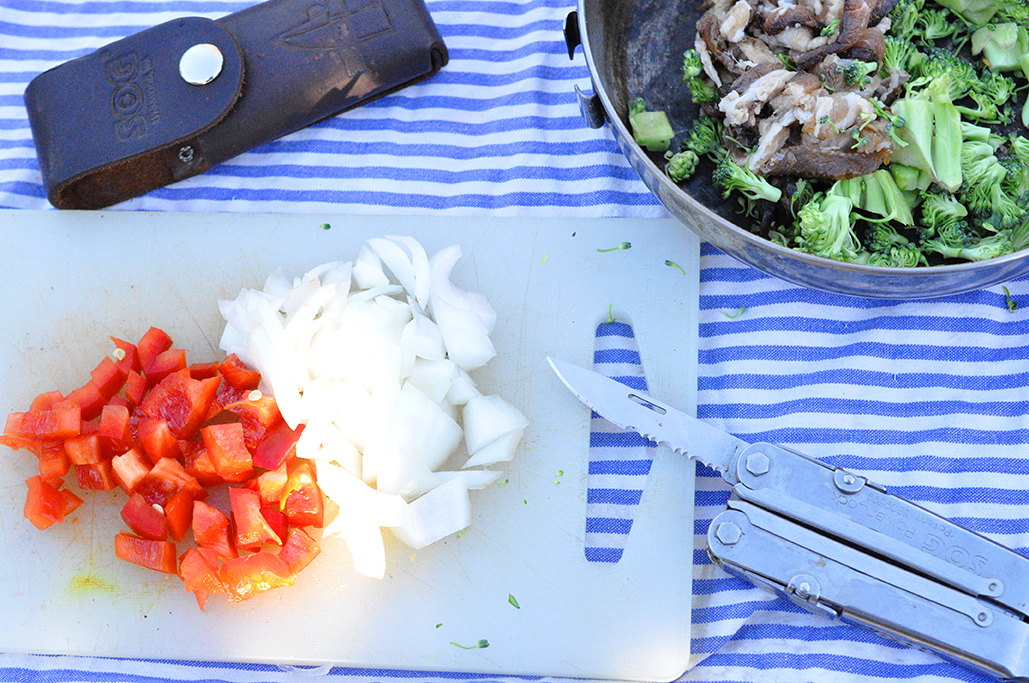
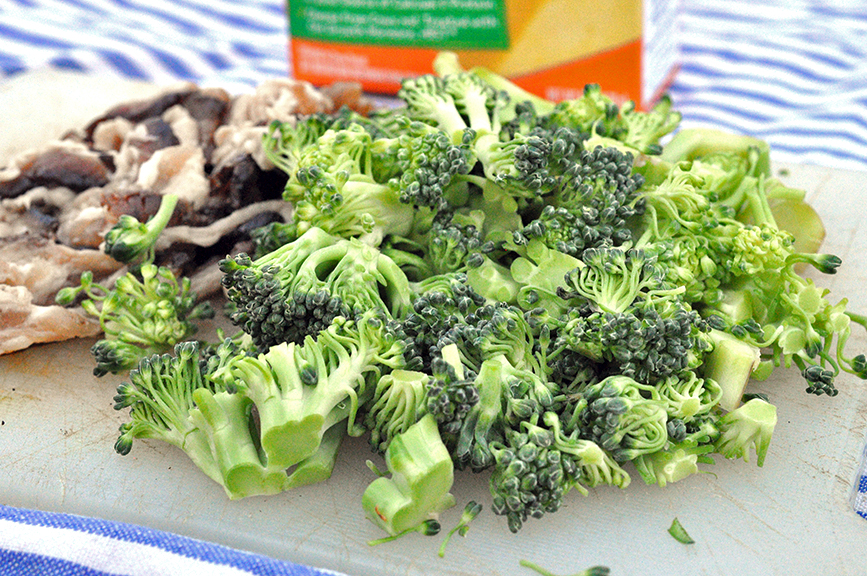
 Lunch is usually on the go, a granola bar, trail mix or piece of fruit. Dinner: Sausage and Vegetables - Optional additions: spicy mustard, horse radish, onions, carrots, broccoli and peppers will all keep for a few days without refrigeration so chop up what you got and toss it in. Tip-don't forget to pack spices for seasoning. Pre-mix them at home and store them in mini zip-lock bags. Mac and Cheese, Ramen or Boxed Soup - Be sure to get a good mac and cheese like Annie's - Optional additons: peppers, garlic, onion. Tip – when boiling water for the noodles or shells you can place the skillet with sautéed veggies on top of the water, this keeps the veggies warm and act as a lid to speed up the boiling process. 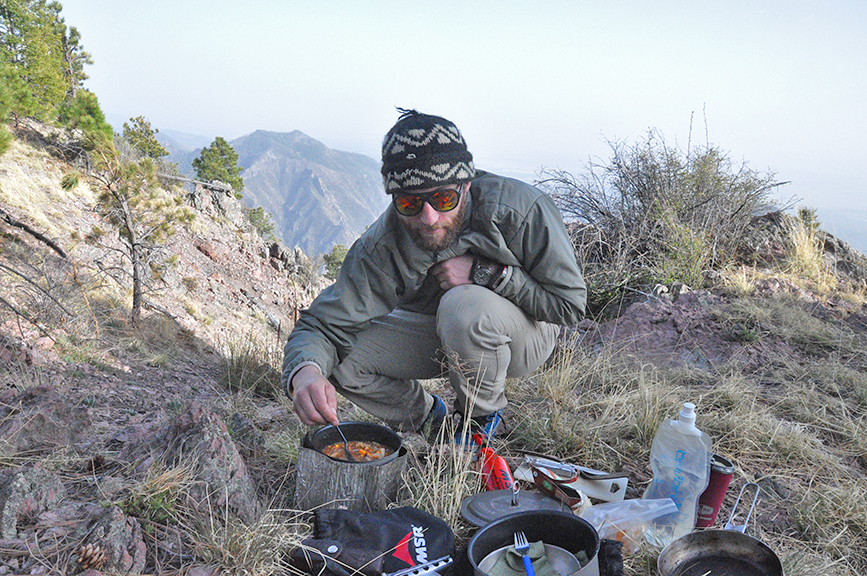
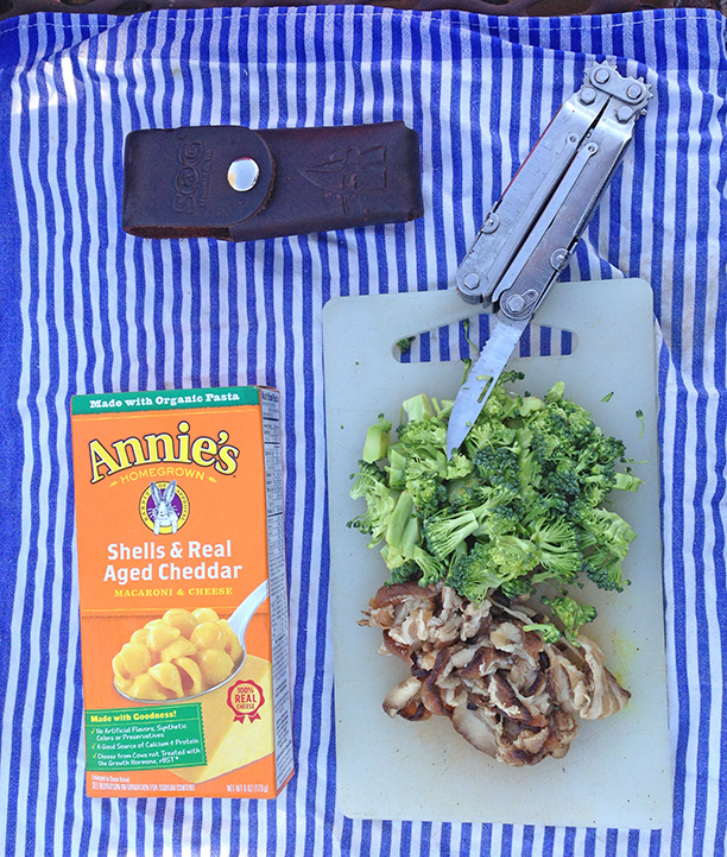 a multi-tool comes in super handy while prepping a meal
  Don’t forget your flask with your liquor of choice. Ours this time was some home made moonshine that we infused with strawberries to make it into the camping version of a desert liquor. 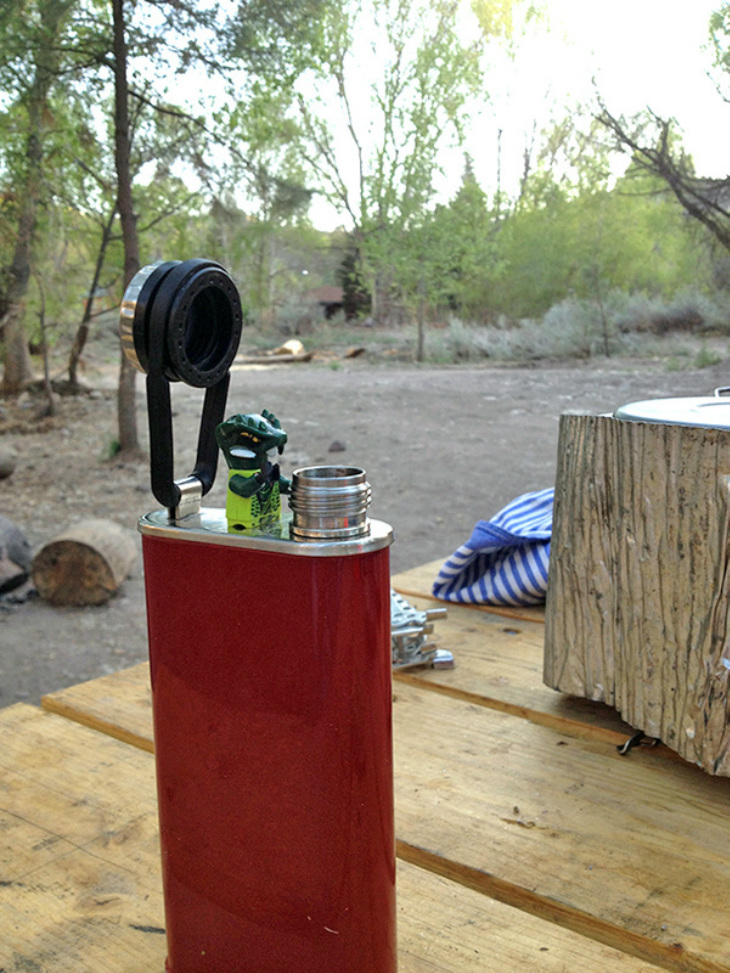 don't forget to share And of course there's the long road home - where all bets are off. When you've been hiking, trailblazing, and just generally exhausting yourself in the great wilderness - you deserve a treat. These donuts, hole included! are from Buns N' Roses in Marfa, TX. 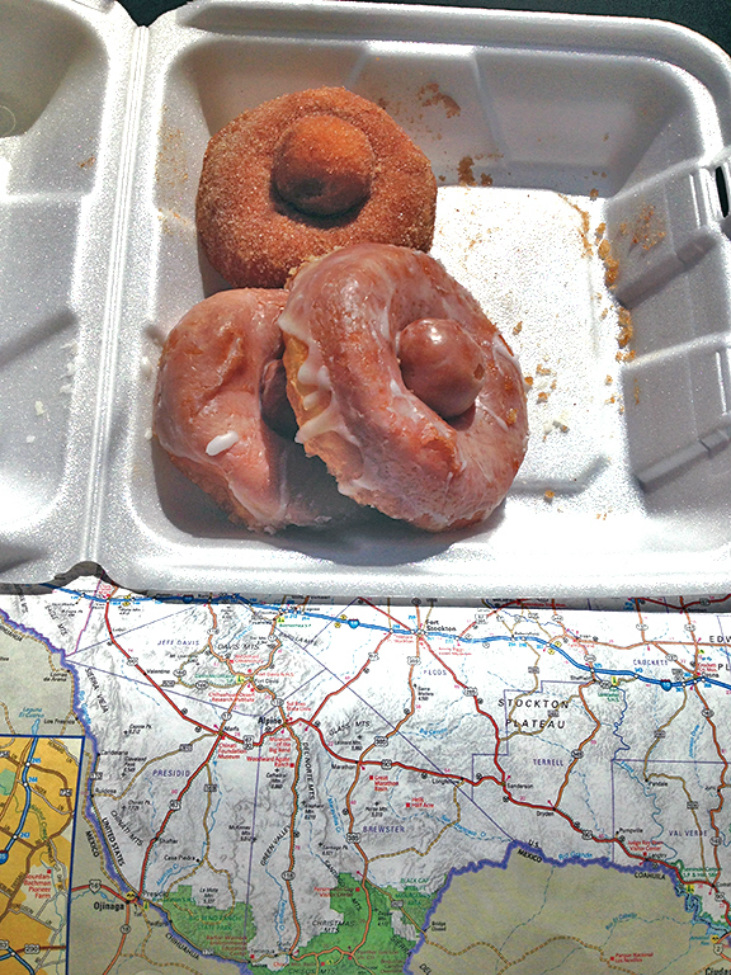 Please submit any questions you have about food and camping! Also to see more photos from our trip find me [Ali] on instagram @borninaford.
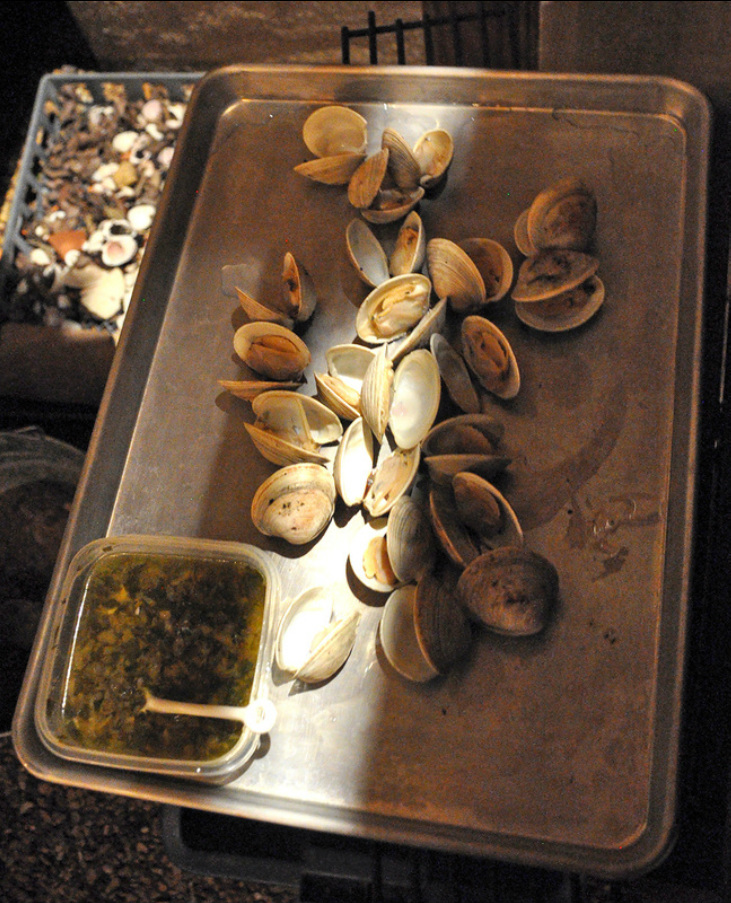
Hands down, my two favorite dishes to have when the weather starts to feel like summer are basil pesto and grilled clams. I could alternate these meals and eat them for days…I mean I would try, have tried…You could probably cook the clams in a cast iron skillet or in an oven, but there’s something about grilling, right? Nearly everyone has a fond childhood memory or two of eating corn, bbq chicken, ribs, or skewered veggies hot off the grill with friends and family nearby. Things can get messy, but the food always tastes great. So when I was recently invited over to my friend Marin’s house to grill, I piped in, “I’ll bring the clams!” My exclamation was received positively with perhaps a little bit of doubt. Down here in Texas I’ve had some dreamy grilled meats, from falling off the bone ribs to buttery brisket, to hot links and perfectly seasoned burgers – but what I'm always thinking in the back of my my mind is...where's the grilled seafood. Spending summers out on the east end of Long Island I grew accustomed to a normal (constant) intake of super fresh summer seafood. Softshell crabs fried in butter (sigh), seared sweet bay scallops, salty oysters, big plump blackened shrimp, and stuffed clams. To be honest it pains me to reminisce…but I’ve traded one tradition for another. I wish I could bring the smoky salty brisket with a perfect bark back for my parents to experience. 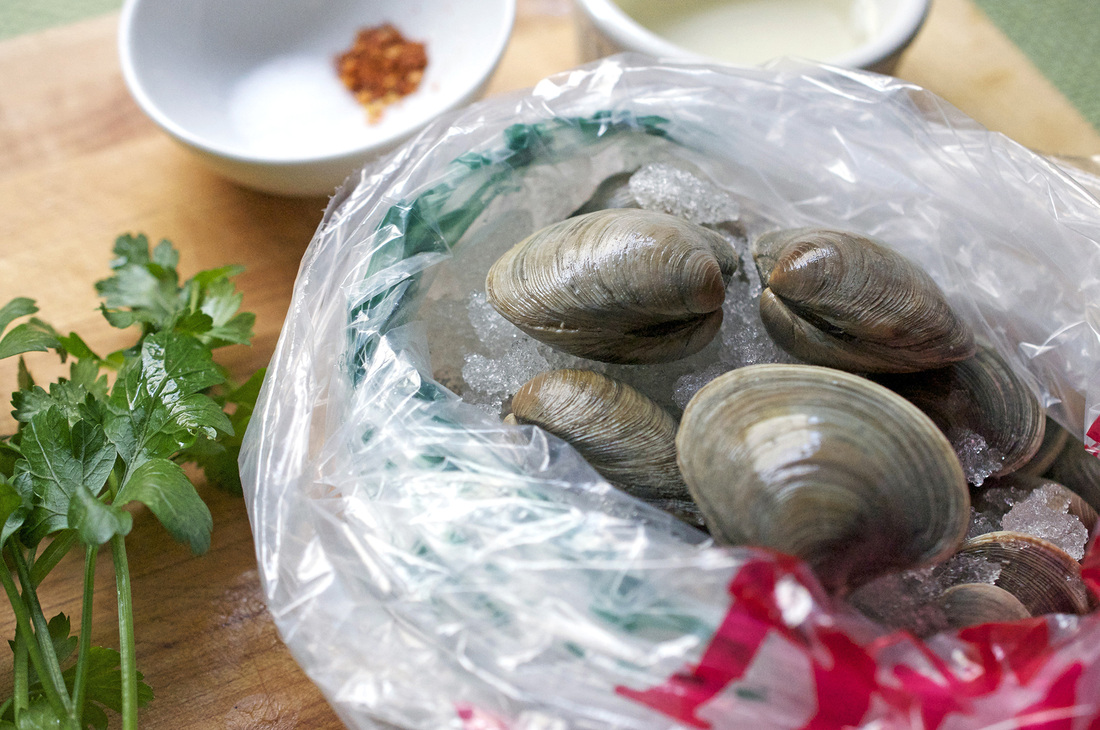
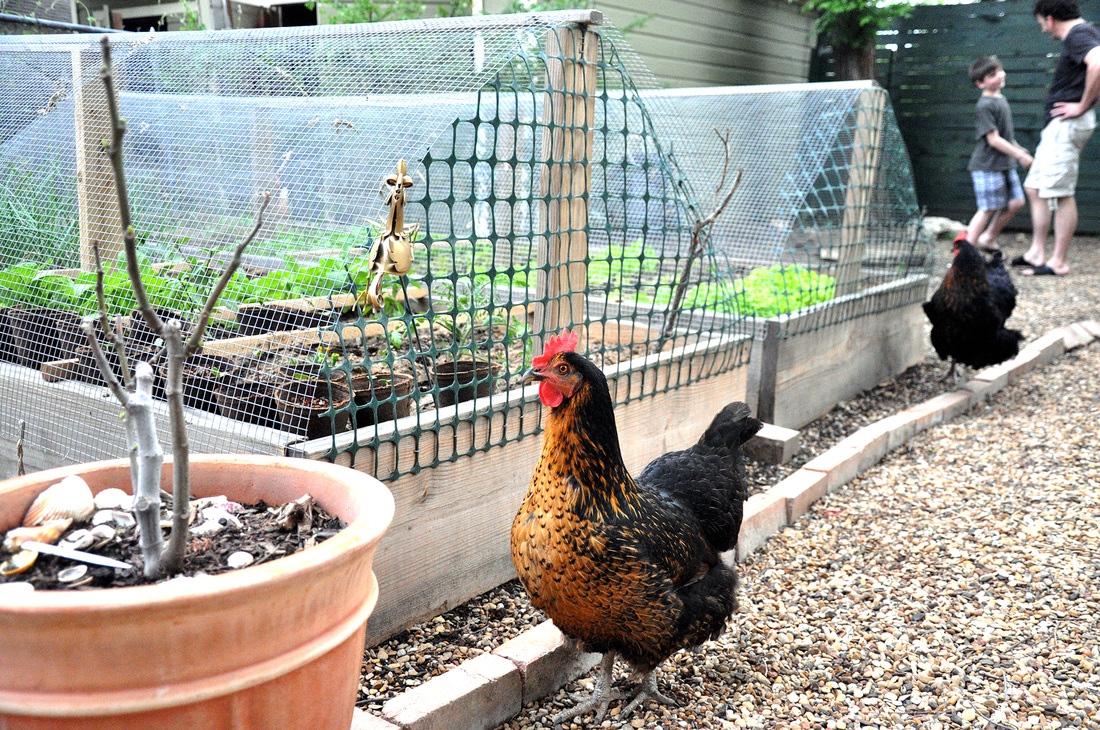
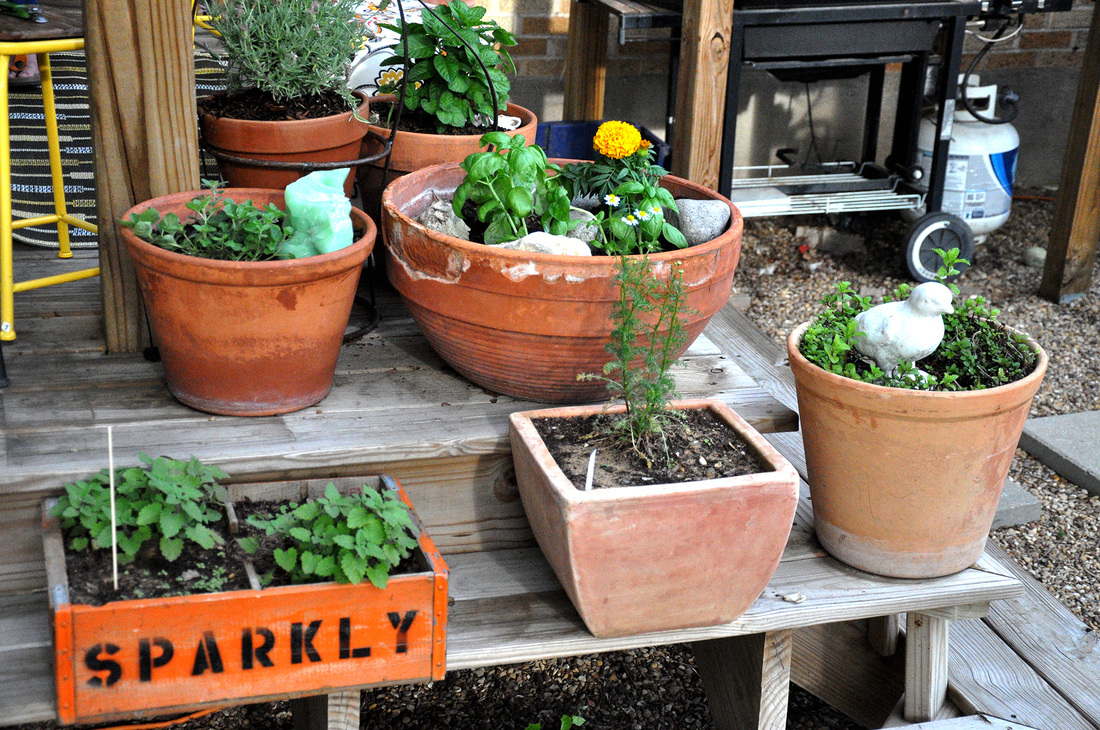
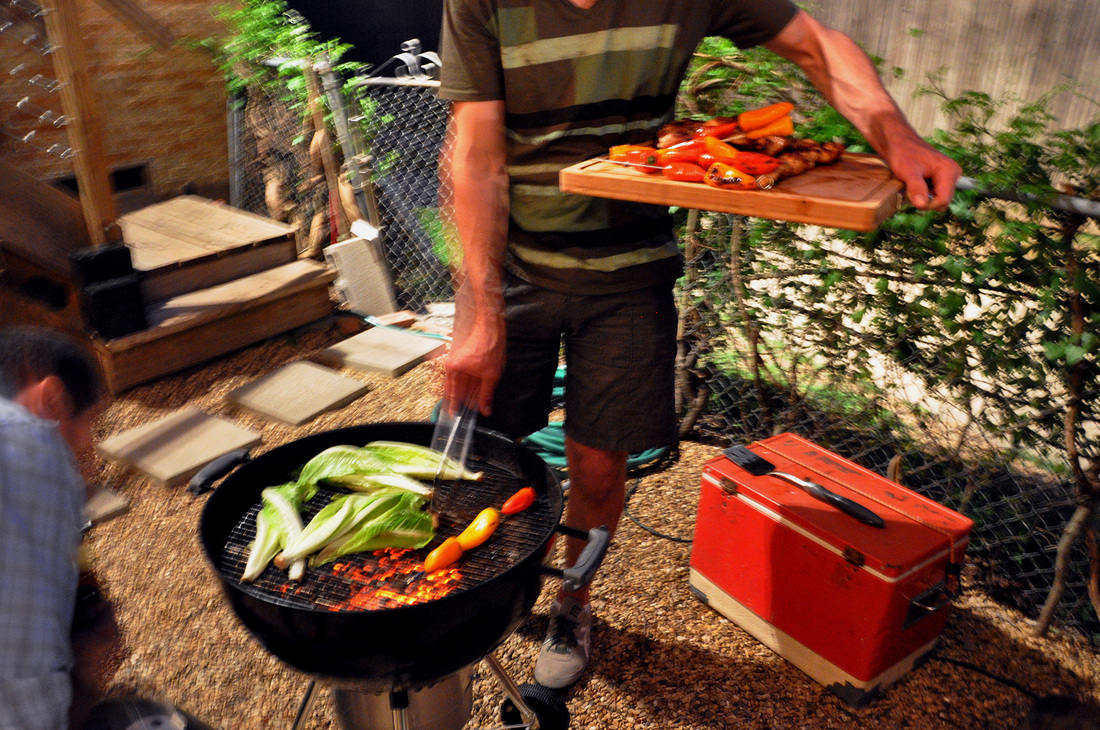
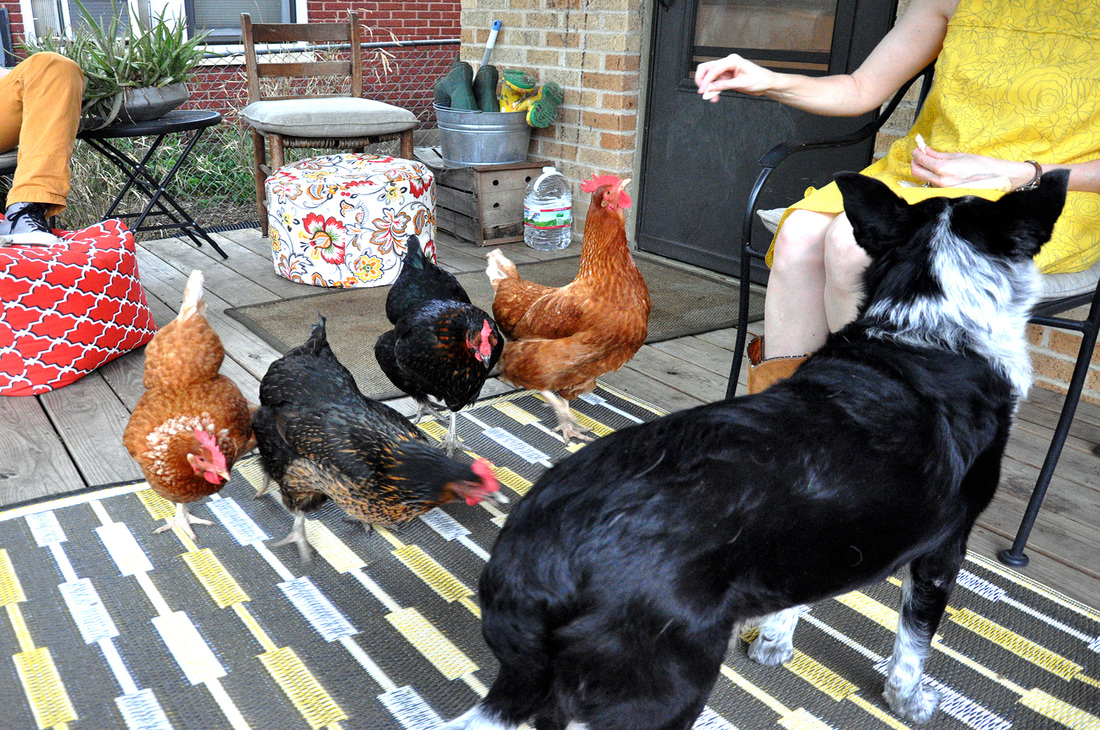
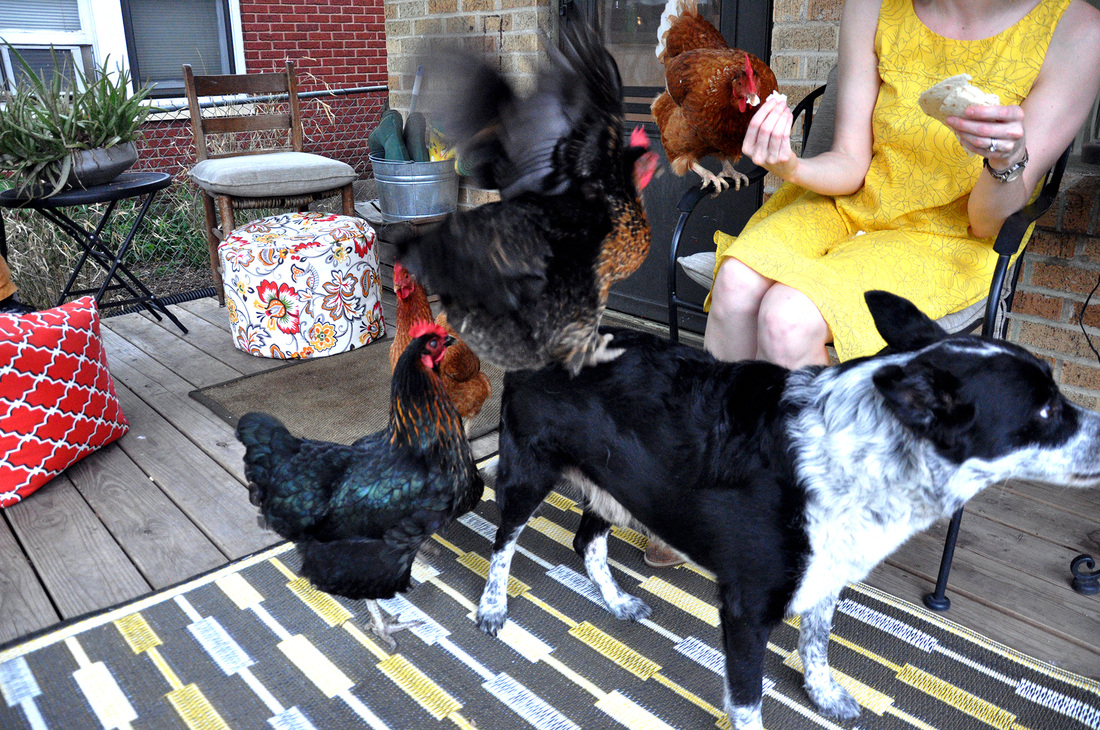
Anyways, I’m getting off track and sort of hungry…The point is that I always want to grill clams when given the chance and was excited that I was going to share my simple recipe with a group of newbies. So where was I? Oh yes, last week I found myself at Marin’s – a true Kentucky lady at heart – urban farm. She has managed to turn her back yard into a little country oasis. With chickens waddling around, a sweet sweet dog name Bear soliciting butt scratches, and a kitty named Kitty sleeping through it all. I was immediately happy and at ease. There were raised garden beds and a made from scratch chicken coop – the only thing missing was, of course, the teepee that hadn’t been waterproofed yet. Herbs sat happy, young and fresh in assorted crates and old planters, the aloe was nearly exploding out of its container. I loved it all. Food is good enough on it own, but when enjoyed in such a perfect place, well let’s just say I was a happy camper. The clams went over spectacularly, claiming their rightful place next to the ribs and sliders. [warning
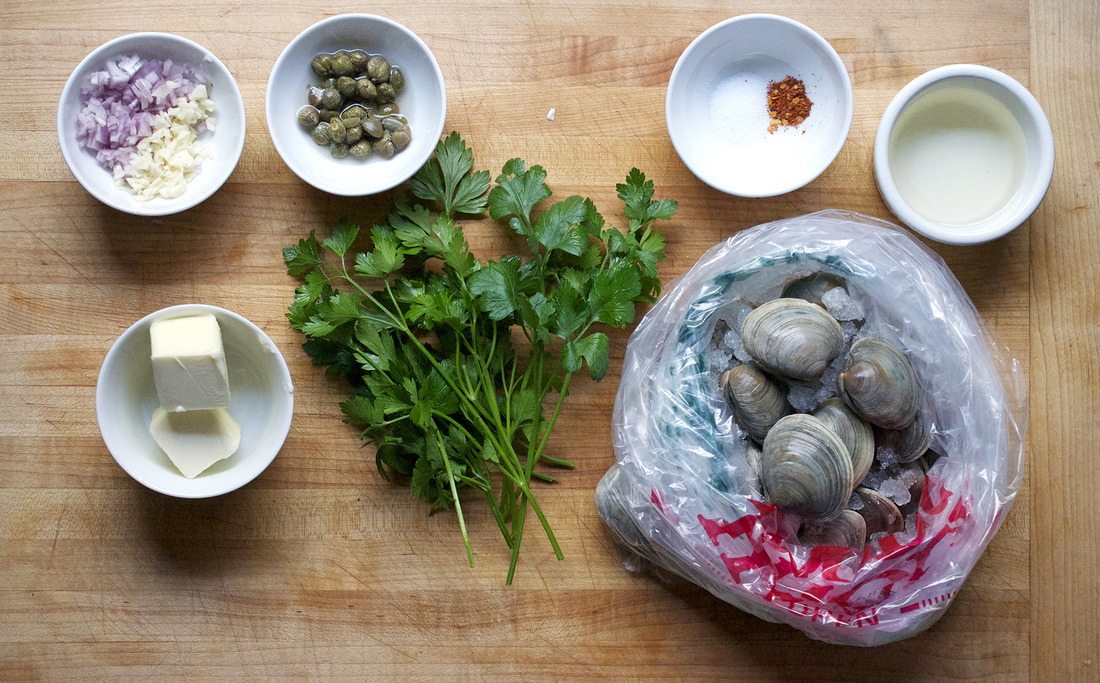
Grilled Clams with Parsley Caper Butter PRINT RECIPE [Prep: 5mins / Cook: 20 / TOTAL: 25mins [*Serving size about 5 clams per person = 5 people]
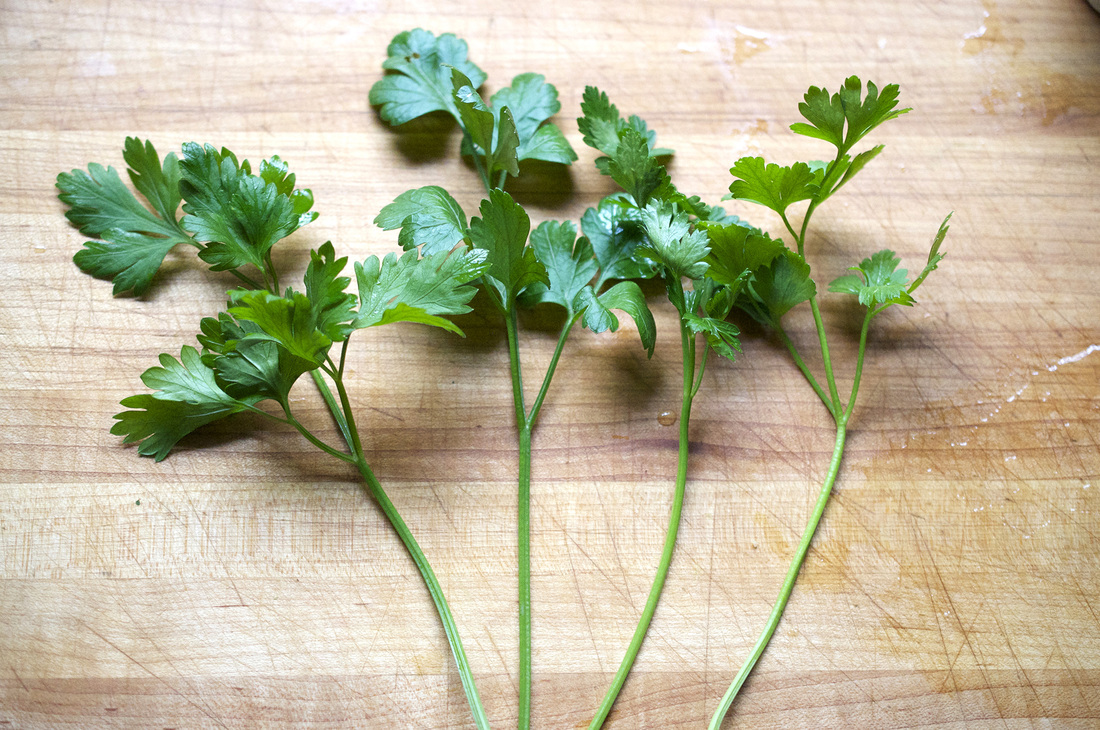
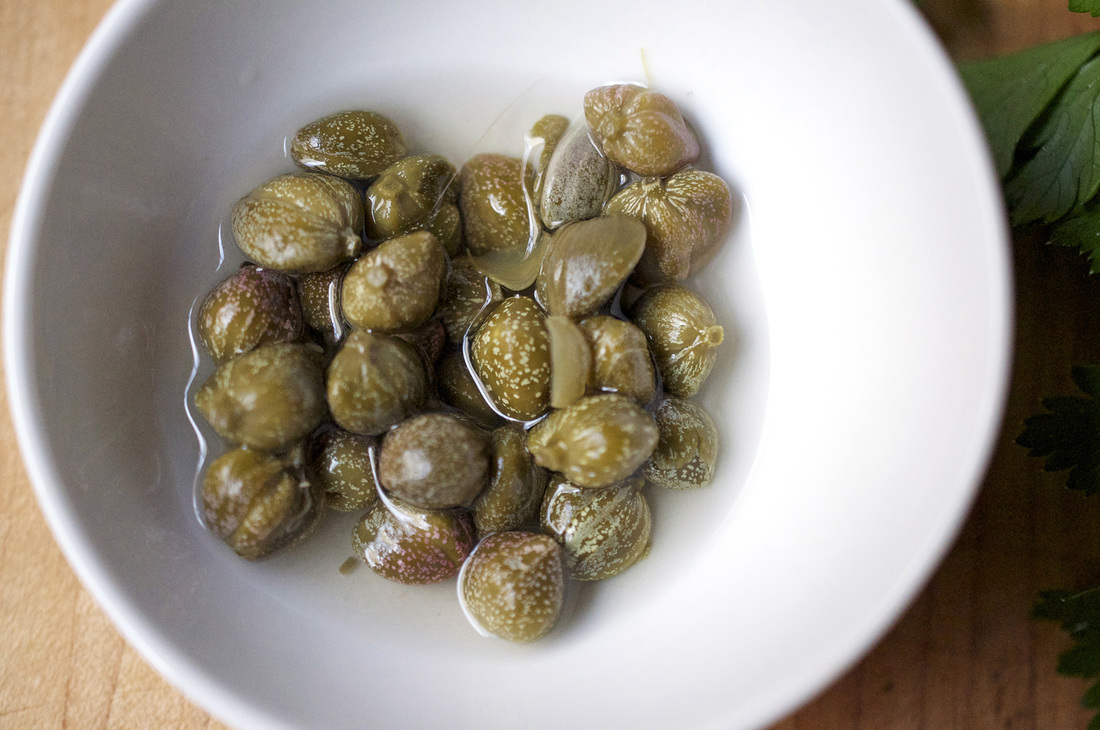
Depending on what kind of grill you have you may want to start heating up the coals/turn on the gas so you won’t have to wait around for it to get nice and hot. When you are ready to start prepping the meal take the clams out and fill a bowl with cold fresh water. Let them sit for 20 minutes. This will cause them to spit out any sand or grit that they have inside their shells. Most clams won't come covered in barnacles so they just need a good rinse with a firm brush right before they're cooked. [Does this sound familiar? Check out my Summertime Clam Pasta for more deets on cooking with clams:o)] Peel and mince both the garlic and shallot. Rinse the parsley, drain the capers and mince both. Once all the prep is finished, melt the butter in small skillet over med high heat. Once the butter is bubbling lightly add the minced shallots and minced garlic, let sauté for about 2 minutes, stirring often. Add the ¼ cup white wine and let it cook off for 1 minute. Add the capers, parsley, salt, pepper and hot pepper flakes. Lower the heat and let simmer for 2-3 minutes before removing from the heat. Transfer to a small serving bowl. If the grill is ready, then the throw the clams on. Spread them out so that they do not crowd each other and close the grill. After 5 minutes start checking for open clams. Make sure to have a serving platter ready next to the grill. As they open remove them from the heat right away. Some clams may take a little longer, just give them a tap or two and keep the grill closed as you wait. The clams can be eaten right away – but watch out, they can be hot! Make sure to give each one a good splash of the parlsey caper butter sauce! *This serving size is based on the clams being a starter or passed appetizer. They go fast so feel free to grill more, especially if they are the main course! The volume of parsley caper butter sauce will go far. I usually have a little leftover and will freeze it and use it as a starter for a seafood pasta sauce. **I used little necks, but cherrystones – a bigger meatier kind – are really good on the grill.
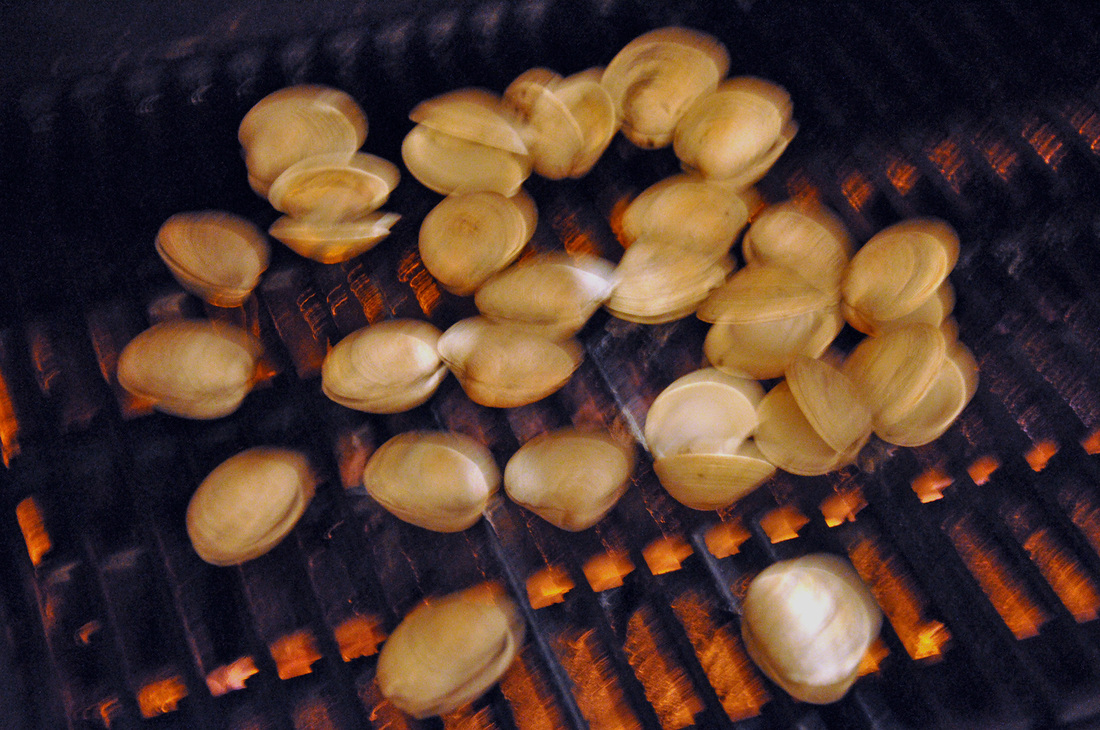
[I need a tripod...or a steadier hand.]
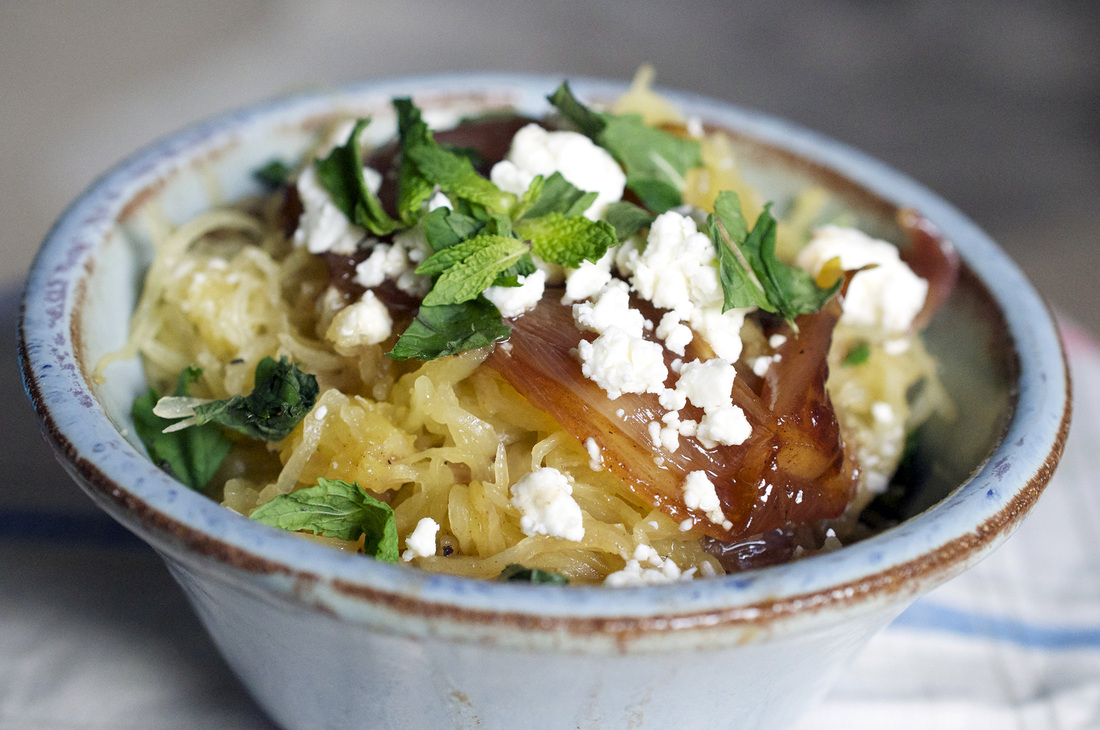
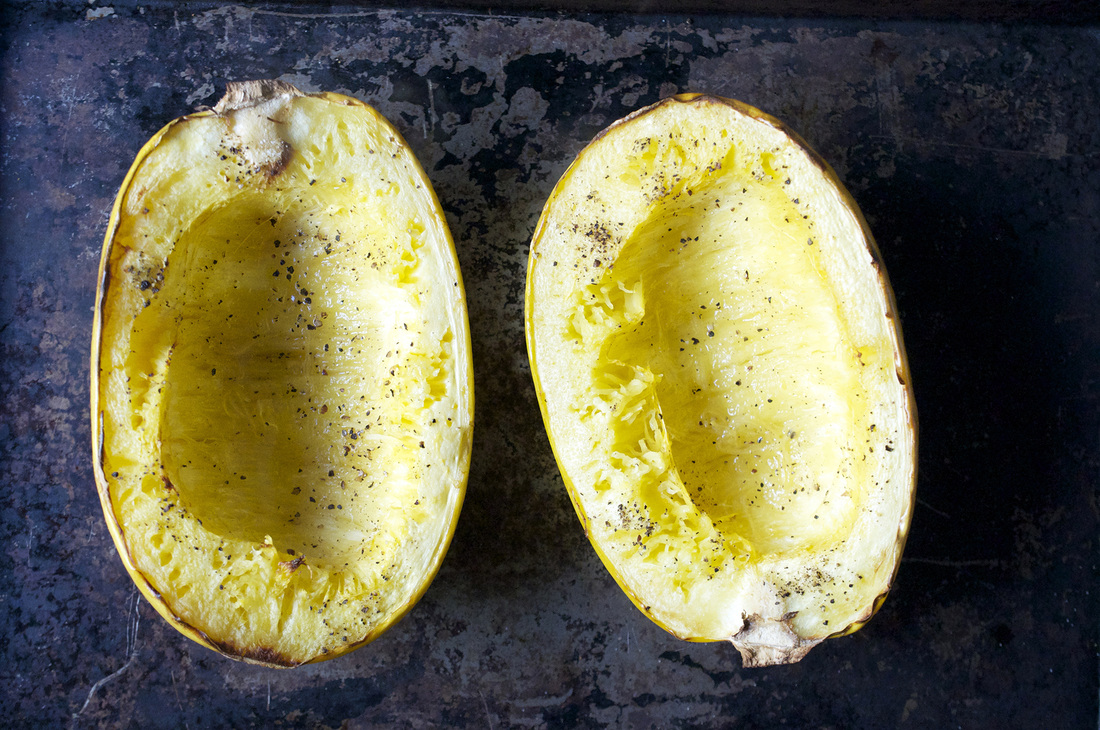
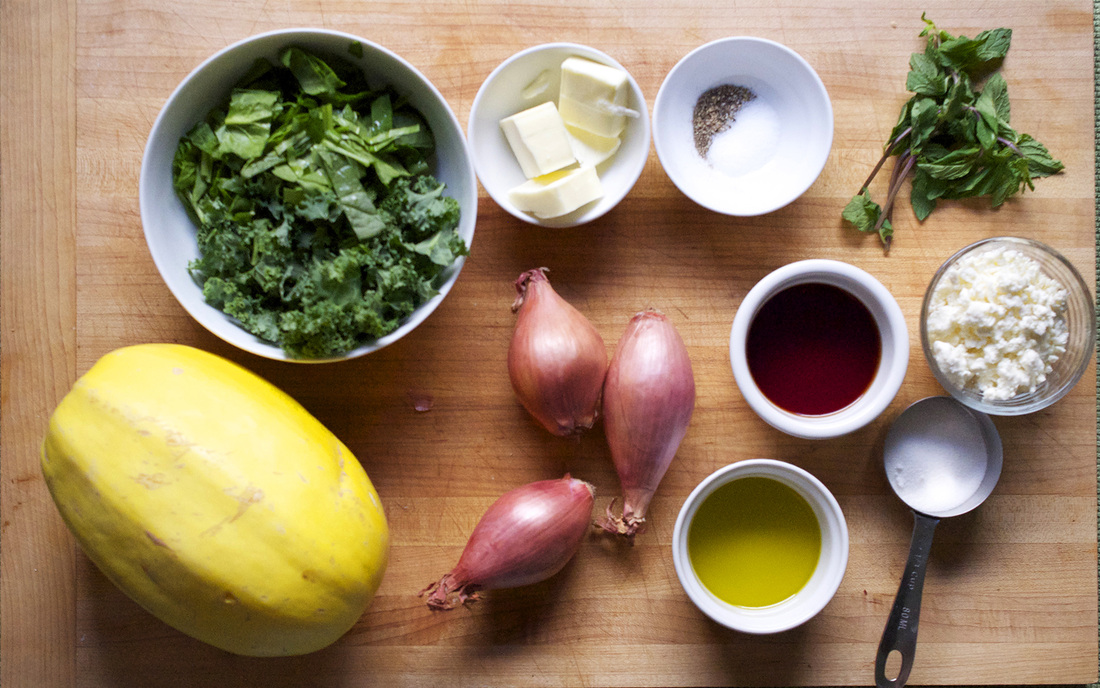
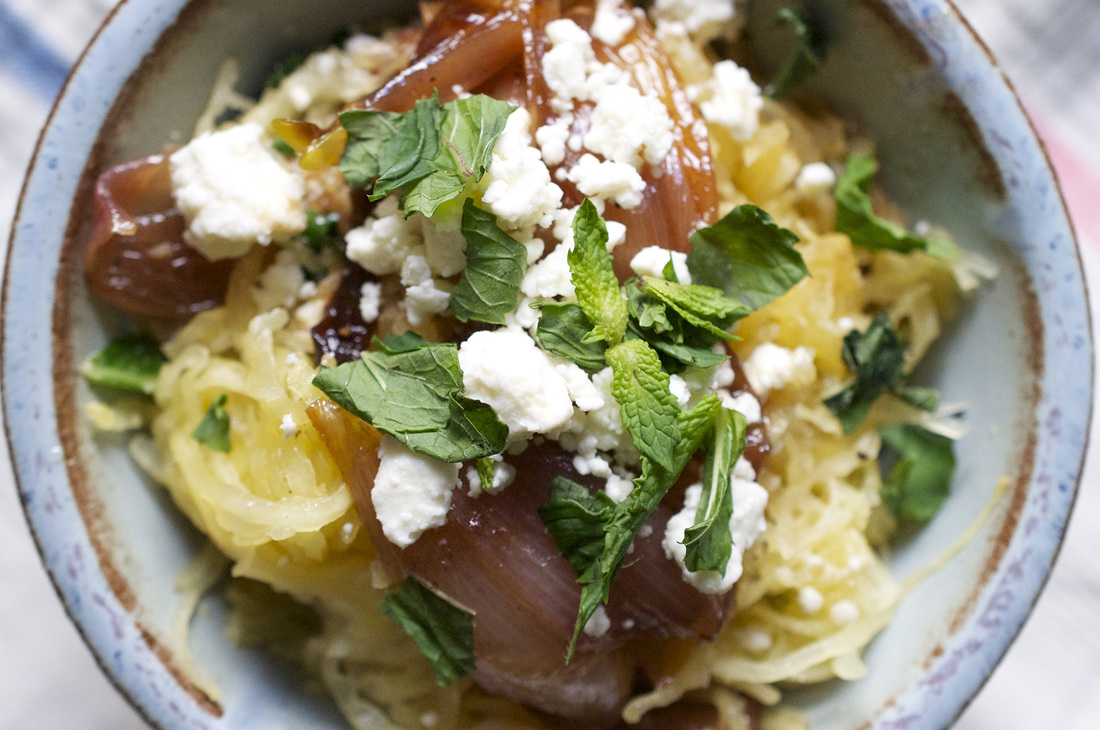
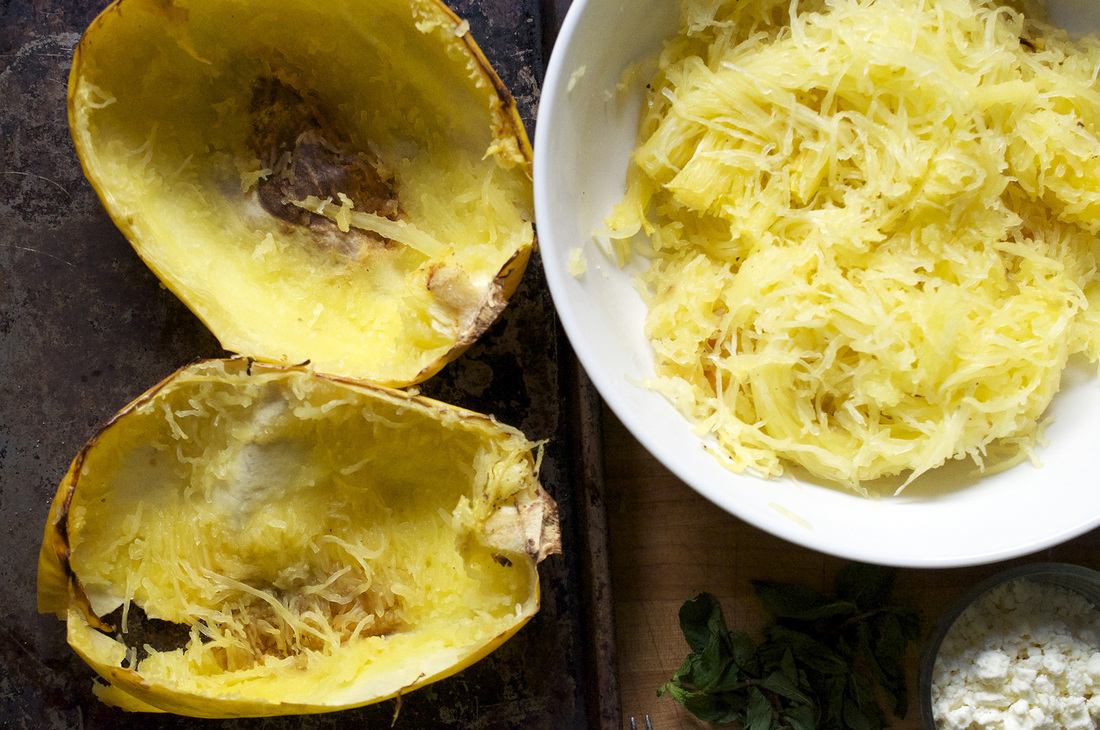
There are few things that I enjoy more then when random food I have hanging out in my fridge becomes an honest to goodness meal. My mom calls this catch it and pull it. I do this quite often but recently this chance encounter of ingredients worked together so well, that I made it again within a week. The culprit was spaghetti squash. I know it’s not really the season for it, spaghetti squash is more of a winter vegetable but it was hanging around in the supermarket sort of like how winter has been hanging around even thought it’s technically Spring now. I then had the squash sitting at home for days not knowing what to use it with, but I wanted to use it before it went bad. Now, my mother and I have had an ongoing conversation about the best way to caramelize whole shallots and I’d recently come across a few recipes that caramelized them on the stovetop and then roasted them in the oven. I happened to have a few shallots, and I wanted to try out one of the recipes, so those were quickly added to the list of ingredients. It really wasn’t until the [buttery sugary] shallots were roasted in the oven along with the spaghetti squash that I picked out a few other things to perk up the dish. Whatever greens I had in my fridge were rinsed, chopped and then quickly sautéed – just to the point of wilting. A little feta saltiness to counteract the sweetness of the shallots and then some mint. Mint because…well just because it adds a surprising flavor to savory dishes and works more often than not. So even though this is more of a Fall/Winter recipe I couldn’t wait to share it. I had it as a main course, because as I mentioned I was rooting around in my fridge for ingredients and hadn’t really planned it all out. If I did it again I’d maybe have it as a side with some sort of fish. Cod or sole would go great…or maybe some scallops… 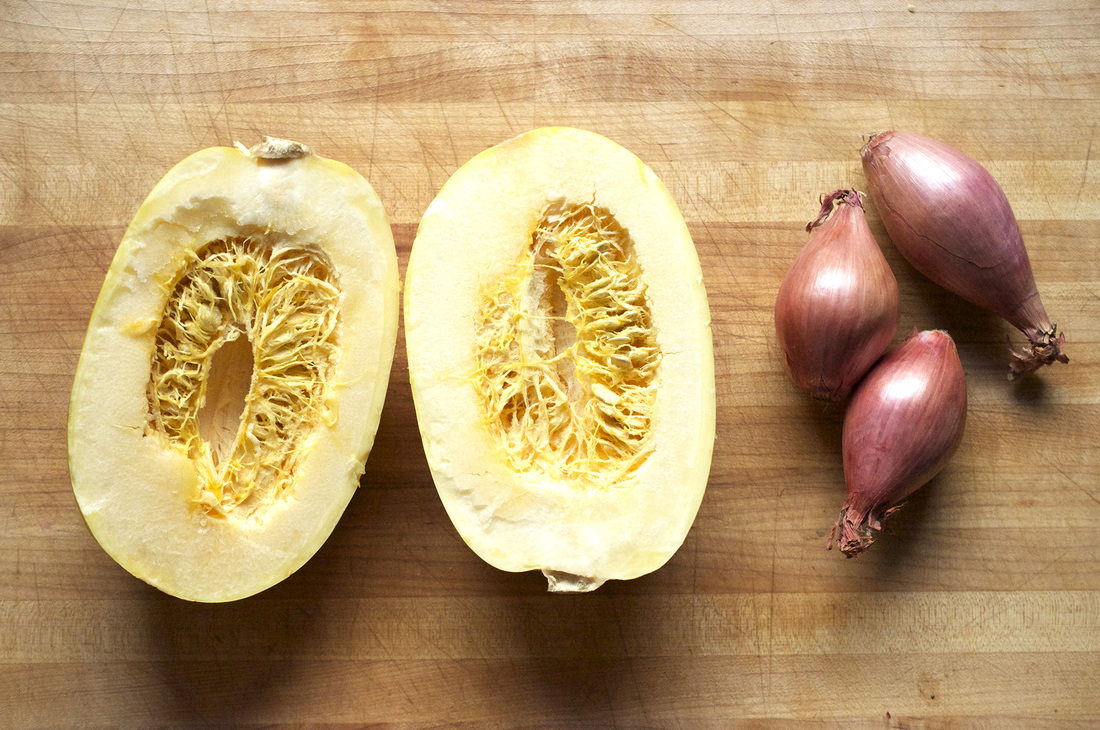
Roasted Spaghetti Squash with Caramelized Shallots PRINT RECIPE [Prep: 10mins / Cook: 45mins / TOTAL: 55mins [2 dinner servings, 4 side servings]
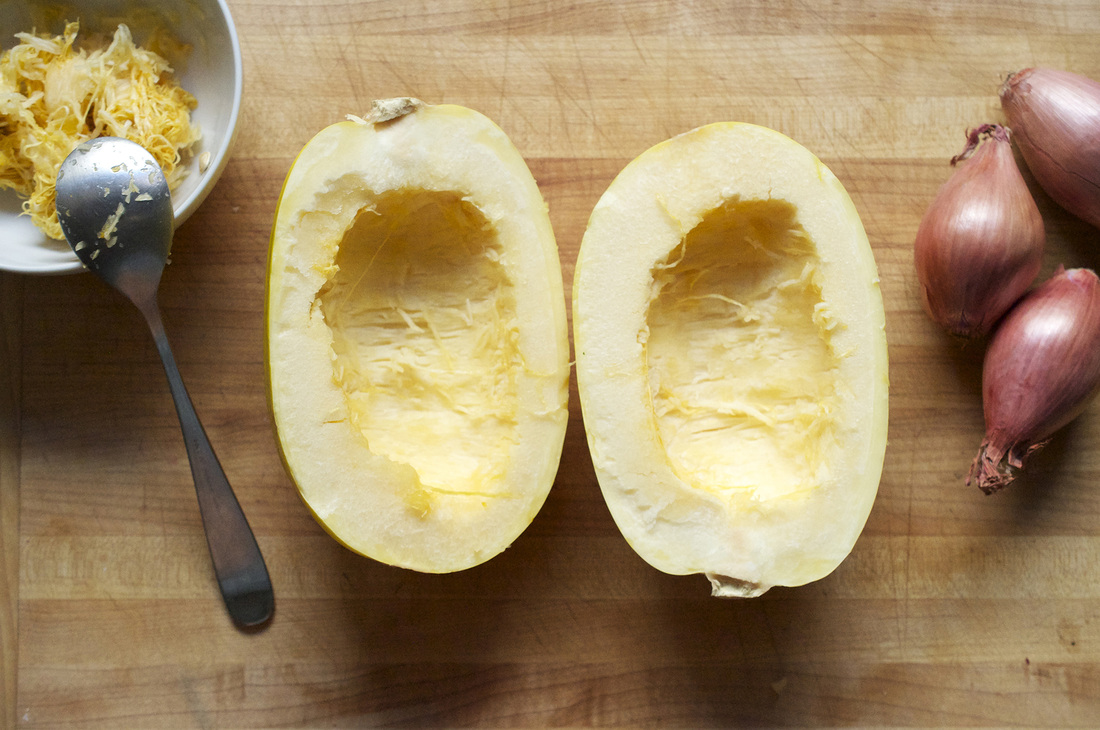
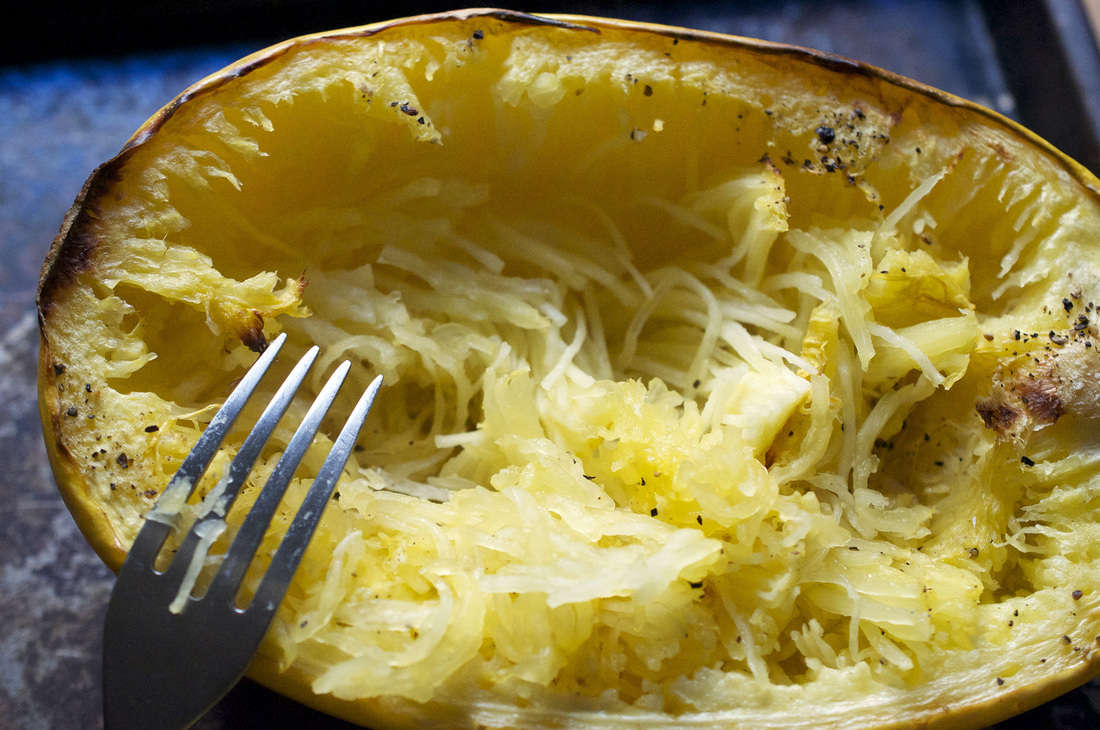
Preheat oven to 400°. Cut the spaghetti squash in half lengthwise and clean out the seeds and pulp with a spoon. Transfer the 2 halves on a baking sheet and spread 1 1/2 tablespoons of olive oil over the surface of the squash and season with a few dashes of salt and some freshly ground pepper. Put in the oven and set the timer to 30 minutes. Peel the shallots and cut in half lengthwise. Put a small skillet over med-high heat and melt the 3 tablespoons of butter. Once melted add the shallots to the butter and let them sit for 1 minute, spooning the butter over the tops of the shallot halves. After letting them sit, flip over and add the sugar. The shallots will start to brown and caramelize faster with the help of the added sugar. Let sauté for 8 minutes longer, about 10 minutes total, stirring often, the shallots will begin to fall apart. Season with a few dashes of salt and some fresh ground pepper. Remove the shallots from the heat and add the red wine vinegar. Return to the heat and stir vigorously, scraping up all the bits stuck to the bottom of the skillet. The shallots will start to break down even more and the vinegar will deglaze the skillet. Turn off the heat. When the 30-minute timer goes off you’ll want to add the shallot mixture to the oven. Transfer the shallots to a small ovenproof platter. Set the timer for 15 minutes. Rinse both the spinach and kale. Stem the kale and roughly chop both of the greens. Using the same skillet [no need to clean it, the skillet is well seasoned by the shallots] turn the heat to medium and add 1 tablespoon olive oil. After 1 minute, add the greens, stirring often. You just want to wilt the spinach and kale a little, sauté for amount 3 minutes, then remove from heat. Once the spaghetti squash is ready, after 45 minutes or so of roasting – it should be fork tender, remove it from the oven and let cool for 5 minutes. Removed the shallots from the oven as well. Shred the squash with a fork, it will break up into spaghetti like segments, so that all you have left is the skin. Transfer the “spaghetti” to a bowl and incorporate the wilted greens. Add 1/2 of the shallots, crumbled feta and torn mint leaves. Mix well. When you are ready to plate the dish incorporate the rest of the shallot mixture, feta, and mint as a topping on eat serving and finish with some fresh ground pepper. This dish is best when served warm, but it’s also great the next day right out of the fridge. 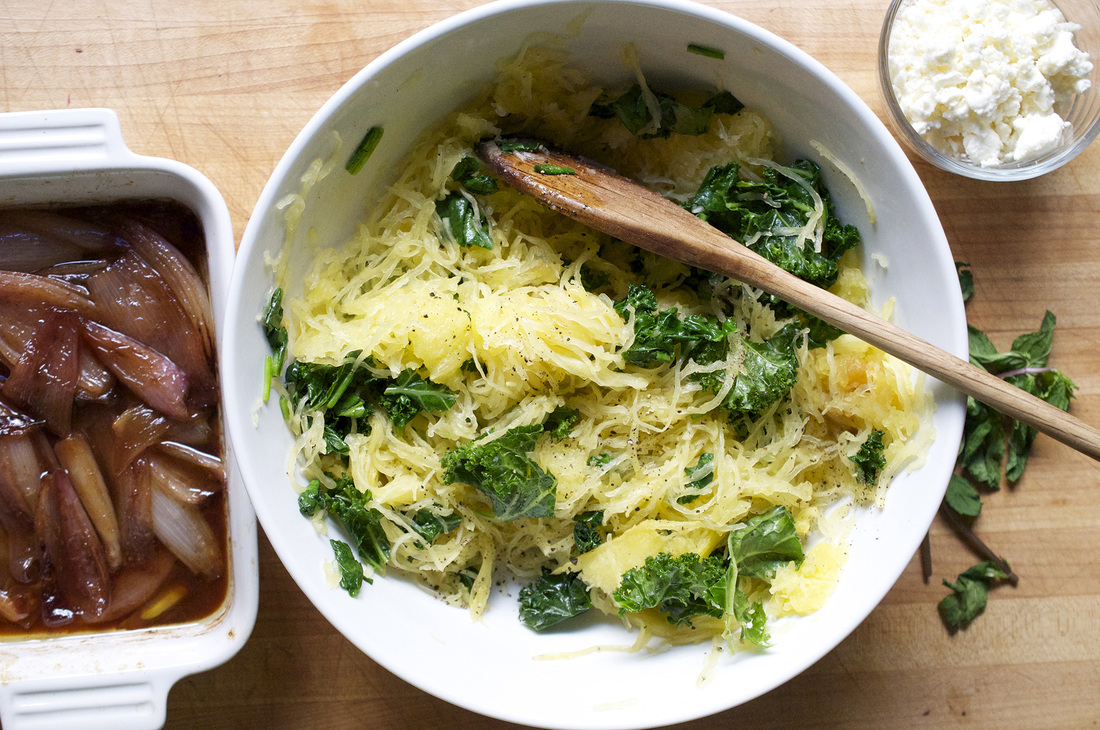
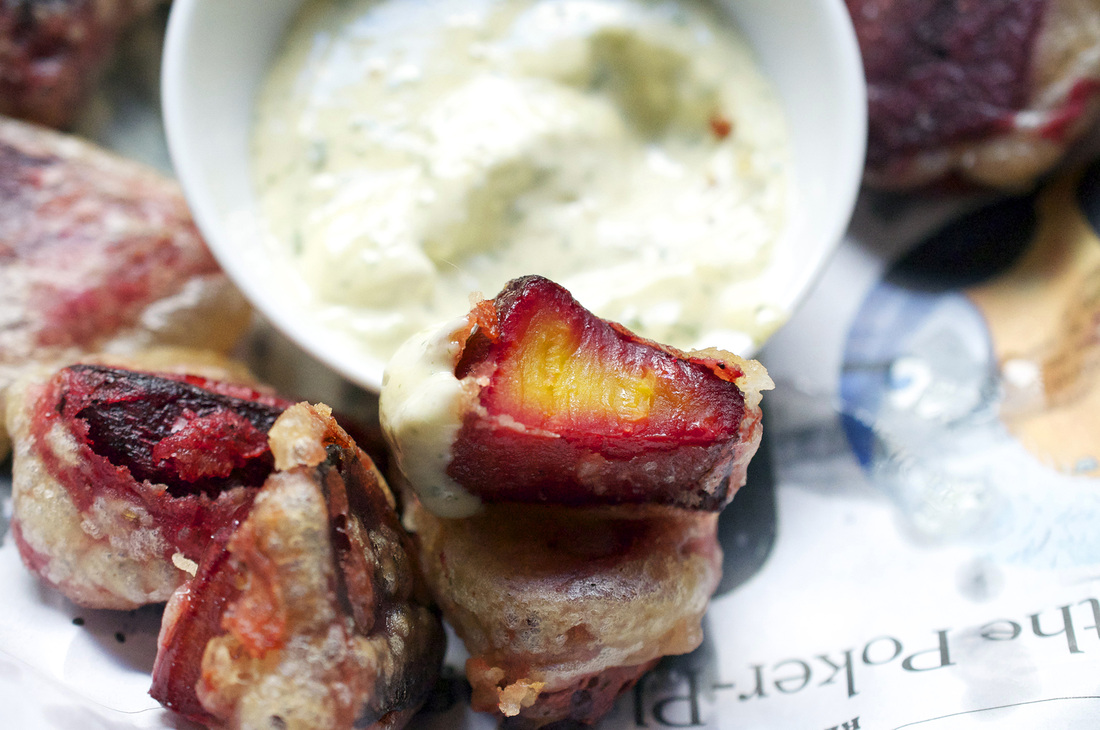
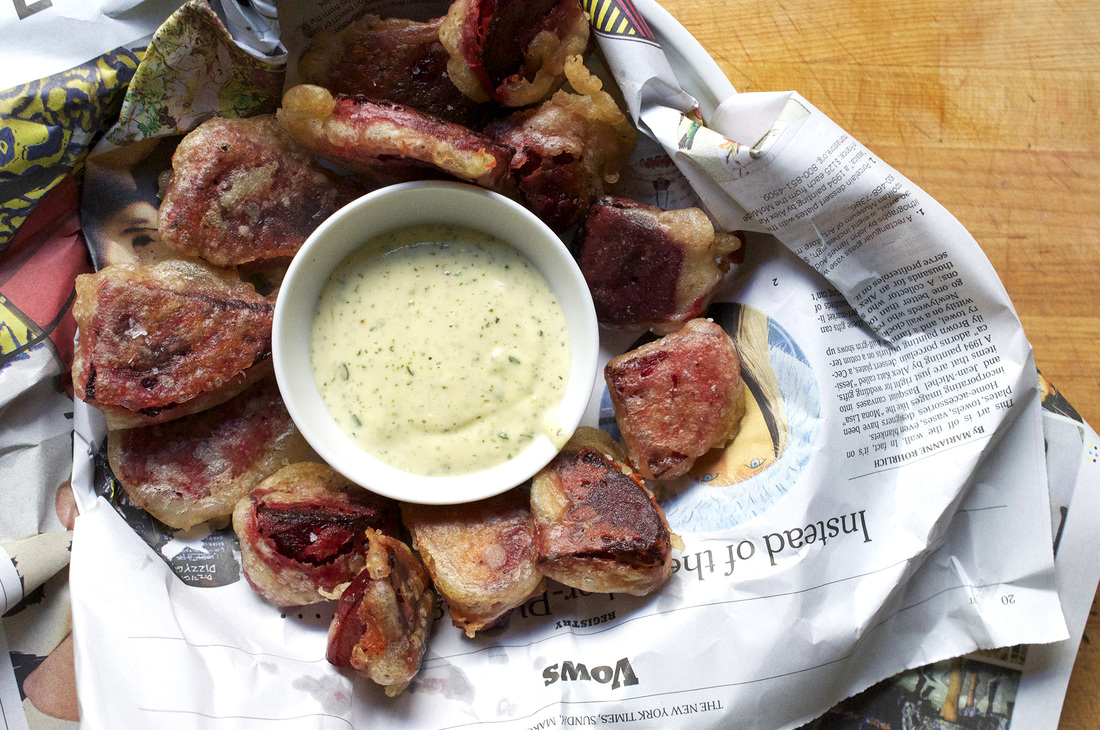 If you didn’t know already, I live in Texas, and it’s taken some time [about 3 years] but I really like it [come on, I’m a New Yorker, it’s bound to take some time to adjust]. While I like to eat healthy I’ve learned that there’s something really special about freshly made fried food [stick with me here]. They do it all down here, especially around the time of the State Fair of Texas, held right here in Dallas. It’s held in the fall and you can pretty much get anything deep-fried. Oreos, butter, sandwiches, beer, burgers. You can also get a real huge turkey leg and walk around chomping on it like it’s no big deal. It’s a lovely lovely time usually followed by a detox. Anyways a little fried food never hurt anyone, especially when it’s homemade. So basically what I’m saying is that while I used to look at vegetable and think, hmmm, I bet I could roast or caramelize that, now I think, I bet I can fry that. Fried avocado, now that is good. Fried portabella’s – yum! Recently I was in Austin visiting a friend and came across fried beets. I was mesmerized. Beets? I’d come to love beets as an adult, but beets are for salads or for the hot pink risotto I make once a year around Valentine’s Day…Fried beets seemed…so weird, I had to try them immediately. They were so freaking good! And I have to admit, taking such a powerfully nutritious vegetable and turning it into a fried food felt sort of wicked, I loved it. It’s like when parents trick their kids into eating broccoli by smothering it in cheese…devious yes, but sometimes you’ve gotta go the distance to make a person eat a veggie. 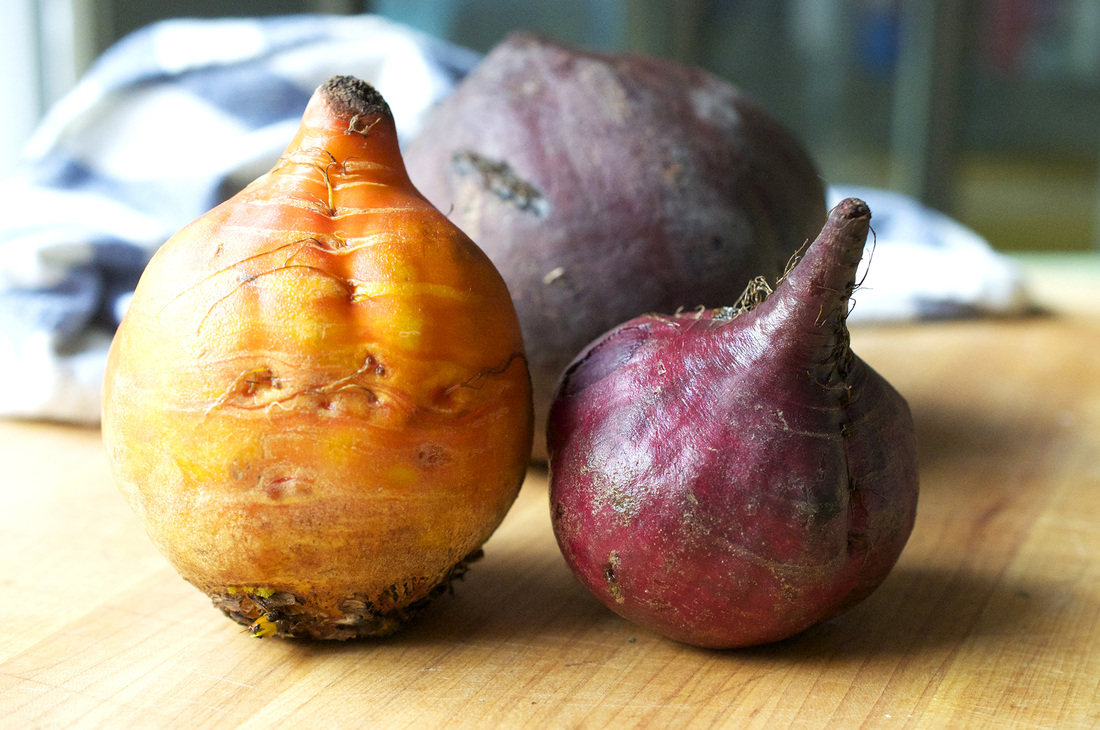 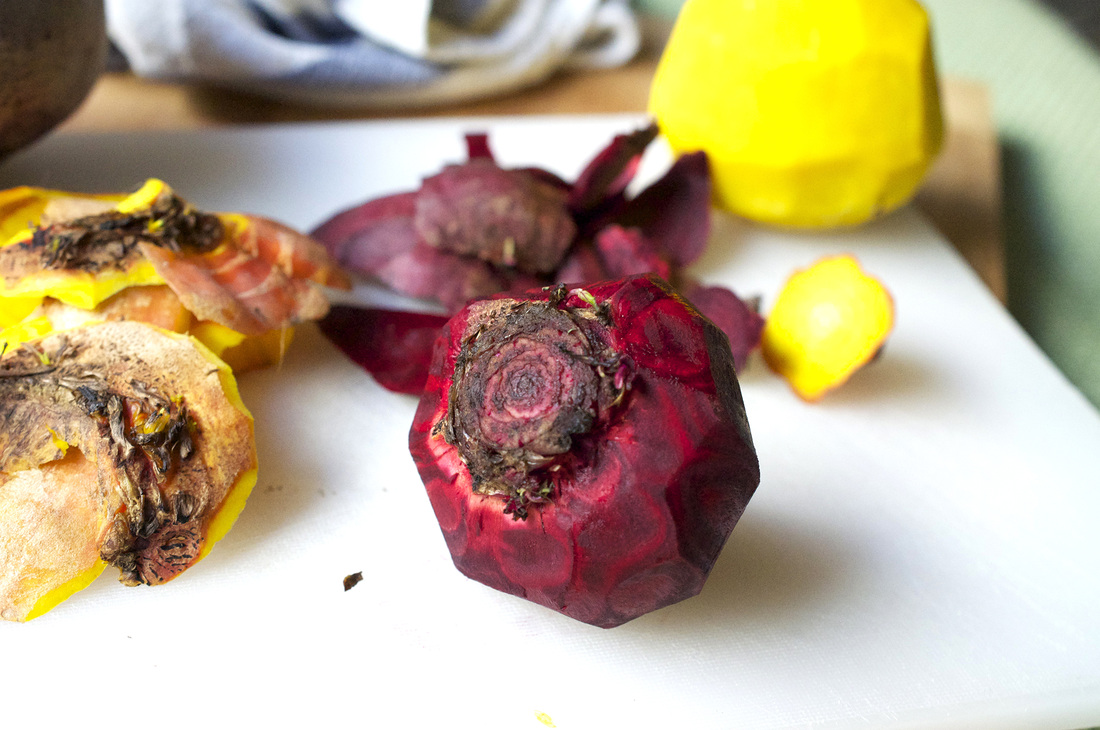 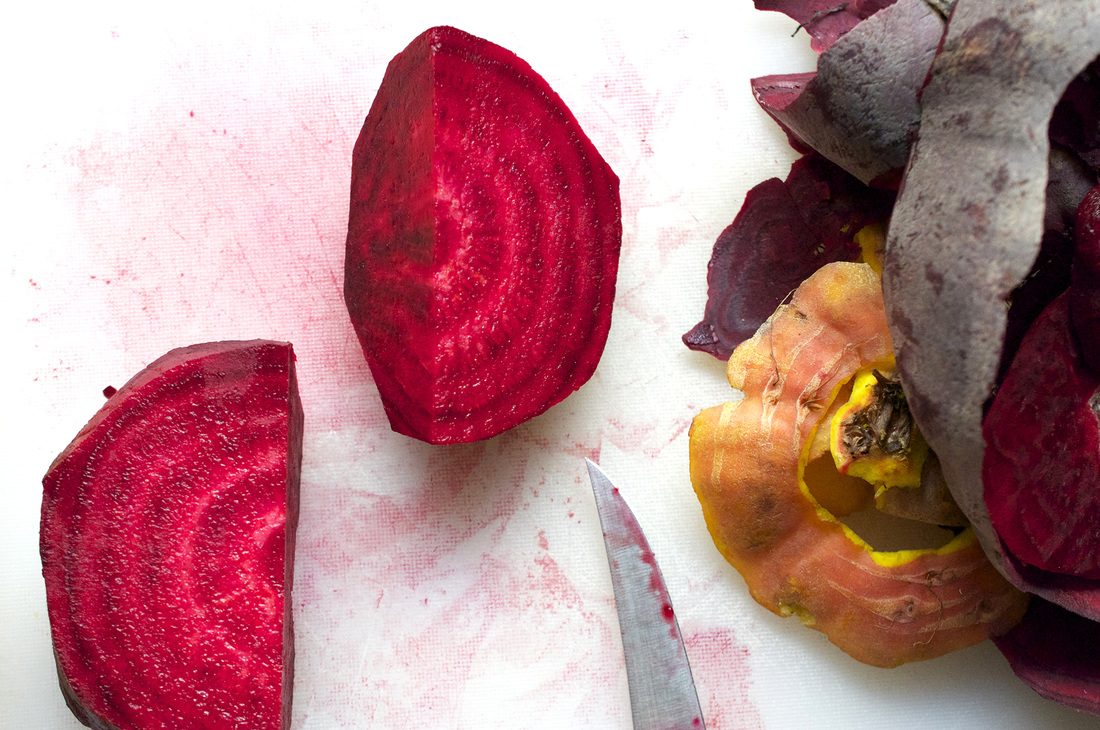 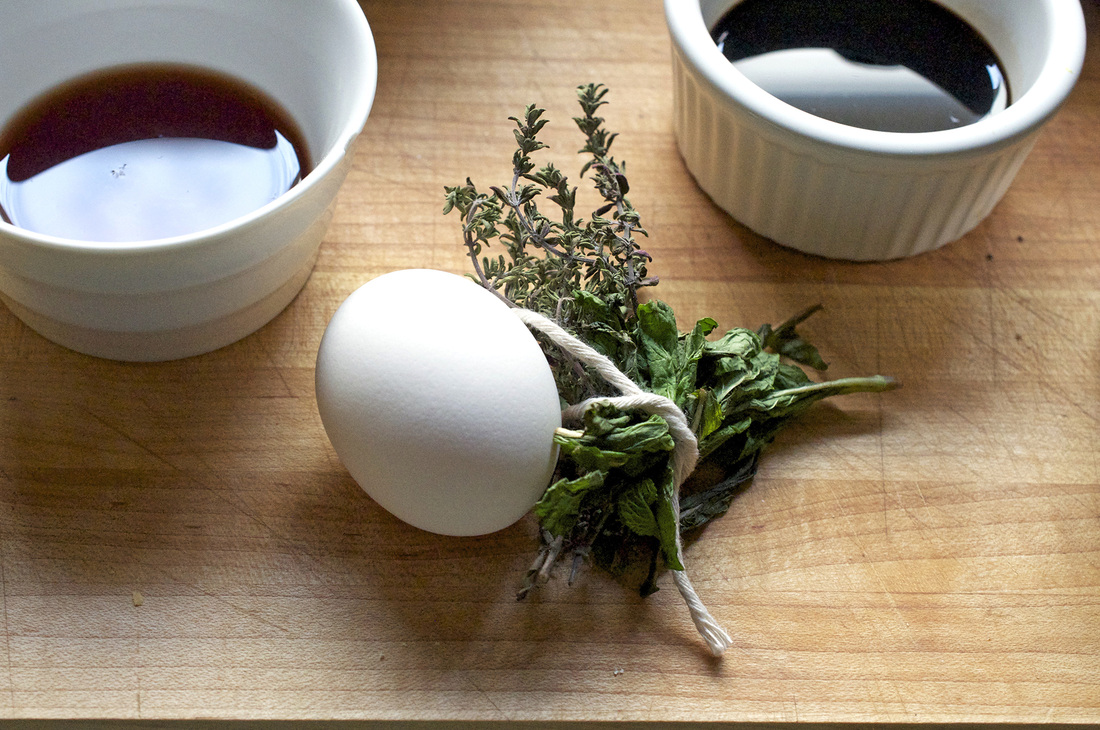 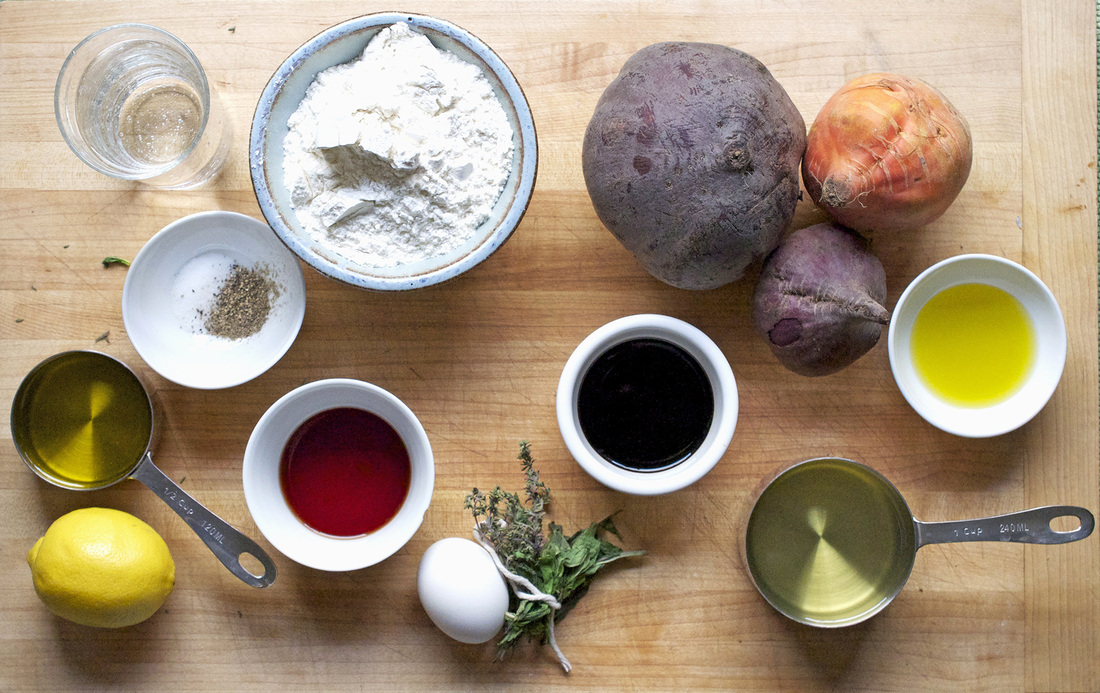 Fried Beets with Minty Thyme Aioli PRINT RECIPE [Prep: 10mins / Cook: 55mins / TOTAL: 1hr5mins [8 appetizer size servings]
Minty Thyme Aioli [Total: 5mins] [1 cup]
Start out by rinsing and peeling the beets. Your hands may turn a little (or a lot) pink, but it’s worth it. Chop the beets into large slices about 1/2 inch thick. Place them in a large skillet, toss with the balsamic vinegar, olive oil, 1/2 teaspoon salt, and a few grinds of fresh pepper. Add 1/2 cup water, cover and bring to a boil over med-high heat. Let boil for about 5 minutes, then lower heat to a simmer and cook until all the liquid has evaporated, about 35 minutes, stirring occasionally. While the beets are cooking you can make the minty thyme aioli. I usually do this in a small food processor, but you can also do it by hand…it just takes a little more patience and time. Roughly chop up the mint and remove the thyme leaves from their stems, mix together in the food processor with the lemon juice, red wine vinegar, egg yolk, salt and pepper. Slowly incorporate the oil a little at a time. The mixture should slowly emulsify. Refrigerate. Once the beets are done cooking [you can test them with a fork, they should pierce easily and slide off] remove them from the skillet, and let cool for about 5 minutes [until they are cool enough to handle]. While the beets are cooling off, rinse out the large skillet you were just using, making sure to wipe it dry, add 1 1/2 cups vegetable oil and put over med-high heat. In a medium bowl combine the flour and seltzer, salt, pepper and cayenne. The consistency should be like sour cream, if it’s too thin add a little more flour, if it’s too thick, a little more seltzer. The thicker the better it coats the beets. Prepare a plate covered in paper towels or newspaper. Add a few beats to the mixture making sure they are all evenly coated. When the oil it ready, you can [carefully] flick a little water and see if it sizzles – or to be extra sure you can use a "test" beet and see if the batter turns golden when added to the oil. Transfer beets to the oil in a slotted spoon. Repeat until skillet is full with beets, wait 1 minute and then start to flip them. Beets are finished when the batter has turned golden brown. Transfer to platter and let paper soak up some of the oil. Repeat until all beets are finished. Serve on a fresh platter with aioli. Enjoy! 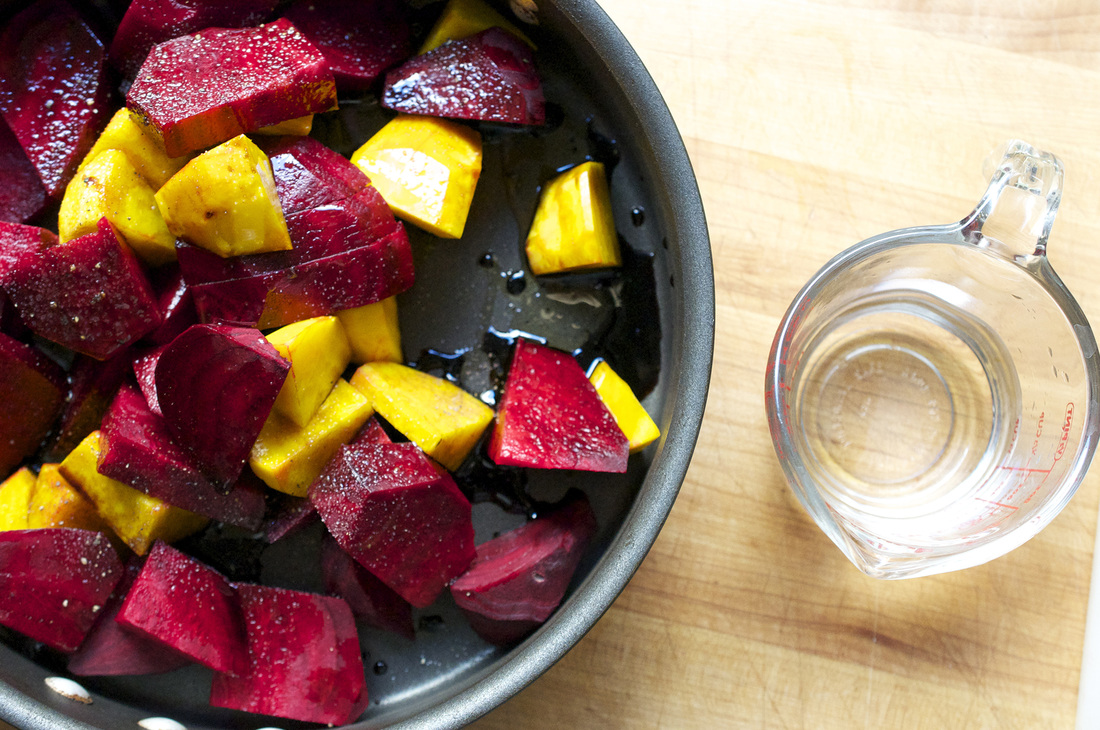 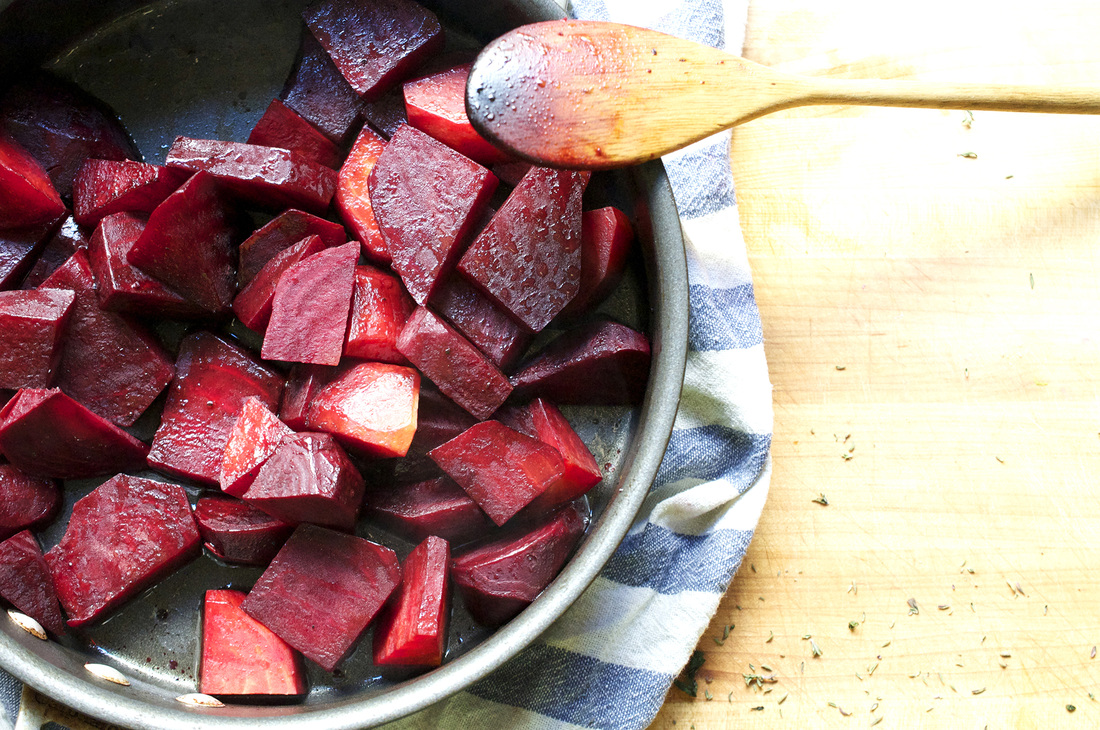
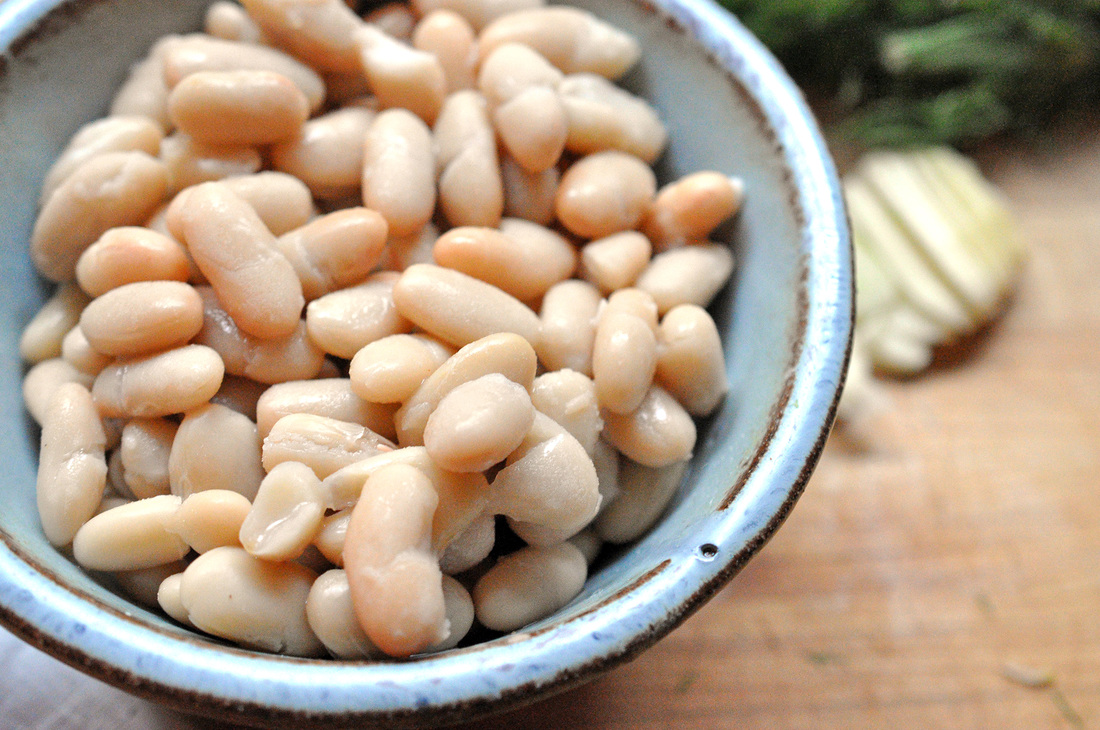
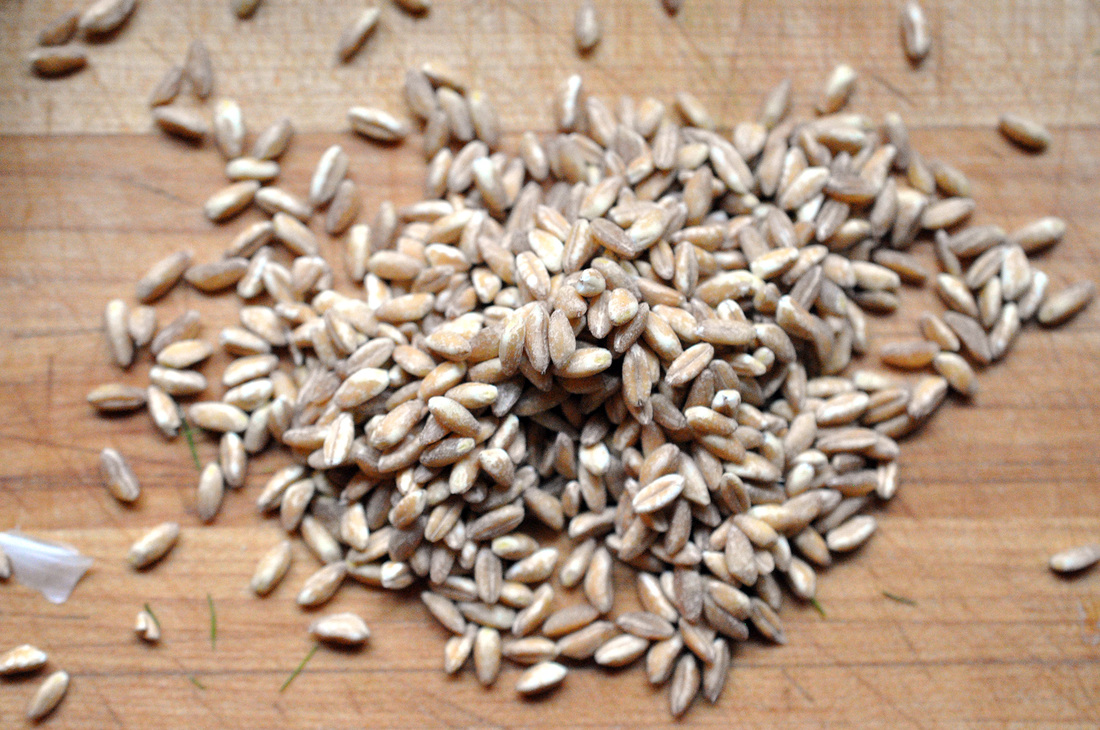
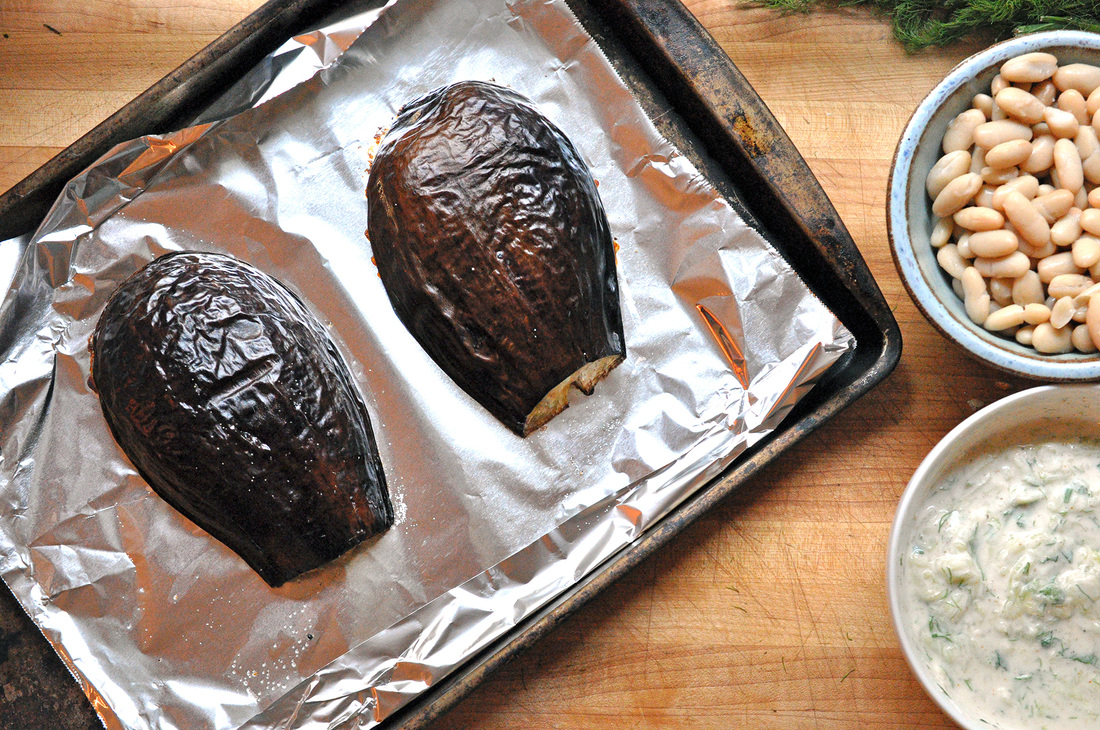
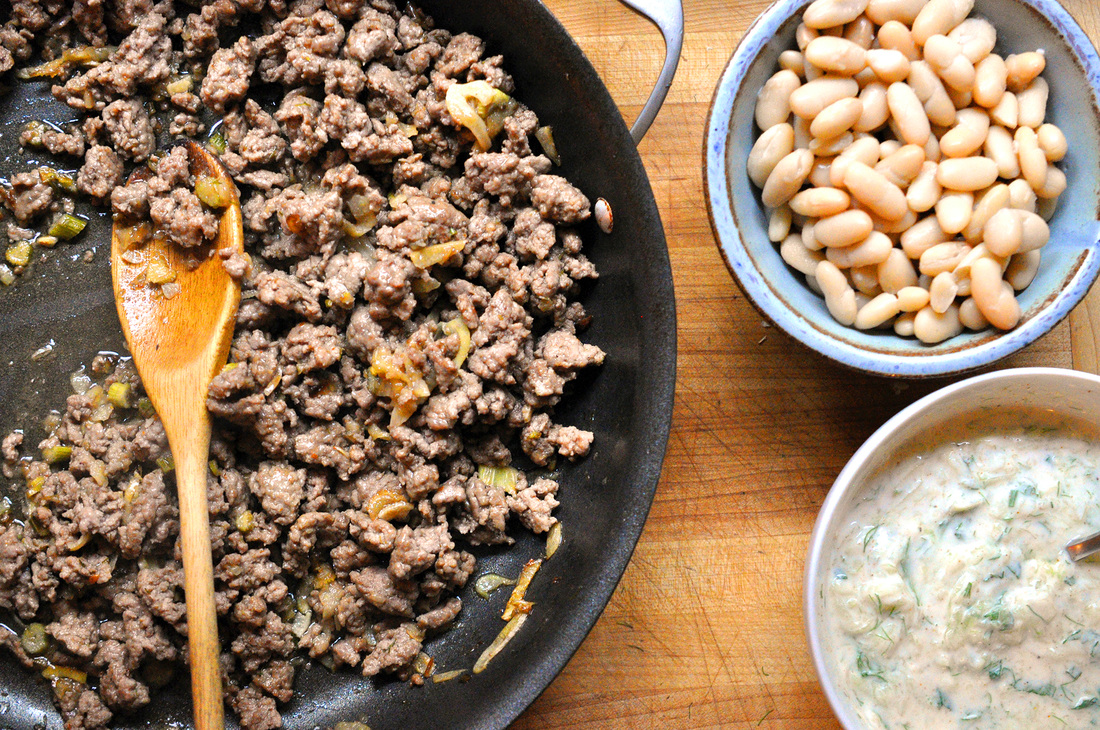
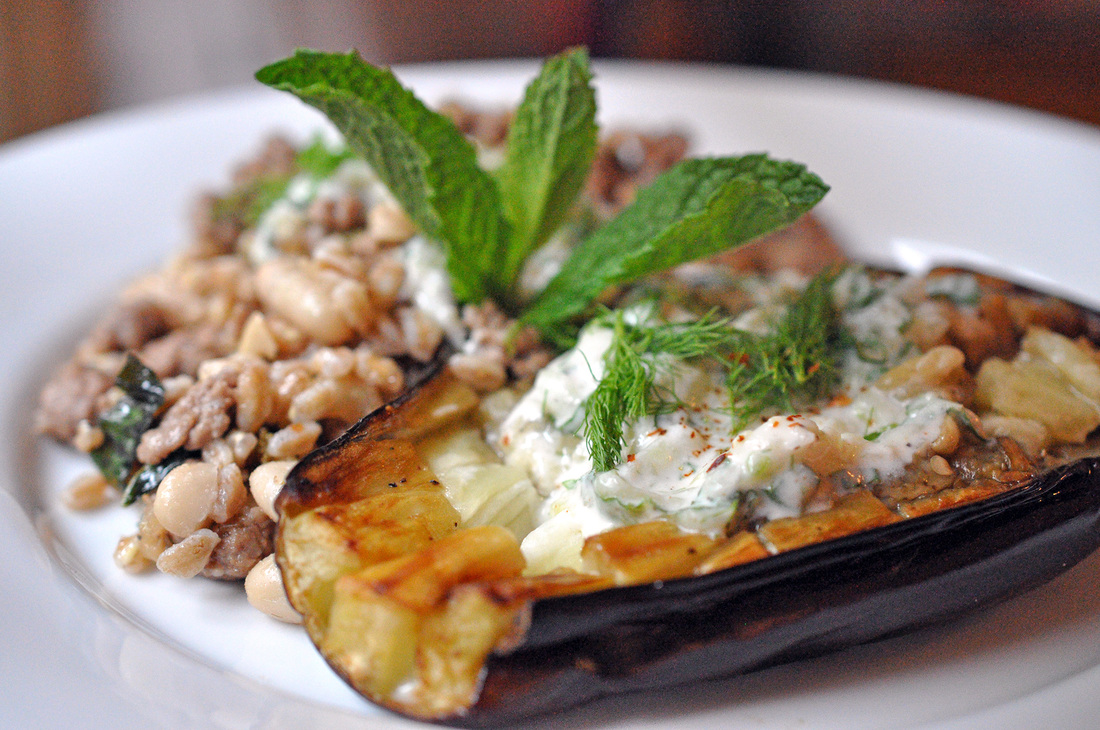 I haven’t cooked meat in a while…for no reason in particular, but it is hard to photograph. I mean a big hunk of juicy meat doesn’t always look as good as it sounds. I also try and stick to what I crave [I suppose I should add here “in moderation” for health’s sake] which tends to be pasta, noodles, sandwiches…with lots of veggies and maybe [absolutely] a smidgeon [a good amount] of cheese. I like to make aiolis, sauces, and dressings, and there’s always a batch of pesto of some sort hanging around in my fridge or freezer. Recently though a good friend of mine told me straight up that I needed to do another meat dish for my blog. So what did I do? I came up with something that I could slather in a sauce – cause that’s my comfort zone. I had an eggplant in my fridge and in my mind that lead to tzaziki and that made me feel a little Mediterranean and then bingo…I arrived at lamb…but it didn’t stop there…I then thought of mint and finally - mint tzaziki! Not every recipe I come up with makes a whole lot of sense – but this one did. I was pretty happy with myself when I went to the supermarket to pick up the lamb. But then I walked by a can of beans, cannellini beans, and knew that they had to be added in. I also wanted to add a little texture and for some reason my mind kept going to faro, subtly nutty with a nice bite. I realized now that my dish was taking a weird turn, but all the ingredients sounded so good together – and I usually go with my gut, which almost always tells my mind what do to. So yeah, that’s usually how my process works. 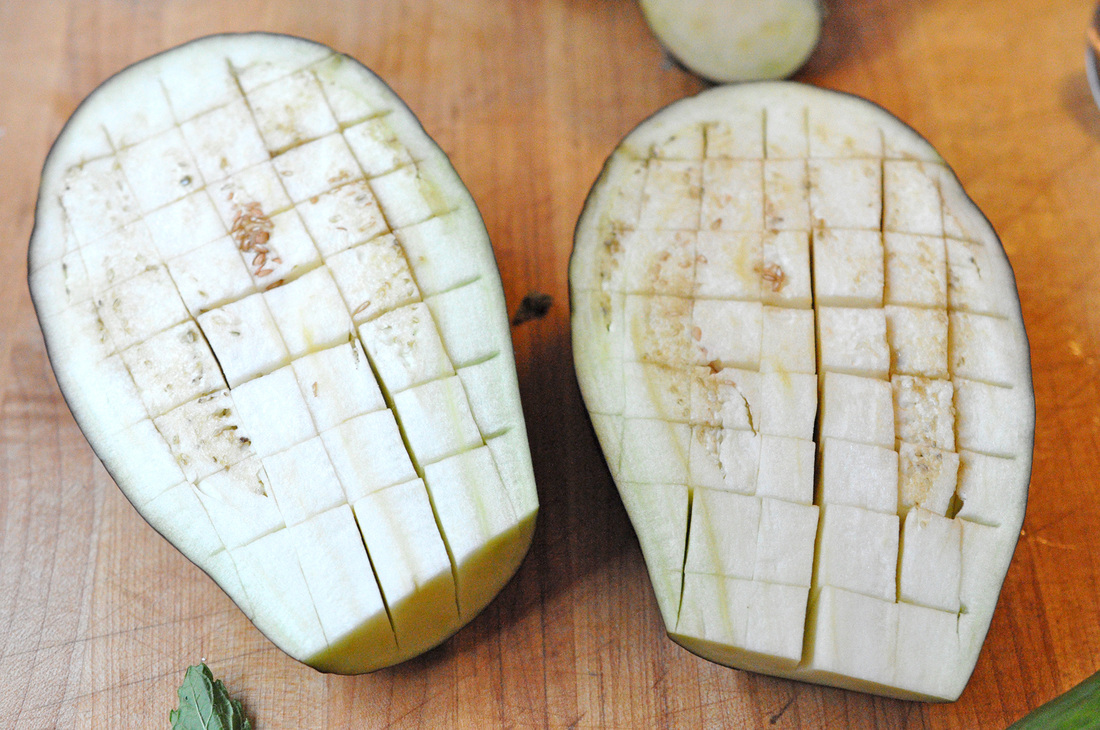
   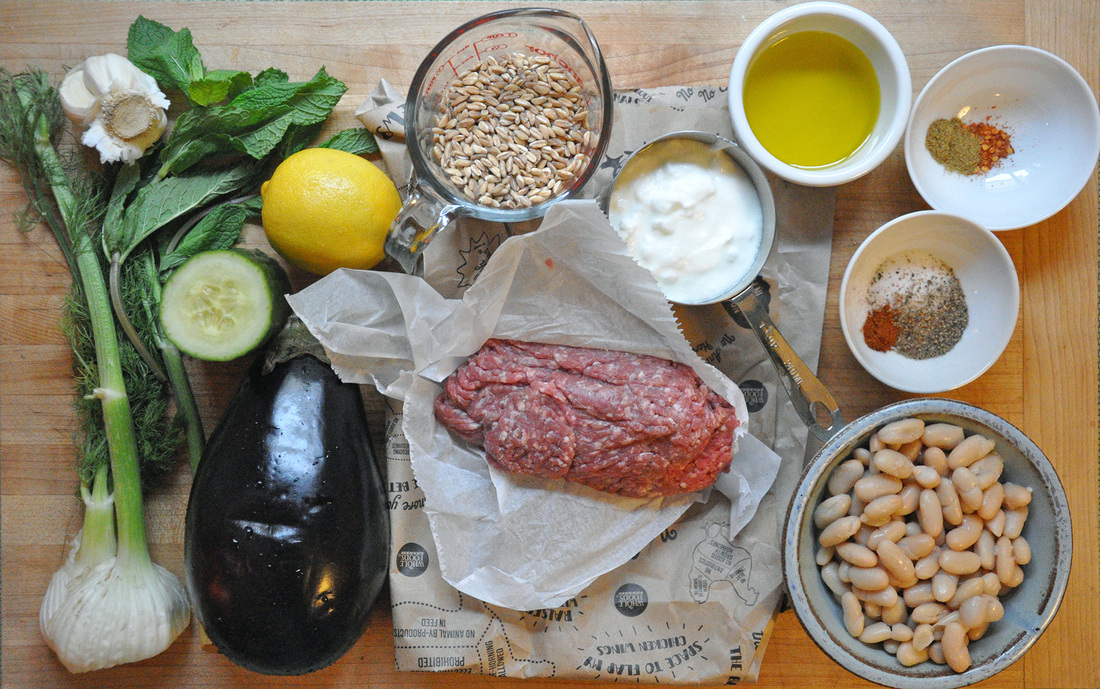 Ground Lamb and Roasted Eggplant with Mint Tzaziki PRINT RECIPE [Prep: 15mins / Cook: 45mins / TOTAL: 1hr] [4 servings]
Mint Tzaziki [Prep: 10 mins, included above] [Yields about 1 1/3 cup]
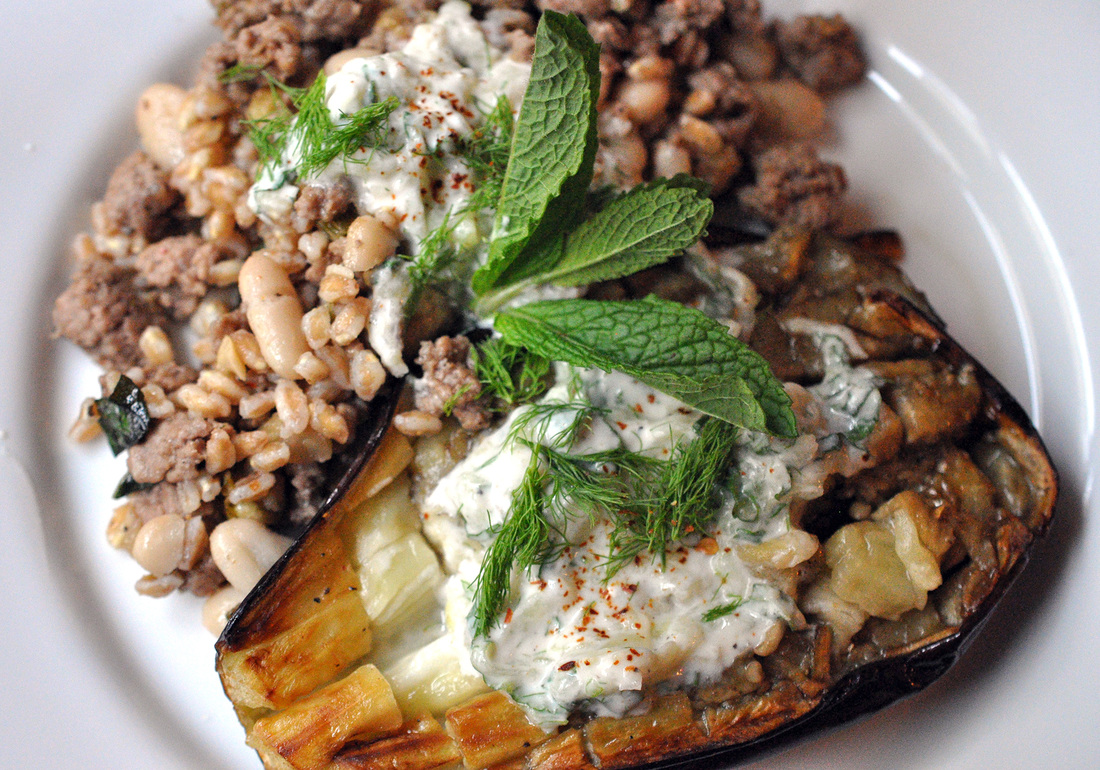
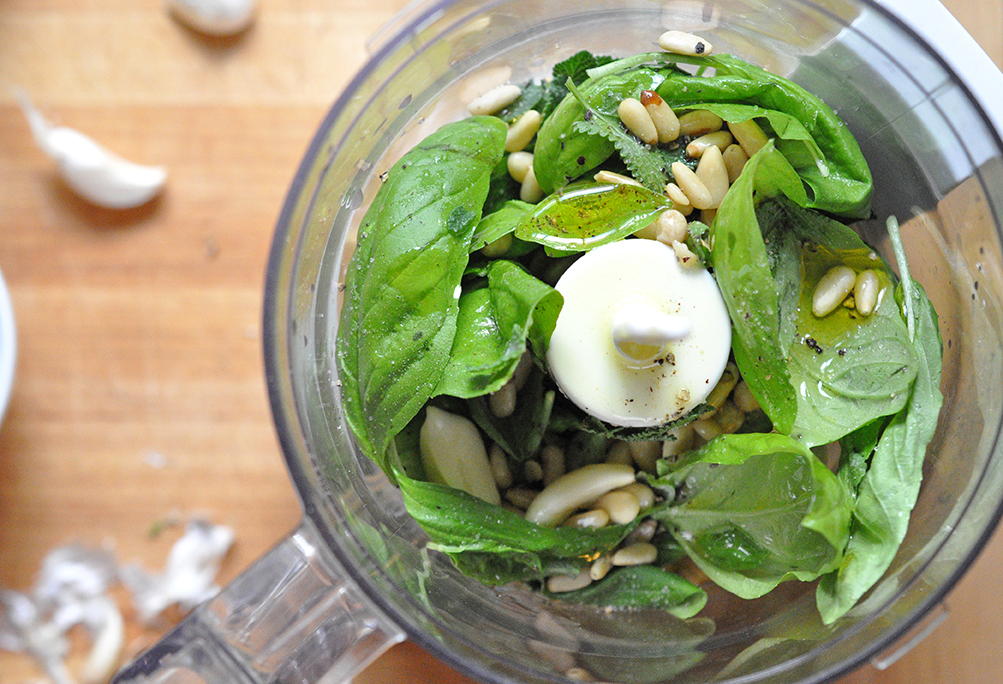
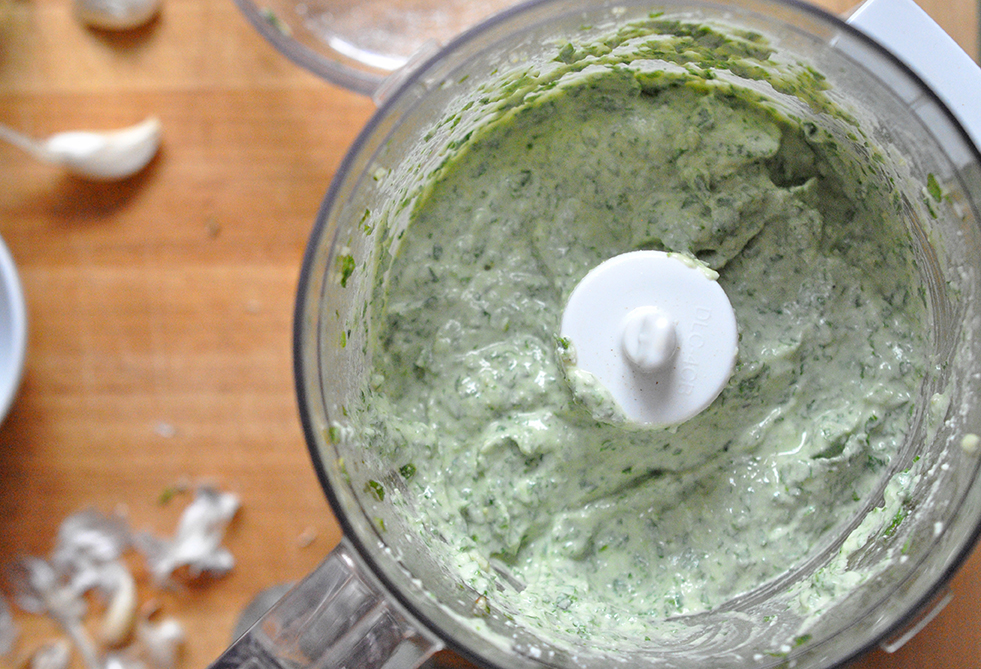
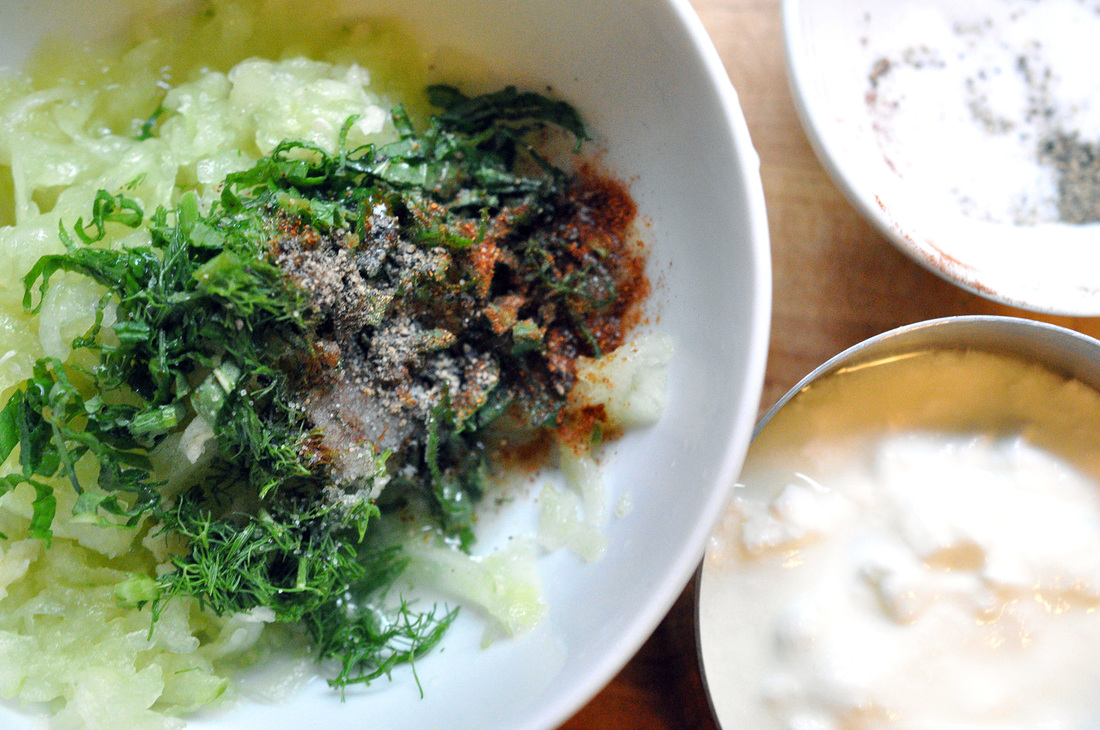
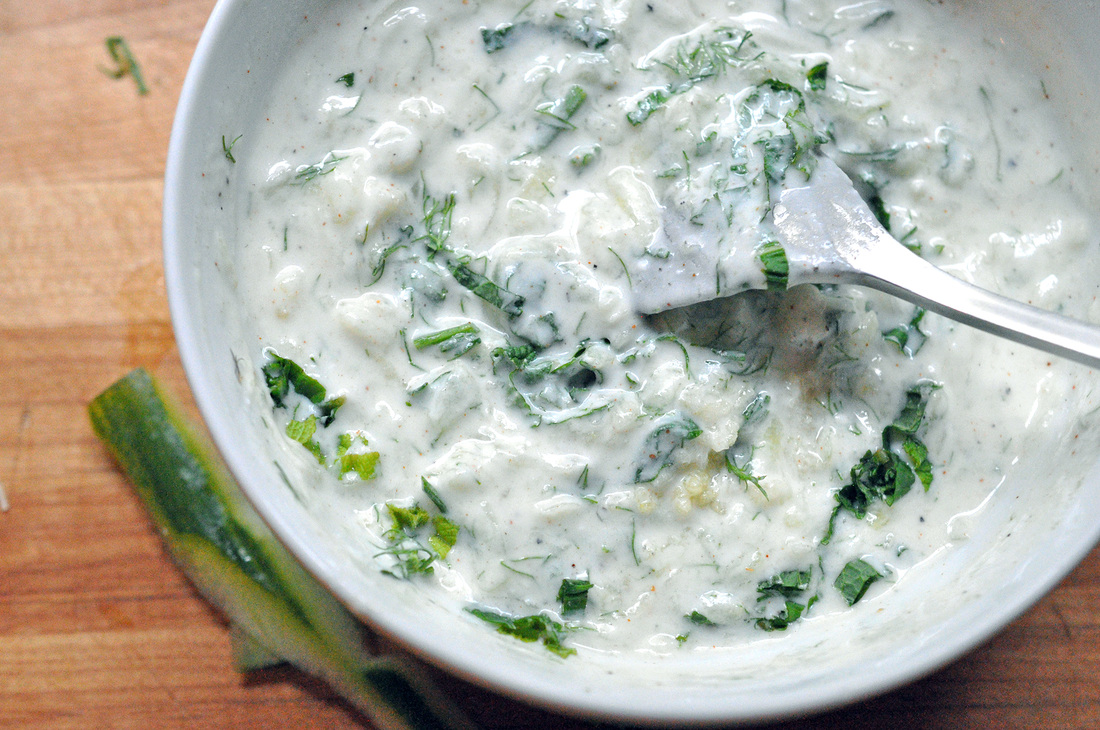
Preheat oven to 400°. The eggplant needs about 40-45 minutes to roast so lets start with that. After it’s been washed and the cap trimmed off, slice the eggplant in half lengthwise and score the flesh, making sure not to pierce the skin. Drizzle about a 1/2 tablespoon, some fresh cracked pepper and a few dashes of salt over each half. Roast face down on top of foil in on a baking sheet for 40-45 minutes. You’ll know the eggplant is finished when the skin becomes wrinkled. Meanwhile you can make the mint tzaziki. Measure out 1 cup plain yogurt into a small mixing bowl, discarding any liquid. To this add, 2 pressed garlic cloves, juice from 1/2 lemon, the paprika, salt and cracked pepper. Roughly chop up about 1 tablespoon of the fennel fronds and 8 mint leaves and incorporate. Peel and grate the cucumber into a small mixing bowl. Spoon off any liquid, pressing down with the back of the spoon helps to squeeze out any excess, incorporate with the rest of the ingredients and mix well. If you are going to be using the tzaziki as soon as the eggplant comes out of the oven you can leave it out, if you are making it a few hours a head of time then it should be refrigerated. Into a small pot add 2 cups water, a dash of salt and 3/4 cups faro. Bring to a boil – this will take about 2-3 minutes. Once the water is boiling, turn the heat down to a simmer and cover the faro. It will need about 20 minutes to cook. Set a timer for yourself so you don’t forget about it during your next steps! Now onto the ground lamb. For some reason I didn’t use my cast iron skillet [stupid stupid…] it will really get you the best browning, caramelized flavor that you want. Take a well oiled cast iron skillet let it heat up over med-high heat. You’ll want to cook the meat in 2 batches, crowded meat doesn’t brown well – and here’s the trick, once you’ve put the meat into the skillet and broken it up a little, just let it sit…and sit without touching it. It’s hard I know, but this helps the meat caramelize and not end up a gray nondescript color (and flavor). Leave it for about 1 minute before flipping and you can begin to break it up more and season with salt [about 1/4 teaspoon] some fresh cracked pepper, 1/2 teaspoon cumin, and 1/4 teaspoon red pepper flakes. The whole process will take about 8-10 minutes each batch – of letting the meat brown and then mixing. When it is ready, remove the skillet from the heat and transfer the lamb to a small mixing bowl. Return the skillet to low-med heat and add 1 tablespoon butter and the sliced fennel. The fennel will take about 5 minutes to turn a nice golden color – stir occasionally so it does not burn. Once the fennel is nearly finished add the sliced garlic and cook for about 3 minutes longer. Remove the skillet from the heat and incorporate the mixture with the ground lamb. The faro should be finished by now, reserve 1/4 cup of the water and drain the rest. Add the drained and rinsed cannellini beans to the same skillet and keep the heat on low. Heat them up slowly, stirring occasionally. Incorporate the cooked faro and 1/4 cup reserved faro water into the skillet. Add the ground lamb mixture to the skillet and about 5-6 torn up mint leaves. The eggplant should be ready to come out of the oven. Carefully flip the halves with a spatula so that they skin side down, and transfer a half to each plate. Add a few spoonfuls of lamb mixture next to eggplant and top the dish off with the tzaziki and garnish with a few mint leaves and fennel fronds. Enjoy!
 Hankering for more meat based dishes? Here are two other recipes I've been meaning to try - they're good examples of how to caramelize ground meat. Lady and Pups is a fun [daring] food blog I follow and Melissa Clark always [always] gets it right!
|
All
Stuff I follow...
Not Without Salt
My New Roots Sprouted Kitchen Thug Kitchen Lady and Pups A CUP OF JO The Daily Meal Melissa Clark ...always 3191 Miles Apart The Sartorialist Garance Dore The Nourished Kitchen Archives
October 2014
|


 RSS Feed